
Wireless Setup Guide
Page 3
... Ethernet cable connected, remove the cable from the successfully access a computer and the wireless router. Web site. 3 Ensure that the computer is connected to AC power during the router setup, contact your computer is off. Record this information in green) Wireless Router Cable Modem Network connections with router Ethernet cable temporarily...
... Ethernet cable connected, remove the cable from the successfully access a computer and the wireless router. Web site. 3 Ensure that the computer is connected to AC power during the router setup, contact your computer is off. Record this information in green) Wireless Router Cable Modem Network connections with router Ethernet cable temporarily...
Backup and Recovery - Windows 7
Page 6
Note the following guidelines before creating recovery discs: ● You will be prompted to AC power during this process. ● Only one set of recovery discs. DVDs and BDs have finished creating the recovery discs. NOTE: Read-write discs, such as ... keep them in a safe place. NOTE: If your system to its original factory state if you experience serious system failure or instability. 2 Creating recovery discs HP recommends that you create recovery discs to be sure that you can restore your computer does not include an internal optical drive, you can use...
Note the following guidelines before creating recovery discs: ● You will be prompted to AC power during this process. ● Only one set of recovery discs. DVDs and BDs have finished creating the recovery discs. NOTE: Read-write discs, such as ... keep them in a safe place. NOTE: If your system to its original factory state if you experience serious system failure or instability. 2 Creating recovery discs HP recommends that you create recovery discs to be sure that you can restore your computer does not include an internal optical drive, you can use...
Backup and Recovery - Windows 7
Page 8
...: Be sure that the computer is connected to improve the security of the computer. 1. NOTE: Windows® includes the User Account Control feature to AC power before you start the backup process.
...: Be sure that the computer is connected to improve the security of the computer. 1. NOTE: Windows® includes the User Account Control feature to AC power before you start the backup process.
Security - Window Vista and Windows 7
Page 5
... computer 2 Using passwords Setting passwords in Windows ...3 Setting passwords in Setup Utility ...3 Administrator password ...3 Managing an administrator password 4 Entering an administrator password 4 Power-on password ...4 Managing a power-on password 5 Entering a power-on password 5 3 Using antivirus software 4 Using firewall software 5 Installing critical security updates 6 Installing an optional security cable 7 Using the fingerprint reader (select...
... computer 2 Using passwords Setting passwords in Windows ...3 Setting passwords in Setup Utility ...3 Administrator password ...3 Managing an administrator password 4 Entering an administrator password 4 Power-on password ...4 Managing a power-on password 5 Entering a power-on password 5 3 Using antivirus software 4 Using firewall software 5 Installing critical security updates 6 Installing an optional security cable 7 Using the fingerprint reader (select...
Security - Window Vista and Windows 7
Page 7
... the computer Security cable slot (used with an optional security cable) 1 Follow the procedures in this guide to use of the computer ● QuickLock ● Power-on password Computer viruses Unauthorized access to data Norton Internet Security software ● Firewall software ● Windows updates Unauthorized access to Setup Utility, BIOS settings...
... the computer Security cable slot (used with an optional security cable) 1 Follow the procedures in this guide to use of the computer ● QuickLock ● Power-on password Computer viruses Unauthorized access to data Norton Internet Security software ● Firewall software ● Windows updates Unauthorized access to Setup Utility, BIOS settings...

Security - Window Vista and Windows 7
Page 9
..., it must be entered each time you access Setup Utility. Be sure that you record your power-on password, you cannot turn on or restart the computer, or exit Hibernation. Setting passwords in Setup Utility. Power-on password* CAUTION: If you forget your Windows user or administrator password. Your administrator password is...
..., it must be entered each time you access Setup Utility. Be sure that you record your power-on password, you cannot turn on or restart the computer, or exit Hibernation. Setting passwords in Setup Utility. Power-on password* CAUTION: If you forget your Windows user or administrator password. Your administrator password is...

Security - Window Vista and Windows 7
Page 10
... current password in the Enter Password field, and then press enter 4 times. 3. To save your administrator password, and then press enter. Power-on password Your power-on or restarting the computer. After this password, follow these steps: 1. Your changes go into effect when the computer restarts. Entering an ... and exit the Setup Utility, use of the screen, press esc. Use the arrow keys to select Exit > Exit Saving Changes. A power-on or restarting the computer. When the Startup Menu is set an administrator password, type your password in the lower-left corner of the screen...
... current password in the Enter Password field, and then press enter 4 times. 3. To save your administrator password, and then press enter. Power-on password Your power-on or restarting the computer. After this password, follow these steps: 1. Your changes go into effect when the computer restarts. Entering an ... and exit the Setup Utility, use of the screen, press esc. Use the arrow keys to select Exit > Exit Saving Changes. A power-on or restarting the computer. When the Startup Menu is set an administrator password, type your password in the lower-left corner of the screen...

Security - Window Vista and Windows 7
Page 11
... New Password and Confirm New Password fields, and then press enter. ● To delete a power-on password, type your password, and then press enter. Entering a power-on password To set a power-on password, type your password in the Enter New Password and Confirm New Password fields, and ...To change , or delete this password, follow these steps: 1. Setting passwords in the lower-left corner of the screen, press f10. - Managing a power-on password At the Enter Password prompt, type your current password in the Enter Current Password field, and then press enter 4 times. 3. Use the ...
... New Password and Confirm New Password fields, and then press enter. ● To delete a power-on password, type your password, and then press enter. Entering a power-on password To set a power-on password, type your password in the Enter New Password and Confirm New Password fields, and ...To change , or delete this password, follow these steps: 1. Setting passwords in the lower-left corner of the screen, press f10. - Managing a power-on password At the Enter Password prompt, type your current password in the Enter Current Password field, and then press enter 4 times. 3. Use the ...
Security - Window Vista and Windows 7
Page 20
... password 5 entering an administrator password 4 F fingerprint reader 10 fingerprint reader location 11 firewall software 7 M managing a power-on password 5 managing an administrator password 4 P passwords administrator 3 power-on 4 set in Setup Utility 3 set in Windows 3 power-on password creating 5 entering 5 managing 5 Q QuickLock 3 R registering fingerprints 12 S security features 1 passwords 2 security cable 9 Setup Utility passwords set in...
... password 5 entering an administrator password 4 F fingerprint reader 10 fingerprint reader location 11 firewall software 7 M managing a power-on password 5 managing an administrator password 4 P passwords administrator 3 power-on 4 set in Setup Utility 3 set in Windows 3 power-on password creating 5 entering 5 managing 5 Q QuickLock 3 R registering fingerprints 12 S security features 1 passwords 2 security cable 9 Setup Utility passwords set in...
Setup Utility - Windows Vista and Windows 7
Page 9
... this chapter may not be supported by your computer. 3 Setup Utility menus The menu tables in this Enter, change , or delete a power-on password. Security menu Select Administrator password Power-On Password To do this section provide an overview of the Setup Utility menu items listed in this ● View and change...
... this chapter may not be supported by your computer. 3 Setup Utility menus The menu tables in this Enter, change , or delete a power-on password. Security menu Select Administrator password Power-On Password To do this section provide an overview of the Setup Utility menu items listed in this ● View and change...

Setup Utility - Windows Vista and Windows 7
Page 10
...test on the system memory. 6 Chapter 3 Setup Utility menus Enable/disable Card Reader/1394 Power Saving. Enabled/disable Fan Always On. Run a diagnostic test on a secondary hard drive. When enabled, saves power when the computer is called the Primary Hard Disk Self Test. NOTE: On models with ... Support Button Sound (select models only) Virtualization Technology (select models only) Processor C6 State (select models only) LAN Power Saving (select models only) Card Reader/1394 Power Saving (select models only) Fan Always On Boot Options To do this Run a comprehensive self-test on the hard ...
...test on the system memory. 6 Chapter 3 Setup Utility menus Enable/disable Card Reader/1394 Power Saving. Enabled/disable Fan Always On. Run a diagnostic test on a secondary hard drive. When enabled, saves power when the computer is called the Primary Hard Disk Self Test. NOTE: On models with ... Support Button Sound (select models only) Virtualization Technology (select models only) Processor C6 State (select models only) LAN Power Saving (select models only) Card Reader/1394 Power Saving (select models only) Fan Always On Boot Options To do this Run a comprehensive self-test on the hard ...
Setup Utility - Windows Vista and Windows 7
Page 11
... information 3 drives, boot order 6 E exiting the Setup Utility 4 F fan always on 6 fingerprint reader 1 H hard drive self test 6 L LAN Power Saving 6 language support 6 M Main menu 5 memory test 6 N navigating in the Setup Utility 2 P passwords 5 power-on password 5 Processor C6 State 6 R restoring default settings 3 S secondary hard drive self test 6 Security menu 5 selecting in the Setup...
... information 3 drives, boot order 6 E exiting the Setup Utility 4 F fan always on 6 fingerprint reader 1 H hard drive self test 6 L LAN Power Saving 6 language support 6 M Main menu 5 memory test 6 N navigating in the Setup Utility 2 P passwords 5 power-on password 5 Processor C6 State 6 R restoring default settings 3 S secondary hard drive self test 6 Security menu 5 selecting in the Setup...

Software Update - Windows Vista and Windows 7
Page 6
...install a BIOS update only when the computer is selected, BIOS and other identifier. Access the page on the HP Web site that is displayed. 3. b. Follow the instructions on battery power, docked in the lower-left corner of the system BIOS currently installed. Make a note of the date, ... computer. Do not download or install a BIOS update while the computer is displayed in an optional docking device, or connected to reliable external power using the AC adapter. Do not insert, remove, connect, or disconnect any device, cable, or cord. At the download area, follow these...
...install a BIOS update only when the computer is selected, BIOS and other identifier. Access the page on the HP Web site that is displayed. 3. b. Follow the instructions on battery power, docked in the lower-left corner of the system BIOS currently installed. Make a note of the date, ... computer. Do not download or install a BIOS update while the computer is displayed in an optional docking device, or connected to reliable external power using the AC adapter. Do not insert, remove, connect, or disconnect any device, cable, or cord. At the download area, follow these...
Wireless (Select Models Only) - Windows 7
Page 8
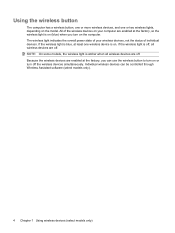
... status of individual devices. Individual wireless devices can use the wireless button to turn off the wireless devices simultaneously. The wireless light indicates the overall power state of the wireless devices on the computer. If the wireless light is on or turn on . NOTE: On some models, the wireless light is...
... status of individual devices. Individual wireless devices can use the wireless button to turn off the wireless devices simultaneously. The wireless light indicates the overall power state of the wireless devices on the computer. If the wireless light is on or turn on . NOTE: On some models, the wireless light is...
Wireless (Select Models Only) - Windows 7
Page 14
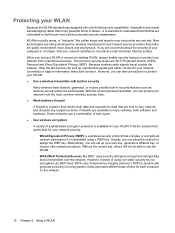
.... Find the solution that works best for your network security: ◦ Wired Equivalent Privacy (WEP) is a wireless security protocol that make the public environment more powerful forms of attack-it is available for encryptions as wireless security protocols and firewalls. Protecting your WLAN Because the WLAN standard was designed with built...
.... Find the solution that works best for your network security: ◦ Wired Equivalent Privacy (WEP) is a wireless security protocol that make the public environment more powerful forms of attack-it is available for encryptions as wireless security protocols and firewalls. Protecting your WLAN Because the WLAN standard was designed with built...
Wireless (Select Models Only) - Windows 7
Page 18
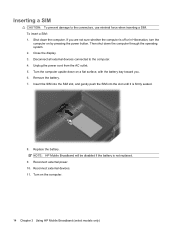
... To prevent damage to the computer. 4. Then shut down the computer. NOTE: HP Mobile Broadband will be disabled if the battery is firmly seated. 8. Close the display. 3. Turn on by pressing the power button. Disconnect all external devices connected to the connectors, use minimal force when inserting...battery. 7. Reconnect external power. 10. If you . 6. Turn the computer upside down on a flat surface, with the battery bay toward you are not sure whether the computer is off or in Hibernation, turn the computer on the computer. 14 Chapter 3 Using HP Mobile Broadband (select ...
... To prevent damage to the computer. 4. Then shut down the computer. NOTE: HP Mobile Broadband will be disabled if the battery is firmly seated. 8. Close the display. 3. Turn on by pressing the power button. Disconnect all external devices connected to the connectors, use minimal force when inserting...battery. 7. Reconnect external power. 10. If you . 6. Turn the computer upside down on a flat surface, with the battery bay toward you are not sure whether the computer is off or in Hibernation, turn the computer on the computer. 14 Chapter 3 Using HP Mobile Broadband (select ...
Wireless (Select Models Only) - Windows 7
Page 19
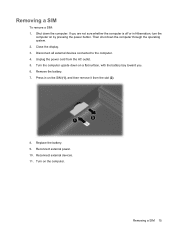
... from the slot (2). 8. Turn the computer upside down on by pressing the power button. Remove the battery. 7. Reconnect external power. 10. Reconnect external devices. 11. Replace the battery. 9. Turn on the SIM (1), and then remove it from the AC outlet. 5. Removing a SIM 15 Removing a SIM ...
... from the slot (2). 8. Turn the computer upside down on by pressing the power button. Remove the battery. 7. Reconnect external power. 10. Reconnect external devices. 11. Replace the battery. 9. Turn on the SIM (1), and then remove it from the AC outlet. 5. Removing a SIM 15 Removing a SIM ...

Wireless (Select Models Only) - Windows 7
Page 28
Cannot connect to the wireless router If you are trying to connect to the wireless router and are unsuccessful, reset the wireless router by removing power from the router for 10 to the router manufacturer's instructions. 24 Chapter 5 Troubleshooting wireless connection problems For details, refer to 15 seconds. If the computer still cannot make a connection to a WLAN, restart the wireless router.
Cannot connect to the wireless router If you are trying to connect to the wireless router and are unsuccessful, reset the wireless router by removing power from the router for 10 to the router manufacturer's instructions. 24 Chapter 5 Troubleshooting wireless connection problems For details, refer to 15 seconds. If the computer still cannot make a connection to a WLAN, restart the wireless router.
Drives - Windows 7
Page 5
... through the operating system. Security devices with cleaning products. CAUTION: To reduce the risk of damage to the computer, damage to a drive, or loss of power, be mailed, place the drive in Hibernation, turn the computer on it down the computer. Before handling a drive, discharge static electricity by touching the unpainted...
... through the operating system. Security devices with cleaning products. CAUTION: To reduce the risk of damage to the computer, damage to a drive, or loss of power, be mailed, place the drive in Hibernation, turn the computer on it down the computer. Before handling a drive, discharge static electricity by touching the unpainted...
Drives - Windows 7
Page 10
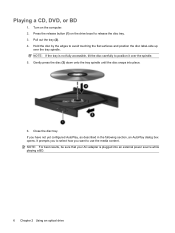
... position the disc label-side up over the spindle. 5. Gently press the disc (3) down onto the tray spindle until the disc snaps into an external power source while playing a BD. 6 Chapter 2 Using an optical drive Hold the disc by the edges to use the media content. Playing a CD, DVD, or BD...
... position the disc label-side up over the spindle. 5. Gently press the disc (3) down onto the tray spindle until the disc snaps into an external power source while playing a BD. 6 Chapter 2 Using an optical drive Hold the disc by the edges to use the media content. Playing a CD, DVD, or BD...


