
Backup and Recovery - Windows Vista
Page 6
... discs, or you have a much higher capacity than CDs. Note the following guidelines before you can restore your computer from the HP Web site. The software allows the creation of only one set of recovery discs. Recovery Manager opens. 2. Click Advanced Options. ...operating the computer on -screen instructions. 2 Chapter 2 Creating recovery discs Select Start > All Programs > Recovery Manager > Recovery Manager. Follow the on battery power, you will need high-quality DVD-R, double-layer DVD-R, DVD+R, double-layer DVD+R, BD-R (writable Blu-ray), or CD-R discs. To create...
... discs, or you have a much higher capacity than CDs. Note the following guidelines before you can restore your computer from the HP Web site. The software allows the creation of only one set of recovery discs. Recovery Manager opens. 2. Click Advanced Options. ...operating the computer on -screen instructions. 2 Chapter 2 Creating recovery discs Select Start > All Programs > Recovery Manager > Recovery Manager. Follow the on battery power, you will need high-quality DVD-R, double-layer DVD-R, DVD+R, double-layer DVD+R, BD-R (writable Blu-ray), or CD-R discs. To create...

Software Update, Backup and Recovery - Windows Vista
Page 6
... power from the AC outlet. To download a BIOS update: 1. Do not download or install a BIOS update while the computer is running on the HP Web site that is displayed in the lower-left corner of the system BIOS currently installed. Make a note of the date, name, or other system...f10. 2. b. While the "Press the ESC key for displaying BIOS information: 1. You may need to the hard drive. 2 Updating software Access the page on battery power, docked in Windows) or by turning on your computer and access the BIOS update you currently have and then download and install the new...
... power from the AC outlet. To download a BIOS update: 1. Do not download or install a BIOS update while the computer is running on the HP Web site that is displayed in the lower-left corner of the system BIOS currently installed. Make a note of the date, name, or other system...f10. 2. b. While the "Press the ESC key for displaying BIOS information: 1. You may need to the hard drive. 2 Updating software Access the page on battery power, docked in Windows) or by turning on your computer and access the BIOS update you currently have and then download and install the new...
Wireless (Select Models Only) - Windows Vista
Page 18
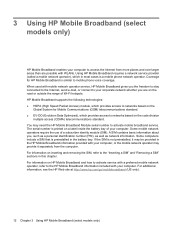
...from more places and over larger areas than are on the Global System for HP Mobile Broadband is similar to mobile phone voice coverage. For information on a label inside the battery bay of your computer. When used with your computer, or the mobile network...standard. Coverage for Mobile Communications (GSM) telecommunications standard. ● EV-DO (Evolution Data Optimized), which in the battery bay. 3 Using HP Mobile Broadband (select models only) HP Mobile Broadband enables your computer to access the Internet from the computer. The serial number is a mobile phone network ...
...from more places and over larger areas than are on the Global System for HP Mobile Broadband is similar to mobile phone voice coverage. For information on a label inside the battery bay of your computer. When used with your computer, or the mobile network...standard. Coverage for Mobile Communications (GSM) telecommunications standard. ● EV-DO (Evolution Data Optimized), which in the battery bay. 3 Using HP Mobile Broadband (select models only) HP Mobile Broadband enables your computer to access the Internet from the computer. The serial number is a mobile phone network ...
Wireless (Select Models Only) - Windows Vista
Page 19
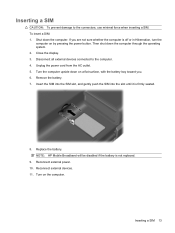
... power. 10. Turn on by pressing the power button. Inserting a SIM 13 Turn the computer upside down the computer through the operating system. 2. Replace the battery. Unplug the power cord from the AC outlet. 5. To insert a SIM: 1. If you . 6. Insert the SIM into the SIM slot, and gently push the ...SIM into the slot until it is not replaced. 9. Then shut down on a flat surface, with the battery bay toward you are not sure whether the computer is off or in Hibernation, turn the computer on the computer. Shut down the computer. NOTE...
... power. 10. Turn on by pressing the power button. Inserting a SIM 13 Turn the computer upside down the computer through the operating system. 2. Replace the battery. Unplug the power cord from the AC outlet. 5. To insert a SIM: 1. If you . 6. Insert the SIM into the SIM slot, and gently push the ...SIM into the slot until it is not replaced. 9. Then shut down on a flat surface, with the battery bay toward you are not sure whether the computer is off or in Hibernation, turn the computer on the computer. Shut down the computer. NOTE...
Wireless (Select Models Only) - Windows Vista
Page 20
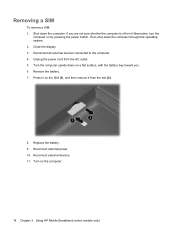
... through the operating system. 2. Then shut down the computer. Disconnect all external devices connected to the computer. 4. Turn on a flat surface, with the battery bay toward you are not sure whether the computer is off or in on by pressing the power button. Close the display. 3. Turn the computer... upside down on the computer. 14 Chapter 3 Using HP Mobile Broadband (select models only) If you . 6. Unplug the power cord from the slot (2). 8. Reconnect external devices. 11.
... through the operating system. 2. Then shut down the computer. Disconnect all external devices connected to the computer. 4. Turn on a flat surface, with the battery bay toward you are not sure whether the computer is off or in on by pressing the power button. Close the display. 3. Turn the computer... upside down on the computer. 14 Chapter 3 Using HP Mobile Broadband (select models only) If you . 6. Unplug the power cord from the slot (2). 8. Reconnect external devices. 11.
Drives - Windows Vista
Page 5
...Hibernation, turn the computer on luggage, such as conveyor belts, use excessive force when inserting a drive into a drive bay. When the battery is the only source of the drive. Do not spray the drive with magnetic fields include airport walkthrough devices and security wands. Security devices... Refer to the following cautions before removing the drive from the drive bay, or traveling with care. The airport security devices that the battery is off, in the Sleep state, or in a bubble-pack mailer or other suitable protective packaging and label the package "FRAGILE." ...
...Hibernation, turn the computer on luggage, such as conveyor belts, use excessive force when inserting a drive into a drive bay. When the battery is the only source of the drive. Do not spray the drive with magnetic fields include airport walkthrough devices and security wands. Security devices... Refer to the following cautions before removing the drive from the drive bay, or traveling with care. The airport security devices that the battery is off, in the Sleep state, or in a bubble-pack mailer or other suitable protective packaging and label the package "FRAGILE." ...
Drives - Windows Vista
Page 14
..., refer to a disc. The write process is writing to the software manufacturer's instructions, which may be provided on disc, in the software Help, or on battery power. Do not use this computer for such purposes. CAUTION: To prevent loss of copyrightprotected material, including computer programs, films, broadcasts, and sound recordings. Do...
..., refer to a disc. The write process is writing to the software manufacturer's instructions, which may be provided on disc, in the software Help, or on battery power. Do not use this computer for such purposes. CAUTION: To prevent loss of copyrightprotected material, including computer programs, films, broadcasts, and sound recordings. Do...
Drives - Windows Vista
Page 20
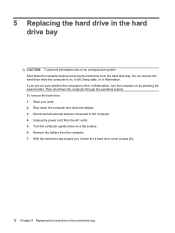
... cord from the computer. 7. Turn the computer upside down the computer through the operating system. Disconnect all external devices connected to the computer. 4. Remove the battery from the AC outlet. 5. If you , loosen the 4 hard drive cover screws (1). 16 Chapter 5 Replacing the hard drive in the hard drive bay CAUTION: To...
... cord from the computer. 7. Turn the computer upside down the computer through the operating system. Disconnect all external devices connected to the computer. 4. Remove the battery from the AC outlet. 5. If you , loosen the 4 hard drive cover screws (1). 16 Chapter 5 Replacing the hard drive in the hard drive bay CAUTION: To...
Memory Modules - Windows Vista
Page 5
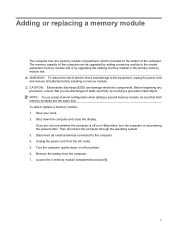
...) can be sure that you are not sure whether the computer is located on a flat surface. 6. Unplug the power cord from the computer. 7. Remove the battery from the AC outlet. 5. Loosen the 4 memory module compartment screws (1). 1 Before beginning any procedure, ensure that both memory modules are discharged of the computer. Shut... the vacant expansion memory module slot or by touching a grounded metal object. To reduce the risk of the computer can damage electronic components. Disconnect all batteries before installing a memory module.
...) can be sure that you are not sure whether the computer is located on a flat surface. 6. Unplug the power cord from the computer. 7. Remove the battery from the AC outlet. 5. Loosen the 4 memory module compartment screws (1). 1 Before beginning any procedure, ensure that both memory modules are discharged of the computer. Shut... the vacant expansion memory module slot or by touching a grounded metal object. To reduce the risk of the computer can damage electronic components. Disconnect all batteries before installing a memory module.
Memory Modules - Windows Vista
Page 8
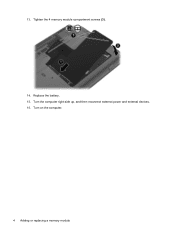
13. Replace the battery. 15. Turn the computer right-side up, and then reconnect external power and external devices. 16. Tighten the 4 memory module compartment screws (3). 14. Turn on the computer. 4 Adding or replacing a memory module
13. Replace the battery. 15. Turn the computer right-side up, and then reconnect external power and external devices. 16. Tighten the 4 memory module compartment screws (3). 14. Turn on the computer. 4 Adding or replacing a memory module

Notebook Tour - Windows Vista
Page 9
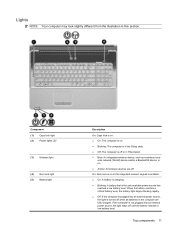
...9679; Blinking: The computer is in the Sleep state. ● Off: The computer is off or in this section. When the battery reaches a critical battery level, the battery light begins blinking rapidly. ● Off: If the computer is plugged into an external Top components 3 Lights NOTE: Your computer may...) device and/or a Bluetooth® device, is turned off . Component (1) Caps lock light (2) Power lights (2)* (3) Wireless light (4) Num lock light (5) Battery light Description On: Caps lock is on. ● On: The computer is on . ● Amber: All wireless devices are off when all...
...9679; Blinking: The computer is in the Sleep state. ● Off: The computer is off or in this section. When the battery reaches a critical battery level, the battery light begins blinking rapidly. ● Off: If the computer is plugged into an external Top components 3 Lights NOTE: Your computer may...) device and/or a Bluetooth® device, is turned off . Component (1) Caps lock light (2) Power lights (2)* (3) Wireless light (4) Num lock light (5) Battery light Description On: Caps lock is on. ● On: The computer is on . ● Amber: All wireless devices are off when all...
Notebook Tour - Windows Vista
Page 10
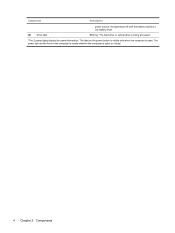
Component Description power source, the light stays off until the battery reaches a low battery level. (6) Drive light Blinking: The hard drive or optical drive is open or closed. 4 Chapter 2 Components The light on the front of the computer is visible whether the computer is open . The power light on the power button is visible only when the computer is being accessed. *The 2 power lights display the same information.
Component Description power source, the light stays off until the battery reaches a low battery level. (6) Drive light Blinking: The hard drive or optical drive is open or closed. 4 Chapter 2 Components The light on the front of the computer is visible whether the computer is open . The power light on the power button is visible only when the computer is being accessed. *The 2 power lights display the same information.

Notebook Tour - Windows Vista
Page 17
... module slots. It is normal for use in the computer by the governmental agency that regulates wireless devices in your country or region. Releases the battery from the battery bay. Bottom components Component (1) Battery bay (2) Battery release latch (3) Vents (5) (4) Wireless module compartment (5) Hard drive bay Description Holds the...
... module slots. It is normal for use in the computer by the governmental agency that regulates wireless devices in your country or region. Releases the battery from the battery bay. Bottom components Component (1) Battery bay (2) Battery release latch (3) Vents (5) (4) Wireless module compartment (5) Hard drive bay Description Holds the...

Notebook Tour - Windows Vista
Page 20
Additional hardware components Component Description (1) Power cord* Connects an AC adapter to an AC outlet. (2) AC adapter Converts AC power to DC power. (3) Battery* Powers the computer when the computer is not plugged into external power. *Batteries and power cords vary in appearance by region and country. 14 Chapter 2 Components
Additional hardware components Component Description (1) Power cord* Connects an AC adapter to an AC outlet. (2) AC adapter Converts AC power to DC power. (3) Battery* Powers the computer when the computer is not plugged into external power. *Batteries and power cords vary in appearance by region and country. 14 Chapter 2 Components
Notebook Tour - Windows Vista
Page 21
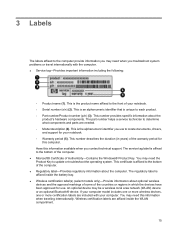
...: ◦ Product name (1). The part number helps a service technician to determine what components and parts are affixed inside the battery bay. ● Wireless certification label(s) (select models only)-Provide information about the product's hardware components. This is affixed inside the...-Contains the Windows® Product Key. This is affixed to the bottom of the computer. ● Microsoft® Certificate of your notebook. ◦ Serial number (s/n) (2). You may need the Product Key to update or troubleshoot the operating system. Wireless certification labels are ...
...: ◦ Product name (1). The part number helps a service technician to determine what components and parts are affixed inside the battery bay. ● Wireless certification label(s) (select models only)-Provide information about the product's hardware components. This is affixed inside the...-Contains the Windows® Product Key. This is affixed to the bottom of the computer. ● Microsoft® Certificate of your notebook. ◦ Serial number (s/n) (2). You may need the Product Key to update or troubleshoot the operating system. Wireless certification labels are ...
Notebook Tour - Windows Vista
Page 22
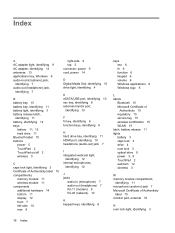
...audio-in (microphone) jack, identifying 7 audio-out (headphone) jack, identifying 7 B battery bay 15 battery bay, identifying 11 battery light, identifying 3 battery release latch, identifying 11 battery, identifying 14 bays battery 11, 15 hard drive 11 Bluetooth label 15 buttons power 5 TouchPad 2 TouchPad on/...Windows logo 6 L labels Bluetooth 15 Microsoft Certificate of Authenticity 15 regulatory 15 service tag 15 wireless certification 15 WLAN 15 latch, battery release 11 lights battery 3 caps lock 3 drive 4 num lock 3 optical drive 9 power 3, 9 TouchPad 2 webcam 12 wireless 3 M memory ...
...audio-in (microphone) jack, identifying 7 audio-out (headphone) jack, identifying 7 B battery bay 15 battery bay, identifying 11 battery light, identifying 3 battery release latch, identifying 11 battery, identifying 14 bays battery 11, 15 hard drive 11 Bluetooth label 15 buttons power 5 TouchPad 2 TouchPad on/...Windows logo 6 L labels Bluetooth 15 Microsoft Certificate of Authenticity 15 regulatory 15 service tag 15 wireless certification 15 WLAN 15 latch, battery release 11 lights battery 3 caps lock 3 drive 4 num lock 3 optical drive 9 power 3, 9 TouchPad 2 webcam 12 wireless 3 M memory ...
Compaq Presario CQ71 Notebook PC and HP G71 Notebook PC - Maintenance and Service Guide
Page 6
... 43 Workstation guidelines 43 Equipment guidelines 44 Component replacement procedures 45 Service tag ...45 Computer feet ...46 Battery ...47 WLAN module ...48 Optical drive ...53 Memory module ...54 Hard drive ...56 Modem module ...58 RTC battery ...59 Keyboard ...60 Keyboard cover ...63 Power button board ...65 Display assembly ...66 Top cover ...72...
... 43 Workstation guidelines 43 Equipment guidelines 44 Component replacement procedures 45 Service tag ...45 Computer feet ...46 Battery ...47 WLAN module ...48 Optical drive ...53 Memory module ...54 Hard drive ...56 Modem module ...58 RTC battery ...59 Keyboard ...60 Keyboard cover ...63 Power button board ...65 Display assembly ...66 Top cover ...72...

Compaq Presario CQ71 Notebook PC and HP G71 Notebook PC - Maintenance and Service Guide
Page 16
... default) Power Battery, 47-Wh, 2.2- standard aspect video AC adapter plug X (smart pin) Docking No docking X Keyboard/ 17-inch full-size X pointing keyboard with devices numeric keypad Synaptics X TouchPad (supports 2-way scroll with ground pin, supports 2-pin DC connector) HP G71 Notebook (UMA) X X X X X X X X X X Silver HP G71 Notebook (UMA) X X X X X X X X X X Presario CQ71 Notebook (Discrete) X X X X X X X X X X X HP G71 Notebook (Discrete) Silver HP G71 Notebook (Discrete) X X X X X X X X X X X X X X X X X X X X X X 8 Chapter...
... default) Power Battery, 47-Wh, 2.2- standard aspect video AC adapter plug X (smart pin) Docking No docking X Keyboard/ 17-inch full-size X pointing keyboard with devices numeric keypad Synaptics X TouchPad (supports 2-way scroll with ground pin, supports 2-pin DC connector) HP G71 Notebook (UMA) X X X X X X X X X X Silver HP G71 Notebook (UMA) X X X X X X X X X X Presario CQ71 Notebook (Discrete) X X X X X X X X X X X HP G71 Notebook (Discrete) Silver HP G71 Notebook (Discrete) X X X X X X X X X X X X X X X X X X X X X X 8 Chapter...

Compaq Presario CQ71 Notebook PC and HP G71 Notebook PC - Maintenance and Service Guide
Page 17
...(32-bit) Windows Vista X Premium (32 and 64-bit) Windows Vista X Home Basic (32-bit) FreeDOS X Serviceability End-user replaceable parts: AC adapter X Battery (system) X Hard drive X Memory module X Modem module X RTC Battery X Optical drive X WLAN module X HP G71 Notebook (UMA) X X X X X X X X X X X X X Silver HP G71 Notebook (UMA) X X X X X X X X X X X X X Presario CQ71 Notebook (Discrete) HP G71 Notebook (Discrete) Silver HP G71 Notebook (Discrete) X X X X X X X X X X X X X X X X X X X X X X X X X X X X X X X X X X X X X 9
...(32-bit) Windows Vista X Premium (32 and 64-bit) Windows Vista X Home Basic (32-bit) FreeDOS X Serviceability End-user replaceable parts: AC adapter X Battery (system) X Hard drive X Memory module X Modem module X RTC Battery X Optical drive X WLAN module X HP G71 Notebook (UMA) X X X X X X X X X X X X X Silver HP G71 Notebook (UMA) X X X X X X X X X X X X X Presario CQ71 Notebook (Discrete) HP G71 Notebook (Discrete) Silver HP G71 Notebook (Discrete) X X X X X X X X X X X X X X X X X X X X X X X X X X X X X X X X X X X X X 9
Compaq Presario CQ71 Notebook PC and HP G71 Notebook PC - Maintenance and Service Guide
Page 19
...is on or the integrated numeric keypad is enabled. ● On: A battery is charging. ● Blinking: A battery that is plugged into an external power source, the light stays off until the battery reaches a low battery level. Top components 11 Lights NOTE: Your computer may look slightly different ...from the illustration in the computer are off. When the battery reaches a critical battery level, the battery light begins blinking rapidly. ● Off: If the computer is the only available power source has reached a low battery level. If the computer is not plugged into an external...
...is on or the integrated numeric keypad is enabled. ● On: A battery is charging. ● Blinking: A battery that is plugged into an external power source, the light stays off until the battery reaches a low battery level. Top components 11 Lights NOTE: Your computer may look slightly different ...from the illustration in the computer are off. When the battery reaches a critical battery level, the battery light begins blinking rapidly. ● Off: If the computer is the only available power source has reached a low battery level. If the computer is not plugged into an external...


