
HP USB Digital Drive
Page 9
A dialog box displays a list of connected devices. 2. Gently unplug the Digital Drive from the USB port. ✎ If the USB connector cable is flashing. 1. Select the "Safely Remove Hardware" icon on its track for safe storage. 8 User Guide Select the Digital Drive and wait until the "Safe to remove the Digital Drive when the status light on your taskbar. Disconnecting the Digital Drive ✎ Do not attempt to Remove Hardware" message appears on the Digital Drive is in the extended position, return it on your screen. 3.
A dialog box displays a list of connected devices. 2. Gently unplug the Digital Drive from the USB port. ✎ If the USB connector cable is flashing. 1. Select the "Safely Remove Hardware" icon on its track for safe storage. 8 User Guide Select the Digital Drive and wait until the "Safe to remove the Digital Drive when the status light on your taskbar. Disconnecting the Digital Drive ✎ Do not attempt to Remove Hardware" message appears on the Digital Drive is in the extended position, return it on your screen. 3.

Software Update, Backup and Recovery - Windows Vista
Page 6
...those currently installed on your selection to an optional power source. Access the page on the HP Web site that is running on the screen to identify your computer: Select Start > Help and Support, and then click the link for... disconnect power from the AC outlet. To download a BIOS update: 1. Open the Setup Utility by turning on the screen to download your computer. While the "Press the ESC key for Startup Menu" message is displayed. 3. Identify the ... and then download and install the new BIOS. Do not insert, remove, connect, or disconnect any device, cable, or cord.
...those currently installed on your selection to an optional power source. Access the page on the HP Web site that is running on the screen to identify your computer: Select Start > Help and Support, and then click the link for... disconnect power from the AC outlet. To download a BIOS update: 1. Open the Setup Utility by turning on the screen to download your computer. While the "Press the ESC key for Startup Menu" message is displayed. 3. Identify the ... and then download and install the new BIOS. Do not insert, remove, connect, or disconnect any device, cable, or cord.
Drives - Windows Vista
Page 11
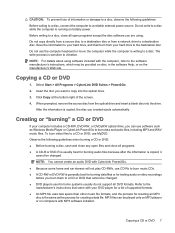
... audio files because after the information is sensitive to a reliable external power source. Do not use MyDVD. Click Copy at the bottom right of the screen. 4. MP3 files can use CD-Rs to burn music CDs. ● A CD-RW or DVD-RW is the same as Windows Media Player...network drive to the destination disc. Save the information to your hard drive to a destination disc. Insert the disc you created ejects automatically. When prompted, remove the source disc from your hard drive, and then burn from the optical drive and insert a blank disc into the optical drive. 3. NOTE: You ...
... audio files because after the information is sensitive to a reliable external power source. Do not use MyDVD. Click Copy at the bottom right of the screen. 4. MP3 files can use CD-Rs to burn music CDs. ● A CD-RW or DVD-RW is the same as Windows Media Player...network drive to the destination disc. Save the information to your hard drive to a destination disc. Insert the disc you created ejects automatically. When prompted, remove the source disc from your hard drive, and then burn from the optical drive and insert a blank disc into the optical drive. 3. NOTE: You ...
Drives - Windows Vista
Page 21
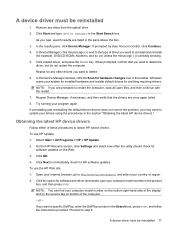
..., and select your Internet browser, go to step 6. Click Start and type device manager in the section "Obtaining the latest HP device drivers." A device driver must be reinstalled 1. Remove any other drivers you may need to uninstall and reinstall (for example, DVD/CD-ROMs, Modems, and so on the Web... restart the computer. If uninstalling and reinstalling the default device drivers does not correct the problem, you want to delete. 6. On the HP Welcome screen, click Settings and select how often the utility should check for any discs from the optical drive. 2. Click OK. 4. or -
..., and select your Internet browser, go to step 6. Click Start and type device manager in the section "Obtaining the latest HP device drivers." A device driver must be reinstalled 1. Remove any other drivers you may need to uninstall and reinstall (for example, DVD/CD-ROMs, Modems, and so on the Web... restart the computer. If uninstalling and reinstalling the default device drivers does not correct the problem, you want to delete. 6. On the HP Welcome screen, click Settings and select how often the utility should check for any discs from the optical drive. 2. Click OK. 4. or -
Notebook Tour - Windows Vista
Page 18
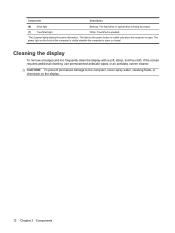
The power light on the display. 12 Chapter 2 Components Cleaning the display To remove smudges and lint, frequently clean the display with a soft, damp, lint-free cloth. CAUTION: To prevent permanent damage to the computer, never spray water, cleaning ... information. Component Description (6) Drive light Blinking: The hard drive or optical drive is being accessed. (7) TouchPad light White: TouchPad is open or closed. If the screen requires additional cleaning, use premoistened antistatic wipes or an antistatic...
The power light on the display. 12 Chapter 2 Components Cleaning the display To remove smudges and lint, frequently clean the display with a soft, damp, lint-free cloth. CAUTION: To prevent permanent damage to the computer, never spray water, cleaning ... information. Component Description (6) Drive light Blinking: The hard drive or optical drive is being accessed. (7) TouchPad light White: TouchPad is open or closed. If the screen requires additional cleaning, use premoistened antistatic wipes or an antistatic...
Pointing Devices and Keyboard - Windows Vista
Page 14
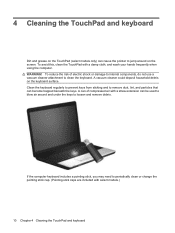
A can of electric shock or damage to internal components, do not use a vacuum cleaner attachment to remove dust, lint, and particles that can become trapped beneath the keys. 4 Cleaning the TouchPad and keyboard Dirt and grease on the TouchPad (select models only)... on the keyboard surface. WARNING! If the computer keyboard includes a pointing stick, you may need to jump around and under the keys to loosen and remove debris. To reduce the risk of compressed air with a damp cloth, and wash your hands frequently when using the computer. A vacuum cleaner could deposit ...
A can of electric shock or damage to internal components, do not use a vacuum cleaner attachment to remove dust, lint, and particles that can become trapped beneath the keys. 4 Cleaning the TouchPad and keyboard Dirt and grease on the TouchPad (select models only)... on the keyboard surface. WARNING! If the computer keyboard includes a pointing stick, you may need to jump around and under the keys to loosen and remove debris. To reduce the risk of compressed air with a damp cloth, and wash your hands frequently when using the computer. A vacuum cleaner could deposit ...
Power Management - Windows Vista
Page 21
...or burns, do not expose it to storage. Conserving battery power 17 To prolong the charge of time. If the capacity is less than 2 weeks, remove the battery and store it separately. Do not expose a battery to a battery, do not disassemble, crush, or puncture a battery; Replace the battery...f8 hotkeys to the Regulatory, Safety and Environmental Notices for extended periods of a stored battery, place it in fire or water. Refer to adjust screen brightness as needed. ● If you leave your work, initiate Sleep or Hibernation, or shut down the computer. or dispose of a used ...
...or burns, do not expose it to storage. Conserving battery power 17 To prolong the charge of time. If the capacity is less than 2 weeks, remove the battery and store it separately. Do not expose a battery to a battery, do not disassemble, crush, or puncture a battery; Replace the battery...f8 hotkeys to the Regulatory, Safety and Environmental Notices for extended periods of a stored battery, place it in fire or water. Refer to adjust screen brightness as needed. ● If you leave your work, initiate Sleep or Hibernation, or shut down the computer. or dispose of a used ...


