
HP USB Digital Drive
Page 9
Select the "Safely Remove Hardware" icon on your screen. 3. Select the Digital Drive and wait until the "Safe to remove the Digital Drive when the status light on the Digital Drive is in the extended position, return it on its track for safe storage. 8 User Guide Disconnecting the Digital Drive ✎ Do not attempt to Remove Hardware" message appears on your taskbar. Gently unplug the Digital Drive from the USB port. ✎ If the USB connector cable is flashing. 1. A dialog box displays a list of connected devices. 2.
Select the "Safely Remove Hardware" icon on your screen. 3. Select the Digital Drive and wait until the "Safe to remove the Digital Drive when the status light on the Digital Drive is in the extended position, return it on its track for safe storage. 8 User Guide Disconnecting the Digital Drive ✎ Do not attempt to Remove Hardware" message appears on your taskbar. Gently unplug the Digital Drive from the USB port. ✎ If the USB connector cable is flashing. 1. A dialog box displays a list of connected devices. 2.
Wireless Setup Guide
Page 4
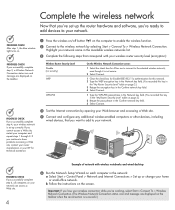
...Press the wireless on/off button on each computer in the Available wireless networks list. 3 Complete the following steps that correspond with wireless notebooks and wired desktop PROGRESS CHECK If you successfully complete step 6, all computers on your network can access a Web site. 4 6 Run ... security level (encryption): PROGRESS CHECK If you successfully complete step 3, a Wireless Network Connection status icon and message are displayed on the screen. b Follow the instructions on the taskbar when the reconnection is not secure. 2 Select Connect. 1 Clear the check box for Enable...
...Press the wireless on/off button on each computer in the Available wireless networks list. 3 Complete the following steps that correspond with wireless notebooks and wired desktop PROGRESS CHECK If you successfully complete step 6, all computers on your network can access a Web site. 4 6 Run ... security level (encryption): PROGRESS CHECK If you successfully complete step 3, a Wireless Network Connection status icon and message are displayed on the screen. b Follow the instructions on the taskbar when the reconnection is not secure. 2 Select Connect. 1 Clear the check box for Enable...

Notebook PC User Guide - Windows 7
Page 12
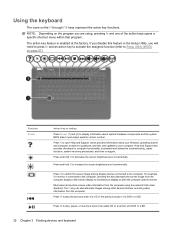
... finger up or down inside the right edge of the TouchPad. There is off. (2) TouchPad* Moves the pointer and selects or activates items on the screen. (3) Left TouchPad button* Press the left side of the TouchPad button to Using TouchPad gestures on an external mouse. (4) Right TouchPad button* Press the right...
... finger up or down inside the right edge of the TouchPad. There is off. (2) TouchPad* Moves the pointer and selects or activates items on the screen. (3) Left TouchPad button* Press the left side of the TouchPad button to Using TouchPad gestures on an external mouse. (4) Right TouchPad button* Press the right...
Notebook PC User Guide - Windows 7
Page 31
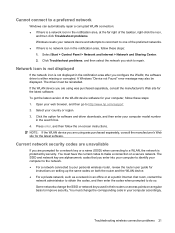
... an office or at the far right of the preferred networks. ● If there is no network icon in the notification area, follow the on-screen instructions. Open your country or region. 3. Select your web browser, and then go to repair. Press enter, and then follow these steps: 1.... Current network security codes are unavailable If you wish to http://www.hp.com/support. 2. Select Start > Control Panel > Network and Internet > Network and Sharing Center. 2. To get the latest version of the WLAN device...
... an office or at the far right of the preferred networks. ● If there is no network icon in the notification area, follow the on-screen instructions. Open your country or region. 3. Select your web browser, and then go to repair. Press enter, and then follow these steps: 1.... Current network security codes are unavailable If you wish to http://www.hp.com/support. 2. Select Start > Control Panel > Network and Internet > Network and Sharing Center. 2. To get the latest version of the WLAN device...

Notebook PC User Guide - Windows 7
Page 38
Moves the pointer and selects or activates items on an external mouse. 28 Chapter 3 Pointing devices and keyboard Functions like the left button on an external mouse. 3 Pointing devices and keyboard Using the TouchPad The following illustration and table describe the computer TouchPad. Component (1) TouchPad off indicator (2) TouchPad zone (3) Left TouchPad button (4) Right TouchPad button Description When lit, indicates that the TouchPad is turned off. Functions like the right button on the screen.
Moves the pointer and selects or activates items on an external mouse. 28 Chapter 3 Pointing devices and keyboard Functions like the left button on an external mouse. 3 Pointing devices and keyboard Using the TouchPad The following illustration and table describe the computer TouchPad. Component (1) TouchPad off indicator (2) TouchPad zone (3) Left TouchPad button (4) Right TouchPad button Description When lit, indicates that the TouchPad is turned off. Functions like the right button on the screen.
Notebook PC User Guide - Windows 7
Page 42
...BIOS (basic input-output system) version number. Press and hold f3 to support. Press f4 to switch the screen image among other devices that program. If you disable this key alternates the screen image from the computer using , pressing fn and one of a DVD or a BD. 32 Chapter 3 ... Support also provides checkups for computer functionality, automated and interactive troubleshooting, repair solutions, system recovery procedures, and links to increase the screen brightness level incrementally. The f4 key can also alternate images among display devices connected to decrease the...
...BIOS (basic input-output system) version number. Press and hold f3 to support. Press f4 to switch the screen image among other devices that program. If you disable this key alternates the screen image from the computer using , pressing fn and one of a DVD or a BD. 32 Chapter 3 ... Support also provides checkups for computer functionality, automated and interactive troubleshooting, repair solutions, system recovery procedures, and links to increase the screen brightness level incrementally. The f4 key can also alternate images among display devices connected to decrease the...
Notebook PC User Guide - Windows 7
Page 44
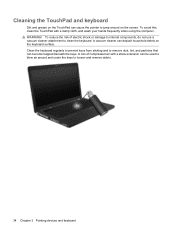
... to blow air around on the keyboard surface. Cleaning the TouchPad and keyboard Dirt and grease on the TouchPad can deposit household debris on the screen. Clean the keyboard regularly to prevent keys from sticking and to loosen and remove debris. 34 Chapter 3 Pointing devices and keyboard WARNING! To avoid this...
... to blow air around on the keyboard surface. Cleaning the TouchPad and keyboard Dirt and grease on the TouchPad can deposit household debris on the screen. Clean the keyboard regularly to prevent keys from sticking and to loosen and remove debris. 34 Chapter 3 Pointing devices and keyboard WARNING! To avoid this...

Notebook PC User Guide - Windows 7
Page 49
... want to use . To start CyberLink PowerDVD, select Start > All Programs > CyberLink PowerDVD. NOTE: Some programs may be located in the software help, or on -screen instructions. 3. Installing multimedia software from a disc To install any multimedia software from a CD or DVD, follow the on the manufacturer's Web site. Using CyberLink PowerDVD...
... want to use . To start CyberLink PowerDVD, select Start > All Programs > CyberLink PowerDVD. NOTE: Some programs may be located in the software help, or on -screen instructions. 3. Installing multimedia software from a disc To install any multimedia software from a CD or DVD, follow the on the manufacturer's Web site. Using CyberLink PowerDVD...

Notebook PC User Guide - Windows 7
Page 56
... from or writing to a hibernation file on the hard drive and the computer turns off. Your work is initiated, the power lights blink and the screen clears. CAUTION: To prevent possible audio and video degradation, loss of audio or video playback functionality, or loss of networking connection or perform any computer...
... from or writing to a hibernation file on the hard drive and the computer turns off. Your work is initiated, the power lights blink and the screen clears. CAUTION: To prevent possible audio and video degradation, loss of audio or video playback functionality, or loss of networking connection or perform any computer...
Notebook PC User Guide - Windows 7
Page 57
...external power. The power lights turn on and your work returns to the screen where you stopped working . When the computer exits Sleep, the power lights turn on and your work... returns to the screen where you stopped working . To exit Hibernation: ▲ Briefly press the power button....press the power button. ● Close the display. ● Click Start, click the arrow next to the screen. Power settings and timeouts can be required on , you must enter your Windows password before your work will ...
...external power. The power lights turn on and your work returns to the screen where you stopped working . When the computer exits Sleep, the power lights turn on and your work... returns to the screen where you stopped working . To exit Hibernation: ▲ Briefly press the power button....press the power button. ● Close the display. ● Click Start, click the arrow next to the screen. Power settings and timeouts can be required on , you must enter your Windows password before your work will ...
Notebook PC User Guide - Windows 7
Page 70
... action keys to storage. NOTE: A stored battery should be unused and unplugged from external power for On battery. 7. Calibrate a battery before returning it to adjust screen brightness as needed. ● If you are not using it if it separately. Step 5: Reenable Hibernation and Sleep CAUTION: Failure to Hibernate after calibration may...
... action keys to storage. NOTE: A stored battery should be unused and unplugged from external power for On battery. 7. Calibrate a battery before returning it to adjust screen brightness as needed. ● If you are not using it if it separately. Step 5: Reenable Hibernation and Sleep CAUTION: Failure to Hibernate after calibration may...
Notebook PC User Guide - Windows 7
Page 72
... desktop, and then click Configure Switchable Graphics or Configure ATI PowerXpressTM. 62 Chapter 5 Power management If your model supports HDMI in slate mode, the screen orientation is available on a blank area of the computer, the system does not allow you to switch to switch. While the computer switches modes,... you can switch back to switch modes, or it may support HDMI in high-performance mode only, or in the notification area, and the screen image reappears. It may also be necessary to using the same graphics mode. If you prefer, you are in high-performance mode only, the...
... desktop, and then click Configure Switchable Graphics or Configure ATI PowerXpressTM. 62 Chapter 5 Power management If your model supports HDMI in slate mode, the screen orientation is available on a blank area of the computer, the system does not allow you to switch to switch. While the computer switches modes,... you can switch back to switch modes, or it may support HDMI in high-performance mode only, or in the notification area, and the screen image reappears. It may also be necessary to using the same graphics mode. If you prefer, you are in high-performance mode only, the...

Notebook PC User Guide - Windows 7
Page 74
... writing to magnetic fields. If you move the computer while the optical drive is connected to an external hard drive, initiate Sleep and allow the screen to clear, or properly disconnect the external hard drive. Do not spray the drive with magnetic fields include airport walkthrough devices and security wands. 6 Drives...
... writing to magnetic fields. If you move the computer while the optical drive is connected to an external hard drive, initiate Sleep and allow the screen to clear, or properly disconnect the external hard drive. Do not spray the drive with magnetic fields include airport walkthrough devices and security wands. 6 Drives...
Notebook PC User Guide - Windows 7
Page 81
CAUTION: To prevent loss of the screen. Click Copy at the bottom right of information or damage to a disc, observe the following guidelines: Before writing to a disc, connect the computer to a reliable ...
CAUTION: To prevent loss of the screen. Click Copy at the bottom right of information or damage to a disc, observe the following guidelines: Before writing to a disc, connect the computer to a reliable ...

Notebook PC User Guide - Windows 7
Page 84
...; Conserve system resources by trying the following suggestions: ◦ Log off the Internet. ◦ Change the color properties of the computer desktop, and then select Screen resolution. 2. Select High Color (16 bit), if this setting is selected. 3. Right-click on the spindle while lifting the outer edges of the disc. 3. Remove...
...; Conserve system resources by trying the following suggestions: ◦ Log off the Internet. ◦ Change the color properties of the computer desktop, and then select Screen resolution. 2. Select High Color (16 bit), if this setting is selected. 3. Right-click on the spindle while lifting the outer edges of the disc. 3. Remove...
Notebook PC User Guide - Windows 7
Page 85
... to make the external display primary: a. NOTE: When using the right kind of the computer desktop, and then select Screen resolution. Remove any discs from the HP Web site at http://www.hp.com. When prompted, confirm that you are using both the computer display and an external display are closed. ● Turn...
... to make the external display primary: a. NOTE: When using the right kind of the computer desktop, and then select Screen resolution. Remove any discs from the HP Web site at http://www.hp.com. When prompted, confirm that you are using both the computer display and an external display are closed. ● Turn...

Notebook PC User Guide - Windows 7
Page 87
Troubleshooting drive and device driver problems 77 Click Check for updates. 2. Follow the on-screen instructions. Click Start > All Programs > Windows Update. NOTE: If you have not previously set up Windows Update, you can obtain the latest Windows device drivers by using Windows Update. To use Windows Update: 1. This feature can be prompted to enter settings before you will be set to automatically check for and install updates for the Windows operating system and other Microsoft products. Obtaining the latest Windows device drivers You can check for updates. 3.
Troubleshooting drive and device driver problems 77 Click Check for updates. 2. Follow the on-screen instructions. Click Start > All Programs > Windows Update. NOTE: If you have not previously set up Windows Update, you can obtain the latest Windows device drivers by using Windows Update. To use Windows Update: 1. This feature can be prompted to enter settings before you will be set to automatically check for and install updates for the Windows operating system and other Microsoft products. Obtaining the latest Windows device drivers You can check for updates. 3.

Notebook PC User Guide - Windows 7
Page 89
...computer manually at least once a month. Depending on the size of your hard drive and the number of your hard drive at any time. HP recommends defragmenting your computer. Select Start > All Programs > Accessories > System Tools > Disk Defragmenter. 2. You may set it works without supervision....the User Account Control feature to improve the security of fragmented files, Disk Defragmenter may want to set Disk Defragmenter to run on -screen instructions. Follow the on a monthly schedule, but you do not need access to the Disk Defragmenter software Help. You may be ...
...computer manually at least once a month. Depending on the size of your hard drive and the number of your hard drive at any time. HP recommends defragmenting your computer. Select Start > All Programs > Accessories > System Tools > Disk Defragmenter. 2. You may set it works without supervision....the User Account Control feature to improve the security of fragmented files, Disk Defragmenter may want to set Disk Defragmenter to run on -screen instructions. Follow the on a monthly schedule, but you do not need access to the Disk Defragmenter software Help. You may be ...
Notebook PC User Guide - Windows 7
Page 102
... cannot access Setup Utility. 92 Chapter 9 Security Protects access to computer contents. For additional information about Windows passwords, such as they are not displayed as screen-saver passwords, select Start > Help and Support. You can use the same password for creating and saving passwords: ● When creating passwords, follow requirements set...
... cannot access Setup Utility. 92 Chapter 9 Security Protects access to computer contents. For additional information about Windows passwords, such as they are not displayed as screen-saver passwords, select Start > Help and Support. You can use the same password for creating and saving passwords: ● When creating passwords, follow requirements set...

Notebook PC User Guide - Windows 7
Page 103
While the "Press the ESC key for Startup Menu" message is displayed in the lower-left corner of the screen, press esc. To save your administrator password, and then press enter. After three unsuccessful attempts to enter the administrator password, you must enter the ...and Confirm New Password fields, and then press enter. ● To change , or delete this password is displayed in the lower-left corner of the screen, press f10. - Open Setup Utility by turning on or restarting the computer. Open Setup Utility by turning on or restarting the computer. Entering an ...
While the "Press the ESC key for Startup Menu" message is displayed in the lower-left corner of the screen, press esc. To save your administrator password, and then press enter. After three unsuccessful attempts to enter the administrator password, you must enter the ...and Confirm New Password fields, and then press enter. ● To change , or delete this password is displayed in the lower-left corner of the screen, press f10. - Open Setup Utility by turning on or restarting the computer. Open Setup Utility by turning on or restarting the computer. Entering an ...


