Resolving Start Up and No Boot Problems Checklist
Page 1
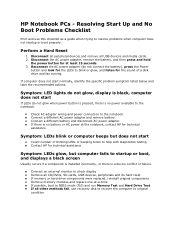
... for technical assistance Symptom: LEDs glow, but does not start Count number of a disk drive and fan turning. Connect a different battery and disconnect AC power adapter. HP Notebook PCs - Disconnect all peripheral devices and remove all other methods fail, use this checklist as a guide when trying to blink or glow,... to startup or boot, and displays a black screen Usually occurs if a component is installed incorrectly, or there is no battery or AC power at the notebook, contact HP for at -a-time If possible, boot to BIOS mode (f10) and run Memory Test and Hard Drive Test If all ...
... for technical assistance Symptom: LEDs glow, but does not start Count number of a disk drive and fan turning. Connect a different battery and disconnect AC power adapter. HP Notebook PCs - Disconnect all peripheral devices and remove all other methods fail, use this checklist as a guide when trying to blink or glow,... to startup or boot, and displays a black screen Usually occurs if a component is installed incorrectly, or there is no battery or AC power at the notebook, contact HP for at -a-time If possible, boot to BIOS mode (f10) and run Memory Test and Hard Drive Test If all ...

Limited warranty and technical support - (1 Year)
Page 3
... IN THE COUNTRY OR LOCALITY WHERE COMPAQ HAS MARKETED THIS PRODUCT. Refer to manufacturer's warranty. Product Limited Warranty Periods Hardware Covered Compaq computer Included HP accessories and batteries Duration of Warranty Period 1 year 1 year Third-party accessories Not warranted by Compaq. IN SUCH STATES OR COUNTRIES, SOME EXCLUSIONS OR LIMITATIONS OF THIS...
... IN THE COUNTRY OR LOCALITY WHERE COMPAQ HAS MARKETED THIS PRODUCT. Refer to manufacturer's warranty. Product Limited Warranty Periods Hardware Covered Compaq computer Included HP accessories and batteries Duration of Warranty Period 1 year 1 year Third-party accessories Not warranted by Compaq. IN SUCH STATES OR COUNTRIES, SOME EXCLUSIONS OR LIMITATIONS OF THIS...

Limited warranty and technical support - (1 Year)
Page 4
... FUNCTION OF THIS COMPAQ PRODUCT TO MAKE IT OPERATE IN A COUNTRY FOR WHICH IT WAS NEVER INTENDED TO FUNCTION FOR LEGAL OR REGULATORY REASONS. Rechargeable batteries are manufactured using new materials or new and used materials equivalent to provide proof of purchase or lease as a condition of the purchase or lease...
... FUNCTION OF THIS COMPAQ PRODUCT TO MAKE IT OPERATE IN A COUNTRY FOR WHICH IT WAS NEVER INTENDED TO FUNCTION FOR LEGAL OR REGULATORY REASONS. Rechargeable batteries are manufactured using new materials or new and used materials equivalent to provide proof of purchase or lease as a condition of the purchase or lease...
Limited warranty and technical support - (1 Year)
Page 5
...only warranted from which the serial number has been removed or that has been damaged or rendered defective (a) as a result of your battery has had a warranted failure, you have been made in failure. These terms and conditions constitute the complete and exclusive warranty agreement ...between you and Compaq regarding the Compaq Product you may have purchased or leased. The battery warranty does not cover changes in the servicing country. To determine whether your failure to run a Compaq diagnostic test. Compaq does...
...only warranted from which the serial number has been removed or that has been damaged or rendered defective (a) as a result of your battery has had a warranted failure, you have been made in failure. These terms and conditions constitute the complete and exclusive warranty agreement ...between you and Compaq regarding the Compaq Product you may have purchased or leased. The battery warranty does not cover changes in the servicing country. To determine whether your failure to run a Compaq diagnostic test. Compaq does...

Getting Started - Windows 7
Page 6
Pinching/Zooming 24 Rotating 24 5 Maintenance Inserting or removing the battery ...25 Replacing or upgrading the hard drive 27 Removing the hard drive ...27 Installing the hard drive ...28 Adding or replacing memory modules 30 Updating ...
Pinching/Zooming 24 Rotating 24 5 Maintenance Inserting or removing the battery ...25 Replacing or upgrading the hard drive 27 Removing the hard drive ...27 Installing the hard drive ...28 Adding or replacing memory modules 30 Updating ...

Getting Started - Windows 7
Page 8
... setup, posture, health, and work habits To access this guide, select Start > Help and Support > User Guides. ● How to maximize battery life ● How to use the multimedia features of the computer ● How to protect the computer ● How to care for the device... computer comes with your country or ● How to http://www.hp.com/ergo. Resources For information about Quick Setup poster ● How to set up the computer ● How to identify computer components HP Notebook Reference Guide ● Power management features To access this guide: ●...
... setup, posture, health, and work habits To access this guide, select Start > Help and Support > User Guides. ● How to maximize battery life ● How to use the multimedia features of the computer ● How to protect the computer ● How to care for the device... computer comes with your country or ● How to http://www.hp.com/ergo. Resources For information about Quick Setup poster ● How to set up the computer ● How to identify computer components HP Notebook Reference Guide ● Power management features To access this guide: ●...

Getting Started - Windows 7
Page 19
It is normal for the internal fan to cool internal components. Bottom 13 Bottom Component (1) Battery bay (2) Vents (4) (3) Battery release latch (4) Memory module compartment (5) Hard drive bay Description Holds the battery. Contains the two memory module slots. Enable airflow to cycle on and off during routine operation. Releases the battery from the battery bay. Holds the hard drive. NOTE: The computer fan starts up automatically to cool internal components and prevent overheating.
It is normal for the internal fan to cool internal components. Bottom 13 Bottom Component (1) Battery bay (2) Vents (4) (3) Battery release latch (4) Memory module compartment (5) Hard drive bay Description Holds the battery. Contains the two memory module slots. Enable airflow to cycle on and off during routine operation. Releases the battery from the battery bay. Holds the hard drive. NOTE: The computer fan starts up automatically to cool internal components and prevent overheating.

Getting Started - Windows 7
Page 20
Additional hardware Component Description (1) Power cord* Connects an AC adapter to an AC outlet. (2) AC adapter Converts AC power to DC power. (3) Battery* Powers the computer when the computer is not plugged into external power. *Batteries and power cords vary in appearance by region and country. 14 Chapter 2 Getting to know your computer
Additional hardware Component Description (1) Power cord* Connects an AC adapter to an AC outlet. (2) AC adapter Converts AC power to DC power. (3) Battery* Powers the computer when the computer is not plugged into external power. *Batteries and power cords vary in appearance by region and country. 14 Chapter 2 Getting to know your computer
Getting Started - Windows 7
Page 31
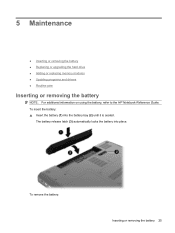
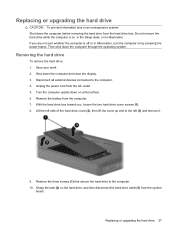
To remove the battery: Inserting or removing the battery 25 To insert the battery: ▲ Insert the battery (1) into place. 5 Maintenance ● Inserting or removing the battery ● Replacing or upgrading the hard drive ● Adding or replacing memory modules ● Updating programs and drivers ● Routine care Inserting or removing the battery NOTE: For additional information on using the battery, refer to the HP Notebook Reference Guide. The battery release latch (3) automatically locks the battery into the battery bay (2) until it is seated.
To remove the battery: Inserting or removing the battery 25 To insert the battery: ▲ Insert the battery (1) into place. 5 Maintenance ● Inserting or removing the battery ● Replacing or upgrading the hard drive ● Adding or replacing memory modules ● Updating programs and drivers ● Routine care Inserting or removing the battery NOTE: For additional information on using the battery, refer to the HP Notebook Reference Guide. The battery release latch (3) automatically locks the battery into the battery bay (2) until it is seated.
Getting Started - Windows 7
Page 32
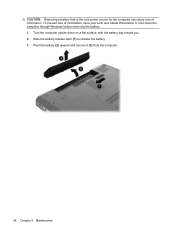
Turn the computer upside down the computer through Windows before removing the battery. 1. CAUTION: Removing a battery that is the sole power source for the computer can cause loss of information, save your work and initiate Hibernation or shut down on a flat surface, with the battery bay toward you. 2. Slide the battery release latch (1) to release the battery 3. Pivot the battery (2) upward and remove it (3) from the computer. 26 Chapter 5 Maintenance To prevent loss of information.
Turn the computer upside down the computer through Windows before removing the battery. 1. CAUTION: Removing a battery that is the sole power source for the computer can cause loss of information, save your work and initiate Hibernation or shut down on a flat surface, with the battery bay toward you. 2. Slide the battery release latch (1) to release the battery 3. Pivot the battery (2) upward and remove it (3) from the computer. 26 Chapter 5 Maintenance To prevent loss of information.
Getting Started - Windows 7
Page 33
... not sure whether the computer is on, in the Sleep state, or in Hibernation, turn the computer on by pressing the power button. Remove the battery from the AC outlet. 5.
... not sure whether the computer is on, in the Sleep state, or in Hibernation, turn the computer on by pressing the power button. Remove the battery from the AC outlet. 5.
Getting Started - Windows 7
Page 35
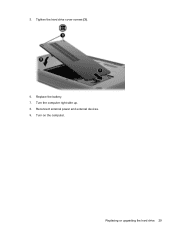
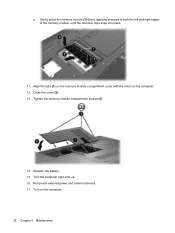
Turn on the computer. Replacing or upgrading the hard drive 29 Replace the battery. 7. Reconnect external power and external devices. 9. Turn the computer right-side up. 8. Tighten the hard drive cover screws (3). 6. 5.
Turn on the computer. Replacing or upgrading the hard drive 29 Replace the battery. 7. Reconnect external power and external devices. 9. Turn the computer right-side up. 8. Tighten the hard drive cover screws (3). 6. 5.
Getting Started - Windows 7
Page 36
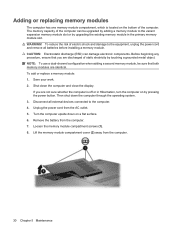
... computer. 4. Then shut down the computer through the operating system. 3. Disconnect all external devices connected to the equipment, unplug the power cord and remove all batteries before installing a memory module. Remove the battery from the AC outlet. 5. Lift the memory module compartment cover (2) away from the computer. 30 Chapter 5 Maintenance
... computer. 4. Then shut down the computer through the operating system. 3. Disconnect all external devices connected to the equipment, unplug the power cord and remove all batteries before installing a memory module. Remove the battery from the AC outlet. 5. Lift the memory module compartment cover (2) away from the computer. 30 Chapter 5 Maintenance
Getting Started - Windows 7
Page 38
c. Turn on the computer. 12. Gently press the memory module (3) down, applying pressure to both the left and right edges of the memory module, until the retention clips snap into place. 11. Turn the computer right-side up. 16. Reconnect external power and external devices. 17. Replace the battery. 15. Close the cover (2). 13. Align the tabs (1) on the memory module compartment cover with the notch on the computer. 32 Chapter 5 Maintenance Tighten the memory module compartment screws (3). 14.
c. Turn on the computer. 12. Gently press the memory module (3) down, applying pressure to both the left and right edges of the memory module, until the retention clips snap into place. 11. Turn the computer right-side up. 16. Reconnect external power and external devices. 17. Replace the battery. 15. Close the cover (2). 13. Align the tabs (1) on the memory module compartment cover with the notch on the computer. 32 Chapter 5 Maintenance Tighten the memory module compartment screws (3). 14.

Getting Started - Windows 7
Page 45
...technical support. Labels 39 If your computer. The regulatory label is located on the bottom of Authenticity is affixed inside the battery bay. ● Wireless certification label or labels (select models only)-Provide information about the computer. The Microsoft Certificate of... internationally with your computer model includes one or more wireless devices, one or more certification labels are affixed inside the battery bay. ● Regulatory label-Provides regulatory information about optional wireless devices and the approval markings of some of Authenticity-...
...technical support. Labels 39 If your computer. The regulatory label is located on the bottom of Authenticity is affixed inside the battery bay. ● Wireless certification label or labels (select models only)-Provide information about the computer. The Microsoft Certificate of... internationally with your computer model includes one or more wireless devices, one or more certification labels are affixed inside the battery bay. ● Regulatory label-Provides regulatory information about optional wireless devices and the approval markings of some of Authenticity-...
Getting Started - Windows 7
Page 46
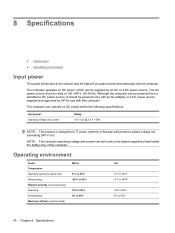
Although the computer can be powered from a standalone DC power source, it should be supplied by HP for IT power systems in this computer. 8 Specifications ● Input power ● Operating environment Input power The power information in Norway ...- 65W NOTE: This product is designed for use with this section may be rated at 100-240 V, 50-60 Hz. The computer operates on DC power, which can operate on the system regulatory label inside the battery bay of the computer. Operating environment Factor Temperature Operating (writing to optical disc) Nonoperating Relative...
Although the computer can be powered from a standalone DC power source, it should be supplied by HP for IT power systems in this computer. 8 Specifications ● Input power ● Operating environment Input power The power information in Norway ...- 65W NOTE: This product is designed for use with this section may be rated at 100-240 V, 50-60 Hz. The computer operates on DC power, which can operate on the system regulatory label inside the battery bay of the computer. Operating environment Factor Temperature Operating (writing to optical disc) Nonoperating Relative...
Getting Started - Windows 7
Page 48
...10 B backing up customized window, toolbar, and menu bar settings 36 personal files 36 battery bay 39 battery bay, identifying 13 battery release latch, identifying 13 battery, identifying 14 battery, replacing 25 bays battery 13 hard drive 13 Bluetooth label 39 buttons power 7 TouchPad 5 C caps lock light...8 esc 8 fn 8 Windows applications 8 Windows logo 8 L labels Bluetooth 39 regulatory 39 serial number 39 wireless certification 39 WLAN 39 latch, battery release 13 lights caps lock 6 drive light 10 optical drive 9 power 6, 9 TouchPad 5 webcam 11 wireless 6 M memory module inserting 31 ...
...10 B backing up customized window, toolbar, and menu bar settings 36 personal files 36 battery bay 39 battery bay, identifying 13 battery release latch, identifying 13 battery, identifying 14 battery, replacing 25 bays battery 13 hard drive 13 Bluetooth label 39 buttons power 7 TouchPad 5 C caps lock light...8 esc 8 fn 8 Windows applications 8 Windows logo 8 L labels Bluetooth 39 regulatory 39 serial number 39 wireless certification 39 WLAN 39 latch, battery release 13 lights caps lock 6 drive light 10 optical drive 9 power 6, 9 TouchPad 5 webcam 11 wireless 6 M memory module inserting 31 ...

Compaq Presario CQ56 Notebook PC and HP G56 Notebook PC - Maintenance and Service Guide
Page 6
Packaging and transporting guidelines 32 Workstation guidelines 32 Equipment guidelines 33 Component replacement procedures 34 Service tag ...34 Computer feet ...35 Battery ...36 Hard drive ...37 Optical drive ...39 WLAN module ...42 Memory module ...44 Keyboard ...46 Top cover ...49 Speaker ... ...52 Power button board ...54 TouchPad button board ...55 USB board ...56 Power connector ...58 Display assembly ...59 System board ...66 RTC battery ...69 Fan/heat sink assembly ...71 Processor ...75 5 Setup Utility ...77 Computer Setup ...77 Starting Setup Utility ...77 Using Setup Utility ...77...
Packaging and transporting guidelines 32 Workstation guidelines 32 Equipment guidelines 33 Component replacement procedures 34 Service tag ...34 Computer feet ...35 Battery ...36 Hard drive ...37 Optical drive ...39 WLAN module ...42 Memory module ...44 Keyboard ...46 Top cover ...49 Speaker ... ...52 Power button board ...54 TouchPad button board ...55 USB board ...56 Power connector ...58 Display assembly ...59 System board ...66 RTC battery ...69 Fan/heat sink assembly ...71 Processor ...75 5 Setup Utility ...77 Computer Setup ...77 Starting Setup Utility ...77 Using Setup Utility ...77...

Compaq Presario CQ56 Notebook PC and HP G56 Notebook PC - Maintenance and Service Guide
Page 7
DVD±RW SuperMulti Double-Layer Drive with LightScribe specifications 85 7 Backup and recovery ...86 Windows 7 backup and recovery ...86 Backing up your information 86 Performing a recovery ...87 Using the Windows recovery tools 88 Using f11 ...88 Using a Windows 7 operating system DVD (purchased separately 89 Linux backup and recovery ...90 8 Power cord set requirements ...91 Requirements for all countries or regions 91 Requirements for specific countries or regions 92 9 Recycling ...93 Battery ...93 Display ...93 Index ...100 vii
DVD±RW SuperMulti Double-Layer Drive with LightScribe specifications 85 7 Backup and recovery ...86 Windows 7 backup and recovery ...86 Backing up your information 86 Performing a recovery ...87 Using the Windows recovery tools 88 Using f11 ...88 Using a Windows 7 operating system DVD (purchased separately 89 Linux backup and recovery ...90 8 Power cord set requirements ...91 Requirements for all countries or regions 91 Requirements for specific countries or regions 92 9 Recycling ...93 Battery ...93 Display ...93 Index ...100 vii

Compaq Presario CQ56 Notebook PC and HP G56 Notebook PC - Maintenance and Service Guide
Page 12
...) √ SUSE Linux √ End-user replaceable parts: AC adapter √ Battery (system) √ Hard drive √ Memory module √ Optical drive √ WLAN module √ Compaq Presario CQ56 AMD √ √ √ √ √ √ √ √ √ HP G56 Intel v Compaq Presario CQ56 Intel √ √ √ √ √ √ √ √ √ 4 Chapter...
...) √ SUSE Linux √ End-user replaceable parts: AC adapter √ Battery (system) √ Hard drive √ Memory module √ Optical drive √ WLAN module √ Compaq Presario CQ56 AMD √ √ √ √ √ √ √ √ √ HP G56 Intel v Compaq Presario CQ56 Intel √ √ √ √ √ √ √ √ √ 4 Chapter...


