
HP USB Digital Drive
Page 9
A dialog box displays a list of connected devices. 2. Disconnecting the Digital Drive ✎ Do not attempt to Remove Hardware" message appears on your screen. 3. Select the "Safely Remove Hardware" icon on your taskbar. Select the Digital Drive and wait until the "Safe to remove the Digital Drive when the status light on the Digital Drive is in the extended position, return it on its track for safe storage. 8 User Guide Gently unplug the Digital Drive from the USB port. ✎ If the USB connector cable is flashing. 1.
A dialog box displays a list of connected devices. 2. Disconnecting the Digital Drive ✎ Do not attempt to Remove Hardware" message appears on your screen. 3. Select the "Safely Remove Hardware" icon on your taskbar. Select the Digital Drive and wait until the "Safe to remove the Digital Drive when the status light on the Digital Drive is in the extended position, return it on its track for safe storage. 8 User Guide Gently unplug the Digital Drive from the USB port. ✎ If the USB connector cable is flashing. 1.
Wireless Setup Guide
Page 4
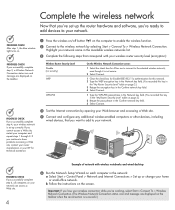
... Network key field. (You recorded this key in the Available wireless networks list. 3 Complete the following steps that correspond with wireless notebooks and wired desktop PROGRESS CHECK If you 've set up or change your home or small-office network. Wireless Router Security Level Disable... (no security) WEP WPA-PSK On the Wireless Network Connection screen: 1 Select the check box for Allow me to connect to the selected wireless network, even though it is successful.) b Follow the instructions...
... Network key field. (You recorded this key in the Available wireless networks list. 3 Complete the following steps that correspond with wireless notebooks and wired desktop PROGRESS CHECK If you 've set up or change your home or small-office network. Wireless Router Security Level Disable... (no security) WEP WPA-PSK On the Wireless Network Connection screen: 1 Select the check box for Allow me to connect to the selected wireless network, even though it is successful.) b Follow the instructions...

Security - Window Vista and Windows 7
Page 8
Because most passwords are not displayed as screen-saver passwords, select Start > Help and Support. 2 Chapter 2 Using passwords A password set in Windows must be set, depending on the computer. The following guidelines when ...
Because most passwords are not displayed as screen-saver passwords, select Start > Help and Support. 2 Chapter 2 Using passwords A password set in Windows must be set, depending on the computer. The following guidelines when ...

Security - Window Vista and Windows 7
Page 10
...Startup Menu" message is displayed in the lower-left corner of the computer. To save your changes and exit the Setup Utility, use of the screen, press f10. - Open the Setup Utility by turning on password is not displayed as it must restart the computer and try again. Your changes...into effect when the computer restarts. While the "Press the ESC key for Startup Menu" message is displayed in the lower-left corner of the screen, press esc. After 3 unsuccessful attempts to enter the administrator password, you must be entered each time you turn on or restarting the computer. Open...
...Startup Menu" message is displayed in the lower-left corner of the computer. To save your changes and exit the Setup Utility, use of the screen, press f10. - Open the Setup Utility by turning on password is not displayed as it must restart the computer and try again. Your changes...into effect when the computer restarts. While the "Press the ESC key for Startup Menu" message is displayed in the lower-left corner of the screen, press esc. After 3 unsuccessful attempts to enter the administrator password, you must be entered each time you turn on or restarting the computer. Open...

Security - Window Vista and Windows 7
Page 11
... a power-on or restarting the computer. While the "Press the ESC key for Startup Menu" message is displayed in the lower-left corner of the screen, press esc. Use the arrow keys to select Security > Set Power-On Password, and then press enter. ● To set , change a power-...on password, type your current password in the Enter Current Password field, type a new password in the lower-left corner of the screen, press f10. - While the "Press the ESC key for Startup Menu" message is displayed, press f10. 2. To save your current password in Setup Utility...
... a power-on or restarting the computer. While the "Press the ESC key for Startup Menu" message is displayed in the lower-left corner of the screen, press esc. Use the arrow keys to select Security > Set Power-On Password, and then press enter. ● To set , change a power-...on password, type your current password in the Enter Current Password field, type a new password in the lower-left corner of the screen, press f10. - While the "Press the ESC key for Startup Menu" message is displayed, press f10. 2. To save your current password in Setup Utility...
Security - Window Vista and Windows 7
Page 18
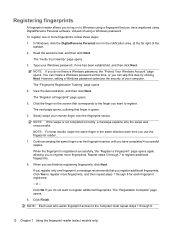
... 8 for each time you use the fingerprint reader. 7. The "Fingerprint Registration Training" page opens. 4. or - Registering fingerprints A fingerprint reader allows you to log on the screen that you register additional fingerprints.
... 8 for each time you use the fingerprint reader. 7. The "Fingerprint Registration Training" page opens. 4. or - Registering fingerprints A fingerprint reader allows you to log on the screen that you register additional fingerprints.

Setup Utility - Windows Vista and Windows 7
Page 5
When the Startup Menu is displayed in the lower-left corner of the screen, press esc. 2. 1 Starting the Setup Utility The Setup Utility is a ROM-based information and customization utility that can be used even when your Windows® ... Menu" message is displayed, press f10. 1 While the "Press the ESC key for Startup Menu" message is displayed in the lower-left corner of the screen, press f10. - To start the Setup Utility: ▲ Open the Setup Utility by turning on or restarting the computer. Open the Setup Utility by turning...
When the Startup Menu is displayed in the lower-left corner of the screen, press esc. 2. 1 Starting the Setup Utility The Setup Utility is a ROM-based information and customization utility that can be used even when your Windows® ... Menu" message is displayed, press f10. 1 While the "Press the ESC key for Startup Menu" message is displayed in the lower-left corner of the screen, press f10. - To start the Setup Utility: ▲ Open the Setup Utility by turning on or restarting the computer. Open the Setup Utility by turning...

Setup Utility - Windows Vista and Windows 7
Page 6
While the "Press the ESC key for Startup Menu" message is displayed in the lower-left corner of the screen, press f10. - 2 Using the Setup Utility Changing the language of the Setup Utility The following procedure explains how to change goes into effect immediately.... Use the arrow keys to select a language, and then press enter. 4. Your change the language of the screen, press esc. or - Use the arrow keys to select System Configuration > Language, and then press enter. 3. While the "Press the ESC key for example...
While the "Press the ESC key for Startup Menu" message is displayed in the lower-left corner of the screen, press f10. - 2 Using the Setup Utility Changing the language of the Setup Utility The following procedure explains how to change goes into effect immediately.... Use the arrow keys to select a language, and then press enter. 4. Your change the language of the screen, press esc. or - Use the arrow keys to select System Configuration > Language, and then press enter. 3. While the "Press the ESC key for example...

Setup Utility - Windows Vista and Windows 7
Page 7
... 1. System information such as the system time and date, and identification information about the computer is displayed in the lower-left corner of the screen, press esc. While the "Press the ESC key for Startup Menu" message is displayed. 3. Open the Setup Utility by turning on or .... The Setup Utility default settings go into effect when the computer restarts. If the Setup Utility is displayed in the lower-left corner of the screen, press f10. - Select the Main menu. When the Startup Menu is open , begin at step 1. Displaying system information 3 If the Setup ...
... 1. System information such as the system time and date, and identification information about the computer is displayed in the lower-left corner of the screen, press esc. While the "Press the ESC key for Startup Menu" message is displayed. 3. Open the Setup Utility by turning on or .... The Setup Utility default settings go into effect when the computer restarts. If the Setup Utility is displayed in the lower-left corner of the screen, press f10. - Select the Main menu. When the Startup Menu is open , begin at step 1. Displaying system information 3 If the Setup ...

Software Update, Backup and Recovery - Windows Vista
Page 6
...version To determine whether available BIOS updates contain later BIOS versions than those currently installed on the HP Web site that is later than the BIOS version currently installed on the screen to download your selection to the hard drive. 2 Updating software BIOS version information (also known ...: Do not disconnect power from the AC outlet. Access the page on the computer, you are already in the lower-left corner of the screen, press f10. 2. Identify the BIOS update that provides software for software, driver, and BIOS updates. 2. Follow the instructions on your computer:...
...version To determine whether available BIOS updates contain later BIOS versions than those currently installed on the HP Web site that is later than the BIOS version currently installed on the screen to download your selection to the hard drive. 2 Updating software BIOS version information (also known ...: Do not disconnect power from the AC outlet. Access the page on the computer, you are already in the lower-left corner of the screen, press f10. 2. Identify the BIOS update that provides software for software, driver, and BIOS updates. 2. Follow the instructions on your computer:...
Software Update, Backup and Recovery - Windows Vista
Page 7
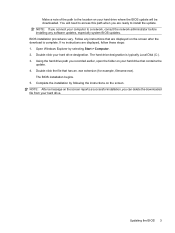
... designation. Double-click the file that contains the update. 4. Using the hard drive path you recorded earlier, open the folder on the screen reports a successful installation, you can delete the downloaded file from your hard drive that has an .exe extension (for example, filename.exe...). Make a note of the path to the location on the screen. Complete the installation by selecting Start > Computer. 2. You will be downloaded. Follow any software updates, especially system BIOS updates. The hard...
... designation. Double-click the file that contains the update. 4. Using the hard drive path you recorded earlier, open the folder on the screen reports a successful installation, you can delete the downloaded file from your hard drive that has an .exe extension (for example, filename.exe...). Make a note of the path to the location on the screen. Complete the installation by selecting Start > Computer. 2. You will be downloaded. Follow any software updates, especially system BIOS updates. The hard...
Wireless (Select Models Only) - Windows Vista
Page 26
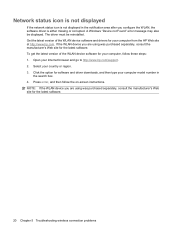
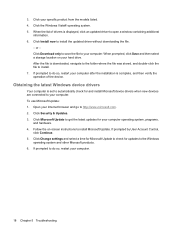
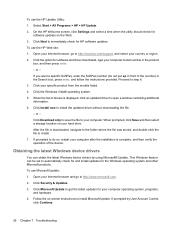
... software. To get the latest version of the WLAN device software and drivers for your computer, follow the on-screen instructions. Select your Internet browser and go to http://www.hp.com/support. 2. NOTE: If the WLAN device you are using was purchased separately, consult the manufacturer's Web ...site for your computer from the HP Web site at http://www.hp.com. A Windows "Device not Found" error message may also be reinstalled. If the WLAN device you configure the WLAN, the ...
... software. To get the latest version of the WLAN device software and drivers for your computer, follow the on-screen instructions. Select your Internet browser and go to http://www.hp.com/support. 2. NOTE: If the WLAN device you are using was purchased separately, consult the manufacturer's Web ...site for your computer from the HP Web site at http://www.hp.com. A Windows "Device not Found" error message may also be reinstalled. If the WLAN device you configure the WLAN, the ...
Drives - Windows Vista
Page 10
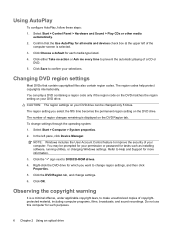
... the DVD Region tab. The region setting you want to make unauthorized copies of a CD or DVD. 5. Refer to improve the security of the computer screen is selected. 3. Click OK. Observing the copyright warning It is displayed on the DVD drive. Click Choose a default for all media and devices check box...
... the DVD Region tab. The region setting you want to make unauthorized copies of a CD or DVD. 5. Refer to improve the security of the computer screen is selected. 3. Click OK. Observing the copyright warning It is displayed on the DVD drive. Click Choose a default for all media and devices check box...
Drives - Windows Vista
Page 11
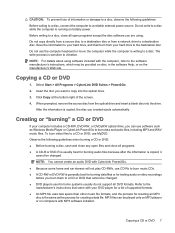
... in the software Help, or on computers with MP3 software installed. Creating or "burning" a CD or DVD If your DVD player for a list of the screen. 4.
... in the software Help, or on computers with MP3 software installed. Creating or "burning" a CD or DVD If your DVD player for a list of the screen. 4.
Drives - Windows Vista
Page 13
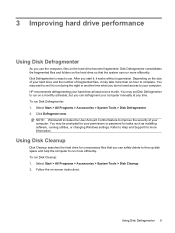
... Start > All Programs > Accessories > System Tools > Disk Cleanup. 2. 3 Improving hard drive performance Using Disk Defragmenter As you use . HP recommends defragmenting your computer. Disk Defragmenter consolidates the fragmented files and folders on -screen instructions. After you start it, it may take more than an hour to run more information. Follow the on...
... Start > All Programs > Accessories > System Tools > Disk Cleanup. 2. 3 Improving hard drive performance Using Disk Defragmenter As you use . HP recommends defragmenting your computer. Disk Defragmenter consolidates the fragmented files and folders on -screen instructions. After you start it, it may take more than an hour to run more information. Follow the on...
Drives - Windows Vista
Page 21
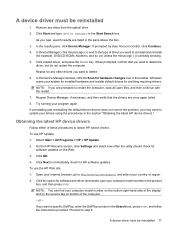
... drivers. As you want to delete the driver, but do not restart the computer. To use the HP Web site: 1. On the HP Welcome screen, click Settings and select how often the utility should check for hardware changes icon in the Search box, press enter, and follow the instructions provided. ...
... drivers. As you want to delete the driver, but do not restart the computer. To use the HP Web site: 1. On the HP Welcome screen, click Settings and select how often the utility should check for hardware changes icon in the Search box, press enter, and follow the instructions provided. ...
Drives - Windows Vista
Page 22
When the list of the device. Click Install now to open a window containing additional information. 6. When prompted, click Save and then select a storage location on -screen instructions to do so, restart your Internet browser and go to install. 7. To use Microsoft Update: 1. If prompted to do so, restart your computer. or - ...
When the list of the device. Click Install now to open a window containing additional information. 6. When prompted, click Save and then select a storage location on -screen instructions to do so, restart your Internet browser and go to install. 7. To use Microsoft Update: 1. If prompted to do so, restart your computer. or - ...

Multimedia - Windows Vista
Page 9
... software 5 With DVD Play, you can enjoy music and DVD movies. To start DVD Play, select Start > All Programs > DVD Play. For more information on -screen instructions. 3.
... software 5 With DVD Play, you can enjoy music and DVD movies. To start DVD Play, select Start > All Programs > DVD Play. For more information on -screen instructions. 3.

Multimedia - Windows Vista
Page 12
Repeatedly pressing fn+f4 alternates the screen image between the computer display and the device. 8 Chapter 4 Video 4 Video Your computer enables you to use a variety of video features: ● Watch movies ● ...
Repeatedly pressing fn+f4 alternates the screen image between the computer display and the device. 8 Chapter 4 Video 4 Video Your computer enables you to use a variety of video features: ● Watch movies ● ...
Multimedia - Windows Vista
Page 30
...Click Download only to save the file to step 6. 3. If prompted to install Microsoft Update. Click Security & Updates. 3. On the HP Welcome screen, click Settings and select a time when the utility should check for software and driver downloads, type your computer. Click the option for ...select your Internet browser and go to open a window containing additional information. 6. To use the HP Web site: 1. When prompted, click Save and then select a storage location on -screen instructions to do not put sp in the Search box, press enter, and follow the instructions provided...
...Click Download only to save the file to step 6. 3. If prompted to install Microsoft Update. Click Security & Updates. 3. On the HP Welcome screen, click Settings and select a time when the utility should check for software and driver downloads, type your computer. Click the option for ...select your Internet browser and go to open a window containing additional information. 6. To use the HP Web site: 1. When prompted, click Save and then select a storage location on -screen instructions to do not put sp in the Search box, press enter, and follow the instructions provided...


