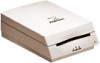
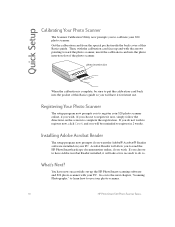
HP PhotoSmart S20 Photo Scanner - Basics, User's Guide
Page 3
Scanning Photographs 11 Running the Scanning Software ...12 Setting the Photo Scanner for the Photographic Format 13 Setting the Photo Scanner for Mounted Film ...14 Setting the Photo Scanner for a Film Strip ...14 Setting the Photo Scanner for a Print ...14 Orienting Photographs for Your Photo Scanner 27 Accessing the HP PhotoSmart Website ...27 Viewing Online Help ...27 Getting Technical Support ...29 http://www...
HP PhotoSmart S20 Photo Scanner - Basics, User's Guide
Page 4
Cleaning Your Photo Scanner 31 Appendix B - Uninstalling Your Photo Scanner 35 Uninstalling the Software ...35 Disconnecting the Photo Scanner ...35 Glossary ...37 Index ...41 2 HP PhotoSmart S20 Photo Scanner Basics Appendix A -
HP PhotoSmart S20 Photo Scanner - Basics, User's Guide
Page 5
...16-bit or better Mouse or compatible Windows pointing device Available USB port http://www.photosmart.com 3 This Basics guide helps you quickly set up to the HP PhotoSmart S20 Photo Scanner Basics guide. Introduction Welcome to 5 frames scanned at a time • Prints ... mm negative strips and slide strips, up the HP PhotoSmart scanning software and S20 photo scanner with PCs running either Microsoft® Windows® 95 or Windows 98. Checking the System Requirements Both the HP PhotoSmart S20 photo scanner and the HP PhotoSmart scanning software work with your PC. Chapter 1 ...
HP PhotoSmart S20 Photo Scanner - Basics, User's Guide
Page 6
Unpacking Your Photo Scanner To unpack your photo scanner. 2. Remove all the contents from around the photo scanner. 4 HP PhotoSmart S20 Photo Scanner Basics This Basics guide for the S20 photo scanner and the Quick Reference for the HP PhotoSmart scanning software calibration card * photo sleeve * HP PhotoSmart CD-ROM with the photo scanner. You should find the following : 1. Remove the plastic wrapper from the HP PhotoSmart S20 photo scanner box. If you notice any damage while...
HP PhotoSmart S20 Photo Scanner - Basics, User's Guide
Page 7
Remove the tape from the photo scanner lid. 4. Open the photo scanner lid carefully and remove the foam insert. http://www.photosmart.com 5 Hold the bottom of the photo scanner with one hand and pull up on the photo scanner lid with your other hand. 5. 3.
HP PhotoSmart S20 Photo Scanner - Basics, User's Guide
Page 8
...'t understand, please refer to the Glossary of definitions starting on page 37. 6 HP PhotoSmart S20 Photo Scanner Basics Chapter 4 explains how to set up the HP PhotoSmart scanning software and S20 photo scanner with your PC. To do this, go on your PC. 6. You must install the HP PhotoSmart scanning software on to your PC (as explained in this guide that you...
HP PhotoSmart S20 Photo Scanner - Basics, User's Guide
Page 9
... Install Software. 3. If you choose to restart your computer now, it will see the HP PhotoSmart setup screen displayed. Within a minute or so, you quickly set up the HP PhotoSmart scanning software and S20 photo scanner with your PC. Note: If the HP PhotoSmart setup screen does not display: Click the Start button in the Windows taskbar and choose...
HP PhotoSmart S20 Photo Scanner - Basics, User's Guide
Page 10
...), as follows: 1. Quick Setup Connecting Your Photo Scanner When the HP PhotoSmart Setup Wizard prompts you to do so, connect your photo scanner to a power outlet and to the left of the USB connector on the front or back exterior of your PC, as shown here: USB symbol USB connector 8 HP PhotoSmart S20 Photo Scanner Basics Plug the other end of...
HP PhotoSmart S20 Photo Scanner - Basics, User's Guide
Page 11
... while it is not in the HP PhotoSmart Setup Wizard dialog box, and then go on to the next page. Connect the rectangular end of the USB interface cable to the USB connector on the front or back exterior of the photo scanner.) Note: The S20 photo scanner does not have a "sleep"... mode for low power consumption when it is to the USB connector on the back of your PC. 5. http://www.photosmart.com 9 The photo scanner does, however, have a power switch. Click the...
HP PhotoSmart S20 Photo Scanner - Basics, User's Guide
Page 12
... calibration card face up the HP PhotoSmart scanning software and S20 photo scanner with the arrows pointing toward the photo scanner, insert the calibration card into the pocket of this Basics guide so you will allow you to register your S20 photo scanner online, if you choose to register it for future use your photo scanner. 10 HP PhotoSmart S20 Photo Scanner Basics If you do so...
HP PhotoSmart S20 Photo Scanner - Basics, User's Guide
Page 13
... gain professional-quality scanned images of these simple steps, you ever need to scan your PC • Setting the photo scanner for the format of these simple steps: • Running the HP PhotoSmart scanning software on your photographs - with your S20 photo scanner. By following these steps is explained in the photo sleeve that came with the HP PhotoSmart S20 photo scanner. Chapter 3 -
HP PhotoSmart S20 Photo Scanner - Basics, User's Guide
Page 14
... HP PhotoSmart S20 Photo Scanner Basics To run the HP PhotoSmart scanning software on your S20 photo scanner will recognize and then scan the photograph you insert into that supports TWAIN. Note: You can also start the HP PhotoSmart scanning software from inside another software program that other program. This allows you to be in the Windows taskbar, and then choose Programs > HP PhotoSmart > S20 Photo Scanner...
HP PhotoSmart S20 Photo Scanner - Basics, User's Guide
Page 15
... print icon photographic format indicator lights photo insertion slot Photo Format button To set the S20 photo scanner for the format of the photo insertion slot changes accordingly to the three photographic formats: the mounted film icon, the film strip icon, and the print icon. http://www.photosmart.com 13 Setting the Photo Scanner for the Photographic Format The...
HP PhotoSmart S20 Photo Scanner - Basics, User's Guide
Page 16
Setting the Photo Scanner for Mounted Film photo insertion slot set for mounted film Setting the Photo Scanner for a Film Strip indicator light photo insertion slot set for a film strip Setting the Photo Scanner for a Print indicator light photo insertion slot set for a print indicator light 14 HP PhotoSmart S20 Photo Scanner Basics
HP PhotoSmart S20 Photo Scanner - Basics, User's Guide
Page 17
Orienting Photographs for Insertion When orienting a photograph for insertion into the S20 photo scanner, you must first determine: • Which is the emulsion side or picture side (face), and which is ... down To orient your photographs properly for scanning, remember to: • Center the mounted film, film strip, or print in the photo insertion slot. • Insert prints with the picture side up. • Insert mounted film and film strips with the emulsion side... on determining the emulsion side of mounted film and film strips, see the online Help. http://www.photosmart.com 15
HP PhotoSmart S20 Photo Scanner - Basics, User's Guide
Page 18
...thick. • Clean and dust-free. (See the online help for the photographic format you wish to the shiny base side.) 16 HP PhotoSmart S20 Photo Scanner Basics To scan mounted film with the emulsion side down . (The emulsion side is dull compared to the shiny base side.) Note:... has short sides and long sides. Press the Photo Format button on cleaning mounted film.) • Inserted with a short side pointing into the photo insertion slot and with the S20 photo scanner. Hold the mounted film by its mounting with the S20 photo scanner, your mounted film, follow these steps: 1.
HP PhotoSmart S20 Photo Scanner - Basics, User's Guide
Page 19
Gently push the mounted film into the photo insertion slot. http://www.photosmart.com 17 Insert a short side of the mounted film into the slot until the scanner light comes on and the photo scanner pulls in the mounted film. The photo scanner pulls in the HP PhotoSmart Scanning Software Quick Reference and the online Help. Begin using the HP PhotoSmart scanning software to adjust or store your scanned image, as explained in the mounted film 5. 3. Insert a short side of the mounted film 4.
HP PhotoSmart S20 Photo Scanner - Basics, User's Guide
Page 20
...film strip has more than 5 frames, once you scan the first 5 frames, you will need to the shiny base side.) 18 HP PhotoSmart S20 Photo Scanner Basics that is, not curled more than shown here: • Inserted with the emulsion side down . (The emulsion side is ... side is dull compared to the shiny base side.) Note: The S20 photo scanner can scan only 35 mm film strips with the S20 photo scanner, your film strip, follow these steps: 1. To scan a film strip with the S20 photo scanner - it into the photo scanner again to 5 frames of any paper labels. • Flat -...
HP PhotoSmart S20 Photo Scanner - Basics, User's Guide
Page 21
3. http://www.photosmart.com 19 Begin using the HP PhotoSmart scanning software to adjust or store your scanned images, as explained in the film strip. Gently push the film strip into the slot until the scanner light comes on and the photo scanner pulls in the HP PhotoSmart Scanning Software Quick Reference and the online Help. The photo scanner pulls in the film strip 4.
HP PhotoSmart S20 Photo Scanner - Basics, User's Guide
Page 22
...as shown here. To scan a print with the top edge pointing in "Setting the Photo Scanner for portrait prints. Inserting and Scanning Prints Notice that a print has either a landscape ...2 inches (or 50 mm x 50 mm). (If you have a smaller print you wish to scan, use the photo sleeve as explained in the next subsection.) • Clean and dust-free. (See the online Help for information on...right for landscape prints, or with the S20 photo scanner, your print, follow these steps: 1. Orient a landscape print face up, top pointing right 20 HP PhotoSmart S20 Photo Scanner Basics