
HP USB Digital Drive
Page 2
You can be included. The HP USB Digital Drive 1 is running Microsoft Windows XP Home, Windows XP Pro, or Windows 2000. The Digital Drive can purchase one (in various storage capacities) from any computer that is a pocket-sized SD (Secure Digital) memory drive for storing and transferring files such as digital pictures, music, video, and data. User Guide 1 However, you will need an SD memory card to operate the Digital Drive. An SD memory card 2 may not be used with any HP authorized reseller.
You can be included. The HP USB Digital Drive 1 is running Microsoft Windows XP Home, Windows XP Pro, or Windows 2000. The Digital Drive can purchase one (in various storage capacities) from any computer that is a pocket-sized SD (Secure Digital) memory drive for storing and transferring files such as digital pictures, music, video, and data. User Guide 1 However, you will need an SD memory card to operate the Digital Drive. An SD memory card 2 may not be used with any HP authorized reseller.

HP USB Digital Drive
Page 3
If the SD memory card does not slide in properly, gently pull it out and reinsert it. 2 User Guide Insert the SD memory card into the SD slot 2 with the notched corner positioned on the lower left as shown. Remove the cap 1 of the Digital Drive. 2. Installing the SD Memory Card 1.
If the SD memory card does not slide in properly, gently pull it out and reinsert it. 2 User Guide Insert the SD memory card into the SD slot 2 with the notched corner positioned on the lower left as shown. Remove the cap 1 of the Digital Drive. 2. Installing the SD Memory Card 1.
HP USB Digital Drive
Page 4
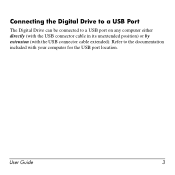
User Guide 3 Connecting the Digital Drive to a USB Port The Digital Drive can be connected to the documentation included with the USB connector cable extended). Refer to a USB port on any computer either directly (with the USB connector cable in its unextended position) or by extension (with your computer for the USB port location.
User Guide 3 Connecting the Digital Drive to a USB Port The Digital Drive can be connected to the documentation included with the USB connector cable extended). Refer to a USB port on any computer either directly (with the USB connector cable in its unextended position) or by extension (with your computer for the USB port location.
HP USB Digital Drive
Page 5
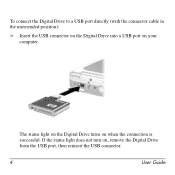
The status light on the Digital Drive turns on , remove the Digital Drive from the USB port, then reinsert the USB connector. 4 User Guide If the status light does not turn on when the connection is successful. To connect the Digital Drive to a USB port directly (with the connector cable in the unextended position): » Insert the USB connector on the Digital Drive into a USB port on your computer.
The status light on the Digital Drive turns on , remove the Digital Drive from the USB port, then reinsert the USB connector. 4 User Guide If the status light does not turn on when the connection is successful. To connect the Digital Drive to a USB port directly (with the connector cable in the unextended position): » Insert the USB connector on the Digital Drive into a USB port on your computer.

HP USB Digital Drive
Page 6
User Guide 5 Rotate the USB connector cable out of its extended position): 1. To connect the Digital Drive to a USB port by extension (with the USB cable in its track gently until it is fully extended.
User Guide 5 Rotate the USB connector cable out of its extended position): 1. To connect the Digital Drive to a USB port by extension (with the USB cable in its track gently until it is fully extended.
HP USB Digital Drive
Page 7
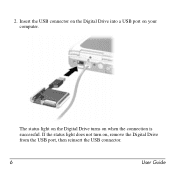
The status light on the Digital Drive turns on , remove the Digital Drive from the USB port, then reinsert the USB connector. 6 User Guide If the status light does not turn on when the connection is successful. Insert the USB connector on the Digital Drive into a USB port on your computer. 2.
The status light on the Digital Drive turns on , remove the Digital Drive from the USB port, then reinsert the USB connector. 6 User Guide If the status light does not turn on when the connection is successful. Insert the USB connector on the Digital Drive into a USB port on your computer. 2.
HP USB Digital Drive
Page 8
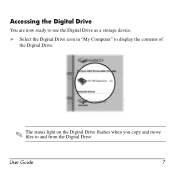
User Guide 7 Accessing the Digital Drive You are now ready to use the Digital Drive as a storage device. » Select the Digital Drive icon in "My Computer" to display the contents of the Digital Drive. ✎ The status light on the Digital Drive flashes when you copy and move files to and from the Digital Drive.
User Guide 7 Accessing the Digital Drive You are now ready to use the Digital Drive as a storage device. » Select the Digital Drive icon in "My Computer" to display the contents of the Digital Drive. ✎ The status light on the Digital Drive flashes when you copy and move files to and from the Digital Drive.

HP USB Digital Drive
Page 9
Select the Digital Drive and wait until the "Safe to remove the Digital Drive when the status light on the Digital Drive is in the extended position, return it on its track for safe storage. 8 User Guide Gently unplug the Digital Drive from the USB port. ✎ If the USB connector cable is flashing. 1. Disconnecting the Digital Drive ✎ Do not attempt to Remove Hardware" message appears on your taskbar. Select the "Safely Remove Hardware" icon on your screen. 3. A dialog box displays a list of connected devices. 2.
Select the Digital Drive and wait until the "Safe to remove the Digital Drive when the status light on the Digital Drive is in the extended position, return it on its track for safe storage. 8 User Guide Gently unplug the Digital Drive from the USB port. ✎ If the USB connector cable is flashing. 1. Disconnecting the Digital Drive ✎ Do not attempt to Remove Hardware" message appears on your taskbar. Select the "Safely Remove Hardware" icon on your screen. 3. A dialog box displays a list of connected devices. 2.
HP USB Digital Drive
Page 10
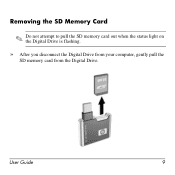
Removing the SD Memory Card ✎ Do not attempt to pull the SD memory card out when the status light on the Digital Drive is flashing. » After you disconnect the Digital Drive from your computer, gently pull the SD memory card from the Digital Drive. User Guide 9
Removing the SD Memory Card ✎ Do not attempt to pull the SD memory card out when the status light on the Digital Drive is flashing. » After you disconnect the Digital Drive from your computer, gently pull the SD memory card from the Digital Drive. User Guide 9
HP USB Digital Drive
Page 11
... ■ Hardware and software you are available on the Internet through HP technical support. To access HP technical support, visit the HP Web site at http://www.hp.com, and select your own questions. Accessing Technical Support Support services are using 10 User Guide HP responds to questions in a timely manner. You can either browse the...
... ■ Hardware and software you are available on the Internet through HP technical support. To access HP technical support, visit the HP Web site at http://www.hp.com, and select your own questions. Accessing Technical Support Support services are using 10 User Guide HP responds to questions in a timely manner. You can either browse the...
HP USB Digital Drive
Page 112
SD Logo is subject to change without notice. The information contained herein is a trademark. User Guide HP USB Digital Drive First Edition July 2003 © 2003 Hewlett-Packard Development Company, L.P. Microsoft and Windows are set forth in the U.S. and/or other countries. HP shall not be liable for HP products and services are trademarks of Microsoft Corporation in the express warranty statements accompanying such products and services. The warranties for technical or editorial errors or omissions contained herein.
SD Logo is subject to change without notice. The information contained herein is a trademark. User Guide HP USB Digital Drive First Edition July 2003 © 2003 Hewlett-Packard Development Company, L.P. Microsoft and Windows are set forth in the U.S. and/or other countries. HP shall not be liable for HP products and services are trademarks of Microsoft Corporation in the express warranty statements accompanying such products and services. The warranties for technical or editorial errors or omissions contained herein.
HP Notebook Series - Maintenance, Shipping and Travel Guide
Page 1
Maintenance, Shipping and Travel hp notebook series Document Part Number: 316760-001 April 2003 This guide explains how to maintain your notebook, provides steps for routine care, and includes guidelines on how to prepare the notebook for shipping or traveling.
Maintenance, Shipping and Travel hp notebook series Document Part Number: 316760-001 April 2003 This guide explains how to maintain your notebook, provides steps for routine care, and includes guidelines on how to prepare the notebook for shipping or traveling.
Maintenance and Service Guide
Page 4
...the Top Case Screws 2-29 Figure 2-20. Removing the Heat Sink (with Fan 2-43 Figure 2-28. Removing the Hard Disk Drive Guide 2-53 iv Service Manual Back View ...1-9 Figure 1-3. Removing the Keyboard Cover 2-14 Figure 2-10. Removing the Display Assembly 2-24 Figure...Removal 2-38 Figure 2-31. Removing the RJ11/1394 Connector Module 2-49 Figure 2-34. Figures Figure 1-1. Back View ...1-12 Figure 1-6. Resetting the Notebook ...1-17 Figure 1-8. Disassembly Flow...2-3 Figure 2-2. Removing an SDRAM Module 2-5 Figure 2-4. Removing an SDRAM Module 2-6 Figure 2-5. Removing the Mini PCI ...
...the Top Case Screws 2-29 Figure 2-20. Removing the Heat Sink (with Fan 2-43 Figure 2-28. Removing the Hard Disk Drive Guide 2-53 iv Service Manual Back View ...1-9 Figure 1-3. Removing the Keyboard Cover 2-14 Figure 2-10. Removing the Display Assembly 2-24 Figure...Removal 2-38 Figure 2-31. Removing the RJ11/1394 Connector Module 2-49 Figure 2-34. Figures Figure 1-1. Back View ...1-12 Figure 1-6. Resetting the Notebook ...1-17 Figure 1-8. Disassembly Flow...2-3 Figure 2-2. Removing an SDRAM Module 2-5 Figure 2-4. Removing an SDRAM Module 2-6 Figure 2-5. Removing the Mini PCI ...
Maintenance and Service Guide
Page 6
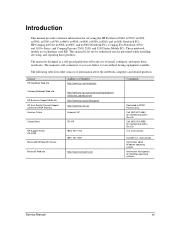
... manual is designed as a self-paced guide that will train you can follow it even without having equipment available. Information and updates for servicing the HP Pavilion ze5600, ze5500, ze5400, ze5300, ze5200, ze4700, ze4600, ze4500, ze4400, ze4300, ze4200, and ze4100 Notebook PCs, HP Compaq nx9010, nx9008, nx9005, and nx9000 Notebook PCs, Compaq Evo Notebook 1050v and 1010v Series, and Compaq...
... manual is designed as a self-paced guide that will train you can follow it even without having equipment available. Information and updates for servicing the HP Pavilion ze5600, ze5500, ze5400, ze5300, ze5200, ze4700, ze4600, ze4500, ze4400, ze4300, ze4200, and ze4100 Notebook PCs, HP Compaq nx9010, nx9008, nx9005, and nx9000 Notebook PCs, Compaq Evo Notebook 1050v and 1010v Series, and Compaq...
Maintenance and Service Guide
Page 59
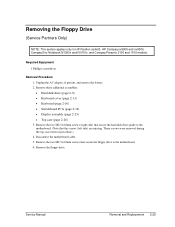
....) 4. Remove the two M2.5×4.0mm screws that secure the floppy drive to the motherboard. (Note that secure the hard disk drive guide to the motherboard. 6. Remove the two M2.5×4.0mm screws (right side) that the screws (left side) are missing. Remove the... if present, and remove the battery. 2. Removing the Floppy Drive (Service Partners Only) NOTE: This section applies only to HP Pavilion ze4x00, HP Compaq nx9005 and nx9000, Compaq Evo Notebook N1050v and N1010v, and Compaq Presario 2100 and 1100 models. Remove these additional assemblies: • Hard disk drive (page ...
....) 4. Remove the two M2.5×4.0mm screws that secure the floppy drive to the motherboard. (Note that secure the hard disk drive guide to the motherboard. 6. Remove the two M2.5×4.0mm screws (right side) that the screws (left side) are missing. Remove the... if present, and remove the battery. 2. Removing the Floppy Drive (Service Partners Only) NOTE: This section applies only to HP Pavilion ze4x00, HP Compaq nx9005 and nx9000, Compaq Evo Notebook N1050v and N1010v, and Compaq Presario 2100 and 1100 models. Remove these additional assemblies: • Hard disk drive (page ...
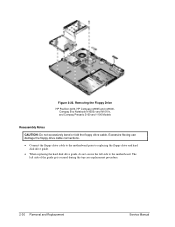
Maintenance and Service Guide
Page 60
... drive and hard disk drive guide. • When replacing the hard disk drive guide, do not secure the left side of the guide gets secured during the top case replacement procedure. 2-30 Removal and Replacement Service Manual Removing the Floppy Drive HP Pavilion 4x00, HP Compaq nx9005 and nx9000, Compaq Evo Notebook N1050v and N1010v, and Compaq...
... drive and hard disk drive guide. • When replacing the hard disk drive guide, do not secure the left side of the guide gets secured during the top case replacement procedure. 2-30 Removal and Replacement Service Manual Removing the Floppy Drive HP Pavilion 4x00, HP Compaq nx9005 and nx9000, Compaq Evo Notebook N1050v and N1010v, and Compaq...
Maintenance and Service Guide
Page 77
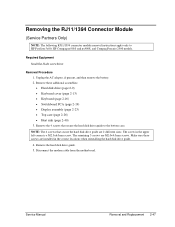
...Remove the 4 screws that secure the hard disk drive guide are 2 different sizes. Required Equipment Small flat-blade screwdriver Removal Procedure 1. NOTE: The 4 screws that secure the hard disk drive guide to HP Pavilion 5x00, HP Compaq nx9010 and nx9008, and Compaq Presario 2500 models. ...Service Manual Removal and Replacement 2-47 Remove these screws are M2.0×4.0mm screws. Remove the hard disk drive guide. 5. Disconnect the modem cable from ...
...Remove the 4 screws that secure the hard disk drive guide are 2 different sizes. Required Equipment Small flat-blade screwdriver Removal Procedure 1. NOTE: The 4 screws that secure the hard disk drive guide to HP Pavilion 5x00, HP Compaq nx9010 and nx9008, and Compaq Presario 2500 models. ...Service Manual Removal and Replacement 2-47 Remove these screws are M2.0×4.0mm screws. Remove the hard disk drive guide. 5. Disconnect the modem cable from ...

Maintenance and Service Guide
Page 82
...2-35. Do not remove the Mini PCI card at this time. 4. Remove the two M2.0×4.0mm screws that secure the hard disk drive guide to the bottom case. Remove the 4 screws that secure the PCMCIA assembly to cables or connectors can degrade performance. 3. Make sure these screws... are M2.0×4.0mm screws. The screw in the correct locations when reinstalling the hard disk drive guide. 6. Remove the hard disk drive guide. Damage to the bottom case. 5. Wireless models only: Remove the Mini PCI door, and then unplug the 2 antenna cables ...
...2-35. Do not remove the Mini PCI card at this time. 4. Remove the two M2.0×4.0mm screws that secure the hard disk drive guide to the bottom case. Remove the 4 screws that secure the PCMCIA assembly to cables or connectors can degrade performance. 3. Make sure these screws... are M2.0×4.0mm screws. The screw in the correct locations when reinstalling the hard disk drive guide. 6. Remove the hard disk drive guide. Damage to the bottom case. 5. Wireless models only: Remove the Mini PCI door, and then unplug the 2 antenna cables ...

Maintenance and Service Guide
Page 92
... Manual Press the tabs on the bottom case when removing or replacing either of the panel, and then lift it from the bottom case. Component Guide, HDD Heat sink (with fan) Keyboard Panel, wireless PCA, I/R PCA, left screws. Additional Steps When replacing the HDD...
... Manual Press the tabs on the bottom case when removing or replacing either of the panel, and then lift it from the bottom case. Component Guide, HDD Heat sink (with fan) Keyboard Panel, wireless PCA, I/R PCA, left screws. Additional Steps When replacing the HDD...
Maintenance and Service Guide
Page 148
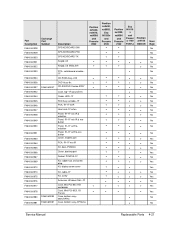
..., UK Keybd, US ENGLISH PCA, switchboard w/cable- 1F CD-ROM Assy-24X DVD Assy-8x CD-RW/DVD Combo ASSY Case, top-1F (gray/silver) Guide, HDD-1F FDD Assy w/cable-1F PCA, IR-1F w/IR Heat sink-1F w/fan Panel, IR-1F w/o IR & w/button Panel, IR-1F w/o IR & ... Card, Mini PCI-8021.1B France Case, bottom assy- W2K/XPPro Case, bottom assy-XPHome Pavilion ze5x00, nx9010, nx9008 and Presario 2500 • • Pavilion ze4x00, nx9005, Evo N1050v and Presario 2100 • • • • • Pavilion ze4200, nx9000 and Presario 2100 • Evo N1010 v and Presari o 1100 F5771J • &#...
..., UK Keybd, US ENGLISH PCA, switchboard w/cable- 1F CD-ROM Assy-24X DVD Assy-8x CD-RW/DVD Combo ASSY Case, top-1F (gray/silver) Guide, HDD-1F FDD Assy w/cable-1F PCA, IR-1F w/IR Heat sink-1F w/fan Panel, IR-1F w/o IR & w/button Panel, IR-1F w/o IR & ... Card, Mini PCI-8021.1B France Case, bottom assy- W2K/XPPro Case, bottom assy-XPHome Pavilion ze5x00, nx9010, nx9008 and Presario 2500 • • Pavilion ze4x00, nx9005, Evo N1050v and Presario 2100 • • • • • Pavilion ze4200, nx9000 and Presario 2100 • Evo N1010 v and Presari o 1100 F5771J • &#...


