
Maintenance and Service Guide
Page 3
... 2-40 Removing the CPU Module ...2-44 Removing the RJ11/1394 Connector Module 2-48 Removing the Motherboard ...2-50 Replacing Components on a Bottom Case 2-59 Repairing the BIOS IC...2-61 Removing Other Components...2-63 Troubleshooting and Diagnostics 3-1 Support Service Partners...3-2 Troubleshooting ...3-3 Diagnostic Tools ...3-18 Replaceable Parts...4-1 Reference Information 5-1 Password Removal Policy...5-2 Hewlett-Packard...
... 2-40 Removing the CPU Module ...2-44 Removing the RJ11/1394 Connector Module 2-48 Removing the Motherboard ...2-50 Replacing Components on a Bottom Case 2-59 Repairing the BIOS IC...2-61 Removing Other Components...2-63 Troubleshooting and Diagnostics 3-1 Support Service Partners...3-2 Troubleshooting ...3-3 Diagnostic Tools ...3-18 Replaceable Parts...4-1 Reference Information 5-1 Password Removal Policy...5-2 Hewlett-Packard...
Maintenance and Service Guide
Page 5
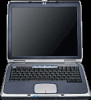
Example of notebook 1-15 Table 1-4. Replacing the Antennas...2-60 Figure 2-37. Basic Troubleshooting Steps ...3-3 Figure 4-1. Product Comparisons...1-1 Table 1-2. Fn Hot Keys ...1-16 Table 1-6. Accessories...Door 2-60 Figure 2-38. Exploded View ...4-2 Figure 4-2. Keyboard Status Lights...1-15 Table 1-5. Functional Structure Description 1-25 Table 2-1. Replacing Small Parts ...2-12 Table 2-5. BIOS Setup Menus and Parameters 3-28 Table 4-1. Disconnecting the Motherboard Cables 2-54 Figure 2-37. Boot-Block Jumper...2-62 Figure 3-1. Main Status Lights (front of Serial ...
Example of notebook 1-15 Table 1-4. Replacing the Antennas...2-60 Figure 2-37. Basic Troubleshooting Steps ...3-3 Figure 4-1. Product Comparisons...1-1 Table 1-2. Fn Hot Keys ...1-16 Table 1-6. Accessories...Door 2-60 Figure 2-38. Exploded View ...4-2 Figure 4-2. Keyboard Status Lights...1-15 Table 1-5. Functional Structure Description 1-25 Table 2-1. Replacing Small Parts ...2-12 Table 2-5. BIOS Setup Menus and Parameters 3-28 Table 4-1. Disconnecting the Motherboard Cables 2-54 Figure 2-37. Boot-Block Jumper...2-62 Figure 3-1. Main Status Lights (front of Serial ...
Maintenance and Service Guide
Page 30
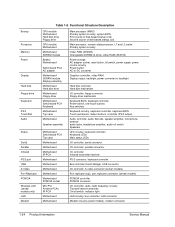
...Motherboard Motherboard PCMCIA socket Mini PCI Antenna PCAs IR PCA Motherboard Motherboard Main processor (MMO) Primary system circuitry, system BIOS First source of disk-based startup code Second source of disk-based startup cod. Main processor, numeric data processor... Hard disk controller Hard disk mechanism I/O controller, floppy connector Floppy drive mechanism Keyboard BIOS, keyboard controller Power switch, one-touch buttons Key switches Keyboard circuitry, keyboard controller, keyboard BIOS Touch pad sensor, Select buttons, controller (PS/2 output) Audio controller, audio decoder...
...Motherboard Motherboard PCMCIA socket Mini PCI Antenna PCAs IR PCA Motherboard Motherboard Main processor (MMO) Primary system circuitry, system BIOS First source of disk-based startup code Second source of disk-based startup cod. Main processor, numeric data processor... Hard disk controller Hard disk mechanism I/O controller, floppy connector Floppy drive mechanism Keyboard BIOS, keyboard controller Power switch, one-touch buttons Key switches Keyboard circuitry, keyboard controller, keyboard BIOS Touch pad sensor, Select buttons, controller (PS/2 output) Audio controller, audio decoder...
Maintenance and Service Guide
Page 86
.... 6. Plug in the floppy drive. 3. To do this. 2-56 Removal and Replacement Service Manual If you must reprogram the BIOS IC, preferably with the latest BIOS-(see page 2-60.) 1. This restores the old system data on the motherboard. NOTE: After Replacing the Motherboard If present, insert... for the automatic update. Reassembly Procedure CAUTION: Be extremely careful when replacing the motherboard. If you might have to contact an HP support center to the next step. 5. Enter the serial number from the bottom of the notebook-you successfully stored system data on page 2-50.
.... 6. Plug in the floppy drive. 3. To do this. 2-56 Removal and Replacement Service Manual If you must reprogram the BIOS IC, preferably with the latest BIOS-(see page 2-60.) 1. This restores the old system data on the motherboard. NOTE: After Replacing the Motherboard If present, insert... for the automatic update. Reassembly Procedure CAUTION: Be extremely careful when replacing the motherboard. If you might have to contact an HP support center to the next step. 5. Enter the serial number from the bottom of the notebook-you successfully stored system data on page 2-50.
Maintenance and Service Guide
Page 89
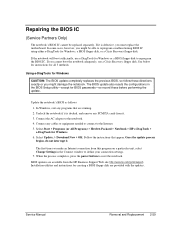
.... 6. Installation utilities and instructions for creating a BIOS floppy disk are available from the HP Business Support Web site http://www.hp.com/go/bizsupport. In some cases, however, you cannot boot the notebook adequately, use e-DiagTools for Windows or a BIOS floppy disk to reprogram the BIOS IC. Update the notebook's BIOS as follows: 1. In Windows, exit any cables...
.... 6. Installation utilities and instructions for creating a BIOS floppy disk are available from the HP Business Support Web site http://www.hp.com/go/bizsupport. In some cases, however, you cannot boot the notebook adequately, use e-DiagTools for Windows or a BIOS floppy disk to reprogram the BIOS IC. Update the notebook's BIOS as follows: 1. In Windows, exit any cables...
Maintenance and Service Guide
Page 90
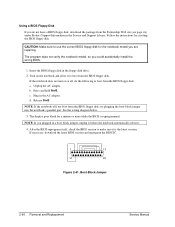
.... Plug in the Service and Support Library. NOTE: If the notebook will not boot from the BIOS floppy disk: a. After the BIOS reprograms itself, check the BIOS version to make sure it before the notebook automatically reboots. 4. Using a BIOS Floppy Disk If you do the following to boot from the...Follow the instructions for a minute or more while the BIOS is the latest version. If the notebook does not turn on the notebook and allow it to boot from the BIOS floppy disk. b. If necessary, download the latest BIOS version and reprogram the BIOS IC. 1 13 14 25 Figure 2-41. Turn...
.... Plug in the Service and Support Library. NOTE: If the notebook will not boot from the BIOS floppy disk: a. After the BIOS reprograms itself, check the BIOS version to make sure it before the notebook automatically reboots. 4. Using a BIOS Floppy Disk If you do the following to boot from the...Follow the instructions for a minute or more while the BIOS is the latest version. If the notebook does not turn on the notebook and allow it to boot from the BIOS floppy disk. b. If necessary, download the latest BIOS version and reprogram the BIOS IC. 1 13 14 25 Figure 2-41. Turn...
Maintenance and Service Guide
Page 91
... (page 2-32) Motherboard (page 2-50) See page 2-32 Additional Steps Reassembly Notes: After replacing the CMOS battery, set the correct time and date using the BIOS Setup utility or Date/Time in the table below. Table 2-5.
... (page 2-32) Motherboard (page 2-50) See page 2-32 Additional Steps Reassembly Notes: After replacing the CMOS battery, set the correct time and date using the BIOS Setup utility or Date/Time in the table below. Table 2-5.
Maintenance and Service Guide
Page 93
3 Troubleshooting and Diagnostics This chapter includes troubleshooting and diagnostic information for testing the functionality of the notebook, and for identifying faulty components: • ASP support information • Troubleshooting information Checking for customer abuse (page 3-4) Troubleshooting the ...page 3-7) • Diagnostic tools e-Diagtools diagnostic program (page 3-18) Power-on self-test (page 3-20) Sycard PCCtest 450/460 PC card (page 3-26) Windows Management Instrumentation (page 3-27) BIOS Setup utility (page 3-27) Service Manual Troubleshooting and Diagnostics 3-1
3 Troubleshooting and Diagnostics This chapter includes troubleshooting and diagnostic information for testing the functionality of the notebook, and for identifying faulty components: • ASP support information • Troubleshooting information Checking for customer abuse (page 3-4) Troubleshooting the ...page 3-7) • Diagnostic tools e-Diagtools diagnostic program (page 3-18) Power-on self-test (page 3-20) Sycard PCCtest 450/460 PC card (page 3-26) Windows Management Instrumentation (page 3-27) BIOS Setup utility (page 3-27) Service Manual Troubleshooting and Diagnostics 3-1
Maintenance and Service Guide
Page 97
... problem. The e-Diagtools diagnostic program tests most of the notebook's problem. Keep in mind possible causes for the problem. The troubleshooting suggestions on self-test, WMI/Toptools (if installed), the BIOS Setup utility, and the Sycard PCCtest. Determine how the ...8226; Consider Causes. Troubleshooting the Problem Record pertinent information about the notebook: • Model and serial number • Operating system and version • Software version (stored in hidden fileC:\version.inf) • BIOS version • Accessories and peripherals used Analyze the problem: &#...
... problem. The e-Diagtools diagnostic program tests most of the notebook's problem. Keep in mind possible causes for the problem. The troubleshooting suggestions on self-test, WMI/Toptools (if installed), the BIOS Setup utility, and the Sycard PCCtest. Determine how the ...8226; Consider Causes. Troubleshooting the Problem Record pertinent information about the notebook: • Model and serial number • Operating system and version • Software version (stored in hidden fileC:\version.inf) • BIOS version • Accessories and peripherals used Analyze the problem: &#...
Maintenance and Service Guide
Page 99
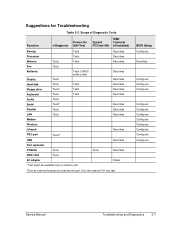
... Tests Describes IEEE 1394 Tests AC adapter Status *Test might be available only on certain units. †Use an external keyboard to exercise the port. BIOS Setup Configures Describes Configures Configures Configures Configures Configures Configures Configures Configures Configures Configures Configures Service Manual Troubleshooting and Diagnostics 3-7 Suggestions for Troubleshooting Table 3-2.
... Tests Describes IEEE 1394 Tests AC adapter Status *Test might be available only on certain units. †Use an external keyboard to exercise the port. BIOS Setup Configures Describes Configures Configures Configures Configures Configures Configures Configures Configures Configures Configures Configures Service Manual Troubleshooting and Diagnostics 3-7 Suggestions for Troubleshooting Table 3-2.
Maintenance and Service Guide
Page 100
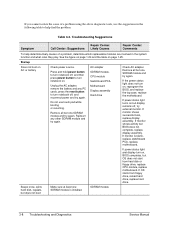
Reinsert any PC cards, press the reset button to turn notebook off , and then press power button to help determine likely causes of a problem using the above diagnostic tools, use touch pad while booting or resuming. ... Check AC adapter. If monitor shows successful boot, replace display assembly. Startup Does not boot on page 1-25. Press and hold power button to turn notebook on , BIOS completes, but display remains off, try again. Remove all but one SDRAM module and try again. See the figure on page 1-24 and the...
Reinsert any PC cards, press the reset button to turn notebook off , and then press power button to help determine likely causes of a problem using the above diagnostic tools, use touch pad while booting or resuming. ... Check AC adapter. If monitor shows successful boot, replace display assembly. Startup Does not boot on page 1-25. Press and hold power button to turn notebook on , BIOS completes, but display remains off, try again. Remove all but one SDRAM module and try again. See the figure on page 1-24 and the...
Maintenance and Service Guide
Page 101
... correctly. Password removal is properly installed and fully charged. Power Service Manual Troubleshooting and Diagnostics 3-9 Restart notebook. Remove and reinstall hard drive. Use BIOS Setup to certain sites. CD/DVD drive Motherboard Hard drive Hard drive contacts Hard drive Password forgotten Verify... Comments Make sure floppy drive is installed and connected correctly. User must call Technical Support and provide proof of ownership. If notebook boots from CD in CD/DVD drive Sluggish startup or shutdown Error message such as "Invalid system disk" or "Auto IDE...
... correctly. Password removal is properly installed and fully charged. Power Service Manual Troubleshooting and Diagnostics 3-9 Restart notebook. Remove and reinstall hard drive. Use BIOS Setup to certain sites. CD/DVD drive Motherboard Hard drive Hard drive contacts Hard drive Password forgotten Verify... Comments Make sure floppy drive is installed and connected correctly. User must call Technical Support and provide proof of ownership. If notebook boots from CD in CD/DVD drive Sluggish startup or shutdown Error message such as "Invalid system disk" or "Auto IDE...
Maintenance and Service Guide
Page 107
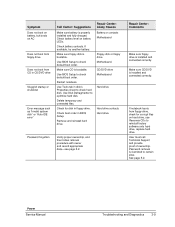
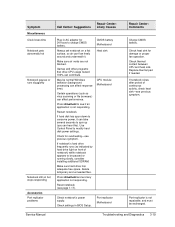
... Windows Help. SDRAM module SDRAM module Increase sound volume. Test audio with notebook. Top case Speaker assembly Switchboard PCA Motherboard Switchboard PCA Motherboard Repair Center:... (internal microphone normally not included). Make sure speaker assembly cable is connected, Use BIOS Setup to check settings. In Mouse Properties, select Synaptics PS/2 TouchPad driver. (...Service Manual Troubleshooting and Diagnostics 3-15 Check whether sound is installed from \hp\drivers\TouchPad.) Top case Motherboard Top case Motherboard Top case Motherboard Make sure C ...
... Windows Help. SDRAM module SDRAM module Increase sound volume. Test audio with notebook. Top case Speaker assembly Switchboard PCA Motherboard Switchboard PCA Motherboard Repair Center:... (internal microphone normally not included). Make sure speaker assembly cable is connected, Use BIOS Setup to check settings. In Mouse Properties, select Synaptics PS/2 TouchPad driver. (...Service Manual Troubleshooting and Diagnostics 3-15 Check whether sound is installed from \hp\drivers\TouchPad.) Top case Motherboard Top case Motherboard Top case Motherboard Make sure C ...
Maintenance and Service Guide
Page 111
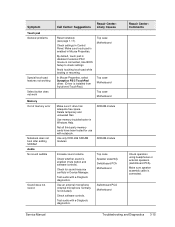
... can contribute. Symptom Miscellaneous Clock loses time Notebook gets abnormally hot Notebook pauses or runs sluggishly Notebook still on but stops responding Accessories Port replicator problems Call Center: Suggestions Repair Center: Likely Causes Plug in BIOS Setup. Check for damage or proper fan... operation. Check heat sink for overheating-see page 1-17). Port replicator Motherboard Repair Center: Comments Charge CMOS battery. Reset notebook (see previous symptom. Certain operations (such...
... can contribute. Symptom Miscellaneous Clock loses time Notebook gets abnormally hot Notebook pauses or runs sluggishly Notebook still on but stops responding Accessories Port replicator problems Call Center: Suggestions Repair Center: Likely Causes Plug in BIOS Setup. Check for damage or proper fan... operation. Check heat sink for overheating-see page 1-17). Port replicator Motherboard Repair Center: Comments Charge CMOS battery. Reset notebook (see previous symptom. Certain operations (such...
Maintenance and Service Guide
Page 112
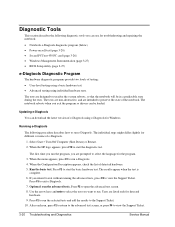
...the program, you exit the program so drivers can download the latest version of e-Diagtools using individual hardware tests. When the HP logo appears, press F10 to open the advanced test screen. 8. If you want to the Support Ticket. 10. After ... select the language for troubleshooting and repairing the notebook: • Notebook e-Diagtools diagnostic program (below) • Power-on self-test (page 3-20) • Sycard PCCtest 450 PC card (page 3-26) • Windows Management Instrumentation (page 3-27) • BIOS Setup utility (page 3-27) e-Diagtools Diagnostic ...
...the program, you exit the program so drivers can download the latest version of e-Diagtools using individual hardware tests. When the HP logo appears, press F10 to open the advanced test screen. 8. If you want to the Support Ticket. 10. After ... select the language for troubleshooting and repairing the notebook: • Notebook e-Diagtools diagnostic program (below) • Power-on self-test (page 3-20) • Sycard PCCtest 450 PC card (page 3-26) • Windows Management Instrumentation (page 3-27) • BIOS Setup utility (page 3-27) e-Diagtools Diagnostic ...

Maintenance and Service Guide
Page 114
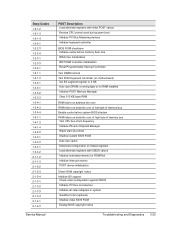
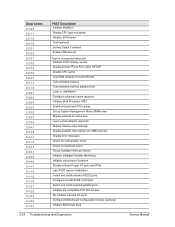
...Diagnostics Service Manual If the BIOS detects a terminal error condition, it requires repair. 1. Beep Codes 1 1-2 1-1-1-3 1-1-1-4 1-1-2-1 1-1-2-3 1-1-2-4 1-1-3-1 1-1-3-2 1-1-3-3 1-1-3-4 1-1-4-1 1-1-4-3 1-1-4-4 1-2-1-1 Table 3-4. When the notebook boots, its system BIOS runs a series of codes; The BIOS will not boot the notebook's operating system if the... If Quiet Boot is enabled in BIOS Setup (the default setting), press esc during boot to see the following table). Note that not all accessories, including SDRAM modules, port replicator, PC cards, printer, external monitor, pointing ...
...Diagnostics Service Manual If the BIOS detects a terminal error condition, it requires repair. 1. Beep Codes 1 1-2 1-1-1-3 1-1-1-4 1-1-2-1 1-1-2-3 1-1-2-4 1-1-3-1 1-1-3-2 1-1-3-3 1-1-3-4 1-1-4-1 1-1-4-3 1-1-4-4 1-2-1-1 Table 3-4. When the notebook boots, its system BIOS runs a series of codes; The BIOS will not boot the notebook's operating system if the... If Quiet Boot is enabled in BIOS Setup (the default setting), press esc during boot to see the following table). Note that not all accessories, including SDRAM modules, port replicator, PC cards, printer, external monitor, pointing ...
Maintenance and Service Guide
Page 115
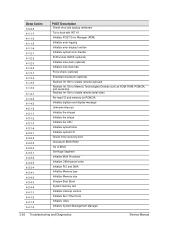
... RAM failure on address line xxxx RAM failure on data bits xxxx of low byte of memory bus Enable cache before system BIOS shadow RAM failure on data bits xxxx of high byte of chipset registers Load alternate registers with initial POST values Restore CPU ...control word during warm boot Initialize PCI Bus Mastering devices Initialize keyboard controller BIOS ROM checksum Initialize cache before memory Auto size 8254 timer initialization 8237 DMA controller initialization Reset Programmable Interrupt Controller Test DRAM refresh ...
... RAM failure on address line xxxx RAM failure on data bits xxxx of low byte of memory bus Enable cache before system BIOS shadow RAM failure on data bits xxxx of high byte of chipset registers Load alternate registers with initial POST values Restore CPU ...control word during warm boot Initialize PCI Bus Mastering devices Initialize keyboard controller BIOS ROM checksum Initialize cache before memory Auto size 8254 timer initialization 8237 DMA controller initialization Reset Programmable Interrupt Controller Test DRAM refresh ...
Maintenance and Service Guide
Page 116
... I/O ports and IRQs Late POST device initialization Detect and install external RS232 ports Configure non-MCD IDE controllers Detect and install external parallel ports Initialize PC-compatible PnP ISA devices Re-initialize onboard I/O ports Configure Motherboard Configurable Devices (optional) Initialize...
... I/O ports and IRQs Late POST device initialization Detect and install external RS232 ports Configure non-MCD IDE controllers Detect and install external parallel ports Initialize PC-compatible PnP ISA devices Re-initialize onboard I/O ports Configure Motherboard Configurable Devices (optional) Initialize...

Maintenance and Service Guide
Page 117
...3-3-3-1 3-3-3-3 3-3-4-1 3-3-4-3 3-4-1-1 3-4-1-2 3-4-1-3 3-4-2-2 3-4-2-3 3-4-2-4 3-4-3-2 3-4-3-3 3-4-3-4 3-4-4-1 3-4-4-2 3-4-4-3 Service Manual POST Description Enable Non-Maskable Interrupts (NMIs) Initialize Extended BIOS Data Area Test and initialize PS/2 mouse Initialize floppy controller Determine number of ATA drives (optional) Initialize hard-disk controllers Initialize local-bus hard-disk ... OS Terminate QuietBoot (optional) Check password (optional) Initialize ACPI BIOS Prepare Boot Initialize SMBIOS Initialize PnP Option ROMs Clear parity checkers Display MultiBoot menu Clear ...
...3-3-3-1 3-3-3-3 3-3-4-1 3-3-4-3 3-4-1-1 3-4-1-2 3-4-1-3 3-4-2-2 3-4-2-3 3-4-2-4 3-4-3-2 3-4-3-3 3-4-3-4 3-4-4-1 3-4-4-2 3-4-4-3 Service Manual POST Description Enable Non-Maskable Interrupts (NMIs) Initialize Extended BIOS Data Area Test and initialize PS/2 mouse Initialize floppy controller Determine number of ATA drives (optional) Initialize hard-disk controllers Initialize local-bus hard-disk ... OS Terminate QuietBoot (optional) Check password (optional) Initialize ACPI BIOS Prepare Boot Initialize SMBIOS Initialize PnP Option ROMs Clear parity checkers Display MultiBoot menu Clear ...
Maintenance and Service Guide
Page 118
... display message Unknown interrupt Initialize the chipset Initialize the bridge Initialize the CPU Initialize system timer Initialize system I/O Check force recovery boot Checksum BIOS ROM Go to BIOS Set Huge Segment Initialize Multi Processor Initialize OEM special code Initialize PIC and DMA Initialize Memory type Initialize Memory size Shadow Boot Block System...
... display message Unknown interrupt Initialize the chipset Initialize the bridge Initialize the CPU Initialize system timer Initialize system I/O Check force recovery boot Checksum BIOS ROM Go to BIOS Set Huge Segment Initialize Multi Processor Initialize OEM special code Initialize PIC and DMA Initialize Memory type Initialize Memory size Shadow Boot Block System...


