Maintenance and Service Guide
Page 53
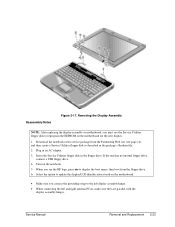
... Manual Removal and Replacement 2-23 . If the unit has no internal floppy drive, connect a USB floppy drive. 4. When you connect the grounding strap to display the boot menu, then boot from the Partnership Web site (see page vii), and then create a Service Utilities floppy disk as...Download the notebook series service package from the floppy drive. 6. Removing the Display Assembly NOTE: After replacing the display assembly or motherboard, you must use the Service Utilities floppy disk to reprogram the EEPROM on the motherboard. • Make sure you see the HP logo, press...
... Manual Removal and Replacement 2-23 . If the unit has no internal floppy drive, connect a USB floppy drive. 4. When you connect the grounding strap to display the boot menu, then boot from the Partnership Web site (see page vii), and then create a Service Utilities floppy disk as...Download the notebook series service package from the floppy drive. 6. Removing the Display Assembly NOTE: After replacing the display assembly or motherboard, you must use the Service Utilities floppy disk to reprogram the EEPROM on the motherboard. • Make sure you see the HP logo, press...
Maintenance and Service Guide
Page 85
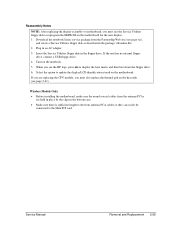
... option to update the display/LCD identification stored on the heat sink (see page 2-41). If the unit has no internal floppy drive, connect a USB floppy drive. 4. If you are held in place by the clips in the package's Readme file. 2. Reassembly Notes NOTE: After replacing the display ...PCA cables so they can easily be connected to reprogram the EEPROM on the notebook. 5. Download the notebook Series service package from the Partnership Web site (see the HP logo, press esc to display the boot menu, and then boot from the antenna PCAs are replacing the CPU module, you must use the ...
... option to update the display/LCD identification stored on the heat sink (see page 2-41). If the unit has no internal floppy drive, connect a USB floppy drive. 4. If you are held in place by the clips in the package's Readme file. 2. Reassembly Notes NOTE: After replacing the display ...PCA cables so they can easily be connected to reprogram the EEPROM on the notebook. 5. Download the notebook Series service package from the Partnership Web site (see the HP logo, press esc to display the boot menu, and then boot from the antenna PCAs are replacing the CPU module, you must use the ...
Maintenance and Service Guide
Page 127
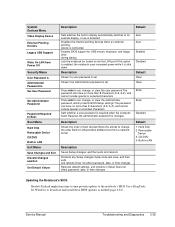
...changes Restores default settings, and remains in LAN provides diskless boot from time to time provide updates to the notebook's BIOS Use e-DiagTools for changes Enter Enter Disabled Description Shows the order of boot devices Move the entries to download and install these BIOS updates... as needed (page 2-61). Hard Disk 2. Removable Device 3. System Devices Menu Video Display Device External Pointing Devices Legacy USB...
...changes Restores default settings, and remains in LAN provides diskless boot from time to time provide updates to the notebook's BIOS Use e-DiagTools for changes Enter Enter Disabled Description Shows the order of boot devices Move the entries to download and install these BIOS updates... as needed (page 2-61). Hard Disk 2. Removable Device 3. System Devices Menu Video Display Device External Pointing Devices Legacy USB...
HP Pavilion ze4x00, ze5x00 and specific xt notebook series - Startup Guide
Page 42
... with, 17 printing infrared printers, 22 PS/2 port, 2, 5 Q QuickRestore System Recovery CD using, 33 R RAM location, 6, 7 rebooting temporary boot device, 17 region code, 20 reset button, 17 resetting, 17 S safety information, iii scroll pad, 3 scroll pad, 2 security cable lock, ..., 29 troubleshooting battery, 30 hard drive, 29 keyboard, 29 performance, 30 pointing devices, 29 power, 30 startup, 31 turning on notebook, 13 U USB port location, 5 third port location, 3 V volume adjusting, 19 volume control, 3 W Windows setting up, 14 wireless communication indicator light, 2, 3 36 Startup Guide
... with, 17 printing infrared printers, 22 PS/2 port, 2, 5 Q QuickRestore System Recovery CD using, 33 R RAM location, 6, 7 rebooting temporary boot device, 17 region code, 20 reset button, 17 resetting, 17 S safety information, iii scroll pad, 3 scroll pad, 2 security cable lock, ..., 29 troubleshooting battery, 30 hard drive, 29 keyboard, 29 performance, 30 pointing devices, 29 power, 30 startup, 31 turning on notebook, 13 U USB port location, 5 third port location, 3 V volume adjusting, 19 volume control, 3 W Windows setting up, 14 wireless communication indicator light, 2, 3 36 Startup Guide


