

End User License Agreement
Page 1
... memory (RAM) for CONDITIONS OF THIS EULA. d. RIGHTS IN THE SOFTWARE the right to this EULA, all terms and conditions of Rights. DOWNLOADING, OR b. You may include associated media, printed materials and "online" or electronic documentation. If the Software Product is provided to you via ... suppliers. Use of this EULA may install and use the Software Product only on more than one computer, you may accompany the HP Product. You may not separate component parts of the original Software Product's proprietary notices and that is not otherwise subject to the ...
... memory (RAM) for CONDITIONS OF THIS EULA. d. RIGHTS IN THE SOFTWARE the right to this EULA, all terms and conditions of Rights. DOWNLOADING, OR b. You may include associated media, printed materials and "online" or electronic documentation. If the Software Product is provided to you via ... suppliers. Use of this EULA may install and use the Software Product only on more than one computer, you may accompany the HP Product. You may not separate component parts of the original Software Product's proprietary notices and that is not otherwise subject to the ...
Maintenance and Service Guide
Page 53
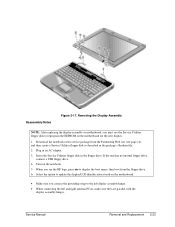
... you see page vii), and then create a Service Utilities floppy disk as described in the package's Readme file. 2. Reassembly Notes Figure 2-17. Download the notebook series service package from the Partnership Web site (see the HP logo, press esc to reprogram the EEPROM on the notebook. 5. Turn on the motherboard for the new display. 1. .
... you see page vii), and then create a Service Utilities floppy disk as described in the package's Readme file. 2. Reassembly Notes Figure 2-17. Download the notebook series service package from the Partnership Web site (see the HP logo, press esc to reprogram the EEPROM on the notebook. 5. Turn on the motherboard for the new display. 1. .

Maintenance and Service Guide
Page 79
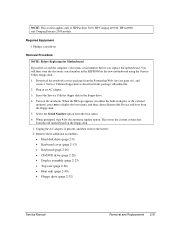
... either the built-in display or the external monitor), press esc to HP Pavilion 4x00, HP Compaq nx9005 and nx9000, Compaq Evo Notebook N1050v and N1010v, and Compaq Presario 2100 and 1100 models. When the HP logo appears (on the floppy disk. 1. Unplug the AC adapter, ... screwdriver Removal Procedure NOTE: Before Replacing the Motherboard If possible, record the computer's electronic serial number before you replace the motherboard. Download the notebook service package from the floppy disk. 5. Removing the Motherboard (Service Partners Only) NOTE: This section applies only to display the ...
... either the built-in display or the external monitor), press esc to HP Pavilion 4x00, HP Compaq nx9005 and nx9000, Compaq Evo Notebook N1050v and N1010v, and Compaq Presario 2100 and 1100 models. When the HP logo appears (on the floppy disk. 1. Unplug the AC adapter, ... screwdriver Removal Procedure NOTE: Before Replacing the Motherboard If possible, record the computer's electronic serial number before you replace the motherboard. Download the notebook service package from the floppy disk. 5. Removing the Motherboard (Service Partners Only) NOTE: This section applies only to display the ...
Maintenance and Service Guide
Page 81
...Download the notebook service package from the Partnership Web site (see page vii), and create a Service Utilities floppy disk as described in an AC adapter. 3. Insert the Service Utilities floppy disk in the EEPROM on either the built-in display or the external monitor), press esc to HP Pavilion 5x00, HP Compaq nx9010, HP... type A for the automatic update option. You will then store the electronic serial number in the floppy drive. 4. When the HP logo appears (on the new motherboard using the Service Utility floppy disk. 1. This stores the current system data from the old motherboard ...
...Download the notebook service package from the Partnership Web site (see page vii), and create a Service Utilities floppy disk as described in an AC adapter. 3. Insert the Service Utilities floppy disk in the EEPROM on either the built-in display or the external monitor), press esc to HP Pavilion 5x00, HP Compaq nx9010, HP... type A for the automatic update option. You will then store the electronic serial number in the floppy drive. 4. When the HP logo appears (on the new motherboard using the Service Utility floppy disk. 1. This stores the current system data from the old motherboard ...
Maintenance and Service Guide
Page 85
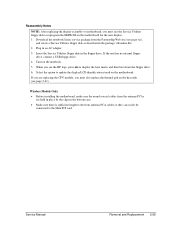
Insert the Service Utilities floppy disk in an AC adapter. 3. When you see the HP logo, press esc to update the display/LCD identification stored on the motherboard. Service Manual Removal and Replacement ... antenna PCA cables so they can easily be connected to reprogram the EEPROM on the motherboard for the new display. 1. Download the notebook Series service package from the antenna PCAs are replacing the CPU module, you must use the Service Utilities floppy disk to...motherboard, you must also replace the thermal pad on the heat sink (see page 2-41). Turn on the notebook. 5.
Insert the Service Utilities floppy disk in an AC adapter. 3. When you see the HP logo, press esc to update the display/LCD identification stored on the motherboard. Service Manual Removal and Replacement ... antenna PCA cables so they can easily be connected to reprogram the EEPROM on the motherboard for the new display. 1. Download the notebook Series service package from the antenna PCAs are replacing the CPU module, you must use the Service Utilities floppy disk to...motherboard, you must also replace the thermal pad on the heat sink (see page 2-41). Turn on the notebook. 5.
Maintenance and Service Guide
Page 87
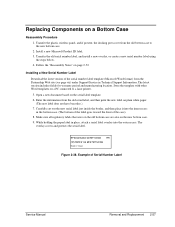
... docking port cover from the old serial label, and then print the new label on a PC connected to the new bottom case. 2. Follow the "Reassembly Notes" on a Bottom Case ...and protects the serial label. Replacing Components on page 2-52. Installing a New Serial Number Label Download the latest version of the serial number label template (Microsoft Word format) from the Partnership Web ...for warranty period and manufacturing location. Open a new document based on the new bottom case. 9. HP Serial Number (S)TW711A1234 1YR (1P) F2072 W EA MFG TW711A1234 Made in place, attach a serial...
... docking port cover from the old serial label, and then print the new label on a PC connected to the new bottom case. 2. Follow the "Reassembly Notes" on a Bottom Case ...and protects the serial label. Replacing Components on page 2-52. Installing a New Serial Number Label Download the latest version of the serial number label template (Microsoft Word format) from the Partnership Web ...for warranty period and manufacturing location. Open a new document based on the new bottom case. 9. HP Serial Number (S)TW711A1234 1YR (1P) F2072 W EA MFG TW711A1234 Made in place, attach a serial...
Maintenance and Service Guide
Page 89
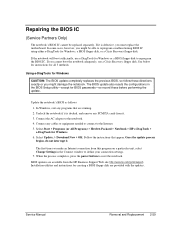
...> Hewlett-Packard > Notebook > HP e-DiagTools > e-DiagTools for all 3 methods. Select Update, > Download New > OK. See below for instructions for Windows. 6. Follow the instructions that are running. 2. BIOS updates are provided with the updates. In some cases, however, you might damage the notebook. Connect any PCMCIA ... replaces the previous BIOS, so follow these before performing the update. Repairing the BIOS IC (Service Partners Only) The notebook's BIOS IC cannot be able to reprogram a malfunctioning BIOS IC using either e-DiagTools for Windows or a BIOS floppy ...
...> Hewlett-Packard > Notebook > HP e-DiagTools > e-DiagTools for all 3 methods. Select Update, > Download New > OK. See below for instructions for Windows. 6. Follow the instructions that are running. 2. BIOS updates are provided with the updates. In some cases, however, you might damage the notebook. Connect any PCMCIA ... replaces the previous BIOS, so follow these before performing the update. Repairing the BIOS IC (Service Partners Only) The notebook's BIOS IC cannot be able to reprogram a malfunctioning BIOS IC using either e-DiagTools for Windows or a BIOS floppy ...
Maintenance and Service Guide
Page 90
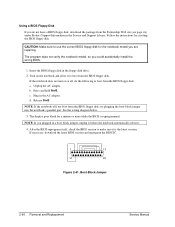
... port. c. See the wiring diagram below. 3. Press and hold Fn+B. d. If necessary, download the latest BIOS version and reprogram the BIOS IC. 1 13 14 25 Figure 2-41. Follow the instructions for the notebook model you do the following to boot from the Partnership Web site (see page vii) under Product Support Information...
... port. c. See the wiring diagram below. 3. Press and hold Fn+B. d. If necessary, download the latest BIOS version and reprogram the BIOS IC. 1 13 14 25 Figure 2-41. Follow the instructions for the notebook model you do the following to boot from the Partnership Web site (see page vii) under Product Support Information...
Maintenance and Service Guide
Page 110
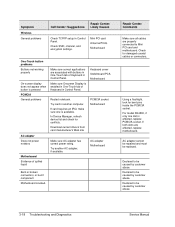
... Check TCP/IP setup in another AC adapter, if available. Make sure Onscreen Display is available. Check for conflicts. Restart notebook. Check SSID, channel, and encryption settings. Try card in Control Panel. Download current drivers from card manufacturer's Web site Make sure AC adapter has correct power rating. Using a flashlight, look for...
... Check TCP/IP setup in another AC adapter, if available. Make sure Onscreen Display is available. Check for conflicts. Restart notebook. Check SSID, channel, and encryption settings. Try card in Control Panel. Download current drivers from card manufacturer's Web site Make sure AC adapter has correct power rating. Using a flashlight, look for...
Maintenance and Service Guide
Page 112
...After each run the advanced tests. The notebook reboots when you exit the program so drivers can download the latest version of e-Diagtools using e-Diagtools for troubleshooting and repairing the notebook: • Notebook e-Diagtools diagnostic program (below) • Power-on self-test (page 3-20) • Sycard PCCtest 450 PC card (page 3-26) • Windows...section describes the following procedure describes how to run e-Diagtools. 4. Running e-Diagtools The following diagnostic tools you can use for Windows. When the HP logo appears, press F10 to start the basic hardware test.
...After each run the advanced tests. The notebook reboots when you exit the program so drivers can download the latest version of e-Diagtools using e-Diagtools for troubleshooting and repairing the notebook: • Notebook e-Diagtools diagnostic program (below) • Power-on self-test (page 3-20) • Sycard PCCtest 450 PC card (page 3-26) • Windows...section describes the following procedure describes how to run e-Diagtools. 4. Running e-Diagtools The following diagnostic tools you can use for Windows. When the HP logo appears, press F10 to start the basic hardware test.
Maintenance and Service Guide
Page 124
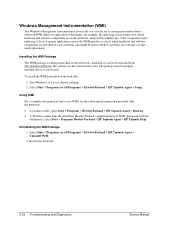
... the notebook's hard disk or can be downloaded from http://wwwhpcom/toptools (the contents are the same in both cases) The package must be used To install the WMI preloaded on the hard disk: 1. Using WMI For a complete description of WMI (group and attribute definitions): select Start > Programs Hewlett-Packard > HP Toptools Agent > HP...
... the notebook's hard disk or can be downloaded from http://wwwhpcom/toptools (the contents are the same in both cases) The package must be used To install the WMI preloaded on the hard disk: 1. Using WMI For a complete description of WMI (group and attribute definitions): select Start > Programs Hewlett-Packard > HP Toptools Agent > HP...
Maintenance and Service Guide
Page 127
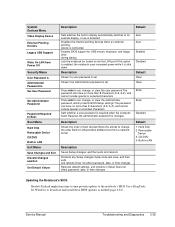
... or time changes Restores default settings, and remains in LAN provides diskless boot from time to time provide updates to the notebook's BIOS Use e-DiagTools for Windows to download and install these BIOS updates as needed (page 2-61). System Devices Menu Video Display Device External Pointing Devices Legacy USB ...device is connected Enables BIOS support for USB mouse, keyboard, and floppy drive during startup Lets the notebook be turned on via the LAN port If this option is enabled, the notebook uses increased power while it is shut down Description Shows if a user password is set Shows if...
... or time changes Restores default settings, and remains in LAN provides diskless boot from time to time provide updates to the notebook's BIOS Use e-DiagTools for Windows to download and install these BIOS updates as needed (page 2-61). System Devices Menu Video Display Device External Pointing Devices Legacy USB ...device is connected Enables BIOS support for USB mouse, keyboard, and floppy drive during startup Lets the notebook be turned on via the LAN port If this option is enabled, the notebook uses increased power while it is shut down Description Shows if a user password is set Shows if...
Hard Drive White Paper
Page 3
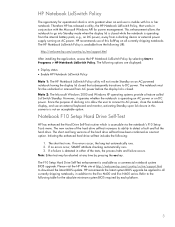
... lid closure in conjunction with his or her notebook. The short test runs. Therefore HP has released a utility, the HP Notebook LidSwitch Policy, that subsequently transitions to the following : 1. Refer to DC power. The HP Notebook LidSwitch Policy is available from AC power before ...; Display status • Enable HP Notebook LidSwitch Policy Note 1: The HP Notebook LidSwitch Policy utility will not invoke Standby on DC power. If no errors occur, the long test automatically runs. 2. If a failure is detected in addition to download the latest BIOS update. The ...
... lid closure in conjunction with his or her notebook. The short test runs. Therefore HP has released a utility, the HP Notebook LidSwitch Policy, that subsequently transitions to the following : 1. Refer to DC power. The HP Notebook LidSwitch Policy is available from AC power before ...; Display status • Enable HP Notebook LidSwitch Policy Note 1: The HP Notebook LidSwitch Policy utility will not invoke Standby on DC power. If no errors occur, the long test automatically runs. 2. If a failure is detected in addition to download the latest BIOS update. The ...


