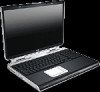
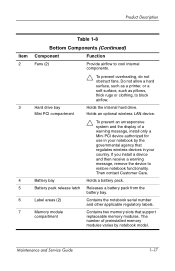
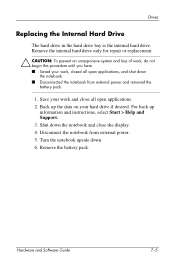
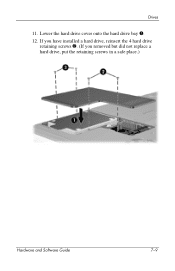
HP Pavilion zd8000 Notebook PC - Maintenance and Service Guide
Page 21
...agency that support replaceable memory modules. Battery bay Holds a battery pack. The number of a warning message, install only a Mini PCI device authorized for use in your notebook by notebook model. Hard drive bay Mini PCI compartment Holds the internal hard drive. Maintenance and ...Service Guide 1-17 Do not allow a hard surface, such as a printer, or a soft surface, such as pillows,...
HP Pavilion zd8000 Notebook PC - Maintenance and Service Guide
Page 22
... left and right sides of the notebook. Refer to Chapter 3, "Illustrated Parts Catalog," to be turned on the left side of the notebook. The fan is designed to identify replacement parts, and Chapter 5, "Removal and Replacement Procedures," for ventilation. These conditions ... ■ Memory module ■ Mini PCI communications devices ■ Hard drive ■ Display ■ Keyboard and TouchPad ■ Audio ■ Intel Pentium 4 processors ■ PC Card Ä CAUTION: To properly ventilate the notebook, allow at least a 7.6--cm (3-inch) clearance on automatically when ...
HP Pavilion zd8000 Notebook PC - Maintenance and Service Guide
Page 39
... OS Loading, Hard Drive, Part 3." Y 1. Remove diskette and reboot. Y Notebook booted? Maintenance and Service Guide 2-17 N Go to "Flowchart 2.13-No OS Loading, Diskette Drive." Replace hard drive. 2. Replace system board. Done Y Boot from diskette drive? N Hard drive partitioned? Load OS using Operating System Disc (if applicable). Y Hard drive accessible? Y Go to "Flowchart 2.12-No OS Loading, Hard Drive, Part 3." Hard drive formatted? N Run FDISK. N Hard drive accessible? Troubleshooting...
HP Pavilion zd8000 Notebook PC - Maintenance and Service Guide
Page 40
N Run SCANDISK and check for bad sectors. Boot from hard drive? Replace hard drive. Y Install OS and reboot. Y OS loading from hard drive? N Fix bad sectors. Done 2-18 Maintenance and Service Guide N Can bad sectors be fixed? Run diagnostics and follow recommendations. N Replace hard drive. N Y Diagnostics on hard drive? Y Virus on diskette? Troubleshooting Flowchart 2.12-No OS Loading, Hard Drive, Part 3 Continued from "Flowchart 2.11-No OS Loading, Hard Drive, Part 2." N System files on hard drive? Y Clean virus. Y Done Replace hard drive.
HP Pavilion zd8000 Notebook PC - Maintenance and Service Guide
Page 45
... or replace broken item. Done Maintenance and Service Guide 2-23 Troubleshooting Flowchart 2.17-Nonfunctioning Device Nonfunctioning device. Y Done Replace diskette drive. Reattach device. Close notebook, plug in power, and reboot. If integrated NIC, replace system board. Go to "Flowchart 2.9-No Operating System (OS) Loading." N Device boots properly? Y N Y Any physical device detected? Replace NIC. Reseat device. Replace hard drive. Clear...
HP Pavilion zd8000 Notebook PC - Maintenance and Service Guide
Page 71
... With Care." Maintenance and Service Guide 4-3 Removal and Replacement Preliminaries 4.3 Preventing Damage to Removable Drives Removable drives are fragile components that must be handled with at least one inch of shock-proof foam. ■ Avoid dropping drives from any height onto any surface. ■ After removing a hard drive, an optical drive, or a diskette drive, place it down the notebook.
HP Pavilion zd8000 Notebook PC - Maintenance and Service Guide
Page 79
... the device to remove hard drive cover Å To prevent an unresponsive system and the display of Screws Removed Preparing the notebook for use in your notebook by the governmental agency that regulates wireless devices in your country. Then contact Customer Care. Switch cover 5 Maintenance and Service Guide 5-3 Removal and Replacement Procedures 5.2 Disassembly Sequence Chart...
HP Pavilion zd8000 Notebook PC - Maintenance and Service Guide
Page 83
Remove the hard drive cover 2. ✎ The hard drive cover is included in the Miscellaneous Plastics Kit, spare part number 374746-001. Remove the hard drive by following these steps: a. b. Loosen the four PM2.0×5.0 screws 1 that secure the hard drive cover to the notebook. Removing the Hard Drive Cover Maintenance and Service Guide 5-7 Removal and Replacement Procedures 5.
HP Pavilion zd8000 Notebook PC - Maintenance and Service Guide
Page 85
Removing the Hard Drive Maintenance and Service Guide 5-9 d. Grasp the mylar tab 1 on the left side of the hard drive and slide the hard drive to the left 2 to disconnect it from the system board. Removal and Replacement Procedures c. Remove the hard drive 3.
HP Pavilion zd8000 Notebook PC - Maintenance and Service Guide
Page 86
Removing the Hard Drive Frame and Connector Reverse the above procedure to the hard drive. Remove the four PM2.5×4.0 screws 1 that secure the hard drive frame to install and reassemble the hard drive. 5-10 Maintenance and Service Guide f. Lift the frame straight up 2 to remove if from the hard drive. Removal and Replacement Procedures e.
HP Pavilion zd8000 Notebook PC - Maintenance and Service Guide
Page 92
Prepare the notebook for use in the United States 373047-001 373048-001 376650-001 1. Remove the hard drive cover (refer to Section 5.3). 2. Removal and Replacement Procedures 5.7 Mini PCI Communications Card Spare Part Number Information 802.11b/g, for use in most of the world (MOW) 802.11b/g, for use in the rest of the world (ROW) 802.11a/b/g combination card, for disassembly (refer to Section 5.3). 5-16 Maintenance and Service Guide
HP Pavilion zd8000 Notebook PC - Maintenance and Service Guide
Page 188
Index R rear components 1-8 remote control, spare part number 3-11, 3-15 removal and replacement preliminaries 4-1 removal and replacement procedures 5-1 right-side components 1-6 RJ-11 (modem) jack location 1-7 pin assignments A-4 RJ-45 (network) jack location 1-7... 3-5, 3-20, 5-45 specifications battery pack 6-7 display 6-3, 6-4 DMA 6-12 DVD/CD-RW Combo Drive 6-8 DVD±RW/R and CD-RW Combo Drive 6-10 hard drive 6-5, 6-6 I/O addresses 6-15 interrupts 6-13 memory map 6-18 notebook 6-1 static shielding materials 4-8 S-Video-out jack location 1-9 pin assignments A-2 switch cover removal 5-18 ...
Getting Started - Enhanced for Accessibility
Page 53
Getting Started 4-15 Depending on the model, when the notebook is shipped, either one or both memory slots are filled with a replaceable memory module. Releases a battery pack from the battery bay. Holds the internal hard drive. Notebook Tour Bottom Components Bays and Memory Compartment Component 1 Memory compartment 2 Battery pack release latch 3 Battery bay 4 Hard drive bay Description Contains 2 memory slots. Holds a battery pack.
Hardware Software Guide
Page 7
... Drives 7-1 Caring for Drives 7-3 Hard Drive 7-4 Identifying the Hard Drive Activity Light 7-4 Replacing the Internal Hard Drive 7-5 Optical Drive 7-10 Inserting an Optical Disc 7-10 Removing an Optical Disc (With Power 7-11 Removing an Optical Disc (Without Power 7-12 Playing an Optical Disc 7-13 Boot Order 7-15 Optional HP USB Digital Drive (Select Models Only 7-15 Installing an Optional SD Memory Card...
Hardware Software Guide
Page 23
Holds the internal hard drive. 1-14 Hardware and Software Guide Holds a battery pack. Releases a battery pack from the battery bay. Hardware Bottom Components Bays and Memory Compartment Component 1 Memory compartment 2 Battery pack release latch 3 Battery bay 4 Hard drive bay Description Contains 2 memory slots. Depending on the model, when the notebook is shipped, either one or both memory slots are filled with a replaceable memory module.
Hardware Software Guide
Page 133
...notebook or a drive: ■ Handle a drive carefully. To prevent electrostatic damage to the notebook or a drive: ❏ Discharge yourself from static electricity before handling a drive by touching a grounded metal object, and ❏ Avoid touching the connectors on the Notebook Documentation CD. ■ Avoid exposing a hard drive... drives. The airport security devices that must be handled with a disc cleaning kit, available from shock, vibration, temperature, and high humidity. Drives Caring for repair or replacement. ■ Electrostatic discharge can damage drive connectors...
Hardware Software Guide
Page 135
... up information and instructions, select Start > Help and Support. 3. Turn the notebook upside down the notebook. ■ Disconnected the notebook from external power. 5. For back up the data on your hard drive if desired. Shut down the notebook and close all open applications. 2. Hardware and Software Guide 7-5 Drives Replacing the Internal Hard Drive The hard drive in the hard drive bay is the internal...
Hardware Software Guide
Page 139
Lower the hard drive cover onto the hard drive bay 1. 12. Drives 11. If you have installed a hard drive, reinsert the 4 hard drive retaining screws 2. (If you removed but did not replace a hard drive, put the retaining screws in a safe place.) Hardware and Software Guide 7-9
Hardware Software Guide
Page 172
... access the settings for a hard drive password. The enhancements add power and security features and provide supplementary support for startup, password, port, Setup utility appearance, and other preferences. The Windows operating system provided on the notebook or on a restoration disc ...f10. The utility reports information about the notebook and provides settings for external devices such as drives and PC Cards. Software Updates, Restorations and Utilities Installing a Retail Version of an Operating System Ä CAUTION: Replacing an operating system enhanced for your operating ...
Hardware Software Guide
Page 182
... procedures 3-10 enablers, PC Card 6-5, 6-10 environmental specifications A-1 error message, Playback of content from 7-15 See also CDs; discs; See digital memory cards fn key 1-3, 2-4 See also function keys function keys changing Standby function 3-13 identifying 1-3, 2-4 See also fn key H hard drive DriveLock 5-17 hard drive activity light 1-7, 7-4 hard drive bay identifying 1-14 installing hard drive 7-7 replacing hard drive 7-5 hard drive cover 7-6, 7-9 Index-4 Hardware...