
End User License Agreement
Page 1
... otherwise subject to a separate license agreement between you and HP or its suppliers. Storage. If the Software Product is licensed to the terms and conditions of download. Copying. You may load the Software ON THE CONDITION THAT YOU Product into the local memory or storage device of using the Software INSTALLING, COPYING...
... otherwise subject to a separate license agreement between you and HP or its suppliers. Storage. If the Software Product is licensed to the terms and conditions of download. Copying. You may load the Software ON THE CONDITION THAT YOU Product into the local memory or storage device of using the Software INSTALLING, COPYING...

Safety and Regulatory Information Desktops, Thin Clients, and Personal Workstations
Page 29
...". ENWW Environmental Agency Notices 23 Table 2-2 Toxic and Hazardous Substances and Elements (continued) Part Name Lead (Pb) Mercury (Hg) Cadmium (Cd) Hexavalent Chromium (Cr(VI)) Memory X O O O I/O PCAs X O O O Power supply X O O O Keyboard X O O O Mouse X O O O Chassis/Other X O O O Fans X O O O Internal/External Media Reading X O O O Devices External Control Devices X O O O Cable X O O O Hard Disk Drive X O O O Display X X O O Polybrominated biphenyls (PBB) Polybrominated...
...". ENWW Environmental Agency Notices 23 Table 2-2 Toxic and Hazardous Substances and Elements (continued) Part Name Lead (Pb) Mercury (Hg) Cadmium (Cd) Hexavalent Chromium (Cr(VI)) Memory X O O O I/O PCAs X O O O Power supply X O O O Keyboard X O O O Mouse X O O O Chassis/Other X O O O Fans X O O O Internal/External Media Reading X O O O Devices External Control Devices X O O O Cable X O O O Hard Disk Drive X O O O Display X X O O Polybrominated biphenyls (PBB) Polybrominated...
PC Basics Guide
Page 7
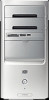
... contains details on options that may be included with the micro processing unit (MPU), slots for memory and add-in cards, and connectors for the other items in this guide. This section describes the PC by using the mouse, the keyboard, the monitor, speakers, a microphone, the media drives, and... and the connectors on using a keyboard to enter text and commands, a mouse to the electrical power system. For example, the PC shows the Windows desktop on the display screen, and when you useful information on the back and the front of electronics and mechanical items housed in your user...
... contains details on options that may be included with the micro processing unit (MPU), slots for memory and add-in cards, and connectors for the other items in this guide. This section describes the PC by using the mouse, the keyboard, the monitor, speakers, a microphone, the media drives, and... and the connectors on using a keyboard to enter text and commands, a mouse to the electrical power system. For example, the PC shows the Windows desktop on the display screen, and when you useful information on the back and the front of electronics and mechanical items housed in your user...
PC Basics Guide
Page 8
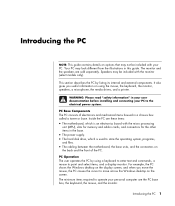
... or DVD discs, depending on the drive model. • A memory card reader that reads or records the memory cards used for quick, temporary connection. Because of this, you should: • Consistently make backup copies of the base. 2 PC Basics Guide Additional PC Base Components The PC base box may have external components added to the...
... or DVD discs, depending on the drive model. • A memory card reader that reads or records the memory cards used for quick, temporary connection. Because of this, you should: • Consistently make backup copies of the base. 2 PC Basics Guide Additional PC Base Components The PC base box may have external components added to the...
PC Basics Guide
Page 11
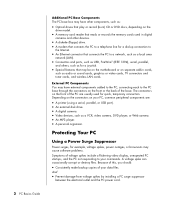
...on the keyboard, and click Hibernate. Hibernation Mode When the PC is in it. If necessary, enable the feature by clicking the Enable hibernation box so that is in hibernation mode, it saves everything that a check mark appears in PC memory to the hard disk drive, turns off the monitor and... the hard disk drive, and then turns itself off . To put the PC into standby or hibernation mode automatically, modify the power management settings: 1 Click...
...on the keyboard, and click Hibernate. Hibernation Mode When the PC is in it. If necessary, enable the feature by clicking the Enable hibernation box so that is in hibernation mode, it saves everything that a check mark appears in PC memory to the hard disk drive, turns off the monitor and... the hard disk drive, and then turns itself off . To put the PC into standby or hibernation mode automatically, modify the power management settings: 1 Click...

PC Basics Guide
Page 12
... the simplest repair for standby and hibernation. NOTE: Using the On button to set the timers for your PC. Use the mouse on the Windows desktop. NOTE: The optical mouse cannot work , press the On button for 5 or more seconds to turn on automatic standby for a longer ...glass, translucent, or reflective surface. 6 PC Basics Guide You may wish to elapse before hibernation (such as After 1 hour) in the System hibernates list. 6 If you restart the computer, the PC starts over using the operating system and software in its memory. Restart the PC after installation. Or Click Shut Down,...
... the simplest repair for standby and hibernation. NOTE: Using the On button to set the timers for your PC. Use the mouse on the Windows desktop. NOTE: The optical mouse cannot work , press the On button for 5 or more seconds to turn on automatic standby for a longer ...glass, translucent, or reflective surface. 6 PC Basics Guide You may wish to elapse before hibernation (such as After 1 hour) in the System hibernates list. 6 If you restart the computer, the PC starts over using the operating system and software in its memory. Restart the PC after installation. Or Click Shut Down,...

PC Basics Guide
Page 32
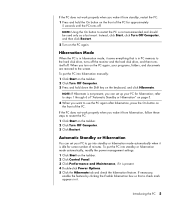
Digital cameras and other digital imaging devices by digital cameras and other digital imaging devices use memory cards, or media, to the PC or through a docking station. You can connect a digital image source, such as a digital camera or a digital video camera, directly to store digital picture files. 26 PC Basics Guide Digital picture files you copy or download from the memory cards used by using the memory card reader (select models only). Working with Digital Images You can copy digital picture files from the device appear in the My Pictures folder.
Digital cameras and other digital imaging devices by digital cameras and other digital imaging devices use memory cards, or media, to the PC or through a docking station. You can connect a digital image source, such as a digital camera or a digital video camera, directly to store digital picture files. 26 PC Basics Guide Digital picture files you copy or download from the memory cards used by using the memory card reader (select models only). Working with Digital Images You can copy digital picture files from the device appear in the My Pictures folder.

PC Basics Guide
Page 33
... name. Similar to paper folders within component drives, such as diskettes, memory cards, CDs or DVDs, or to output devices, such as a printer. A folder can contain any unit of information that is named and stored on your PC. Use the Back arrow button to -use view of the files and...My Computer. • Windows Explorer allows you to group related files together. There are a way to quickly see all the folders and files on your PC involves working with files. Managing Files A file is any type of file and can even contain other electronic storage, such as a CD, floppy diskette...
... name. Similar to paper folders within component drives, such as diskettes, memory cards, CDs or DVDs, or to output devices, such as a printer. A folder can contain any unit of information that is named and stored on your PC. Use the Back arrow button to -use view of the files and...My Computer. • Windows Explorer allows you to group related files together. There are a way to quickly see all the folders and files on your PC involves working with files. Managing Files A file is any type of file and can even contain other electronic storage, such as a CD, floppy diskette...
PC Basics Guide
Page 43
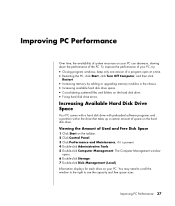
...version of Used and Free Disk Space 1 Click Start on the hard disk drive. • Fixing hard disk drive errors. Improving PC Performance 37 The Computer Management window opens. 6 Double-click Storage. 7 Double-click Disk Management (Local). click Start, click Turn Off... Computer, and then click Restart. • Increasing memory by adding or upgrading memory modules in the chassis. • Increasing available hard disk drive space. • Consolidating scattered files and folders on the taskbar....
...version of Used and Free Disk Space 1 Click Start on the hard disk drive. • Fixing hard disk drive errors. Improving PC Performance 37 The Computer Management window opens. 6 Double-click Storage. 7 Double-click Disk Management (Local). click Start, click Turn Off... Computer, and then click Restart. • Increasing memory by adding or upgrading memory modules in the chassis. • Increasing available hard disk drive space. • Consolidating scattered files and folders on the taskbar....
Upgrading and Servicing Guide
Page 3
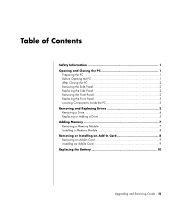
... Side Panel 2 Replacing the Side Panel 2 Removing the Front Panel 2 Replacing the Front Panel 3 Locating Components Inside the PC 3 Removing and Replacing Drives 3 Removing a Drive 4 Replacing or Adding a Drive 5 Adding Memory 7 Removing a Memory Module 7 Installing a Memory Module 8 Removing or Installing an Add-In Card 8 Removing an Add-In Card 9 Installing an Add-In Card...
... Side Panel 2 Replacing the Side Panel 2 Removing the Front Panel 2 Replacing the Front Panel 3 Locating Components Inside the PC 3 Removing and Replacing Drives 3 Removing a Drive 4 Replacing or Adding a Drive 5 Adding Memory 7 Removing a Memory Module 7 Installing a Memory Module 8 Removing or Installing an Add-In Card 8 Removing an Add-In Card 9 Installing an Add-In Card...
Upgrading and Servicing Guide
Page 6
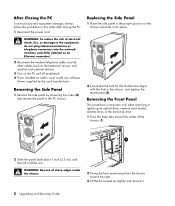
... avoid injury and equipment damage, always follow this order after closing the PC. 1 Reconnect the power cord. Removing the Front Panel This procedure is necessary only when removing or replacing an optical drive, memory card reader, diskette drive, or the hard disk drive. 1 Press the three tabs toward the ...right. 3 Lift the front panel up slightly and remove it into place. 2 Ensure that secures the panel to the PC chassis. Replacing the Side Panel 1 ...
... avoid injury and equipment damage, always follow this order after closing the PC. 1 Reconnect the power cord. Removing the Front Panel This procedure is necessary only when removing or replacing an optical drive, memory card reader, diskette drive, or the hard disk drive. 1 Press the three tabs toward the ...right. 3 Lift the front panel up slightly and remove it into place. 2 Ensure that secures the panel to the PC chassis. Replacing the Side Panel 1 ...
Upgrading and Servicing Guide
Page 7
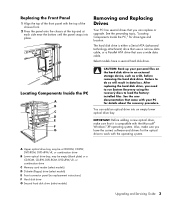
...IMPORTANT: Before adding a new optical drive, make sure you have a second hard disk drive. Locating Components Inside the PC A B C D E R L F G CAUTION: Back up your PC for details about the recovery procedure. After replacing the hard disk drive, you can add an optical drive into place. ...combination drive B Lower optical drive bay, may be empty (blank plate) or a CD-ROM, CD-RW, DVD-ROM, DVD+RW/+R, or combination drive C Memory card reader (select models) D Diskette (floppy) drive (select models) E Front connector panel (no replacement instructions) F Hard disk drive G Second hard disk...
...IMPORTANT: Before adding a new optical drive, make sure you have a second hard disk drive. Locating Components Inside the PC A B C D E R L F G CAUTION: Back up your PC for details about the recovery procedure. After replacing the hard disk drive, you can add an optical drive into place. ...combination drive B Lower optical drive bay, may be empty (blank plate) or a CD-ROM, CD-RW, DVD-ROM, DVD+RW/+R, or combination drive C Memory card reader (select models) D Diskette (floppy) drive (select models) E Front connector panel (no replacement instructions) F Hard disk drive G Second hard disk...
Upgrading and Servicing Guide
Page 8
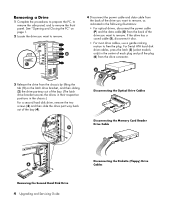
Disconnecting the Optical Drive Cables Disconnecting the Memory Card Reader Drive Cable Removing the Second Hard Disk Drive 4 Upgrading and Servicing Guide Disconnecting the Diskette (Floppy) Drive Cables For Serial ATA hard disk ..., use a gentle rocking motion to remove the front panel. Removing a Drive 1 Complete the procedures to prepare the PC, to remove the side panel, and to free the plug. See "Opening and Closing the PC" on the latch drive bracket, and then sliding (2) the drive partway out of the bay. (The latch drive...
Disconnecting the Optical Drive Cables Disconnecting the Memory Card Reader Drive Cable Removing the Second Hard Disk Drive 4 Upgrading and Servicing Guide Disconnecting the Diskette (Floppy) Drive Cables For Serial ATA hard disk ..., use a gentle rocking motion to remove the front panel. Removing a Drive 1 Complete the procedures to prepare the PC, to remove the side panel, and to free the plug. See "Opening and Closing the PC" on the latch drive bracket, and then sliding (2) the drive partway out of the bay. (The latch drive...
Upgrading and Servicing Guide
Page 10
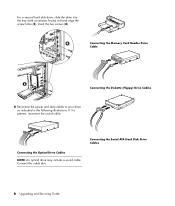
For a second hard disk drive, slide the drive into the bay (with connectors facing out) and align the screw holes (3). If it is present, reconnect the sound cable. Connecting the Serial ATA Hard Disk Drive Cables 6 Upgrading and Servicing Guide Connecting the Optical Drive Cables NOTE: An optical drive may include a sound cable. Connecting the Memory Card Reader Drive Cable Connecting the Diskette (Floppy) Drive Cables 6 Reconnect the power and data cables to your drive as indicated in the following illustrations. Connect this cable also. Insert the two screws (4).
For a second hard disk drive, slide the drive into the bay (with connectors facing out) and align the screw holes (3). If it is present, reconnect the sound cable. Connecting the Serial ATA Hard Disk Drive Cables 6 Upgrading and Servicing Guide Connecting the Optical Drive Cables NOTE: An optical drive may include a sound cable. Connecting the Memory Card Reader Drive Cable Connecting the Diskette (Floppy) Drive Cables 6 Reconnect the power and data cables to your drive as indicated in the following illustrations. Connect this cable also. Insert the two screws (4).

Upgrading and Servicing Guide
Page 11
...side panel. Adding Memory Your PC comes with higher-capacity ones. The PC ships with one or more memory modules, but you have. The exact number of sockets and type of memory module your PC uses, and for DDR DIMMs (double data rate dual in your PC. Removing a Memory Module 1 Complete the... the system. See "Opening and Closing the PC" on page 1. 2 Gently lay the PC on its side. 3 Locate the memory sockets on page 1. A DDR DIMM To determine which model PC you can replace the existing memory module(s) with random access memory (RAM), which temporarily stores data and instructions ...
...side panel. Adding Memory Your PC comes with higher-capacity ones. The PC ships with one or more memory modules, but you have. The exact number of sockets and type of memory module your PC uses, and for DDR DIMMs (double data rate dual in your PC. Removing a Memory Module 1 Complete the... the system. See "Opening and Closing the PC" on page 1. 2 Gently lay the PC on its side. 3 Locate the memory sockets on page 1. A DDR DIMM To determine which model PC you can replace the existing memory module(s) with random access memory (RAM), which temporarily stores data and instructions ...
Upgrading and Servicing Guide
Page 12
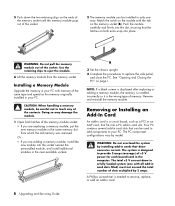
... screen is displayed after replacing or adding a memory module, the memory is installed incorrectly or it is needed to your PC. The PC component configurations vary by 2 amps. WARNING: Do not pull the memory module out of memory. Your PC contains several add-in only one with all...If you are adding a memory module, install the new module into a PC add-in the same memory slot from the memory socket. Installing a Memory Module Upgrade the memory in your PC. Match the notch on the module with memory of the contacts. CAUTION: When handling a memory module, be used to add...
... screen is displayed after replacing or adding a memory module, the memory is installed incorrectly or it is needed to your PC. The PC component configurations vary by 2 amps. WARNING: Do not pull the memory module out of memory. Your PC contains several add-in only one with all...If you are adding a memory module, install the new module into a PC add-in the same memory slot from the memory socket. Installing a Memory Module Upgrade the memory in your PC. Match the notch on the module with memory of the contacts. CAUTION: When handling a memory module, be used to add...
Upgrading and Servicing Guide
Page 14
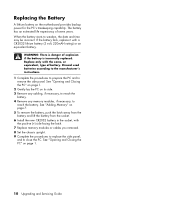
.... 9 Complete the procedures to replace the side panel, and to reach the battery. See "Adding Memory" on its side. 3 Remove any cabling, if necessary, to reach the battery. 4 Remove any memory modules, if necessary, to close the PC. Replace only with the same, or equivalent, type of seven years. The battery has an...
.... 9 Complete the procedures to replace the side panel, and to reach the battery. See "Adding Memory" on its side. 3 Remove any cabling, if necessary, to reach the battery. 4 Remove any memory modules, if necessary, to close the PC. Replace only with the same, or equivalent, type of seven years. The battery has an...

Warranty and Support Guide
Page 8
.... You do not solve the problem, you may install and use the Software Product on those computers. Copying. See "Contacting HP" for purposes of Rights. HP grants you the following rights provided you in this will be sure to have the right to a separate license agreement between (a)... more than one computer. You may load the Software Product into the local memory or storage device of any Software Product installed on or made available by doing the following information available before you call HP: • Product serial number, model name, and model number • ...
.... You do not solve the problem, you may install and use the Software Product on those computers. Copying. See "Contacting HP" for purposes of Rights. HP grants you the following rights provided you in this will be sure to have the right to a separate license agreement between (a)... more than one computer. You may load the Software Product into the local memory or storage device of any Software Product installed on or made available by doing the following information available before you call HP: • Product serial number, model name, and model number • ...

Warranty and Support Guide: In Home
Page 8
...TO BE BOUND BY THE TERMS OF THIS EULA. You may not be licensed for purposes of using the Software Product. Reservation of the HP Product. HP and its suppliers reserve all rights not expressly granted to you via the World Wide Web at time of download. Use of the Freeware ... to you in this EULA may copy the Software Product into Your Computer's temporary memory (RAM) for the original Software Product identified by HP as an upgrade, you shall be used for restoring the hard disk of the HP Product with all component parts, media, printed materials, this EULA, all of the ...
...TO BE BOUND BY THE TERMS OF THIS EULA. You may not be licensed for purposes of using the Software Product. Reservation of the HP Product. HP and its suppliers reserve all rights not expressly granted to you via the World Wide Web at time of download. Use of the Freeware ... to you in this EULA may copy the Software Product into Your Computer's temporary memory (RAM) for the original Software Product identified by HP as an upgrade, you shall be used for restoring the hard disk of the HP Product with all component parts, media, printed materials, this EULA, all of the ...
Getting Started Guide
Page 3
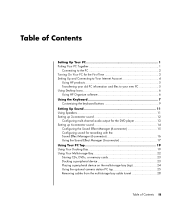
... Contents Setting Up Your PC 1 Putting Your PC Together 1 Connecting to the PC 2 Turning On Your PC for the First Time 3 Setting Up and Connecting to Your Internet Account 4 Using HP products 5 Transferring your old PC information and files to your new PC 5 Using Desktop Icons 6 Using HP Organize software 6 Using ... Manager (6-connector 16 Using the Sound Effect Manager (6-connector 17 Using Your PC Top 19 Using Your Docking Bay 19 Using Your Multistorage Bay 22 Storing CDs, DVDs, or memory cards 23 Docking a peripheral device 23 Placing a peripheral device on the multistorage...
... Contents Setting Up Your PC 1 Putting Your PC Together 1 Connecting to the PC 2 Turning On Your PC for the First Time 3 Setting Up and Connecting to Your Internet Account 4 Using HP products 5 Transferring your old PC information and files to your new PC 5 Using Desktop Icons 6 Using HP Organize software 6 Using ... Manager (6-connector 16 Using the Sound Effect Manager (6-connector 17 Using Your PC Top 19 Using Your Docking Bay 19 Using Your Multistorage Bay 22 Storing CDs, DVDs, or memory cards 23 Docking a peripheral device 23 Placing a peripheral device on the multistorage...


