
End User License Agreement
Page 2
...hard disk drive-based solution, an external media-based recovery solution (e.g. This EULA will prevail. 4. Any software recovery solution provided with/for which the recovery solution was originally purchased. floppy disk, CD or DVD) or an equivalent solution delivered in the Software Product and user documentation are protected by HP...the form of the HP Product with/for your upgrade eligibility. 3. This EULA applies to updates or supplements to the All intellectual property rights in any term or condition of such license. You shall not remove any Microsoft operating ...
...hard disk drive-based solution, an external media-based recovery solution (e.g. This EULA will prevail. 4. Any software recovery solution provided with/for which the recovery solution was originally purchased. floppy disk, CD or DVD) or an equivalent solution delivered in the Software Product and user documentation are protected by HP...the form of the HP Product with/for your upgrade eligibility. 3. This EULA applies to updates or supplements to the All intellectual property rights in any term or condition of such license. You shall not remove any Microsoft operating ...
PC Basics Guide
Page 44
... Recycle Bin, the files are not using Application Recovery. 1 Click Start. 2 Click Control Panel. 3 Double-click Add or Remove Programs. 4 Click the Change or Remove Programs icon on the left of files you want to clean, and click Properties. 5 On the General tab, click Disk Cleanup... 4 Right-click the hard disk drive you use your Windows desktop. 2 On the File menu, click Empty Recycle Bin to delete all open programs. 2 Click Start on your PC and store files, the hard disk drive fills up and becomes cluttered, affecting performance. Cleaning Up Your Hard Disk Drive As you want to ...
... Recycle Bin, the files are not using Application Recovery. 1 Click Start. 2 Click Control Panel. 3 Double-click Add or Remove Programs. 4 Click the Change or Remove Programs icon on the left of files you want to clean, and click Properties. 5 On the General tab, click Disk Cleanup... 4 Right-click the hard disk drive you use your Windows desktop. 2 On the File menu, click Empty Recycle Bin to delete all open programs. 2 Click Start on your PC and store files, the hard disk drive fills up and becomes cluttered, affecting performance. Cleaning Up Your Hard Disk Drive As you want to ...

PC Basics Guide
Page 45
... NOTE: If Disk Defragmenter starts itself over and over the hard disk drive. Press Enter again to start Disk Defragmenter. Consolidating Scattered Files and Folders Over time, as you add, move, and remove files and folders on your PC, the bits of data become scattered over , this issue,...Advanced Options menu, use the steps above to select the operating system. When the Desktop message appears, click Yes to select Safe Mode and press Enter. Improving PC Performance 39 Log on your PC. With the Disk Defragmenter program, you can slow down the performance of data together....
... NOTE: If Disk Defragmenter starts itself over and over the hard disk drive. Press Enter again to start Disk Defragmenter. Consolidating Scattered Files and Folders Over time, as you add, move, and remove files and folders on your PC, the bits of data become scattered over , this issue,...Advanced Options menu, use the steps above to select the operating system. When the Desktop message appears, click Yes to select Safe Mode and press Enter. Improving PC Performance 39 Log on your PC. With the Disk Defragmenter program, you can slow down the performance of data together....

PC Basics Guide
Page 47
..., 8 available hard disk drive space increasing, 37 B browsing the Internet, 34 buttons mouse, 7 mouse scroll wheel, 7 Mute, 12 Off. See turning off PC special keys, 12 Start, 23 C cables, for connecting a TV, 13 CD keyboard button, 12 chassis components, 1 connecting a TV, 13 Ethernet, 32 Control Panel, 24 opening, 23 D desktop, 21 desktop icons, removing, 22 digital...
..., 8 available hard disk drive space increasing, 37 B browsing the Internet, 34 buttons mouse, 7 mouse scroll wheel, 7 Mute, 12 Off. See turning off PC special keys, 12 Start, 23 C cables, for connecting a TV, 13 CD keyboard button, 12 chassis components, 1 connecting a TV, 13 Ethernet, 32 Control Panel, 24 opening, 23 D desktop, 21 desktop icons, removing, 22 digital...
Upgrading and Servicing Guide
Page 6
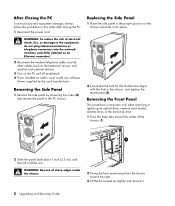
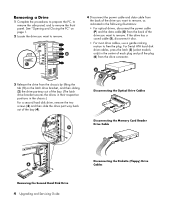
... for the thumbscrew aligns with the hole in this order after closing the PC. 1 Reconnect the power cord. Removing the Front Panel This procedure is necessary only when removing or replacing an optical drive, memory card reader, diskette drive, or the hard disk drive. 1 Press the three tabs toward the right. 3 Lift the front panel up slightly...
... for the thumbscrew aligns with the hole in this order after closing the PC. 1 Reconnect the power cord. Removing the Front Panel This procedure is necessary only when removing or replacing an optical drive, memory card reader, diskette drive, or the hard disk drive. 1 Press the three tabs toward the right. 3 Lift the front panel up slightly...
Upgrading and Servicing Guide
Page 7
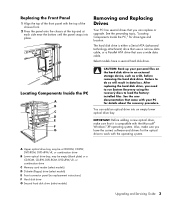
..., make sure that came with your personal files on the hard disk drive to work with the operating system. Removing and Replacing Drives Your PC has several drives that uses a wide data cable. You can replace or upgrade. Locating Components Inside the PC A B C D E R L F G CAUTION: Back up your PC for details about the recovery procedure. See the user documentation...
..., make sure that came with your personal files on the hard disk drive to work with the operating system. Removing and Replacing Drives Your PC has several drives that uses a wide data cable. You can replace or upgrade. Locating Components Inside the PC A B C D E R L F G CAUTION: Back up your PC for details about the recovery procedure. See the user documentation...
Upgrading and Servicing Guide
Page 8
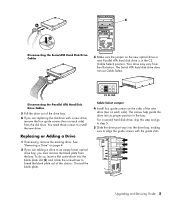
... Disconnecting the Memory Card Reader Drive Cable Removing the Second Hard Disk Drive 4 Upgrading and Servicing Guide Disconnecting the Diskette (Floppy) Drive Cables Removing a Drive 1 Complete the procedures to prepare the PC, to remove the side panel, and to free the plug. For Serial ATA hard disk drive cables, press the latch (5) (select models only) in the center of each plug...
... Disconnecting the Memory Card Reader Drive Cable Removing the Second Hard Disk Drive 4 Upgrading and Servicing Guide Disconnecting the Diskette (Floppy) Drive Cables Removing a Drive 1 Complete the procedures to prepare the PC, to remove the side panel, and to free the plug. For Serial ATA hard disk drive cables, press the latch (5) (select models only) in the center of each plug...
Upgrading and Servicing Guide
Page 9
... blank plate from the illustration. 6 5 Disconnecting the Serial ATA Hard Disk Drive Cables 3 Make sure the jumper on the new optical drive or new Parallel ATA hard disk drive is in the bay. See "Removing a Drive" on page 4. 2 If you are adding a drive to install the new drive. To do so, insert a flat screwdriver into its proper position in...
... blank plate from the illustration. 6 5 Disconnecting the Serial ATA Hard Disk Drive Cables 3 Make sure the jumper on the new optical drive or new Parallel ATA hard disk drive is in the bay. See "Removing a Drive" on page 4. 2 If you are adding a drive to install the new drive. To do so, insert a flat screwdriver into its proper position in...

Upgrading and Servicing Guide
Page 11
... or more memory modules, but you have. CAUTION: When handling a memory module, be able to locate the hard disk drives and data may damage the module. 4 Move any of memory module could damage the system. Removing a Memory Module 1 Complete the procedures to prepare the PC and to remove the side panel. Connecting the Parallel ATA...
... or more memory modules, but you have. CAUTION: When handling a memory module, be able to locate the hard disk drives and data may damage the module. 4 Move any of memory module could damage the system. Removing a Memory Module 1 Complete the procedures to prepare the PC and to remove the side panel. Connecting the Parallel ATA...
Warranty and Support Guide
Page 5
... FOR THE RESTORATION OR REINSTALLATION OF ANY PROGRAMS OR DATA OTHER THAN SOFTWARE INSTALLED BY HP WHEN THE PRODUCT IS MANUFACTURED. YOU SHOULD MAKE PERIODIC BACKUP COPIES OF THE DATA STORED ON YOUR HARD DRIVE OR OTHER STORAGE DEVICES AS A PRECAUTION AGAINST POSSIBLE FAILURES, ALTERATION, OR LOSS OF THE... has been discontinued. BEFORE RETURNING ANY UNIT FOR SERVICE, BE SURE TO BACK UP DATA AND REMOVE ANY CONFIDENTIAL, PROPRIETARY, OR PERSONAL INFORMATION. This is the same or equivalent to your HP Hardware Product in performance or (b) to give you a refund of your purchase price or lease ...
... FOR THE RESTORATION OR REINSTALLATION OF ANY PROGRAMS OR DATA OTHER THAN SOFTWARE INSTALLED BY HP WHEN THE PRODUCT IS MANUFACTURED. YOU SHOULD MAKE PERIODIC BACKUP COPIES OF THE DATA STORED ON YOUR HARD DRIVE OR OTHER STORAGE DEVICES AS A PRECAUTION AGAINST POSSIBLE FAILURES, ALTERATION, OR LOSS OF THE... has been discontinued. BEFORE RETURNING ANY UNIT FOR SERVICE, BE SURE TO BACK UP DATA AND REMOVE ANY CONFIDENTIAL, PROPRIETARY, OR PERSONAL INFORMATION. This is the same or equivalent to your HP Hardware Product in performance or (b) to give you a refund of your purchase price or lease ...
Warranty and Support Guide
Page 9
...is effective unless terminated or rejected. e. Freeware. Any software recovery solution provided with/for your HP Product, whether in the form of the HP Product with/for restoring the hard disk of a hard disk drive-based solution, an external media-based recovery solution (e.g., floppy disk, CD or DVD) or .... 2. Prior to the transfer, the end user receiving the transferred product must agree to provide such services. 9. You shall not remove any Microsoft® operating system software contained in such recovery solution shall be licensed for in its affiliates may make a one-time ...
...is effective unless terminated or rejected. e. Freeware. Any software recovery solution provided with/for your HP Product, whether in the form of the HP Product with/for restoring the hard disk of a hard disk drive-based solution, an external media-based recovery solution (e.g., floppy disk, CD or DVD) or .... 2. Prior to the transfer, the end user receiving the transferred product must agree to provide such services. 9. You shall not remove any Microsoft® operating system software contained in such recovery solution shall be licensed for in its affiliates may make a one-time ...
Warranty and Support Guide: In Home
Page 5
... controls issued by the United States or other peripherals - Exclusions HP does not warrant that has been discontinued. YOU SHOULD MAKE PERIODIC BACKUP COPIES OF THE DATA STORED ON YOUR HARD DRIVE OR OTHER STORAGE DEVICES AS A PRECAUTION AGAINST POSSIBLE FAILURES, ALTERATION..., OR LOSS OF THE DATA. The term "HP Hardware Product" is longer. The Limited Warranty Period starts on the date of this Limited Warranty. HP IS NOT RESPONSIBLE FOR DAMAGE TO OR LOSS OF ANY PROGRAMS, DATA, OR REMOVABLE...
... controls issued by the United States or other peripherals - Exclusions HP does not warrant that has been discontinued. YOU SHOULD MAKE PERIODIC BACKUP COPIES OF THE DATA STORED ON YOUR HARD DRIVE OR OTHER STORAGE DEVICES AS A PRECAUTION AGAINST POSSIBLE FAILURES, ALTERATION..., OR LOSS OF THE DATA. The term "HP Hardware Product" is longer. The Limited Warranty Period starts on the date of this Limited Warranty. HP IS NOT RESPONSIBLE FOR DAMAGE TO OR LOSS OF ANY PROGRAMS, DATA, OR REMOVABLE...
Getting Started Guide
Page 45
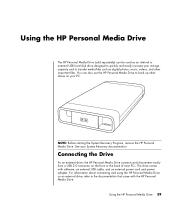
...Drive As an external drive, the HP Personal Media Drive connects and disconnects easily from a USB 2.0 connector on your PC. The drive comes with the HP Personal Media Drive. Using the HP Personal Media Drive 39 For information about connecting and using the HP Personal Media Drive as an external drive, refer to back up other important files. Using the HP Personal Media Drive The HP... photos, music, videos, and other drives on the front or the back of most PCs. NOTE: Before starting the System Recovery Program, remove the HP Personal Media Drive. See your storage capacity and to ...
...Drive As an external drive, the HP Personal Media Drive connects and disconnects easily from a USB 2.0 connector on your PC. The drive comes with the HP Personal Media Drive. Using the HP Personal Media Drive 39 For information about connecting and using the HP Personal Media Drive as an external drive, refer to back up other important files. Using the HP Personal Media Drive The HP... photos, music, videos, and other drives on the front or the back of most PCs. NOTE: Before starting the System Recovery Program, remove the HP Personal Media Drive. See your storage capacity and to ...
Getting Started Guide
Page 47
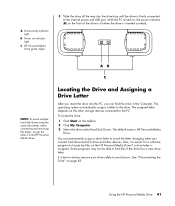
... changing when you connect and disconnect this drive and other storage devices connected to the PC. See "Disconnecting the Drive" on the taskbar. 2 Click My Computer. 3 Select the drive under Hard Disk Drives. NOTE: To avoid multiple hard disk drives using the same drive letter, when connecting and removing the drives, assign the letter Z to the drive. The default name is assigned.
... changing when you connect and disconnect this drive and other storage devices connected to the PC. See "Disconnecting the Drive" on the taskbar. 2 Click My Computer. 3 Select the drive under Hard Disk Drives. NOTE: To avoid multiple hard disk drives using the same drive letter, when connecting and removing the drives, assign the letter Z to the drive. The default name is assigned.

Getting Started Guide
Page 74
.... 4 Click Data Disc. 5 You must have at least one disc, File Archive asks you for files related to the category and moves them into the drive. 5 Place a check mark in the upper-right corner. 6 Click Yes. 7 Click the Burn icon to save your files to the Archive window: &#... time you completed a File Archive. 6 Add your data disc without the files you need to remove files. RecordNow! This is often used when you removed. 8 Click Done when the recording is complete. scans your hard disk for additional discs. 8 Click Done when recording is complete. Creating an Image File RecordNow! ...
.... 4 Click Data Disc. 5 You must have at least one disc, File Archive asks you for files related to the category and moves them into the drive. 5 Place a check mark in the upper-right corner. 6 Click Yes. 7 Click the Burn icon to save your files to the Archive window: &#... time you completed a File Archive. 6 Add your data disc without the files you need to remove files. RecordNow! This is often used when you removed. 8 Click Done when the recording is complete. scans your hard disk for additional discs. 8 Click Done when recording is complete. Creating an Image File RecordNow! ...


