
Getting Started Guide
Page 5
... indicators 59 Special keyboard buttons 60 Identifying Special Keyboard Buttons 60 Customizing the keyboard buttons 62 Keyboard Shortcuts 63 Wireless Mouse and Keyboard Troubleshooting 64 Synchronizing a wireless mouse and keyboard 64 Using the Mouse 67 Using the Mouse Buttons 68 Scrolling ...68 Autoscrolling 69 Panning...69 Changing Mouse Settings 69 Switching mouse button functions 69 Changing mouse pointer speed 70 Changing the double-click speed 70 Turning on the ClickLock option 70 Changing the scroll wheel speed 71 Wireless Mouse and Keyboard Troubleshooting 71 Table of...
... indicators 59 Special keyboard buttons 60 Identifying Special Keyboard Buttons 60 Customizing the keyboard buttons 62 Keyboard Shortcuts 63 Wireless Mouse and Keyboard Troubleshooting 64 Synchronizing a wireless mouse and keyboard 64 Using the Mouse 67 Using the Mouse Buttons 68 Scrolling ...68 Autoscrolling 69 Panning...69 Changing Mouse Settings 69 Switching mouse button functions 69 Changing mouse pointer speed 70 Changing the double-click speed 70 Turning on the ClickLock option 70 Changing the scroll wheel speed 71 Wireless Mouse and Keyboard Troubleshooting 71 Table of...

Getting Started Guide
Page 6
... HD Audio Manager 81 Retasking front panel audio connectors 82 Configuring multistreaming audio 83 When to use multistreaming audio 84 Setting up multistreaming audio 84 Configuring audio for Windows Media Center 85 Selecting recording devices 86 Resolving sound issues 86 Using the Windows Media Center Remote Control 87 Remote Control Buttons Overview 88 About the Remote Control 90 Troubleshooting the Remote Control 91 Remote sensor is not receiving a signal from the remote control 91 Introducing Your Computer Software 93 Learning More About Software 93 Using the Desktop 93...
... HD Audio Manager 81 Retasking front panel audio connectors 82 Configuring multistreaming audio 83 When to use multistreaming audio 84 Setting up multistreaming audio 84 Configuring audio for Windows Media Center 85 Selecting recording devices 86 Resolving sound issues 86 Using the Windows Media Center Remote Control 87 Remote Control Buttons Overview 88 About the Remote Control 90 Troubleshooting the Remote Control 91 Remote sensor is not receiving a signal from the remote control 91 Introducing Your Computer Software 93 Learning More About Software 93 Using the Desktop 93...
Getting Started Guide
Page 25
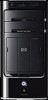
To connect the wireless LAN antenna: 1 Screw the wireless LAN antenna cable into the wireless LAN connector on the back of your wireless network, verify that the integrated WLAN device is not properly installed. 4 Click the Windows Start Button on the taskbar. 2 Type Device Manager into the Start Search box, and then click Device Manager to open the Network and Sharing Center window. 6 Click Connect to open the Device Manager window. 3 Click Network adapters. NOTE: The appearance of the computer. 2 For the best wireless performance...
To connect the wireless LAN antenna: 1 Screw the wireless LAN antenna cable into the wireless LAN connector on the back of your wireless network, verify that the integrated WLAN device is not properly installed. 4 Click the Windows Start Button on the taskbar. 2 Type Device Manager into the Start Search box, and then click Device Manager to open the Network and Sharing Center window. 6 Click Connect to open the Device Manager window. 3 Click Network adapters. NOTE: The appearance of the computer. 2 For the best wireless performance...

Getting Started Guide
Page 30
.... Optical Out (optical SPDIF output) connects playback devices such as a mini disc recorder, digital audio tape recorder, or external hard disk recorder. You must select either the microphone or the Line In function in the front of your speakers. 20 Getting Started (features vary by model) Type 6 has six connectors. HP computers support many different audio options, sound connections, and speaker configurations. See "Selecting a microphone." This chapter describes the most typical options. Sound connector (continued) Type 3 Type 6 Type...
.... Optical Out (optical SPDIF output) connects playback devices such as a mini disc recorder, digital audio tape recorder, or external hard disk recorder. You must select either the microphone or the Line In function in the front of your speakers. 20 Getting Started (features vary by model) Type 6 has six connectors. HP computers support many different audio options, sound connections, and speaker configurations. See "Selecting a microphone." This chapter describes the most typical options. Sound connector (continued) Type 3 Type 6 Type...
Getting Started Guide
Page 54
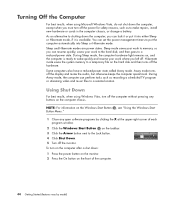
... the power button on the monitor. 2 Press the On button on the taskbar. 3 Click the Arrow button next to put it is ready to make repairs, install new hardware or cards in the computer chassis, or change a battery. and then goes to a temporary file on the hard disk and then turns off the hardware. Away mode turns off the display and mutes the audio, but otherwise keeps the computer operational. During Away mode...
... the power button on the monitor. 2 Press the On button on the taskbar. 3 Click the Arrow button next to put it is ready to make repairs, install new hardware or cards in the computer chassis, or change a battery. and then goes to a temporary file on the hard disk and then turns off the hardware. Away mode turns off the display and mutes the audio, but otherwise keeps the computer operational. During Away mode...
Getting Started Guide
Page 59
... with Windows Vista. Does not have access to complete virus scan Turning On the Computer for the First Time 49 For example, you to change other user settings or passwords, or install software. Standard User: Is not allowed to change the limited account picture, and to change account types for certain users Drawbacks to multiple user accounts: More memory (RAM) usage Multiple Temporary Internet Files folders to remove during Disk Cleanup...
... with Windows Vista. Does not have access to complete virus scan Turning On the Computer for the First Time 49 For example, you to change other user settings or passwords, or install software. Standard User: Is not allowed to change the limited account picture, and to change account types for certain users Drawbacks to multiple user accounts: More memory (RAM) usage Multiple Temporary Internet Files folders to remove during Disk Cleanup...
Getting Started Guide
Page 60
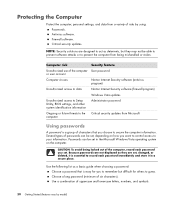
... lowercase letters, numbers, and symbols. 50 Getting Started (features vary by using: Passwords. Protecting the Computer Protect the computer, personal settings, and data from a variety of risks by model) Computer risk Security feature Unauthorized use of the computer User password or user account Computer viruses Norton Internet Security software (antivirus program) Unauthorized access to data Norton Internet Security software (firewall program) Windows Vista updates Unauthorized access to Setup Utility, BIOS settings, and other...
... lowercase letters, numbers, and symbols. 50 Getting Started (features vary by using: Passwords. Protecting the Computer Protect the computer, personal settings, and data from a variety of risks by model) Computer risk Security feature Unauthorized use of the computer User password or user account Computer viruses Norton Internet Security software (antivirus program) Unauthorized access to data Norton Internet Security software (firewall program) Windows Vista updates Unauthorized access to Setup Utility, BIOS settings, and other...
Getting Started Guide
Page 63
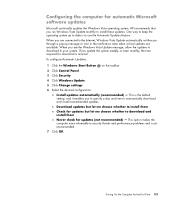
... to the Internet, Windows Vista Update automatically notifies you through a pop-up to date is the default setting, and it enables you update the system weekly, or even monthly, the time required for updates (not recommended) - When you are available. To configure Automatic Updates: 1 Click the Windows Start Button on the taskbar. 2 Click Control Panel. 3 Click Security. 4 Click Windows Update. 5 Click Change settings. 6 Select the desired configuration: Install updates automatically (recommended) - Configuring the computer...
... to the Internet, Windows Vista Update automatically notifies you through a pop-up to date is the default setting, and it enables you update the system weekly, or even monthly, the time required for updates (not recommended) - When you are available. To configure Automatic Updates: 1 Click the Windows Start Button on the taskbar. 2 Click Control Panel. 3 Click Security. 4 Click Windows Update. 5 Click Change settings. 6 Select the desired configuration: Install updates automatically (recommended) - Configuring the computer...
Getting Started Guide
Page 86
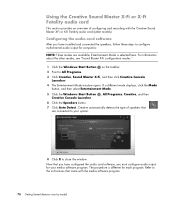
... Launcher. 4 The Entertainment Mode window opens. The procedure is selected here. Refer to the instructions that came with the Creative Sound Blaster X-Fi or X-Fi Fatality audio card (select models). Creative automatically detects the type of configuring and recording with the media software program. 76 Getting Started (features vary by model) If a different mode displays, click the Mode button, and then select Entertainment Mode. 5 Click the Windows Start Button , All Programs, Creative...
... Launcher. 4 The Entertainment Mode window opens. The procedure is selected here. Refer to the instructions that came with the Creative Sound Blaster X-Fi or X-Fi Fatality audio card (select models). Creative automatically detects the type of configuring and recording with the media software program. 76 Getting Started (features vary by model) If a different mode displays, click the Mode button, and then select Entertainment Mode. 5 Click the Windows Start Button , All Programs, Creative...

Getting Started Guide
Page 87
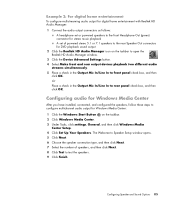
... function in all three modes. However, each mode optimizes the audio card resources to the FlexiJack connector on the audio card. Available features: Recording from Creative. 1 Connect your output device, you are available in the Creative Console Launcher after you can change the FlexiJack mode, if necessary. If so, you connect the audio cable to the FlexiJack connector on the audio card. 2 Click the Windows Start Button , All Programs, Creative...
... function in all three modes. However, each mode optimizes the audio card resources to the FlexiJack connector on the audio card. Available features: Recording from Creative. 1 Connect your output device, you are available in the Creative Console Launcher after you can change the FlexiJack mode, if necessary. If so, you connect the audio cable to the FlexiJack connector on the audio card. 2 Click the Windows Start Button , All Programs, Creative...
Getting Started Guide
Page 95
... to Speaker Setup window opens. 5 Click Next. 6 Choose the speaker connection type, and then click Next. 7 Select the number of powered stereo 5.1 or 7.1 speakers to the rear Speaker Out connectors for Windows Media Center: 1 Click the Windows Start Button on the taskbar to open the Realtek HD Audio Manager window. 3 Click the Device Advanced Settings button. 4 Select Make front and rear output devices playback two different audio streams simultaneously. 5 Place a check in the Output Mic In/Line In to test the speakers...
... to Speaker Setup window opens. 5 Click Next. 6 Choose the speaker connection type, and then click Next. 7 Select the number of powered stereo 5.1 or 7.1 speakers to the rear Speaker Out connectors for Windows Media Center: 1 Click the Windows Start Button on the taskbar to open the Realtek HD Audio Manager window. 3 Click the Device Advanced Settings button. 4 Select Make front and rear output devices playback two different audio streams simultaneously. 5 Place a check in the Output Mic In/Line In to test the speakers...

Getting Started Guide
Page 134
... the memory cards for anything that uses the Safely Remove Hardware task. See "Formatting a Memory Card." 124 Getting Started (features vary by model) Make sure that the memory card is fully inserted into the empty slot. Make sure that the read /write or security switch on the card. Replace the memory card, if necessary. Do not click Stop in the Safely Remove Hardware window. Do not insert or remove memory cards when the activity light is blinking...
... the memory cards for anything that uses the Safely Remove Hardware task. See "Formatting a Memory Card." 124 Getting Started (features vary by model) Make sure that the memory card is fully inserted into the empty slot. Make sure that the read /write or security switch on the card. Replace the memory card, if necessary. Do not click Stop in the Safely Remove Hardware window. Do not insert or remove memory cards when the activity light is blinking...

Getting Started Guide
Page 218
... panel 7 Composite Video In 6 computer 2 FM In 6 headphones 4 keyboard 4 Microphone In 4 modem 7 monitor 7 mouse 4 printer 5 S-video In 5 TV/Cable Ant 6 USB 4, 5 country/region codes 149 Creative Sound Blaster X-Fi Sound Card audio modes 77 configuring 76 cursor speed 70 customizing keyboard buttons 62 CyberLink LabelPrint creating a LightScribe label 176 features 104 CyberLink Power2Go copying a disc 174 erasing discs 170 features 104 CyberLink PowerDirector creating video disc 173 D desktop switching from Windows Media Center 164 devices connecting 10 digital camera connecting...
... panel 7 Composite Video In 6 computer 2 FM In 6 headphones 4 keyboard 4 Microphone In 4 modem 7 monitor 7 mouse 4 printer 5 S-video In 5 TV/Cable Ant 6 USB 4, 5 country/region codes 149 Creative Sound Blaster X-Fi Sound Card audio modes 77 configuring 76 cursor speed 70 customizing keyboard buttons 62 CyberLink LabelPrint creating a LightScribe label 176 features 104 CyberLink Power2Go copying a disc 174 erasing discs 170 features 104 CyberLink PowerDirector creating video disc 173 D desktop switching from Windows Media Center 164 devices connecting 10 digital camera connecting...
Getting Started Guide
Page 219
... HP Pocket Media Drive 125 HP Total Care Advisor 41 I IBM Microdrive 122 Internet security 52, 100 K keyboard connector 4 customizing buttons 62 shortcuts 63 types of buttons 57 using 57 L LAN (local area network) 12 antenna 15 checking wireless LAN device 15 connecting Ethernet LAN 5 connecting wireless LAN device 14 setting up 13 using Local Area Network 12 LightScribe, creating a LightScribe disc label 175 local area network (LAN) 12 M magicSpot 198 manuals storing 10 memory card reader 179 card types 119 in-use light 123 troubleshooting 124 using 119 memory card...
... HP Pocket Media Drive 125 HP Total Care Advisor 41 I IBM Microdrive 122 Internet security 52, 100 K keyboard connector 4 customizing buttons 62 shortcuts 63 types of buttons 57 using 57 L LAN (local area network) 12 antenna 15 checking wireless LAN device 15 connecting Ethernet LAN 5 connecting wireless LAN device 14 setting up 13 using Local Area Network 12 LightScribe, creating a LightScribe disc label 175 local area network (LAN) 12 M magicSpot 198 manuals storing 10 memory card reader 179 card types 119 in-use light 123 troubleshooting 124 using 119 memory card...
Upgrading and Servicing Guide
Page 3
...3 Removing the Front Panel 3 Replacing the Front Panel 3 Locating Components Inside the PC 4 Removing and Replacing Drives 4 Removing an Optical Drive 4 Replacing or Adding an Optical Drive 5 Removing a Memory Card Reader 5 Installing a Memory Card Reader 6 Removing a Hard Disk Drive 6 Replacing a Hard Disk Drive 8 Adding an Additional Hard Disk Drive 9 Adding Memory 11 Removing a Memory Module 11 Installing a Memory Module 12 Removing or Installing an Add-in Card 12 Removing an Add-in Card 12 Installing an Add-in Card 13 Replacing the Battery 14 Upgrading and Servicing Guide...
...3 Removing the Front Panel 3 Replacing the Front Panel 3 Locating Components Inside the PC 4 Removing and Replacing Drives 4 Removing an Optical Drive 4 Replacing or Adding an Optical Drive 5 Removing a Memory Card Reader 5 Installing a Memory Card Reader 6 Removing a Hard Disk Drive 6 Replacing a Hard Disk Drive 8 Adding an Additional Hard Disk Drive 9 Adding Memory 11 Removing a Memory Module 11 Installing a Memory Module 12 Removing or Installing an Add-in Card 12 Removing an Add-in Card 12 Installing an Add-in Card 13 Replacing the Battery 14 Upgrading and Servicing Guide...

Upgrading and Servicing Guide
Page 6
... and then from the wall outlet, and allow the internal system components to replace the hardware listed in this guide. 2 Upgrading and Servicing Guide Ensure that you may need to remove the other attached cables (such as the keyboard, mouse, and monitor). 3 Reconnect external devices. 4 Turn on the PC and all peripherals such as the monitor. 5 If you installed an add-in card, install any software drivers supplied by briefly touching a grounded metal object. After Closing...
... and then from the wall outlet, and allow the internal system components to replace the hardware listed in this guide. 2 Upgrading and Servicing Guide Ensure that you may need to remove the other attached cables (such as the keyboard, mouse, and monitor). 3 Reconnect external devices. 4 Turn on the PC and all peripherals such as the monitor. 5 If you installed an add-in card, install any software drivers supplied by briefly touching a grounded metal object. After Closing...
Upgrading and Servicing Guide
Page 9
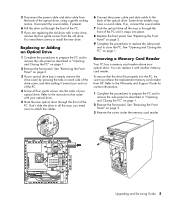
... Support Guide for contact information. 1 Complete the procedures to prepare the PC and to purchase the replacement memory card reader from the old drive. Replacing or Adding an Optical Drive 1 Complete the procedures to prepare the PC and to the back of the optical drive, using a gentle rocking motion. You need room to attach the cables. 6 Connect the power cable and data cable to remove the side panel as described in "Opening and Closing the PC...
... Support Guide for contact information. 1 Complete the procedures to prepare the PC and to purchase the replacement memory card reader from the old drive. Replacing or Adding an Optical Drive 1 Complete the procedures to prepare the PC and to the back of the optical drive, using a gentle rocking motion. You need room to attach the cables. 6 Connect the power cable and data cable to remove the side panel as described in "Opening and Closing the PC...

Upgrading and Servicing Guide
Page 10
... the screw hole under the memory card reader. The hard disk drive is aligned with the system recovery partition of the HP Personal Media Drive bay before removing the hard disk drive. See "Replacing the Front Panel" on the hard disk drive to an external storage device, such as a CD, before removing the cables. 6 Insert the screw to secure the memory card reader to the chassis. 7 Replace the front panel. If you need to run System Recovery using the recovery discs to load the factoryinstalled...
... the screw hole under the memory card reader. The hard disk drive is aligned with the system recovery partition of the HP Personal Media Drive bay before removing the hard disk drive. See "Replacing the Front Panel" on the hard disk drive to an external storage device, such as a CD, before removing the cables. 6 Insert the screw to secure the memory card reader to the chassis. 7 Replace the front panel. If you need to run System Recovery using the recovery discs to load the factoryinstalled...
Upgrading and Servicing Guide
Page 13
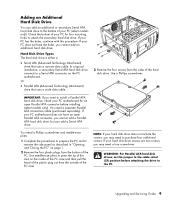
... a Serial ATA connector on the PC motherboard. If your PC has the holes, continue with this procedure. You need to the PC. WARNING: For Parallel ATA hard disk drives, set the jumper to the cable select (CS) position before installing (select models only). Hard Disk Drive Types The hard disk drive is either a: • Serial ATA (Advanced Technology Attachment) drive that uses a wide data cable. 3 Remove the four screws from the bottom of the PC case. Upgrading and Servicing Guide 9 If your hard disk drive...
... a Serial ATA connector on the PC motherboard. If your PC has the holes, continue with this procedure. You need to the PC. WARNING: For Parallel ATA hard disk drives, set the jumper to the cable select (CS) position before installing (select models only). Hard Disk Drive Types The hard disk drive is either a: • Serial ATA (Advanced Technology Attachment) drive that uses a wide data cable. 3 Remove the four screws from the bottom of the PC case. Upgrading and Servicing Guide 9 If your hard disk drive...
Upgrading and Servicing Guide
Page 17
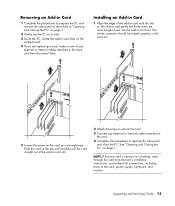
... card, and then disconnect them. Removing an Add-in Card 1 Complete the procedures to prepare the PC and remove the side panel as described in "Opening and Closing the PC" on page 1. 2 Gently lay the PC on its side. 3 Inside the PC, locate the add-in card slots on the motherboard. 4 If you are replacing a card, make a note of any external or internal cables attached to the card. 4 Complete the procedures to the card, power supply, keyboard, and monitor...
... card, and then disconnect them. Removing an Add-in Card 1 Complete the procedures to prepare the PC and remove the side panel as described in "Opening and Closing the PC" on page 1. 2 Gently lay the PC on its side. 3 Inside the PC, locate the add-in card slots on the motherboard. 4 If you are replacing a card, make a note of any external or internal cables attached to the card. 4 Complete the procedures to the card, power supply, keyboard, and monitor...

