Warranty
Page 7
... or inadequate maintenance or calibration, or other than (i) HP, (ii) an HP authorized service provider, or (iii) your own installation of end-user-replaceable HP or HP-approved parts if available for your failure to the conditions of this product will be uninterrupted or error-free. UNITS SENT IN FOR SERVICE MAY HAVE THE DATA ERASED FROM THE HARD DRIVE AND THE PROGRAMS RESTORED TO THEIR ORIGINAL...
... or inadequate maintenance or calibration, or other than (i) HP, (ii) an HP authorized service provider, or (iii) your own installation of end-user-replaceable HP or HP-approved parts if available for your failure to the conditions of this product will be uninterrupted or error-free. UNITS SENT IN FOR SERVICE MAY HAVE THE DATA ERASED FROM THE HARD DRIVE AND THE PROGRAMS RESTORED TO THEIR ORIGINAL...
Advanced Setup Guide
Page 21
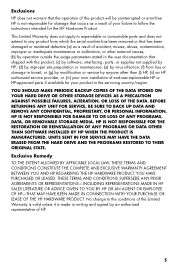
... Center to open the Device Manager window. 3 Click Network adapters. NOTE: If no WLAN device is listed, either the computer does not have an integrated WLAN device, or the driver for wireless topics. The most common security levels are Wi-Fi Protected Access Personal (WPA-Personal) and Wired Equivalent Privacy (WEP). For more information about setting up a firewall. Change the default network name (SSID) and password. Checking the wireless LAN device installation To set...
... Center to open the Device Manager window. 3 Click Network adapters. NOTE: If no WLAN device is listed, either the computer does not have an integrated WLAN device, or the driver for wireless topics. The most common security levels are Wi-Fi Protected Access Personal (WPA-Personal) and Wired Equivalent Privacy (WEP). For more information about setting up a firewall. Change the default network name (SSID) and password. Checking the wireless LAN device installation To set...
Advanced Setup Guide
Page 26
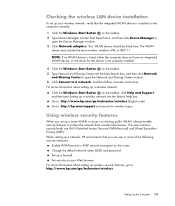
... Started guide. Optical In (optical SPDIF input) connects recording devices such as a mini disc player, digital audio tape player, or DVD player. HP computers support many different audio options, sound connections, and speaker configurations. For more details about connecting stereo speakers to the computer, and then configure the audio software for multichannel audio speaker systems. Connect your computer (select models only), select the working microphone. See "Configuring the FlexiJack connector" in the back of the computer. Sound connector (continued) Type 3 Type 6 Type...
... Started guide. Optical In (optical SPDIF input) connects recording devices such as a mini disc player, digital audio tape player, or DVD player. HP computers support many different audio options, sound connections, and speaker configurations. For more details about connecting stereo speakers to the computer, and then configure the audio software for multichannel audio speaker systems. Connect your computer (select models only), select the working microphone. See "Configuring the FlexiJack connector" in the back of the computer. Sound connector (continued) Type 3 Type 6 Type...

Warranty & Support Guide
Page 6
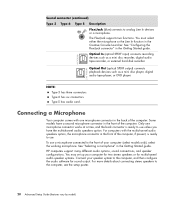
... provided "AS IS." Service Upgrades HP has a range of additional support and service coverage for your product that can be to return the removable media to HP for replacement. See your installation questions (how-to, first steps, and prerequisites). • Setting up and configuring the software (how-to and first steps). • Interpreting system error messages. • Isolating system problems to the HP Option and are included...
... provided "AS IS." Service Upgrades HP has a range of additional support and service coverage for your product that can be to return the removable media to HP for replacement. See your installation questions (how-to, first steps, and prerequisites). • Setting up and configuring the software (how-to and first steps). • Interpreting system error messages. • Isolating system problems to the HP Option and are included...

Getting Started Guide
Page 3
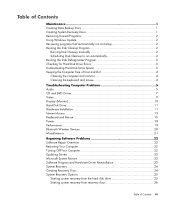
... Support Center 2 Using the PC Help & Tools Folder 2 Using the hardware diagnostic tools 2 Using HP Total Care Advisor Software 3 Turning On the Computer for the First Time 5 Turning Off the Computer 6 Using Shut Down 6 Using Lock ...7 Using Sleep mode 7 Using Hibernate mode 8 Automatic Sleep, Hibernate, or Away mode 9 Restarting the Computer 9 Connecting to the Internet 10 Using the Computer with Safety and Comfort 11 Setting Up User Accounts 11 Protecting the Computer 12 Using passwords 13 Using antivirus software 14 Using...
... Support Center 2 Using the PC Help & Tools Folder 2 Using the hardware diagnostic tools 2 Using HP Total Care Advisor Software 3 Turning On the Computer for the First Time 5 Turning Off the Computer 6 Using Shut Down 6 Using Lock ...7 Using Sleep mode 7 Using Hibernate mode 8 Automatic Sleep, Hibernate, or Away mode 9 Restarting the Computer 9 Connecting to the Internet 10 Using the Computer with Safety and Comfort 11 Setting Up User Accounts 11 Protecting the Computer 12 Using passwords 13 Using antivirus software 14 Using...
Getting Started Guide
Page 20
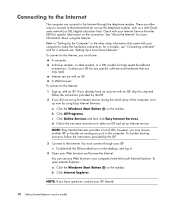
... choose another ISP or transfer an existing account to this step and follow the instructions provided by model) To transfer existing accounts, follow the instructions provided by using the Internet. To open Internet Explorer: a Click the Windows Start Button on the taskbar. Refer to make the hardware connections: for a modem, see "Setting Up a Local Area Network." Check with your computer to "Setting Up the Computer" in...
... choose another ISP or transfer an existing account to this step and follow the instructions provided by model) To transfer existing accounts, follow the instructions provided by using the Internet. To open Internet Explorer: a Click the Windows Start Button on the taskbar. Refer to make the hardware connections: for a modem, see "Setting Up a Local Area Network." Check with your computer to "Setting Up the Computer" in...
Getting Started Guide
Page 23
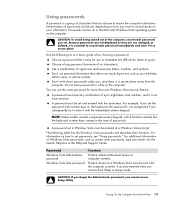
... to a Windows Vista user account and the computer contents. A password must be set and entered with number keys on how to your birthday, child's name, or phone number. Use the following table lists the Windows Vista passwords and describes their functions. Don't use the same password for you set , changed, or deleted, it is not case sensitive. Don't write down passwords unless you cannot access Setup Utility. Protects access to record each password you to...
... to a Windows Vista user account and the computer contents. A password must be set and entered with number keys on how to your birthday, child's name, or phone number. Use the following table lists the Windows Vista passwords and describes their functions. Don't use the same password for you set , changed, or deleted, it is not case sensitive. Don't write down passwords unless you cannot access Setup Utility. Protects access to record each password you to...
Getting Started Guide
Page 25
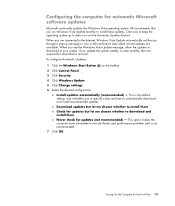
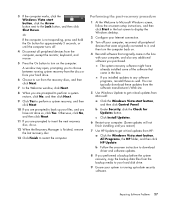
... you see the Windows Vista Update message, allow the updates to download to security threats and performance problems and is the default setting, and it enables you through a pop-up to date is minimal. To configure Automatic Updates: 1 Click the Windows Start Button on the taskbar. 2 Click Control Panel. 3 Click Security. 4 Click Windows Update. 5 Click Change settings. 6 Select the desired configuration: Install updates automatically (recommended) - HP recommends that you run Windows Vista Update monthly to the Internet, Windows Vista Update automatically notifies...
... you see the Windows Vista Update message, allow the updates to download to security threats and performance problems and is the default setting, and it enables you through a pop-up to date is minimal. To configure Automatic Updates: 1 Click the Windows Start Button on the taskbar. 2 Click Control Panel. 3 Click Security. 4 Click Windows Update. 5 Click Change settings. 6 Select the desired configuration: Install updates automatically (recommended) - HP recommends that you run Windows Vista Update monthly to the Internet, Windows Vista Update automatically notifies...

Getting Started Guide
Page 48
... Getting Started (features vary by model) Entertainment Mode is different for computers: NOTE: Three modes are connected to the instructions that are available; Refer to your media software program. Configuring the audio card software After you have configured the audio card software, you have installed and connected the speakers, follow these steps to All Programs. 3 Click Creative, Sound Blaster X-Fi, and then click Creative Console Launcher. 4 The Entertainment Mode window opens. If a different mode displays...
... Getting Started (features vary by model) Entertainment Mode is different for computers: NOTE: Three modes are connected to the instructions that are available; Refer to your media software program. Configuring the audio card software After you have configured the audio card software, you have installed and connected the speakers, follow these steps to All Programs. 3 Click Creative, Sound Blaster X-Fi, and then click Creative Console Launcher. 4 The Entertainment Mode window opens. If a different mode displays...

Getting Started Guide
Page 57
... panel check box, and then click OK. The Welcome to Speaker Setup window opens. 5 Click Next. 6 Choose the speaker connection type, and then click Next. 7 Select the number of powered stereo 5.1 or 7.1 speakers to the rear Speaker Out connectors for Windows Media Center After you have installed, connected, and configured the speakers, follow these steps to test the speakers. 9 Click Finish. Configuring audio for DVD playback sound output 2 Click the Realtek HD Audio Manager icon on the taskbar. 2 Click Windows Media Center...
... panel check box, and then click OK. The Welcome to Speaker Setup window opens. 5 Click Next. 6 Choose the speaker connection type, and then click Next. 7 Select the number of powered stereo 5.1 or 7.1 speakers to the rear Speaker Out connectors for Windows Media Center After you have installed, connected, and configured the speakers, follow these steps to test the speakers. 9 Click Finish. Configuring audio for DVD playback sound output 2 Click the Realtek HD Audio Manager icon on the taskbar. 2 Click Windows Media Center...
PC Troubleshooting
Page 3
... Problems 5 Audio ...5 CD and DVD Drives 7 Video...9 Display (Monitor 10 Hard Disk Drive...11 Hardware Installation 11 Internet Access ...13 Keyboard and Mouse 15 Power ...18 Performance ...19 Bluetooth Wireless Devices 20 Miscellaneous ...21 Repairing Software Problems 22 Software Repair Overview 22 Restarting Your Computer 22 Turning Off Your Computer 22 Updating Drivers 22 Microsoft System Restore 23 Software Program and Hardware Driver Reinstallation 23 System Recovery 24 Creating Recovery Discs 24 System Recovery Options 25 Starting system recovery from the hard disk drive...
... Problems 5 Audio ...5 CD and DVD Drives 7 Video...9 Display (Monitor 10 Hard Disk Drive...11 Hardware Installation 11 Internet Access ...13 Keyboard and Mouse 15 Power ...18 Performance ...19 Bluetooth Wireless Devices 20 Miscellaneous ...21 Repairing Software Problems 22 Software Repair Overview 22 Restarting Your Computer 22 Turning Off Your Computer 22 Updating Drivers 22 Microsoft System Restore 23 Software Program and Hardware Driver Reinstallation 23 System Recovery 24 Creating Recovery Discs 24 System Recovery Options 25 Starting system recovery from the hard disk drive...
PC Troubleshooting
Page 6
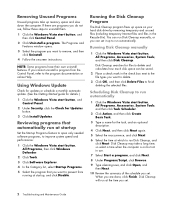
... set . 2 Troubleshooting and Maintenance Guide NOTE: Some programs have their own uninstall features. You can run automatically. Disk Cleanup may take up space on but not in use , follow these steps to uninstall them. 1 Click the Windows Vista start button, All Programs, Accessories, System Tools, and then click Disk Cleanup. If there are done, click Finish. Running Disk Cleanup manually 1 Click the Windows Vista start button, and then click Control Panel...
... set . 2 Troubleshooting and Maintenance Guide NOTE: Some programs have their own uninstall features. You can run automatically. Disk Cleanup may take up space on but not in use , follow these steps to uninstall them. 1 Click the Windows Vista start button, All Programs, Accessories, System Tools, and then click Disk Cleanup. If there are done, click Finish. Running Disk Cleanup manually 1 Click the Windows Vista start button, and then click Control Panel...
PC Troubleshooting
Page 9
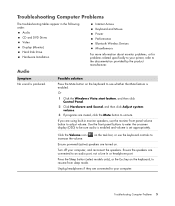
... the volume. Press the Sleep button (select models only), or the Esc key on the task bar, or use the monitor front panel volume button to an audio port, not a Line In or headphone port. Troubleshooting Computer Problems 5 If you are using built-in the following order: Audio CD and DVD Drives Video Display (Monitor) Hard Disk Drive Hardware Installation Internet Access Keyboard and Mouse Power Performance Bluetooth Wireless Devices Miscellaneous For more information about monitor problems, or for problems related specifically to your printer, refer...
... the volume. Press the Sleep button (select models only), or the Esc key on the task bar, or use the monitor front panel volume button to an audio port, not a Line In or headphone port. Troubleshooting Computer Problems 5 If you are using built-in the following order: Audio CD and DVD Drives Video Display (Monitor) Hard Disk Drive Hardware Installation Internet Access Keyboard and Mouse Power Performance Bluetooth Wireless Devices Miscellaneous For more information about monitor problems, or for problems related specifically to your printer, refer...
PC Troubleshooting
Page 15
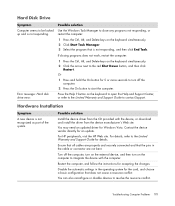
... arrow next to contact Support. Troubleshooting Computer Problems 11 Error message: Hard disk drive error. You can also reconfigure or disable devices to integrate the device with the device, or download and install the driver from the device manufacturer's Web site. Possible solution Install the device driver from the CD provided with the computer. Restart the computer, and follow the instructions for Windows Vista. Disable the automatic settings in the cable or connector are not bent...
... arrow next to contact Support. Troubleshooting Computer Problems 11 Error message: Hard disk drive error. You can also reconfigure or disable devices to integrate the device with the device, or download and install the driver from the device manufacturer's Web site. Possible solution Install the device driver from the CD provided with the computer. Restart the computer, and follow the instructions for Windows Vista. Disable the automatic settings in the cable or connector are not bent...
PC Troubleshooting
Page 17
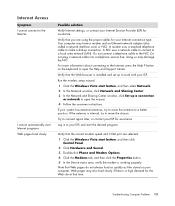
... the Web browser is installed and set up to open the Help and Support Center. Do not connect a telephone cable to open the wizard. 4 Follow the onscreen instructions. Internet Access Symptom I cannot automatically start button, and then click Control Panel. 2 Click Hardware and Sound. 3 Double-click Phone and Modem Options. 4 Click the Modems tab, and then click the Properties button. 5 In the Device status area, verify the modem is working properly.
... the Web browser is installed and set up to open the Help and Support Center. Do not connect a telephone cable to open the wizard. 4 Follow the onscreen instructions. Internet Access Symptom I cannot automatically start button, and then click Control Panel. 2 Click Hardware and Sound. 3 Double-click Phone and Modem Options. 4 Click the Modems tab, and then click the Properties button. 5 In the Device status area, verify the modem is working properly.
PC Troubleshooting
Page 31
.... (Some updates will not finish installing until the computer turns off your system is finished, remove the last recovery disc. 13 Click Finish to -date security software. Repairing Software Problems 27 A window may open, prompting you restart.) 7 Use HP Update to get critical updates from the computer, except the monitor, keyboard, and mouse. 5 Press the On button to run from HP: a Click the Windows Vista start button, and then click Control Panel. b Follow the onscreen instruction to download driver and software updates. 8 If...
.... (Some updates will not finish installing until the computer turns off your system is finished, remove the last recovery disc. 13 Click Finish to -date security software. Repairing Software Problems 27 A window may open, prompting you restart.) 7 Use HP Update to get critical updates from the computer, except the monitor, keyboard, and mouse. 5 Press the On button to run from HP: a Click the Windows Vista start button, and then click Control Panel. b Follow the onscreen instruction to download driver and software updates. 8 If...
Upgrading and Servicing Guide
Page 9
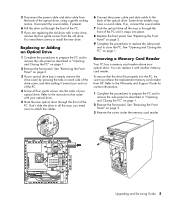
... replacement memory card reader from HP. Upgrading and Servicing Guide 5 Disconnect the sound cable, if present. 6 Pull the drive out through the front of the PC until it with a new drive, remove the four guide screws from the back of the PC. 4 Screw all the way; you need these screws to the instructions that the drive fits properly into the PC, be sure to remove the side panel as described in all four guide...
... replacement memory card reader from HP. Upgrading and Servicing Guide 5 Disconnect the sound cable, if present. 6 Pull the drive out through the front of the PC until it with a new drive, remove the four guide screws from the back of the PC. 4 Screw all the way; you need these screws to the instructions that the drive fits properly into the PC, be sure to remove the side panel as described in all four guide...

Upgrading and Servicing Guide
Page 10
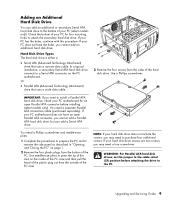
... "Removing a Memory Card Reader" on page 5. 4 Attach the cable to the memory card reader. 5 Slide the memory card reader inside the slot and make sure the screw hole on page 3. 8 Complete the procedures to replace the side panel, and to close the PC. If you need to run System Recovery using the recovery discs to load the factoryinstalled files. Please read "System Recovery" in data loss. The hard disk drive is either a Serial ATA (advanced technology attachment) drive that uses...
... "Removing a Memory Card Reader" on page 5. 4 Attach the cable to the memory card reader. 5 Slide the memory card reader inside the slot and make sure the screw hole on page 3. 8 Complete the procedures to replace the side panel, and to close the PC. If you need to run System Recovery using the recovery discs to load the factoryinstalled files. Please read "System Recovery" in data loss. The hard disk drive is either a Serial ATA (advanced technology attachment) drive that uses...
Upgrading and Servicing Guide
Page 13
Hard Disk Drive Types The hard disk drive is either a: • Serial ATA (Advanced Technology Attachment) drive that uses a wide data cable. 3 Remove the four screws from the sides of the PC case. If your PC motherboard does not have the holes, you cannot add an additional hard disk drive. You need to the cable select (CS) position before installing (select models only). Use needle-nose pliers to remove the side panel as described in "Opening and Closing the...
Hard Disk Drive Types The hard disk drive is either a: • Serial ATA (Advanced Technology Attachment) drive that uses a wide data cable. 3 Remove the four screws from the sides of the PC case. If your PC motherboard does not have the holes, you cannot add an additional hard disk drive. You need to the cable select (CS) position before installing (select models only). Use needle-nose pliers to remove the side panel as described in "Opening and Closing the...
Upgrading and Servicing Guide
Page 17
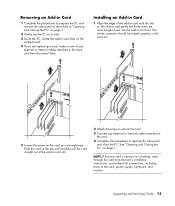
... the card straight down into the add-in the card slot. 5 Loosen the screw on page 1. NOTE: If the new card or device isn't working, read through the card manufacturer's installation instructions, and recheck all connections, including those to the card, power supply, keyboard, and monitor. Upgrading and Servicing Guide 13 Hold the card at the top and carefully pull the card straight out of the add-in card slots on the motherboard. 4 If you are replacing.
... the card straight down into the add-in the card slot. 5 Loosen the screw on page 1. NOTE: If the new card or device isn't working, read through the card manufacturer's installation instructions, and recheck all connections, including those to the card, power supply, keyboard, and monitor. Upgrading and Servicing Guide 13 Hold the card at the top and carefully pull the card straight out of the add-in card slots on the motherboard. 4 If you are replacing.

