

Limited Warranty and Support Guide
Page 4
..., you may be fixed by the use of all component replacements, support uplift contracts are being used in many cases, the defect can be directed by HP to verify configurations, load most recent firmware, install software patches, run HP diagnostics tests, or use of Warranty Service To enable HP to employ available support technologies provided by HP. Types of or to provide the best possible support and service during standard office hours. If...
..., you may be fixed by the use of all component replacements, support uplift contracts are being used in many cases, the defect can be directed by HP to verify configurations, load most recent firmware, install software patches, run HP diagnostics tests, or use of Warranty Service To enable HP to employ available support technologies provided by HP. Types of or to provide the best possible support and service during standard office hours. If...
Limited Warranty and Support Guide
Page 12
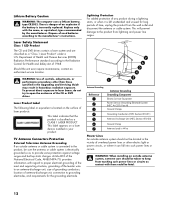
... is located on a laser device installed in hazardous radiation exposure. TV Antenna Connectors Protection External Television Antenna Grounding If an outside antenna or cable system is connected to grounding electrodes, and requirements for the grounding electrode. Lightning Protection For added protection of an explosion if the battery is classified as to the Radiation Control for long periods of overhead power lines...
... is located on a laser device installed in hazardous radiation exposure. TV Antenna Connectors Protection External Television Antenna Grounding If an outside antenna or cable system is connected to grounding electrodes, and requirements for the grounding electrode. Lightning Protection For added protection of an explosion if the battery is classified as to the Radiation Control for long periods of overhead power lines...
Limited Warranty and Support Guide
Page 14
... Internet Security by WildTangent (not available in your specific needs. Phone and e-mail support may be included with it left our factory. Refer to the setup poster included with your system for our computers and understand that you have any problems setting up your new computer. For software not listed, the HP Customer Care Center provides 30-day limited support. If you attempted to make...
... Internet Security by WildTangent (not available in your specific needs. Phone and e-mail support may be included with it left our factory. Refer to the setup poster included with your system for our computers and understand that you have any problems setting up your new computer. For software not listed, the HP Customer Care Center provides 30-day limited support. If you attempted to make...
Start Here Guide
Page 4
... desktop on a TV screen 49 Adjusting the screen resolution 49 Connecting more than one display 50 Using the Windows Media Center Setup for Optional Setup of Your TV Display...........50 Disabling the TV-out Option 51 Disconnecting the TV 51 Connecting to a Monitor or High-Definition TV 52 Choosing the AV connection to use 52 Connecting an HDMI device 54 Connecting a DVI device 55 Connecting to a Standard TV 56 Connecting to component video 56 Connecting to S-video 57 iv Start...
... desktop on a TV screen 49 Adjusting the screen resolution 49 Connecting more than one display 50 Using the Windows Media Center Setup for Optional Setup of Your TV Display...........50 Disabling the TV-out Option 51 Disconnecting the TV 51 Connecting to a Monitor or High-Definition TV 52 Choosing the AV connection to use 52 Connecting an HDMI device 54 Connecting a DVI device 55 Connecting to a Standard TV 56 Connecting to component video 56 Connecting to S-video 57 iv Start...
Start Here Guide
Page 20
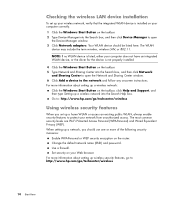
... onscreen instructions. Go to open the Device Manager window. 3 Click Network adapters. The most common security levels are Wi-Fi Protected Access Personal (WPA-Personal) and Wired Equivalent Privacy (WEP). Change the default network name (SSID) and password. NOTE: If no WLAN device is listed, either your computer does not have an integrated WLAN device, or the driver for the device is installed on your computer correctly. 1 Click the Windows Start Button...
... onscreen instructions. Go to open the Device Manager window. 3 Click Network adapters. The most common security levels are Wi-Fi Protected Access Personal (WPA-Personal) and Wired Equivalent Privacy (WEP). Change the default network name (SSID) and password. NOTE: If no WLAN device is listed, either your computer does not have an integrated WLAN device, or the driver for the device is installed on your computer correctly. 1 Click the Windows Start Button...
Start Here Guide
Page 26
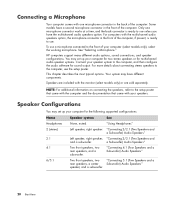
... option. HP computers support many different audio options, sound connections, and speaker configurations. "Using Headphones" Left speaker, right speaker. Your system may set up your speaker system to the computer, see the setup poster. a Subwoofer) Audio Speakers" Two front speakers, two rear speakers, and a subwoofer. Some models have different components. "Connecting 4.1 (Four Speakers and a Subwoofer) Audio Speakers" Two front speakers, two "Connecting 5.1 (Five Speakers and a rear speakers, a center Subwoofer) Audio Speakers" speaker, and a subwoofer. 20 Start...
... option. HP computers support many different audio options, sound connections, and speaker configurations. "Using Headphones" Left speaker, right speaker. Your system may set up your speaker system to the computer, see the setup poster. a Subwoofer) Audio Speakers" Two front speakers, two rear speakers, and a subwoofer. Some models have different components. "Connecting 4.1 (Four Speakers and a Subwoofer) Audio Speakers" Two front speakers, two "Connecting 5.1 (Five Speakers and a rear speakers, a center Subwoofer) Audio Speakers" speaker, and a subwoofer. 20 Start...
Getting Started Guide
Page 4
... Switching Mouse Button Functions 29 Changing Mouse Pointer Speed 29 Using the Windows Media Center Remote Control 31 Remote Control Buttons Overview 32 About the Remote Control 34 Troubleshooting the remote control 35 Remote sensor is not receiving a signal from the remote control 35 Introducing Your Computer Software 37 Learning More About Software 37 Using the Desktop 37 Removing desktop icons 38 Retrieving desktop icons 38 Using the Windows Start Button Menu 38 Using the All Programs menu 38 Organizing your All Programs list 39 Using the Control Panel 39 Resizing Windows...
... Switching Mouse Button Functions 29 Changing Mouse Pointer Speed 29 Using the Windows Media Center Remote Control 31 Remote Control Buttons Overview 32 About the Remote Control 34 Troubleshooting the remote control 35 Remote sensor is not receiving a signal from the remote control 35 Introducing Your Computer Software 37 Learning More About Software 37 Using the Desktop 37 Removing desktop icons 38 Retrieving desktop icons 38 Using the Windows Start Button Menu 38 Using the All Programs menu 38 Organizing your All Programs list 39 Using the Control Panel 39 Resizing Windows...

Getting Started Guide
Page 24
... Control Panel. 3 Click Security. 4 Click Windows Updates. 5 Click Change Settings. 6 Select the desired configuration: Automatic (recommended) - This is recommended that you to specify a day and time to download and install them Never check for Software Updates Microsoft continually updates the Windows Vista operating system. Download updates but let me choose whether to install them Check for updates but let me choose whether to automatically download and install recommended updates. It is the default setting...
... Control Panel. 3 Click Security. 4 Click Windows Updates. 5 Click Change Settings. 6 Select the desired configuration: Automatic (recommended) - This is recommended that you to specify a day and time to download and install them Never check for Software Updates Microsoft continually updates the Windows Vista operating system. Download updates but let me choose whether to install them Check for updates but let me choose whether to automatically download and install recommended updates. It is the default setting...
Getting Started Guide
Page 35
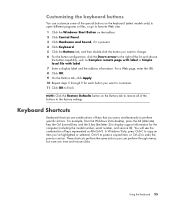
... and mouse clicks. NOTE: Click the Restore Defaults button on the taskbar. 2 Click Control Panel. 3 Click Hardware and Sound, if it is present. 4 Click Keyboard. 5 Click the Buttons tab, and then double-click the button you want to change. 6 For the button configuration, click the Down arrow to finish. For example, from the Windows Vista desktop, press the Alt (alternate) key, the Ctrl (control) key, and the S key (the letter S) to display support...
... and mouse clicks. NOTE: Click the Restore Defaults button on the taskbar. 2 Click Control Panel. 3 Click Hardware and Sound, if it is present. 4 Click Keyboard. 5 Click the Buttons tab, and then double-click the button you want to change. 6 For the button configuration, click the Down arrow to finish. For example, from the Windows Vista desktop, press the Alt (alternate) key, the Ctrl (control) key, and the S key (the letter S) to display support...

Getting Started Guide
Page 185
... turning off PC 10 remote control 32 buttons, keyboard customizing 25 C card reader, memory 61 carpal tunnel syndrome 5 CDs creating a music CD in Music 101, 102 erasing rewritable 120 playing in Music 96, 98 change the speed of the cursor 29 Computer Playback 149 country/region codes 111 cursor speed 29 customizing keyboard buttons 25 Index D desktop switching from Media Center 80 digital images 129 digital picture 61, 129 digital video...
... turning off PC 10 remote control 32 buttons, keyboard customizing 25 C card reader, memory 61 carpal tunnel syndrome 5 CDs creating a music CD in Music 101, 102 erasing rewritable 120 playing in Music 96, 98 change the speed of the cursor 29 Computer Playback 149 country/region codes 111 cursor speed 29 customizing keyboard buttons 25 Index D desktop switching from Media Center 80 digital images 129 digital picture 61, 129 digital video...
Getting Started Guide
Page 188
... 172 Start menu Media Center 78 Support messages 2 SVCD 150 switching mouse button functions 29 T Television Program Guide no data available 159 recording TV programs 165 searching for TV programs 163 setting up a download method 160 using the More information button 159 viewing 159 troubleshooting remote sensor 35 turning off PC 10 TV adding missing channels to the guide 162 advanced recording options 165 editing channels in the guide 162 manually downloading the guide...
... 172 Start menu Media Center 78 Support messages 2 SVCD 150 switching mouse button functions 29 T Television Program Guide no data available 159 recording TV programs 165 searching for TV programs 163 setting up a download method 160 using the More information button 159 viewing 159 troubleshooting remote sensor 35 turning off PC 10 TV adding missing channels to the guide 162 advanced recording options 165 editing channels in the guide 162 manually downloading the guide...
PC Troubleshooting
Page 3
...Audio ...5 CD and DVD Drives 7 Video...9 Display (Monitor)...9 Hard Disk Drive...10 Hardware Installation 11 Internet Access ...13 Keyboard and Mouse 15 Power ...17 Performance ...19 Bluetooth Wireless Devices 20 Miscellaneous ...21 Repairing Software Problems 22 Software Repair Overview 22 Restarting Your Computer 22 Turning Off Your Computer 22 Updating Drivers 22 Microsoft System Restore 23 Software Program and Hardware Driver Reinstallation 23 System Recovery 24 Creating Recovery Discs 24 System Recovery Options 25 Starting system recovery from the hard disk drive 25 Running...
...Audio ...5 CD and DVD Drives 7 Video...9 Display (Monitor)...9 Hard Disk Drive...10 Hardware Installation 11 Internet Access ...13 Keyboard and Mouse 15 Power ...17 Performance ...19 Bluetooth Wireless Devices 20 Miscellaneous ...21 Repairing Software Problems 22 Software Repair Overview 22 Restarting Your Computer 22 Turning Off Your Computer 22 Updating Drivers 22 Microsoft System Restore 23 Software Program and Hardware Driver Reinstallation 23 System Recovery 24 Creating Recovery Discs 24 System Recovery Options 25 Starting system recovery from the hard disk drive 25 Running...
PC Troubleshooting
Page 9
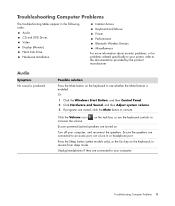
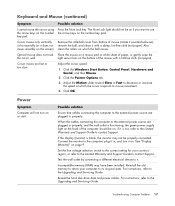
... button to see whether the Mute feature is produced. Troubleshooting Computer Problems 5 Turn off your computer, and reconnect the speakers. Ensure the speakers are connected to your computer. Troubleshooting Computer Problems The troubleshooting tables appear in the following order: Audio CD and DVD Drives Video Display (Monitor) Hard Disk Drive Hardware Installation Internet Access Keyboard and Mouse Power Performance Bluetooth Wireless Devices Miscellaneous For more information about monitor problems, or for problems related specifically to your printer, refer to an audio port...
... button to see whether the Mute feature is produced. Troubleshooting Computer Problems 5 Turn off your computer, and reconnect the speakers. Ensure the speakers are connected to your computer. Troubleshooting Computer Problems The troubleshooting tables appear in the following order: Audio CD and DVD Drives Video Display (Monitor) Hard Disk Drive Hardware Installation Internet Access Keyboard and Mouse Power Performance Bluetooth Wireless Devices Miscellaneous For more information about monitor problems, or for problems related specifically to your printer, refer to an audio port...
PC Troubleshooting
Page 15
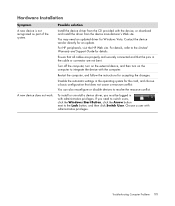
... a resource conflict. A Hardware Installation Symptom A new device is not recognized as part of the system. Ensure that all cables are not bent. To install or uninstall a device driver, you need an updated driver for details. Turn off the computer, turn on the external device, and then turn on the computer to the Limited Warranty and Support Guide for Windows Vista. Choose a user with the device, or download and install the driver from the device manufacturer's Web site...
... a resource conflict. A Hardware Installation Symptom A new device is not recognized as part of the system. Ensure that all cables are not bent. To install or uninstall a device driver, you need an updated driver for details. Turn off the computer, turn on the external device, and then turn on the computer to the Limited Warranty and Support Guide for Windows Vista. Choose a user with the device, or download and install the driver from the device manufacturer's Web site...
PC Troubleshooting
Page 17
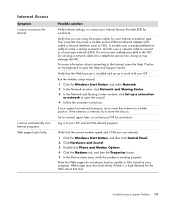
... onscreen instructions. Run the wireless setup wizard: 1 Click the Windows Start Button, and select Network. 2 In the Network window, click Network and Sharing Center. 3 In the Network and Sharing Center window, click Set up a connection or network to work with your Internet connection type. Web pages may also load slowly if there is working properly. A modem uses a standard telephone cable to make a dial-up to open the Help and Support Center. Verify that the correct modem speed and COM port are using...
... onscreen instructions. Run the wireless setup wizard: 1 Click the Windows Start Button, and select Network. 2 In the Network window, click Network and Sharing Center. 3 In the Network and Sharing Center window, click Set up a connection or network to work with your Internet connection type. Web pages may also load slowly if there is working properly. A modem uses a standard telephone cable to make a dial-up to open the Help and Support Center. Verify that the correct modem speed and COM port are using...
PC Troubleshooting
Page 21
... number the arrow keys on the number key pad. See "Display (Monitor)" on which the cursor responds to the Upgrading and Servicing Guide. For instructions, refer to contact Support. Keyboard and Mouse (continued) Symptom Possible solution I cannot move smoothly on the screen). When the cables connecting the computer to its original state. For instructions, refer to mouse movement. 4 Click OK. Adjust the cursor speed: 1 Click the Windows Start Button, Control Panel, Hardware and Sound, and then Mouse...
... number the arrow keys on the number key pad. See "Display (Monitor)" on which the cursor responds to the Upgrading and Servicing Guide. For instructions, refer to contact Support. Keyboard and Mouse (continued) Symptom Possible solution I cannot move smoothly on the screen). When the cables connecting the computer to its original state. For instructions, refer to mouse movement. 4 Click OK. Adjust the cursor speed: 1 Click the Windows Start Button, Control Panel, Hardware and Sound, and then Mouse...
Upgrading and Servicing Guide
Page 9
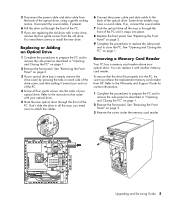
... new drive. See "Removing the Front Panel" on page 1. You need room to attach the cables. 6 Connect the power cable and data cable to the instructions that the drive fits properly into the PC, be sure to purchase the replacement memory card reader from the back of the PC until it snaps into the sides of the optical drive. If so, connect the sound cable. 7 Push the optical drive all the way in all four guide...
... new drive. See "Removing the Front Panel" on page 1. You need room to attach the cables. 6 Connect the power cable and data cable to the instructions that the drive fits properly into the PC, be sure to purchase the replacement memory card reader from the back of the PC until it snaps into the sides of the optical drive. If so, connect the sound cable. 7 Push the optical drive all the way in all four guide...

Upgrading and Servicing Guide
Page 10
... memory card reader. You can replace the (primary) hard disk drive attached to your HP Personal Media Drive bay. See "Removing the Front Panel" on page 1. 6 Upgrading and Servicing Guide The hard disk drive is aligned with the system recovery partition of the HP Personal Media Drive bay before removing the hard disk drive. If you need to run System Recovery using the recovery discs to load the factoryinstalled files. Failure to do so will result in "Opening and Closing the PC" on page 1. 2 Remove the front panel...
... memory card reader. You can replace the (primary) hard disk drive attached to your HP Personal Media Drive bay. See "Removing the Front Panel" on page 1. 6 Upgrading and Servicing Guide The hard disk drive is aligned with the system recovery partition of the HP Personal Media Drive bay before removing the hard disk drive. If you need to run System Recovery using the recovery discs to load the factoryinstalled files. Failure to do so will result in "Opening and Closing the PC" on page 1. 2 Remove the front panel...
Upgrading and Servicing Guide
Page 13
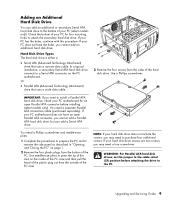
... open Parallel ATA connector before attaching the drive to the cable select (CS) position before installing (select models only). In a typical installation, a secondary Serial ATA hard disk drive connects to the bottom of the PC case. Or • Parallel ATA (Advanced Technology Attachment) drive that uses a narrow data cable. WARNING: For Parallel ATA hard disk drives, set the jumper to the PC. Hard Disk Drive Types The hard disk drive is either a: • Serial ATA (Advanced Technology Attachment) drive that uses a wide data cable. 3 Remove...
... open Parallel ATA connector before attaching the drive to the cable select (CS) position before installing (select models only). In a typical installation, a secondary Serial ATA hard disk drive connects to the bottom of the PC case. Or • Parallel ATA (Advanced Technology Attachment) drive that uses a narrow data cable. WARNING: For Parallel ATA hard disk drives, set the jumper to the PC. Hard Disk Drive Types The hard disk drive is either a: • Serial ATA (Advanced Technology Attachment) drive that uses a wide data cable. 3 Remove...
Upgrading and Servicing Guide
Page 17
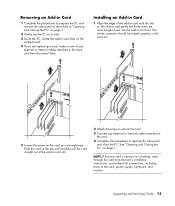
... to replace the side panel and close the PC. The whole connector should be seated properly in card slot. 2 Attach the screw to secure the card. 3 Connect any external or internal cables attached to the card, and then disconnect them. Upgrading and Servicing Guide 13 NOTE: If the new card or device isn't working, read through the card manufacturer's installation instructions, and recheck all connections, including those to the card, power supply, keyboard, and monitor. Hold the card at...
... to replace the side panel and close the PC. The whole connector should be seated properly in card slot. 2 Attach the screw to secure the card. 3 Connect any external or internal cables attached to the card, and then disconnect them. Upgrading and Servicing Guide 13 NOTE: If the new card or device isn't working, read through the card manufacturer's installation instructions, and recheck all connections, including those to the card, power supply, keyboard, and monitor. Hold the card at...

