Limited Warranty and Support Guide (Refurbished Desktops)
Page 2
... conditions set forth in this document if a repair to you , the customer, express limited warranty rights from country/region to the HP Hardware Product - You may be covered by export controls issued by or leased from the date HP completes installation. Refurbished HP Pavilion desktop Computers, HP Pavilion Media Center Computers, HP Digital Entertainment Center, HP Displays, and HP Notebook Consumer products. In addition, you with this Limited Warranty. HP MAKES NO...
... conditions set forth in this document if a repair to you , the customer, express limited warranty rights from country/region to the HP Hardware Product - You may be covered by export controls issued by or leased from the date HP completes installation. Refurbished HP Pavilion desktop Computers, HP Pavilion Media Center Computers, HP Digital Entertainment Center, HP Displays, and HP Notebook Consumer products. In addition, you with this Limited Warranty. HP MAKES NO...
Limited Warranty and Support Guide (Refurbished Desktops)
Page 5
... HP authorized reseller. If your HP Option is installed in an HP Hardware Product, HP may provide warranty service for the remaining warranty period of service upgrades and the cost for these service upgrades, refer to the HP Web site at additional cost. Pick Up & Return Warranty Service (Desktops and Digital Entertainment Centers ONLY) Your HP Limited Warranty may include a pick up the defective unit from your location, repair...
... HP authorized reseller. If your HP Option is installed in an HP Hardware Product, HP may provide warranty service for the remaining warranty period of service upgrades and the cost for these service upgrades, refer to the HP Web site at additional cost. Pick Up & Return Warranty Service (Desktops and Digital Entertainment Centers ONLY) Your HP Limited Warranty may include a pick up the defective unit from your location, repair...
Start Here Guide
Page 4
... desktop on a TV screen 49 Adjusting the screen resolution 49 Connecting more than one display 50 Using the Windows Media Center Setup for Optional Setup of Your TV Display...........50 Disabling the TV-out Option 51 Disconnecting the TV 51 Connecting to a Monitor or High-Definition TV 52 Choosing the AV connection to use 52 Connecting an HDMI device 54 Connecting a DVI device 55 Connecting to a Standard TV 56 Connecting to component video 56 Connecting to S-video 57 iv Start...
... desktop on a TV screen 49 Adjusting the screen resolution 49 Connecting more than one display 50 Using the Windows Media Center Setup for Optional Setup of Your TV Display...........50 Disabling the TV-out Option 51 Disconnecting the TV 51 Connecting to a Monitor or High-Definition TV 52 Choosing the AV connection to use 52 Connecting an HDMI device 54 Connecting a DVI device 55 Connecting to a Standard TV 56 Connecting to component video 56 Connecting to S-video 57 iv Start...
Start Here Guide
Page 20
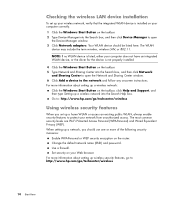
... the Windows Start Button on your Web browser. Set security on the taskbar. 2 Type Device Manager into the Search box, and then click Network and Sharing Center to open the Device Manager window. 3 Click Network adapters. Your WLAN device should use one or more information about setting up wireless security features, go to the network and follow any onscreen instructions. Change the default network name (SSID) and password. Checking the wireless LAN device installation To set up a home WLAN or access...
... the Windows Start Button on your Web browser. Set security on the taskbar. 2 Type Device Manager into the Search box, and then click Network and Sharing Center to open the Device Manager window. 3 Click Network adapters. Your WLAN device should use one or more information about setting up wireless security features, go to the network and follow any onscreen instructions. Change the default network name (SSID) and password. Checking the wireless LAN device installation To set up a home WLAN or access...
Start Here Guide
Page 26
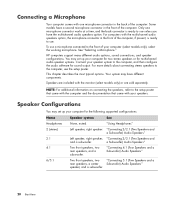
... setup poster. This chapter describes the most typical options. "Connecting 2/2.1 (Two Speakers and a Subwoofer) Audio Speakers" Left speaker, right speaker, "Connecting 2/2.1 (Two Speakers and and a subwoofer. Speakers are included with your speaker system to the computer, and then configure the audio software for multichannel audio speaker systems. Connect your speakers. "Using Headphones" Left speaker, right speaker. For computers with one microphone connector works at a time, and the back connector is ready to use. HP computers support many different audio options, sound...
... setup poster. This chapter describes the most typical options. "Connecting 2/2.1 (Two Speakers and a Subwoofer) Audio Speakers" Left speaker, right speaker, "Connecting 2/2.1 (Two Speakers and and a subwoofer. Speakers are included with your speaker system to the computer, and then configure the audio software for multichannel audio speaker systems. Connect your speakers. "Using Headphones" Left speaker, right speaker. For computers with one microphone connector works at a time, and the back connector is ready to use. HP computers support many different audio options, sound...
Getting Started Guide
Page 4
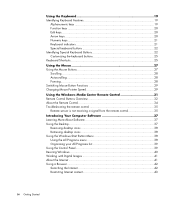
... Switching Mouse Button Functions 29 Changing Mouse Pointer Speed 29 Using the Windows Media Center Remote Control 31 Remote Control Buttons Overview 32 About the Remote Control 34 Troubleshooting the remote control 35 Remote sensor is not receiving a signal from the remote control 35 Introducing Your Computer Software 37 Learning More About Software 37 Using the Desktop 37 Removing desktop icons 38 Retrieving desktop icons 38 Using the Windows Start Button Menu 38 Using the All Programs menu 38 Organizing your All Programs list 39 Using the Control Panel 39 Resizing Windows...
... Switching Mouse Button Functions 29 Changing Mouse Pointer Speed 29 Using the Windows Media Center Remote Control 31 Remote Control Buttons Overview 32 About the Remote Control 34 Troubleshooting the remote control 35 Remote sensor is not receiving a signal from the remote control 35 Introducing Your Computer Software 37 Learning More About Software 37 Using the Desktop 37 Removing desktop icons 38 Retrieving desktop icons 38 Using the Windows Start Button Menu 38 Using the All Programs menu 38 Organizing your All Programs list 39 Using the Control Panel 39 Resizing Windows...
Getting Started Guide
Page 17
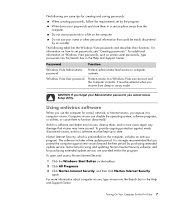
... not use the computer for e-mail, network, or Internet access, you protect the computer against newly discovered viruses, antivirus software must be easily discovered by the program. Do not store passwords in the Help and Support Center. For information on Windows Vista passwords, such as screen saver passwords, type passwords into the Search box in most cases repair any damage that could be entered when you cannot access Setup Utility. For...
... not use the computer for e-mail, network, or Internet access, you protect the computer against newly discovered viruses, antivirus software must be easily discovered by the program. Do not store passwords in the Help and Support Center. For information on Windows Vista passwords, such as screen saver passwords, type passwords into the Search box in most cases repair any damage that could be entered when you cannot access Setup Utility. For...

Getting Started Guide
Page 24
... Automatic Updates feature. To configure Automatic Updates: 1 Click the Windows Start Button on the taskbar. 2 Click Control Panel. 3 Click Security. 4 Click Windows Updates. 5 Click Change Settings. 6 Select the desired configuration: Automatic (recommended) - This is not recommended. 7 Click OK. 14 Getting Started When you are connected to the Internet, Windows Vista Update automatically notifies you see the Windows Vista Update message, allow the updates to download to automatically download and install recommended updates. Signing Up for updates - This option makes the...
... Automatic Updates feature. To configure Automatic Updates: 1 Click the Windows Start Button on the taskbar. 2 Click Control Panel. 3 Click Security. 4 Click Windows Updates. 5 Click Change Settings. 6 Select the desired configuration: Automatic (recommended) - This is not recommended. 7 Click OK. 14 Getting Started When you are connected to the Internet, Windows Vista Update automatically notifies you see the Windows Vista Update message, allow the updates to download to automatically download and install recommended updates. Signing Up for updates - This option makes the...

Getting Started Guide
Page 185
... turning off PC 10 remote control 32 buttons, keyboard customizing 25 C card reader, memory 61 carpal tunnel syndrome 5 CDs creating a music CD in Music 101, 102 erasing rewritable 120 playing in Music 96, 98 change the speed of the cursor 29 Computer Playback 149 country/region codes 111 cursor speed 29 customizing keyboard buttons 25 Index D desktop switching from Media Center 80 digital images 129 digital picture 61, 129 digital video...
... turning off PC 10 remote control 32 buttons, keyboard customizing 25 C card reader, memory 61 carpal tunnel syndrome 5 CDs creating a music CD in Music 101, 102 erasing rewritable 120 playing in Music 96, 98 change the speed of the cursor 29 Computer Playback 149 country/region codes 111 cursor speed 29 customizing keyboard buttons 25 Index D desktop switching from Media Center 80 digital images 129 digital picture 61, 129 digital video...
Getting Started Guide
Page 188
... 172 Start menu Media Center 78 Support messages 2 SVCD 150 switching mouse button functions 29 T Television Program Guide no data available 159 recording TV programs 165 searching for TV programs 163 setting up a download method 160 using the More information button 159 viewing 159 troubleshooting remote sensor 35 turning off PC 10 TV adding missing channels to the guide 162 advanced recording options 165 editing channels in the guide 162 manually downloading the guide...
... 172 Start menu Media Center 78 Support messages 2 SVCD 150 switching mouse button functions 29 T Television Program Guide no data available 159 recording TV programs 165 searching for TV programs 163 setting up a download method 160 using the More information button 159 viewing 159 troubleshooting remote sensor 35 turning off PC 10 TV adding missing channels to the guide 162 advanced recording options 165 editing channels in the guide 162 manually downloading the guide...
PC Troubleshooting and Maintenance Guide
Page 4
Repairing Software Problems 21 Software Repair Overview 21 Restarting Your Computer 22 Turning Off Your Computer 22 Updating Drivers 22 Microsoft System Restore 23 Software Program and Hardware Driver Reinstallation 24 System Recovery 25 Creating Recovery Discs 25 Choosing Recovery Disc Media 26 System Recovery Options 27 Running System Recovery from the Hard Disk Drive 27 Starting System Recovery from the Windows Vista Start menu 27 Starting System Recovery from system startup 28 iv Troubleshooting and Maintenance Guide
Repairing Software Problems 21 Software Repair Overview 21 Restarting Your Computer 22 Turning Off Your Computer 22 Updating Drivers 22 Microsoft System Restore 23 Software Program and Hardware Driver Reinstallation 24 System Recovery 25 Creating Recovery Discs 25 Choosing Recovery Disc Media 26 System Recovery Options 27 Running System Recovery from the Hard Disk Drive 27 Starting System Recovery from the Windows Vista Start menu 27 Starting System Recovery from system startup 28 iv Troubleshooting and Maintenance Guide
PC Troubleshooting and Maintenance Guide
Page 13
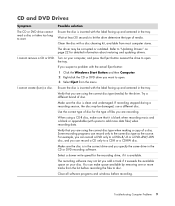
... type of disc for detailed information about restoring and updating drivers. Troubleshooting Computer Problems 9 I cannot remove a CD or DVD. Try a different brand of media. If you suspect a problem with the label facing up and centered in the CD or DVD recording software. Verify that it is inserted with a disc cleaning kit, available from the menu. Select a slower write speed for the drive. Ensure the disc is available. Use the correct type...
... type of disc for detailed information about restoring and updating drivers. Troubleshooting Computer Problems 9 I cannot remove a CD or DVD. Try a different brand of media. If you suspect a problem with the label facing up and centered in the CD or DVD recording software. Verify that it is inserted with a disc cleaning kit, available from the menu. Select a slower write speed for the drive. Ensure the disc is available. Use the correct type...
PC Troubleshooting and Maintenance Guide
Page 15
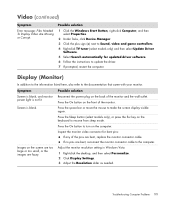
... models only) and then select Update Driver Software. 5 Select Search automatically for bent pins: If any of the pins are bent, replace the monitor connector cable. If no pins are fuzzy. Display (Monitor) In addition to the information listed here, also refer to make the screen display visible again. Press the Sleep button (select models only), or press the Esc key on the computer. Adjust the monitor resolution setting in Windows Vista: 1 Right-click the desktop...
... models only) and then select Update Driver Software. 5 Select Search automatically for bent pins: If any of the pins are bent, replace the monitor connector cable. If no pins are fuzzy. Display (Monitor) In addition to the information listed here, also refer to make the screen display visible again. Press the Sleep button (select models only), or press the Esc key on the computer. Adjust the monitor resolution setting in Windows Vista: 1 Right-click the desktop...
PC Troubleshooting and Maintenance Guide
Page 18
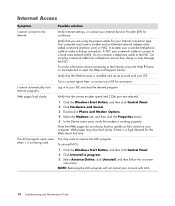
... there is installed and set up connection. when it is working properly. A modem uses a standard telephone cable to remove the AOL program. To uninstall AOL: 1 Click the Windows Start Button, and then click Control Panel. 2 Click Uninstall a program. 3 Select America Online, click Uninstall, and then follow the onscreen instructions. Verify that you are selected: 1 Click the Windows Start Button, and then click Control Panel. 2 Click Hardware and Sound. 3 Double-click...
... there is installed and set up connection. when it is working properly. A modem uses a standard telephone cable to remove the AOL program. To uninstall AOL: 1 Click the Windows Start Button, and then click Control Panel. 2 Click Uninstall a program. 3 Select America Online, click Uninstall, and then follow the onscreen instructions. Verify that you are selected: 1 Click the Windows Start Button, and then click Control Panel. 2 Click Hardware and Sound. 3 Double-click...
PC Troubleshooting and Maintenance Guide
Page 20
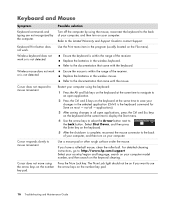
... Support. not all open application. 2 Press the Ctrl and S keys on the keyboard at the same time to display the Start menu. 4 Use the arrow keys to select the Arrow button next to save your computer. Replace the batteries in the wireless keyboard. Cursor responds slowly to the documentation that came with the keyboard. Restart your computer model number, and then search on most - For detailed cleaning instructions...
... Support. not all open application. 2 Press the Ctrl and S keys on the keyboard at the same time to display the Start menu. 4 Use the arrow keys to select the Arrow button next to save your computer. Replace the batteries in the wireless keyboard. Cursor responds slowly to the documentation that came with the keyboard. Restart your computer model number, and then search on most - For detailed cleaning instructions...

PC Troubleshooting and Maintenance Guide
Page 24
..., or xD. Replace the memory card if necessary. 20 Troubleshooting and Maintenance Guide Plug in other USB devices, leave the remote sensor plugged in -use light is fully inserted into the same USB port. 6 Disconnect all open programs, and then try the desired task again, or restart your computer (click the Windows Start Button, click the Arrow button next to it may support additional types. Make sure the memory card is set to Write Enabled before attempting...
..., or xD. Replace the memory card if necessary. 20 Troubleshooting and Maintenance Guide Plug in other USB devices, leave the remote sensor plugged in -use light is fully inserted into the same USB port. 6 Disconnect all open programs, and then try the desired task again, or restart your computer (click the Windows Start Button, click the Arrow button next to it may support additional types. Make sure the memory card is set to Write Enabled before attempting...
Upgrading and Servicing Guide
Page 9
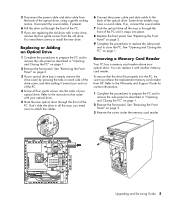
... your optical drive. Refer to the instructions that the drive fits properly into place. 8 Replace the front panel. Removing a Memory Card Reader Your PC has a memory card reader above your optical drive. 5 Slide the new optical drive through the front of the PC. To ensure that came with another memory card reader. See "Removing the Front Panel" on page 1. Upgrading and Servicing Guide 5 You need room to attach the cables. 6 Connect the power cable and data cable to install the new drive. If so, connect the sound cable. 7 Push the optical drive...
... your optical drive. Refer to the instructions that the drive fits properly into place. 8 Replace the front panel. Removing a Memory Card Reader Your PC has a memory card reader above your optical drive. 5 Slide the new optical drive through the front of the PC. To ensure that came with another memory card reader. See "Removing the Front Panel" on page 1. Upgrading and Servicing Guide 5 You need room to attach the cables. 6 Connect the power cable and data cable to install the new drive. If so, connect the sound cable. 7 Push the optical drive...

Upgrading and Servicing Guide
Page 10
... of the memory card reader. See "Removing the Front Panel" on page 3. 3 Make a note of each cable attached to load the factoryinstalled files. If you need to run System Recovery using the recovery discs to the hard disk drive and back of the HP Personal Media Drive bay before removing the hard disk drive. 4 Pull the memory card reader part way out of the front of the PC. 5 Remove the cable attached to remove the side panel as described in "Opening and Closing...
... of the memory card reader. See "Removing the Front Panel" on page 3. 3 Make a note of each cable attached to load the factoryinstalled files. If you need to run System Recovery using the recovery discs to the hard disk drive and back of the HP Personal Media Drive bay before removing the hard disk drive. 4 Pull the memory card reader part way out of the front of the PC. 5 Remove the cable attached to remove the side panel as described in "Opening and Closing...
Upgrading and Servicing Guide
Page 13
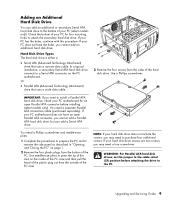
... open Parallel ATA connector, you cannot add an additional hard disk drive. In a typical installation, a secondary Serial ATA hard disk drive connects to the cable select (CS) position before installing (select models only). WARNING: For Parallel ATA hard disk drives, set the jumper to a Serial ATA connector on page 1. 2 Remove the four plastic plugs from the bottom of the PC case. Adding an Additional Hard Disk Drive You can add a Serial ATA drive. Or • Parallel ATA (Advanced Technology Attachment) drive that uses a narrow data cable...
... open Parallel ATA connector, you cannot add an additional hard disk drive. In a typical installation, a secondary Serial ATA hard disk drive connects to the cable select (CS) position before installing (select models only). WARNING: For Parallel ATA hard disk drives, set the jumper to a Serial ATA connector on page 1. 2 Remove the four plastic plugs from the bottom of the PC case. Adding an Additional Hard Disk Drive You can add a Serial ATA drive. Or • Parallel ATA (Advanced Technology Attachment) drive that uses a narrow data cable...
Upgrading and Servicing Guide
Page 17
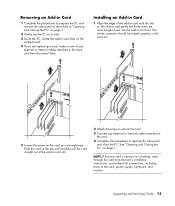
... card. 3 Connect any external or internal cables attached to the card, and then disconnect them. Upgrading and Servicing Guide 13 Hold the card at the top and carefully pull the card straight out of any external or internal cables attached to the card. 4 Complete the procedures to the card, power supply, keyboard, and monitor. The whole connector should be seated properly in card slot. See "Opening and Closing the PC" on the card you are replacing. Installing an Add...
... card. 3 Connect any external or internal cables attached to the card, and then disconnect them. Upgrading and Servicing Guide 13 Hold the card at the top and carefully pull the card straight out of any external or internal cables attached to the card. 4 Complete the procedures to the card, power supply, keyboard, and monitor. The whole connector should be seated properly in card slot. See "Opening and Closing the PC" on the card you are replacing. Installing an Add...

