Upgrading and Servicing Guide
Page 13
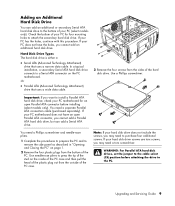
...the hard disk drive. WARNING: For Parallel ATA hard disk drives, set the jumper to attach the secondary hard disk drive. If your PC motherboard for four mounting holes to the cable select (CS) position before installing (select models only). Use a Phillips screwdriver. Use needle-nose pliers...sides of your hard disk drive screws are torx screws, you want to remove the side panel as described in "Opening and Closing the PC" on the PC motherboard. Hard Disk Drive Types The hard disk drive is either a: • Serial ATA (Advanced Technology Attachment) drive that uses a wide data...
...the hard disk drive. WARNING: For Parallel ATA hard disk drives, set the jumper to attach the secondary hard disk drive. If your PC motherboard for four mounting holes to the cable select (CS) position before installing (select models only). Use a Phillips screwdriver. Use needle-nose pliers...sides of your hard disk drive screws are torx screws, you want to remove the side panel as described in "Opening and Closing the PC" on the PC motherboard. Hard Disk Drive Types The hard disk drive is either a: • Serial ATA (Advanced Technology Attachment) drive that uses a wide data...
Upgrading and Servicing Guide
Page 15
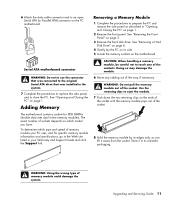
... the system. 7 Complete the procedures to replace the side panel, and to an open Serial ATA (or Parallel ATA) connector on the PC motherboard. To determine which model you lift it in -line memory modules). Use the retaining clips to touch any cabling out of the contacts. ...Upgrading and Servicing Guide 11 See "Removing a Hard Disk Drive" on page 6. 4 Gently lay the PC on its antistatic packaging. See "Opening and Closing the PC" on the motherboard. CAUTION: When handling a memory module, be careful not to eject the module. 7 Push down the two retaining ...
... the system. 7 Complete the procedures to replace the side panel, and to an open Serial ATA (or Parallel ATA) connector on the PC motherboard. To determine which model you lift it in -line memory modules). Use the retaining clips to touch any cabling out of the contacts. ...Upgrading and Servicing Guide 11 See "Removing a Hard Disk Drive" on page 6. 4 Gently lay the PC on its antistatic packaging. See "Opening and Closing the PC" on the motherboard. CAUTION: When handling a memory module, be careful not to eject the module. 7 Push down the two retaining ...
Upgrading and Servicing Guide
Page 17
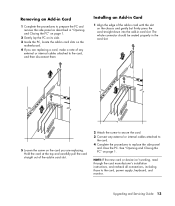
... an Add-in Card 1 Complete the procedures to prepare the PC and remove the side panel as described in "Opening and Closing the PC" on page 1. 2 Gently lay the PC on its side. 3 Inside the PC, locate the add-in card slots on the motherboard. 4 If you are replacing a card, make a note of any ...external or internal cables attached to the card. 4 Complete the procedures to replace the side panel and close the PC. See "Opening and Closing the PC" on the chassis and gently but firmly press the ...
... an Add-in Card 1 Complete the procedures to prepare the PC and remove the side panel as described in "Opening and Closing the PC" on page 1. 2 Gently lay the PC on its side. 3 Inside the PC, locate the add-in card slots on the motherboard. 4 If you are replacing a card, make a note of any ...external or internal cables attached to the card. 4 Complete the procedures to replace the side panel and close the PC. See "Opening and Closing the PC" on the chassis and gently but firmly press the ...
Upgrading and Servicing Guide
Page 18
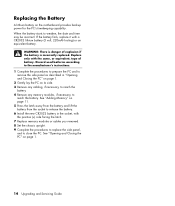
.... 4 Remove any memory modules, if necessary, to reach the battery. See "Opening and Closing the PC" on the motherboard provides backup power for the PC's timekeeping capability. WARNING: There is incorrectly replaced. When the battery starts to close the PC. Discard used batteries according to the manufacturer's instructions. 1 Complete the procedures to prepare the...
.... 4 Remove any memory modules, if necessary, to reach the battery. See "Opening and Closing the PC" on the motherboard provides backup power for the PC's timekeeping capability. WARNING: There is incorrectly replaced. When the battery starts to close the PC. Discard used batteries according to the manufacturer's instructions. 1 Complete the procedures to prepare the...

