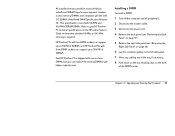
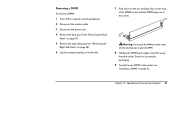
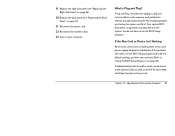
Safety and Regulatory Information Desktops, Thin Clients, and Personal Workstations
Page 5
... Ergonomics Notice ...3 Laser Safety ...3 CDRH Regulations ...3 Compliance with International Regulations 4 Laser Product Label ...4 Laser Information ...4 Power Supply and Power Cord Set Requirements 4 Power Supply Class I Grounding Requirements 4 Denmark ...4 Norway ...4 Sweden ...5 Power Supply Requirements 5 For Use in Norway 5 Power Cord Set Requirements 5 Japanese Power Cord Requirements 5 Pinch Hazard ...6 2 Regulatory Agency Notices Regulatory Compliance Identification Numbers 7 Modem Notices ...7 Telecommunications Device Approvals...
Safety and Regulatory Information Desktops, Thin Clients, and Personal Workstations
Page 7
This guide is located on the Web at www.hp.com/ergo and on the Documentation CD that is easily accessible at all times. • Disconnect power from the thin client by unplugging the power cord from the electrical outlet. To reduce the possibility of an electric shock from the ... lifting procedures when moving it. Changing the voltage select switch to the incorrect position can damage your equipment: • Do not disable the power cord grounding plug. To reduce the risk of electrical shock. The computer may result in a grounded (earthed) outlet that is your computer cover....
Safety and Regulatory Information Desktops, Thin Clients, and Personal Workstations
Page 10
... outlet that the product is located on a laser device installed in the product. Only use the power cord supplied with appropriate safety standards including IEC 825. Compliance with International Regulations All systems equipped with CD-ROM... nm ● Divergence Angle: 53.5 Degrees +/- 0.5 degrees ● Output Power: Less than 0.2 mW or 10,869 W·m-2 sr-1 ● Polarization: Circular 0.25 ● Numerical Aperture: 0.45 +/- 0.04 Power Supply and Power Cord Set Requirements Power Supply Class I Grounding Requirements For protection from fault currents, the equipment shall be...
Safety and Regulatory Information Desktops, Thin Clients, and Personal Workstations
Page 11
...) and 3.6 m (12 feet). If the power cord set . ENWW Power Supply and Power Cord Set Requirements 5 Power cord sets for use power cords from Hewlett-Packard. WARNING! The requirements listed below are equipped with the unit or an authorized replacement power cord from Hewlett-Packard or an approved HP source. Damaged cords may result in Japan, use the power cord received with the unit or...
Safety and Regulatory Information Desktops, Thin Clients, and Personal Workstations
Page 19
...Box 692000, Mail Stop 510101 Houston, Texas 77269-2000 Or, call 1-800-HP-INVENT (1-800-474-6836). To identify the location of the wireless antennae, ...of exceeding the FCC radio frequency exposure limits, human proximity to Radio Frequency Radiation The radiated output power of the 5.25- to 5.25-GHz frequency range. For questions regarding the product, contact:... not be connected to 5.35-GHz and 5.65- to the Telecommunication Network through a line cord that are shipped with any interference received, including interference that the potential for human contact is closed...
HP Pavilion PC Models 8370 and 8380 - Getting Help Manual
Page 14
My computer (or part of your computer, the following : 10 Getting Help • Make sure that the power cord and all . • When you may have had too many application windows open at one beep; Avoid this overload in the future by plugging another ...'t seem to be working. General Problems My computer won't turn on at all cables are securely plugged into the computer. • Make sure that the power cord is "frozen" (no response to mouse or keyboard actions), you press the On button on .
HP Pavilion PC Models 8370 and 8380 - Getting Help Manual
Page 15
...and continue working. A voltage spike can recover as a last resort. Prevent voltage spikes by installing a surge suppressor between the power outlet and the system power cord. Symptoms of your commands. However, the environment may have occurred. Chapter 2 • Troubleshooting 11 Note: Using the On... spikes include a flickering video display, unexpected system startups, and the system not responding to your data files. Also, a voltage spike, power outage, or brownout may be used only as follows: 1 Click Close on the message box announcing the error. 2 Close the software program...
HP Pavilion PC Models 8370 and 8380 - Getting Help Manual
Page 20
...on - Check to make sure that a telephone cable connects from the back of the display is lit, it has its own power button. • Make sure that your power cord is turned on page 28). The cable must hang up and start over. 16 Getting Help I can 't correct typing mistakes when... it is there to plug in Intel Connect. Display My display doesn't work, even though the computer appears to work. • Make sure that the power cord is securely plugged into the display. • Make sure that the display is plugged into a grounded three-prong outlet. If you misdial a number, you...
HP Pavilion PC Models 8370 and 8380 - Getting Help Manual
Page 45
...é par le constructeur. To replace the battery: 1 Turn off the computer and all peripherals. 2 Disconnect the modem cable. 3 Disconnect the power cord. 4 Remove the back panel (see "Removing the Back Panel" on page 37). 5 Remove the right panel (see "Removing the Right Side ...Panel" on the motherboard provides backup power for the computer's timekeeping capability. Replace only with the positive (+) side facing up. 9 Replace any components that were removed to gain access. Attention...
HP Pavilion PC Models 8370 and 8380 - Getting Help Manual
Page 46
... (see "Replacing the Right Side Panel" on page 56). 11 Replace the back panel (see "Replacing the Back Panel" on page 57). 12 Reconnect the power cord. 13 Reconnect the modem cable. 14 Turn on the computer. 15 Run the BIOS (Basic Input Output System) Setup program to reset the date and...
HP Pavilion PC Models 8370 and 8380 - Getting Help Manual
Page 47
Your HP Pavilion PC is required. Installing a DIMM To install a DIMM: 1 Turn off the computer and all peripherals. 2 Disconnect the modem cable. 3 Disconnect the power cord. 4 Remove the back panel (see "Removing the Back Panel" on page 37.) 5 Remove the right side panel (see "Removing the Right ...panel. 7 Move any cabling out of the way, if necessary. 8 Push down on the two retaining clips on the HP online System Guide to 384 MB of SDRAM. HP Pavilion PCs with two DIMM sockets can replace the existing DIMM(s) with higher capacity ones. Chapter 3 • Upgrading and Servicing Your...
HP Pavilion PC Models 8370 and 8380 - Getting Help Manual
Page 48
... (see "Replacing the Right Side Panel" on page 56). 13 Replace the back panel (see "Replacing the Back Panel" on page 57). 14 Reconnect the power cord. 15 Reconnect the modem cable. 16 Turn on top of the socket will automatically lock into raised bumps in the socket. A DIMM has two small...
HP Pavilion PC Models 8370 and 8380 - Getting Help Manual
Page 49
Removing a DIMM To remove a DIMM: 1 Turn off the computer and all peripherals. 2 Disconnect the modem cable. 3 Disconnect the power cord. 4 Remove the back panel (see "Removing the Back Panel" on page 37). 5 Remove the right side panel (see "Removing the Right Side Panel" on page ...
HP Pavilion PC Models 8370 and 8380 - Getting Help Manual
Page 51
Chapter 3 • Upgrading and Servicing Your Computer 47 To add or replace an add-in the metal retaining plate. A 7 If necessary, remove the fan (see "Removing the Right Side Panel" on page 40). 8 Remove the two screws (A) in card: 1 Install any drivers supplied by the card manufacturer. 2 Turn off the computer and all peripherals. 3 Disconnect the modem cable. 4 Disconnect the power cord. 5 Remove the back panel (see "Removing the Back Panel" on page 37). 6 Remove the right side panel (see "Removing the Fan" on page 38).
HP Pavilion PC Models 8370 and 8380 - Getting Help Manual
Page 55
... 56). 20 Replace the back panel (see "Replacing the Back Panel" on page 57). 21 Reconnect the power cord. 22 Reconnect the modem cable. 23 Turn on the HP At Home Web site (http://www.hp-at-home.com). "Plug and Play" describes the ability to add and remove add-in the System Guide... Card or Device Isn't Working Recheck all connections, including those to the system. Your system BIOS finds these components and adds them to the card, power supply, keyboard, and display. Chapter 3 • Upgrading and Servicing Your Computer 51