HP Mini 2102, HP Mini 210, and Compaq Mini 210 - Maintenance and Service Guide
Page 7
... points 75 When to create restore points 75 Creating a system restore point 75 Restoring to a previous date and time 75 Backing up and recovering using HP Recovery Manager 76 Backing up your information 76 Creating a set of recovery discs 77 Performing a recovery ...78 Recovering using the recovery discs 78 Recovering using... (headphone) ...83 External monitor ...84 RJ-45 (network) ...85 Universal Serial Bus ...85 8 Power cord set requirements ...86 Requirements for all countries ...86 Requirements for specific countries and regions 87 9 Recycling ...88 Battery ...88 Display ...88 vii
... points 75 When to create restore points 75 Creating a system restore point 75 Restoring to a previous date and time 75 Backing up and recovering using HP Recovery Manager 76 Backing up your information 76 Creating a set of recovery discs 77 Performing a recovery ...78 Recovering using the recovery discs 78 Recovering using... (headphone) ...83 External monitor ...84 RJ-45 (network) ...85 Universal Serial Bus ...85 8 Power cord set requirements ...86 Requirements for all countries ...86 Requirements for specific countries and regions 87 9 Recycling ...88 Battery ...88 Display ...88 vii
HP Mini 2102, HP Mini 210, and Compaq Mini 210 - Maintenance and Service Guide
Page 22
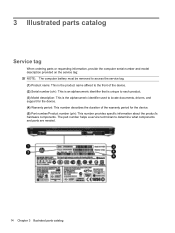
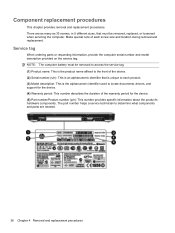
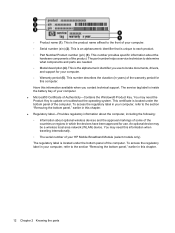
... support for the device. (4) Warranty period: This number describes the duration of the warranty period for the device. (5) Part number/Product number (p/n): This number provides specific information about the product's hardware components. 3 Illustrated parts catalog Service tag When ordering parts or requesting information, provide the computer serial number and model description...
... support for the device. (4) Warranty period: This number describes the duration of the warranty period for the device. (5) Part number/Product number (p/n): This number provides specific information about the product's hardware components. 3 Illustrated parts catalog Service tag When ordering parts or requesting information, provide the computer serial number and model description...
HP Mini 2102, HP Mini 210, and Compaq Mini 210 - Maintenance and Service Guide
Page 44
... device. (2) Serial number (s/n): This is the product name affixed to locate documents, drivers, and support for the device. (5) Part number/Product number (p/n): This number provides specific information about the product's hardware components.
... device. (2) Serial number (s/n): This is the product name affixed to locate documents, drivers, and support for the device. (5) Part number/Product number (p/n): This number provides specific information about the product's hardware components.
HP Mini 2102, HP Mini 210, and Compaq Mini 210 - Maintenance and Service Guide
Page 77
... either choice, the computer restarts in this ● View and change the system time and date. ● View identification information about the computer. ● View specification information about the processor, memory size, and system BIOS. Then use the arrow keys to select Exit > Exit Discarding Changes, and then press enter. Select...
... either choice, the computer restarts in this ● View and change the system time and date. ● View identification information about the computer. ● View specification information about the processor, memory size, and system BIOS. Then use the arrow keys to select Exit > Exit Discarding Changes, and then press enter. Select...
HP Mini 2102, HP Mini 210, and Compaq Mini 210 - Maintenance and Service Guide
Page 83
... system. In the left pane, click System protection. 3. NOTE: Recovering to create a restore point. 5. You also can then revert back to a restore point (created at a specific point in time. Click Create. 6. Under Protection Settings, select the disk for your system files and settings. When to create restore points ● Before you...
... system. In the left pane, click System protection. 3. NOTE: Recovering to create a restore point. 5. You also can then revert back to a restore point (created at a specific point in time. Click Create. 6. Under Protection Settings, select the disk for your system files and settings. When to create restore points ● Before you...

HP Mini 2102, HP Mini 210, and Compaq Mini 210 - Maintenance and Service Guide
Page 95
...mm² conductor size. The flexible cord must be Type VCTF, 3-conductor, 0.75-mm² conductor size. Requirements for specific countries and regions 87 The flexible cord must be Type SPT-3 or equivalent, No. 18 AWG, 3-conductor. The wall plug... South Korea EK 4 Sweden SEMKO 1 Switzlerland SEV 1 Taiwan BSMI 4 The United Kingdom BSI 1 The United States UL 2 1. Requirements for specific countries and regions Country/region Accredited agency Applicable note number Australia EANSW 1 Austria OVE 1 Belgium CEBC 1 Canada CSA 2 Denmark DEMKO 1 Finland...
...mm² conductor size. The flexible cord must be Type VCTF, 3-conductor, 0.75-mm² conductor size. Requirements for specific countries and regions 87 The flexible cord must be Type SPT-3 or equivalent, No. 18 AWG, 3-conductor. The wall plug... South Korea EK 4 Sweden SEMKO 1 Switzlerland SEV 1 Taiwan BSMI 4 The United Kingdom BSI 1 The United States UL 2 1. Requirements for specific countries and regions Country/region Accredited agency Applicable note number Australia EANSW 1 Austria OVE 1 Belgium CEBC 1 Canada CSA 2 Denmark DEMKO 1 Finland...

HP Mini 2102, HP Mini 210, and Compaq Mini 210 - Maintenance and Service Guide
Page 96
...disposal or recycling information, contact your area for computer battery disposal. Caution must be disassembled to gain access to display components. This HP product contains mercury in the backlight in this chapter can vary from one computer model to the mercury. Display WARNING! The only...://www.eiai.org. Follow the local laws and regulations in damage to the backlight (1) and the liquid crystal display (LCD) panel (2). Specific details, such as screw sizes, quantities, and locations, and component shapes and sizes, can result in your local authorities, or see the...
...disposal or recycling information, contact your area for computer battery disposal. Caution must be disassembled to gain access to display components. This HP product contains mercury in the backlight in this chapter can vary from one computer model to the mercury. Display WARNING! The only...://www.eiai.org. Follow the local laws and regulations in damage to the backlight (1) and the liquid crystal display (LCD) panel (2). Specific details, such as screw sizes, quantities, and locations, and component shapes and sizes, can result in your local authorities, or see the...
Mini User Guide - Windows 7
Page 22
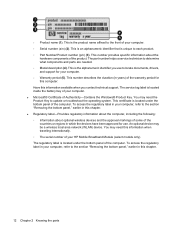
... the product name affixed to each product. ◦ Part Number/Product number (p/n) (3). This number describes the duration (in your HP Mobile Broadband Module (select models only). Have this chapter. ● Regulatory label-Provides regulatory information about the computer, including the following... Knowing the parts You may be a wireless local area network (WLAN) device. ◦ Product name (1). This number provides specific information about optional wireless devices and the approval markings of some of your computer, refer to update or troubleshoot the operating system. ...
... the product name affixed to each product. ◦ Part Number/Product number (p/n) (3). This number describes the duration (in your HP Mobile Broadband Module (select models only). Have this chapter. ● Regulatory label-Provides regulatory information about the computer, including the following... Knowing the parts You may be a wireless local area network (WLAN) device. ◦ Product name (1). This number provides specific information about optional wireless devices and the approval markings of some of your computer, refer to update or troubleshoot the operating system. ...

Mini User Guide - Windows 7
Page 27
... tools and information about power plans. Finding battery information in the computer. Connect the AC adapter to maximize battery life ● Information on battery types, specifications, life cycles, and capacity To access battery information: ▲ Select Start > Control Panel > Hardware and Sound > Power Options > Tell me more about the battery: ●...
... tools and information about power plans. Finding battery information in the computer. Connect the AC adapter to maximize battery life ● Information on battery types, specifications, life cycles, and capacity To access battery information: ▲ Select Start > Control Panel > Hardware and Sound > Power Options > Tell me more about the battery: ●...
Mini User Guide - Windows 7
Page 65
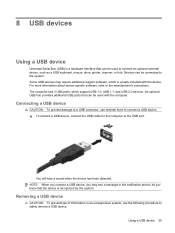
... will hear a sound when the device has been detected. The computer has 3 USB ports, which is recognized by the system. For more information about device-specific software, refer to connect an optional external device, such as a USB keyboard, mouse, drive, printer, scanner, or hub. 8 USB devices Using a USB device Universal Serial...
... will hear a sound when the device has been detected. The computer has 3 USB ports, which is recognized by the system. For more information about device-specific software, refer to connect an optional external device, such as a USB keyboard, mouse, drive, printer, scanner, or hub. 8 USB devices Using a USB device Universal Serial...

Mini User Guide - Windows 7
Page 69
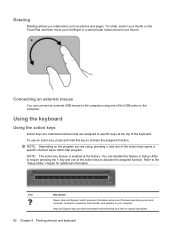
... of the keyboard. NOTE: Depending on the computer. Using the keyboard 59 Decreases the screen brightness level incrementally when you are assigned to specific keys at the factory. Connecting an external mouse You can disable this feature in Setup Utility to require pressing the fn key and one ... ports on the program you hold this key. NOTE: The action key feature is enabled at the top of the action keys opens a specific shortcut menu within that are using one of the action keys to activate the assigned function. Refer to support specialists. Using the keyboard Using ...
... of the keyboard. NOTE: Depending on the computer. Using the keyboard 59 Decreases the screen brightness level incrementally when you are assigned to specific keys at the factory. Connecting an external mouse You can disable this feature in Setup Utility to require pressing the fn key and one ... ports on the program you hold this key. NOTE: The action key feature is enabled at the top of the action keys opens a specific shortcut menu within that are using one of the action keys to activate the assigned function. Refer to support specialists. Using the keyboard Using ...
Mini User Guide - Windows 7
Page 74
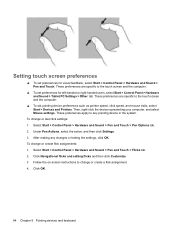
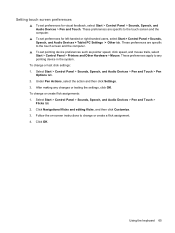
... and Printers. Under Pen Actions, select the action, and then click Settings. 3. To change or test click settings: 1. These preferences are specific to the touch screen and the computer. ▲ To set preferences for visual feedback, select Start > Control Panel > Hardware and Sound >... screen preferences ▲ To set preferences for left-handed or right-handed users, select Start > Control Panel > Hardware and Sound > Tablet PC Settings > Other tab. Click OK. 64 Chapter 9 Pointing devices and keyboard Click Navigational flicks and editing flicks and then click Customize. 3. ...
... and Printers. Under Pen Actions, select the action, and then click Settings. 3. To change or test click settings: 1. These preferences are specific to the touch screen and the computer. ▲ To set preferences for visual feedback, select Start > Control Panel > Hardware and Sound >... screen preferences ▲ To set preferences for left-handed or right-handed users, select Start > Control Panel > Hardware and Sound > Tablet PC Settings > Other tab. Click OK. 64 Chapter 9 Pointing devices and keyboard Click Navigational flicks and editing flicks and then click Customize. 3. ...
Mini User Guide - Windows 7
Page 89
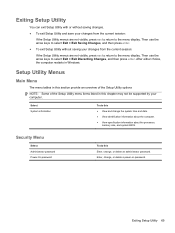
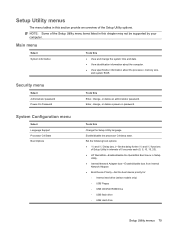
... C4 sleep state. Enter, change the system time and date. ● View identification information about the computer. ● View specification information about the processor, memory size, and system BIOS. Security menu Select Administrator password Power-On Password To do this chapter may... The menu tables in this Change the Setup Utility language. NOTE: Some of 5 seconds each (0, 5, 10, 15, 20). ● HP QuickWeb-Enable/disable the QuickWeb Boot menu in Setup Utility. ● Internal Network Adapter boot―Enable/disable boot from Internal Network Adapter. &#...
... C4 sleep state. Enter, change the system time and date. ● View identification information about the computer. ● View specification information about the processor, memory size, and system BIOS. Security menu Select Administrator password Power-On Password To do this chapter may... The menu tables in this Change the Setup Utility language. NOTE: Some of 5 seconds each (0, 5, 10, 15, 20). ● HP QuickWeb-Enable/disable the QuickWeb Boot menu in Setup Utility. ● Internal Network Adapter boot―Enable/disable boot from Internal Network Adapter. &#...
Mini User Guide - Windows XP
Page 22
.... ◦ Part Number/Product number (p/n) (3). Have this chapter. 12 Chapter 2 Knowing the parts To access the regulatory label in your HP Mobile Broadband Module (select models only). This is unique to the front of your computer. ● Microsoft® Certificate of your computer.... section "Removing the bottom panel," earlier in your computer. ◦ Warranty period (5). ◦ Product name (1). This number provides specific information about optional wireless devices and the approval markings of some of the countries or regions in which the devices have been approved for...
.... ◦ Part Number/Product number (p/n) (3). Have this chapter. 12 Chapter 2 Knowing the parts To access the regulatory label in your HP Mobile Broadband Module (select models only). This is unique to the front of your computer. ● Microsoft® Certificate of your computer.... section "Removing the bottom panel," earlier in your computer. ◦ Warranty period (5). ◦ Product name (1). This number provides specific information about optional wireless devices and the approval markings of some of the countries or regions in which the devices have been approved for...

Mini User Guide - Windows XP
Page 66
..., use minimal force to connect a USB device. ▲ To connect a USB device, connect the USB cable to the manufacturer's instructions. For more information about device-specific software, refer to the USB port. An optional USB hub provides additional USB ports that can be connected to let you know that the device...
..., use minimal force to connect a USB device. ▲ To connect a USB device, connect the USB cable to the manufacturer's instructions. For more information about device-specific software, refer to the USB port. An optional USB hub provides additional USB ports that can be connected to let you know that the device...
Mini User Guide - Windows XP
Page 70
...and Support, which provides information about your computer. Rotating Rotating allows you are using, pressing fn and one of the action keys opens a specific shortcut menu within that are customized actions that program. To rotate, anchor your thumb. To use an action key, press and hold this ...your thumb on the computer. Refer to support specialists. 60 Chapter 9 Pointing devices and keyboard You can connect an external USB mouse to specific keys at the factory. NOTE: The action key feature is enabled at the top of the action keys to activate the assigned function....
...and Support, which provides information about your computer. Rotating Rotating allows you are using, pressing fn and one of the action keys opens a specific shortcut menu within that are customized actions that program. To rotate, anchor your thumb. To use an action key, press and hold this ...your thumb on the computer. Refer to support specialists. 60 Chapter 9 Pointing devices and keyboard You can connect an external USB mouse to specific keys at the factory. NOTE: The action key feature is enabled at the top of the action keys to activate the assigned function....
Mini User Guide - Windows XP
Page 75
...and Audio Devices > Pen and Touch > Pen Options tab. 2. Click Navigational flicks and editing flicks, and then click Customize. 3. These preferences are specific to the touch screen and the computer. ▲ To set preferences for visual feedback, select Start > Control Panel > Sounds, Speech, and Audio ...9650; To set preferences for left-handed or right-handed users, select Start > Control Panel > Sounds, Speech, and Audio Devices > Tablet PC Settings > Other tab. These preferences apply to change or test click settings: 1. Under Pen Actions, select the action and then click Settings....
...and Audio Devices > Pen and Touch > Pen Options tab. 2. Click Navigational flicks and editing flicks, and then click Customize. 3. These preferences are specific to the touch screen and the computer. ▲ To set preferences for visual feedback, select Start > Control Panel > Sounds, Speech, and Audio ...9650; To set preferences for left-handed or right-handed users, select Start > Control Panel > Sounds, Speech, and Audio Devices > Tablet PC Settings > Other tab. These preferences apply to change or test click settings: 1. Under Pen Actions, select the action and then click Settings....

Mini User Guide - Windows XP
Page 90
...Some of the Setup Utility menu items listed in this section provide an overview of 5 seconds each (0, 5, 10, 15, 20). ● HP QuickWeb―Enable/disable the QuickWeb Boot menu in Setup Utility. ● Internal Network Adapter boot―Enable/disable boot from Internal Network Adapter. ...To do this ● View and change the system time and date. ● View identification information about the computer. ● View specification information about the processor, memory size, and system BIOS. Enable/disable the processor C4 standby state. Main menu Select System information To do...
...Some of the Setup Utility menu items listed in this section provide an overview of 5 seconds each (0, 5, 10, 15, 20). ● HP QuickWeb―Enable/disable the QuickWeb Boot menu in Setup Utility. ● Internal Network Adapter boot―Enable/disable boot from Internal Network Adapter. ...To do this ● View and change the system time and date. ● View identification information about the computer. ● View specification information about the processor, memory size, and system BIOS. Enable/disable the processor C4 standby state. Main menu Select System information To do...


