HP Mini 2102, HP Mini 210, and Compaq Mini 210 - Maintenance and Service Guide
Page 43
... standing workstations and are flexible straps with a minimum of one megohm ±10% resistance in contact with ground cords of shoes or boots. Material Antistatic plastic Carbon-loaded plastic Metallized laminate Use Bags Floor mats Floor mats Voltage protection level 1,500 V 7,500 V 5,000...other assembly or soldering aids ● Nonconductive foam ● Conductive tabletop workstations with the skin. Foot straps (heel, toe, or boot straps) can be used at all times. The following table lists the shielding protection provided by antistatic bags and floor mats. Equipment ...
... standing workstations and are flexible straps with a minimum of one megohm ±10% resistance in contact with ground cords of shoes or boots. Material Antistatic plastic Carbon-loaded plastic Metallized laminate Use Bags Floor mats Floor mats Voltage protection level 1,500 V 7,500 V 5,000...other assembly or soldering aids ● Nonconductive foam ● Conductive tabletop workstations with the skin. Foot straps (heel, toe, or boot straps) can be used at all times. The following table lists the shielding protection provided by antistatic bags and floor mats. Equipment ...
HP Mini 2102, HP Mini 210, and Compaq Mini 210 - Maintenance and Service Guide
Page 78
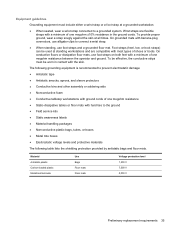
... 70 Chapter 5 Setup Utility Run a diagnostic test on the hard drive. Enable/disable the processor C4 standby state. Set the following boot options: ● f10 and f12 Delay (sec.)―Set the delay for the f10 and f12 functions of Setup Utility in intervals ...of 5 seconds each (0, 5, 10, 15, 20). ● HP QuickWeb―Enable/disable the QuickWeb Boot menu in Setup Utility. ● Internal Network Adapter boot―Enable/disable boot from Internal Network Adapter. ● Boot Device Priority―Set the boot device priority for: ◦ Internal hard drive (select models only...
... 70 Chapter 5 Setup Utility Run a diagnostic test on the hard drive. Enable/disable the processor C4 standby state. Set the following boot options: ● f10 and f12 Delay (sec.)―Set the delay for the f10 and f12 functions of Setup Utility in intervals ...of 5 seconds each (0, 5, 10, 15, 20). ● HP QuickWeb―Enable/disable the QuickWeb Boot menu in Setup Utility. ● Internal Network Adapter boot―Enable/disable boot from Internal Network Adapter. ● Boot Device Priority―Set the boot device priority for: ◦ Internal hard drive (select models only...

HP Mini 2102, HP Mini 210, and Compaq Mini 210 - Maintenance and Service Guide
Page 81
... restart your country or region. 3. If prompted to a USB port on your computer. 2. NOTE: This process may take several minutes. 8. Change the boot device order by turning on the screen reports a successful recovery, click Finish. After a message on or restarting the computer, and then pressing f9. 4. Open...keys to format the USB flash drive and extract the Disaster Recovery files. 7. Click Download only to save the file to http://www.hp.com/support, and select your computer after the installation is downloaded, navigate to the USB flash drive or external drive, and then ...
... restart your country or region. 3. If prompted to a USB port on your computer. 2. NOTE: This process may take several minutes. 8. Change the boot device order by turning on the screen reports a successful recovery, click Finish. After a message on or restarting the computer, and then pressing f9. 4. Open...keys to format the USB flash drive and extract the Disaster Recovery files. 7. Click Download only to save the file to http://www.hp.com/support, and select your computer after the installation is downloaded, navigate to the USB flash drive or external drive, and then ...
HP Mini 2102, HP Mini 210, and Compaq Mini 210 - Maintenance and Service Guide
Page 89
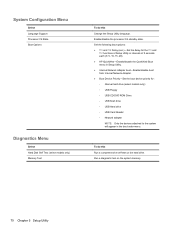
... 7. Before performing a disaster recovery, you need a USB flash drive (purchased separately). Click Download only to save the file to http://www.hp.com/support, and select your computer. 5. This process may take several minutes. 8. NOTE: Running the SoftPaq makes the USB drive bootable. ...country or region. 3. Restoring your hard drive image To restore your hard drive image using Disaster Recovery, follow these steps: 1. Change the boot device order by turning on your computer. 3. At the Roxio BackOnTrack Disaster Recovery screen, select Disaster Recovery, and then click Next. 6....
... 7. Before performing a disaster recovery, you need a USB flash drive (purchased separately). Click Download only to save the file to http://www.hp.com/support, and select your computer. 5. This process may take several minutes. 8. NOTE: Running the SoftPaq makes the USB drive bootable. ...country or region. 3. Restoring your hard drive image To restore your hard drive image using Disaster Recovery, follow these steps: 1. Change the boot device order by turning on your computer. 3. At the Roxio BackOnTrack Disaster Recovery screen, select Disaster Recovery, and then click Next. 6....

HP Mini 2102, HP Mini 210, and Compaq Mini 210 - Maintenance and Service Guide
Page 102
..., 30, 38 battery bay 12 battery light 10 battery release latches 12 Blu-ray ROM DVD±R/RW SuperMulti Drive, spare part number 23, 26 boot options 70 buttons TouchPad 6 TouchPad on/off 6 C cables, service considerations 32 caps lock light 7 changing the language of Setup Utility 67 chipset, product description 1 components...
..., 30, 38 battery bay 12 battery light 10 battery release latches 12 Blu-ray ROM DVD±R/RW SuperMulti Drive, spare part number 23, 26 boot options 70 buttons TouchPad 6 TouchPad on/off 6 C cables, service considerations 32 caps lock light 7 changing the language of Setup Utility 67 chipset, product description 1 components...
Mini User Guide - Windows 7
Page 89
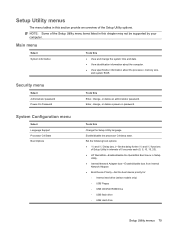
...and date. ● View identification information about the computer. ● View specification information about the processor, memory size, and system BIOS. Set the following boot options: ● f10 and f12 Delay (sec.)―Set the delay for : ◦ Internal hard drive (select models only) ◦ USB Floppy ...for the f10 and f12 functions of Setup Utility in intervals of 5 seconds each (0, 5, 10, 15, 20). ● HP QuickWeb-Enable/disable the QuickWeb Boot menu in this section provide an overview of the Setup Utility menu items listed in this chapter may not be supported by your ...
...and date. ● View identification information about the computer. ● View specification information about the processor, memory size, and system BIOS. Set the following boot options: ● f10 and f12 Delay (sec.)―Set the delay for : ◦ Internal hard drive (select models only) ◦ USB Floppy ...for the f10 and f12 functions of Setup Utility in intervals of 5 seconds each (0, 5, 10, 15, 20). ● HP QuickWeb-Enable/disable the QuickWeb Boot menu in this section provide an overview of the Setup Utility menu items listed in this chapter may not be supported by your ...

Mini User Guide - Windows 7
Page 90
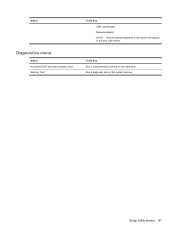
Run a diagnostic test on the hard drive. To do this Run a comprehensive self-test on the system memory. 80 Chapter 14 Setup Utility Select Diagnostics menu Select Hard Disk Self Test (select models only) Memory Test To do this ◦ USB Card Reader ◦ Network adapter NOTE: Only the devices attached to the system appear in the boot order menu.
Run a diagnostic test on the hard drive. To do this Run a comprehensive self-test on the system memory. 80 Chapter 14 Setup Utility Select Diagnostics menu Select Hard Disk Self Test (select models only) Memory Test To do this ◦ USB Card Reader ◦ Network adapter NOTE: Only the devices attached to the system appear in the boot order menu.

Mini User Guide - Windows 7
Page 91
... battery light 18, 19 battery power 16 battery release latches 9, 17 battery temperature 23 bay, battery 9 BIOS, updating 73 Bluetooth device 27 boot options 79 boot order 79 buttons left TouchPad 3 right TouchPad 4 TouchPad, on/off button 3 C cables LAN 26 USB 55 VGA 44 calibrating battery 20 ...diskette drive 66 display switch, identifying 8 displaying system information 78 drive media 13 drives diskette 66 external 66 hard 66 optical 66 drives, boot order 79 DVD drive 66 E earbuds 8, 39 encryption 31 entering a power-on password 49 entering an administrator password 48 exiting Setup Utility ...
... battery light 18, 19 battery power 16 battery release latches 9, 17 battery temperature 23 bay, battery 9 BIOS, updating 73 Bluetooth device 27 boot options 79 boot order 79 buttons left TouchPad 3 right TouchPad 4 TouchPad, on/off button 3 C cables LAN 26 USB 55 VGA 44 calibrating battery 20 ...diskette drive 66 display switch, identifying 8 displaying system information 78 drive media 13 drives diskette 66 external 66 hard 66 optical 66 drives, boot order 79 DVD drive 66 E earbuds 8, 39 encryption 31 entering a power-on password 49 entering an administrator password 48 exiting Setup Utility ...

Mini User Guide - Windows XP
Page 90
...To do this ● View and change , or delete a power-on password. System Configuration menu Select Language Support Processor C4 State Boot Options To do this Change the Setup Utility language. Setup Utility menus The menu tables in this section provide an overview of 5 seconds... each (0, 5, 10, 15, 20). ● HP QuickWeb―Enable/disable the QuickWeb Boot menu in Setup Utility. ● Internal Network Adapter boot―Enable/disable boot from Internal Network Adapter. ● Boot Device Priority―Set the boot device priority for the f10 and f12 functions of Setup ...
...To do this ● View and change , or delete a power-on password. System Configuration menu Select Language Support Processor C4 State Boot Options To do this Change the Setup Utility language. Setup Utility menus The menu tables in this section provide an overview of 5 seconds... each (0, 5, 10, 15, 20). ● HP QuickWeb―Enable/disable the QuickWeb Boot menu in Setup Utility. ● Internal Network Adapter boot―Enable/disable boot from Internal Network Adapter. ● Boot Device Priority―Set the boot device priority for the f10 and f12 functions of Setup ...
Mini User Guide - Windows XP
Page 91
Run a diagnostic test on the hard drive. Setup Utility menus 81 Select Diagnostics menu Select Hard Disk Self Test (select models only) Memory Test To do this ◦ USB Card Reader ◦ Network adapter NOTE: Only the devices attached to the system will appear in the boot order menu. To do this Run a comprehensive self-test on the system memory.
Run a diagnostic test on the hard drive. Setup Utility menus 81 Select Diagnostics menu Select Hard Disk Self Test (select models only) Memory Test To do this ◦ USB Card Reader ◦ Network adapter NOTE: Only the devices attached to the system will appear in the boot order menu. To do this Run a comprehensive self-test on the system memory.
Mini User Guide - Windows XP
Page 92
...bay, identifying 9 battery light 18, 19 battery power 16 battery release latches 9, 17 battery temperature 22 bay, battery 9 BIOS, updating 74 boot options 80 boot order 80 buttons left TouchPad 4 right TouchPad 4 TouchPad on/off 3 C cables LAN 25 USB 56 VGA 45 calibrating battery 20 caps lock... diskette drive 67 display switch, identifying 8 displaying system information 79 drive media 13 drives diskette 67 external 67 hard 67 optical 67 drives, boot order 80 DVD drive 67 E earbuds 8, 39 encryption 29 entering a power-on password 50 entering an administrator password 49 exiting Setup Utility ...
...bay, identifying 9 battery light 18, 19 battery power 16 battery release latches 9, 17 battery temperature 22 bay, battery 9 BIOS, updating 74 boot options 80 boot order 80 buttons left TouchPad 4 right TouchPad 4 TouchPad on/off 3 C cables LAN 25 USB 56 VGA 45 calibrating battery 20 caps lock... diskette drive 67 display switch, identifying 8 displaying system information 79 drive media 13 drives diskette 67 external 67 hard 67 optical 67 drives, boot order 80 DVD drive 67 E earbuds 8, 39 encryption 29 entering a power-on password 50 entering an administrator password 49 exiting Setup Utility ...


