HP LaserJet Printer Family - Print Media Specification Guide
Page 29
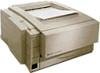
...from a paper jam, follow the directions that is specified in the user paper path or be able to remove build-up in your HP LaserJet printer user guide. q Make sure that the paper meets the specifications that are listed for basis weight in the printer. set incorrectly q... light or too flimsy. tray. q Change the paper type or manually feed the paper into the printer. Chapter 3 Troubleshooting 23 q Replace the paper in the fuser. q Manually feed the paper into the printer. Paper is too stiff or heavy. For more information. q Use the correct output bin...
...from a paper jam, follow the directions that is specified in the user paper path or be able to remove build-up in your HP LaserJet printer user guide. q Make sure that the paper meets the specifications that are listed for basis weight in the printer. set incorrectly q... light or too flimsy. tray. q Change the paper type or manually feed the paper into the printer. Chapter 3 Troubleshooting 23 q Replace the paper in the fuser. q Manually feed the paper into the printer. Paper is too stiff or heavy. For more information. q Use the correct output bin...
HP PCL/PJL reference - Printer Job Language Technical Reference Addendum
Page 122
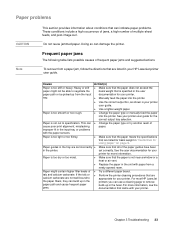
... ORDER SUPPLIES PAGES LEFT REPLACE BLACK TONER REPLACE CYAN TONER REPLACE MAGENTA TONER REPLACE YELLOW TONER REPLACE IMAGE DRUM REPLACE BLACK DRUM REPLACE CYAN DRUM REPLACE MAGENTA DRUM REPLACE YELLOW DRUM REPLACE BLACK CARTRIDGE REPLACE CYAN CARTRIDGE REPLACE MAGENTA CARTRIDGE REPLACE YELLOW CARTRIDGE REPLACE TRANSPORT KIT REPLACE CLEANING KIT REPLACE TRANSFER KIT REPLACE FUSER KIT PERFORM PRINTER MAINTENANCE REPLACE SUPPLIES NON-HP SUPPLIES IN USE Genuine HP Supplies Tells the CP...
... ORDER SUPPLIES PAGES LEFT REPLACE BLACK TONER REPLACE CYAN TONER REPLACE MAGENTA TONER REPLACE YELLOW TONER REPLACE IMAGE DRUM REPLACE BLACK DRUM REPLACE CYAN DRUM REPLACE MAGENTA DRUM REPLACE YELLOW DRUM REPLACE BLACK CARTRIDGE REPLACE CYAN CARTRIDGE REPLACE MAGENTA CARTRIDGE REPLACE YELLOW CARTRIDGE REPLACE TRANSPORT KIT REPLACE CLEANING KIT REPLACE TRANSFER KIT REPLACE FUSER KIT PERFORM PRINTER MAINTENANCE REPLACE SUPPLIES NON-HP SUPPLIES IN USE Genuine HP Supplies Tells the CP...
HP PCL/PJL reference - Printer Job Language Technical Reference Addendum
Page 140
... PERFORM PRINTER MAINTENANCE ORDER SUPPLIES PAGES LEFT REPLACE BLACK TONER REPLACE CYAN TONER REPLACE MAGENTA TONER REPLACE YELLOW TONER REPLACE IMAGE DRUM REPLACE BLACK DRUM REPLACE CYAN DRUM REPLACE MAGENTA DRUM REPLACE YELLOW DRUM REPLACE BLACK CARTRIDGE REPLACE CYAN CARTRIDGE REPLACE MAGENTA CARTRIDGE REPLACE YELLOW CARTRIDGE REPLACE TRANSPORT KIT REPLACE CLEANING KIT REPLACE TRANFER KIT REPLACE FUSER KIT PERFORM PRINTER MAINTENANCE REPLACE SUPPLIES INSTALL BLACK TONER INSTALL CYAN TONER...
... PERFORM PRINTER MAINTENANCE ORDER SUPPLIES PAGES LEFT REPLACE BLACK TONER REPLACE CYAN TONER REPLACE MAGENTA TONER REPLACE YELLOW TONER REPLACE IMAGE DRUM REPLACE BLACK DRUM REPLACE CYAN DRUM REPLACE MAGENTA DRUM REPLACE YELLOW DRUM REPLACE BLACK CARTRIDGE REPLACE CYAN CARTRIDGE REPLACE MAGENTA CARTRIDGE REPLACE YELLOW CARTRIDGE REPLACE TRANSPORT KIT REPLACE CLEANING KIT REPLACE TRANFER KIT REPLACE FUSER KIT PERFORM PRINTER MAINTENANCE REPLACE SUPPLIES INSTALL BLACK TONER INSTALL CYAN TONER...
HP PCL/PJL reference - Printer Job Language Technical Reference Addendum
Page 142
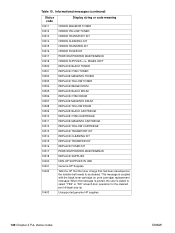
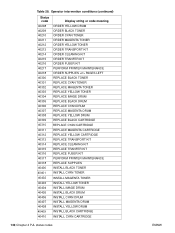
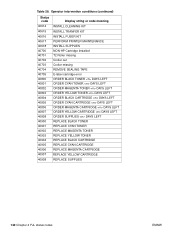
...40905 40906 40907 40908 Display string or code meaning INSTALL CLEANING KIT INSTALL TRANFER KIT INSTALL FUSER KIT PERFORM PRINTER MAINTENANCE INSTALL SUPPLIES NON-HP Cartridge Installed T2 Roller missing Croller out Croller missing REMOVE SEALING TAPE E-label cartridge error...MAGENTA CARTRIDGE DAYS LEFT ORDER YELLOW CARTRIDGE DAYS LEFT ORDER SUPPLIES DAYS LEFT REPLACE BLACK TONER REPLACE CYAN TONER REPLACE MAGENTA TONER REPLACE YELLOW TONER REPLACE BLACK CARTRIDGE REPLACE CYAN CARTRIDGE REPLACE MAGENTA CARTRIDGE REPLACE YELLOW CARTRIDGE REPLACE SUPPLIES 140 Chapter 4 PJL status codes ENWW
...40905 40906 40907 40908 Display string or code meaning INSTALL CLEANING KIT INSTALL TRANFER KIT INSTALL FUSER KIT PERFORM PRINTER MAINTENANCE INSTALL SUPPLIES NON-HP Cartridge Installed T2 Roller missing Croller out Croller missing REMOVE SEALING TAPE E-label cartridge error...MAGENTA CARTRIDGE DAYS LEFT ORDER YELLOW CARTRIDGE DAYS LEFT ORDER SUPPLIES DAYS LEFT REPLACE BLACK TONER REPLACE CYAN TONER REPLACE MAGENTA TONER REPLACE YELLOW TONER REPLACE BLACK CARTRIDGE REPLACE CYAN CARTRIDGE REPLACE MAGENTA CARTRIDGE REPLACE YELLOW CARTRIDGE REPLACE SUPPLIES 140 Chapter 4 PJL status codes ENWW

Service Manual
Page 8
...62 Step 6: Image fusing 62 Paper feed system 63 Paper jam detection 65 Basic sequence of operation 66 6 Removal and replacement Chapter contents 69 Removal and replacement strategy 70 Required tools 71 Installing memory cards (DRAM 72 Covers and doors 73 Back Cover 73 EP Door Assembly 75 ...Memory Door 76 Main Cover and Paper Input Assembly 77 Internal assemblies 78 Control Panel 78 Exit Roller Assembly 79 Delivery Assembly 80 Fuser Pressure...
...62 Step 6: Image fusing 62 Paper feed system 63 Paper jam detection 65 Basic sequence of operation 66 6 Removal and replacement Chapter contents 69 Removal and replacement strategy 70 Required tools 71 Installing memory cards (DRAM 72 Covers and doors 73 Back Cover 73 EP Door Assembly 75 ...Memory Door 76 Main Cover and Paper Input Assembly 77 Internal assemblies 78 Control Panel 78 Exit Roller Assembly 79 Delivery Assembly 80 Fuser Pressure...

Service Manual
Page 11
... 5-4 Image formation block diagram 61 Figure 5-5 Simplified paper path 63 Figure 5-6 Solenoid and sensors 64 Figure 5-7 General timing diagram - HP LaserJet 6L and HP LaserJet 6L ProSL . 68 Figure 6-1 Phillips and PosiDriv screwdrivers 71 Figure 6-2 Back Cover removal (1 of 2 73 Figure 6-3 Back Cover ... 6-9 Delivery Assembly removal (1 of 2 80 Figure 6-10 Delivery Assembly removal (2 of 2 81 Figure 6-11 Fuser Pressure Plate removal 82 Figure 6-12 Fuser Pressure Plate replacement 83 Figure 6-13 Heating Element removal (1 of 3 84 Figure 6-14 Heating Element removal (2 of 3 85 Figure...
... 5-4 Image formation block diagram 61 Figure 5-5 Simplified paper path 63 Figure 5-6 Solenoid and sensors 64 Figure 5-7 General timing diagram - HP LaserJet 6L and HP LaserJet 6L ProSL . 68 Figure 6-1 Phillips and PosiDriv screwdrivers 71 Figure 6-2 Back Cover removal (1 of 2 73 Figure 6-3 Back Cover ... 6-9 Delivery Assembly removal (1 of 2 80 Figure 6-10 Delivery Assembly removal (2 of 2 81 Figure 6-11 Fuser Pressure Plate removal 82 Figure 6-12 Fuser Pressure Plate replacement 83 Figure 6-13 Heating Element removal (1 of 3 84 Figure 6-14 Heating Element removal (2 of 3 85 Figure...

Service Manual
Page 63
...photosensitive properties of the drum allow an image to paper. Be careful to avoid exposing the drum to provide a printed page. Drum Cleaning Paper Delivery Fuser Block 6. CAUTION The printer's toner cartridge does not include a light-blocking shutter. EN Image formation system 61 The toner cartridge contains the photosensitive drum,... requires the interaction of several different technologies (such as electronics, optics, and electrophotographics) to light, which wear, degrade, or are consumed in the replaceable toner cartridge, eliminates the need for a service call when...
...photosensitive properties of the drum allow an image to paper. Be careful to avoid exposing the drum to provide a printed page. Drum Cleaning Paper Delivery Fuser Block 6. CAUTION The printer's toner cartridge does not include a light-blocking shutter. EN Image formation system 61 The toner cartridge contains the photosensitive drum,... requires the interaction of several different technologies (such as electronics, optics, and electrophotographics) to light, which wear, degrade, or are consumed in the replaceable toner cartridge, eliminates the need for a service call when...

Service Manual
Page 71
... and replacement strategy 70 Required tools 71 Installing memory cards (DRAM 72 Covers and doors 73 Back Cover 73 EP Door Assembly 75 Memory Door 76 Main Cover and Paper Input Assembly 77 Internal assemblies 78 Control Panel 78 Exit Roller Assembly 79 Delivery Assembly 80 Fuser Pressure... Plate 82 Heating Element 84 Pressure Roller 87 Face-Up/Face-Down Lever 88 Fuser Exit Roller Assembly 89 Paper Exit Sensor Flag 90 Top assemblies 91 Laser/Scanner Assembly ...
... and replacement strategy 70 Required tools 71 Installing memory cards (DRAM 72 Covers and doors 73 Back Cover 73 EP Door Assembly 75 Memory Door 76 Main Cover and Paper Input Assembly 77 Internal assemblies 78 Control Panel 78 Exit Roller Assembly 79 Delivery Assembly 80 Fuser Pressure... Plate 82 Heating Element 84 Pressure Roller 87 Face-Up/Face-Down Lever 88 Fuser Exit Roller Assembly 89 Paper Exit Sensor Flag 90 Top assemblies 91 Laser/Scanner Assembly ...

Service Manual
Page 82
The EP Right-Hand assembly must be removed to access any fuser components. 2 1 Figure 6-9 Delivery Assembly removal (1 of the printer (Figure 6-9, callout 2). Note Delivery Assembly 1 Remove the Printer Covers and Exit Roller Assembly. 2 Remove the EP Right-hand assembly by pressing inward on the tab (Figure 6-9, callout 1) and sliding the assembly toward the front of 2) 80 Removal and replacement EN
The EP Right-Hand assembly must be removed to access any fuser components. 2 1 Figure 6-9 Delivery Assembly removal (1 of the printer (Figure 6-9, callout 2). Note Delivery Assembly 1 Remove the Printer Covers and Exit Roller Assembly. 2 Remove the EP Right-hand assembly by pressing inward on the tab (Figure 6-9, callout 1) and sliding the assembly toward the front of 2) 80 Removal and replacement EN

Service Manual
Page 84
Fuser Pressure Plate 1 Remove Printer Covers and Delivery Assembly (Figures 6-9 and 6-10). 2 Remove the (2) screws (Figure 6-11, callout 1). 3 Press the Fuser Plate retainer clips out to remove it (Figure 6-11, callout 3). 2 3 1 Figure 6-11 Fuser Pressure Plate removal 82 Removal and replacement EN Lift up to release the Pressure Plate (Figure 6-11, callout 2). 4 Rotate the plate around and toward the back.
Fuser Pressure Plate 1 Remove Printer Covers and Delivery Assembly (Figures 6-9 and 6-10). 2 Remove the (2) screws (Figure 6-11, callout 1). 3 Press the Fuser Plate retainer clips out to remove it (Figure 6-11, callout 3). 2 3 1 Figure 6-11 Fuser Pressure Plate removal 82 Removal and replacement EN Lift up to release the Pressure Plate (Figure 6-11, callout 2). 4 Rotate the plate around and toward the back.

Service Manual
Page 85
Place the rear slits in each corner. Lower the plate over the rear brackets that the spring is kept in place by four locking mechanisms in the plate over the retaining clips, pressing on both sides of the Fuser Pressure Plate (Figure 6-12, callout, 2). To reinstall The Fuser Pressure Plate is placed over the positioning pin (callout 3) because inadequate pressure will cause fusing problems. Replace the screws. Figure 6-12 Fuser Pressure Plate replacement EN Internal assemblies 83 It is important that hold the Fusing Assembly (Figure 6-12, callout 1).
Place the rear slits in each corner. Lower the plate over the rear brackets that the spring is kept in place by four locking mechanisms in the plate over the retaining clips, pressing on both sides of the Fuser Pressure Plate (Figure 6-12, callout, 2). To reinstall The Fuser Pressure Plate is placed over the positioning pin (callout 3) because inadequate pressure will cause fusing problems. Replace the screws. Figure 6-12 Fuser Pressure Plate replacement EN Internal assemblies 83 It is important that hold the Fusing Assembly (Figure 6-12, callout 1).

Service Manual
Page 86
Heating Element 1 Remove Printer Covers, Delivery Assembly (Figures 6-9 and 6-10), and Fuser Pressure Plate (Figure 6-11). 2 Remove the wire cover (on the right side of the printer) for the Heating Element wires by pressing in on the tab and pulling outward (Figure 6-13, callout 1). 1 Figure 6-13 Heating Element removal (1 of 3) 84 Removal and replacement EN
Heating Element 1 Remove Printer Covers, Delivery Assembly (Figures 6-9 and 6-10), and Fuser Pressure Plate (Figure 6-11). 2 Remove the wire cover (on the right side of the printer) for the Heating Element wires by pressing in on the tab and pulling outward (Figure 6-13, callout 1). 1 Figure 6-13 Heating Element removal (1 of 3) 84 Removal and replacement EN

Service Manual
Page 90
...6-9 and 6-10), Fuser Pressure Plate (Figure 6-11), and Heating Element (Figures 6-13 through 6-15), and Pressure Roller (Figure 6-16). 2 Rotate the lever forward 90 degrees (past the spring) and pull it falls in place in front of the printer. Figure 6-17 Face-Up/Face-Down Lever replacement Note You can tell... the front of the Exit Rollers, and you should be able to feel the spring's release mechanism. 88 Removal and replacement EN Figure 6-17 shows the lever from an HP LaserJet 5L. While the shape of the square tab (Figure 6-17). The machined ridges on the left and is in place...
...6-9 and 6-10), Fuser Pressure Plate (Figure 6-11), and Heating Element (Figures 6-13 through 6-15), and Pressure Roller (Figure 6-16). 2 Rotate the lever forward 90 degrees (past the spring) and pull it falls in place in front of the printer. Figure 6-17 Face-Up/Face-Down Lever replacement Note You can tell... the front of the Exit Rollers, and you should be able to feel the spring's release mechanism. 88 Removal and replacement EN Figure 6-17 shows the lever from an HP LaserJet 5L. While the shape of the square tab (Figure 6-17). The machined ridges on the left and is in place...

Service Manual
Page 92
...examine the Paper Exit Sensor flag. CAUTION Note Paper Exit Sensor Flag 1 Remove the Printer Covers, Delivery Assembly (Figures 6-9 and 6-10), and Fuser Pressure Plate (Figure 6-11). Before proceeding to exactly this position. 2 Remove the Paper Exit Sensor flag by giving the spring an extra turn ...before reinstalling. Figure 6-19 Paper Exit Sensor Flag replacement 90 Removal and replacement EN Place the left side and pulling up on the right side. To reinstall It is important that you reinstall the flag ...
...examine the Paper Exit Sensor flag. CAUTION Note Paper Exit Sensor Flag 1 Remove the Printer Covers, Delivery Assembly (Figures 6-9 and 6-10), and Fuser Pressure Plate (Figure 6-11). Before proceeding to exactly this position. 2 Remove the Paper Exit Sensor flag by giving the spring an extra turn ...before reinstalling. Figure 6-19 Paper Exit Sensor Flag replacement 90 Removal and replacement EN Place the left side and pulling up on the right side. To reinstall It is important that you reinstall the flag ...

Service Manual
Page 125
... printer. Service and error messages Service errors prevent further printer operation until some action is it back in. If the message clears, replace the memory card. 3. Uninterruptible power assembly) is pressed.) Use Table 7-4, "Service and Error Messages," to see a pattern in ...the printer, remove any optional memory, then power the printer back on in a steady state. Note: Chronic fuser failures or fuser 2. Normal resistance is not measured replace the heating element 5. EN Printer error troubleshooting 123 Table 7-3 Service and error messages ROM/RAM Error. This ...
... printer. Service and error messages Service errors prevent further printer operation until some action is it back in. If the message clears, replace the memory card. 3. Uninterruptible power assembly) is pressed.) Use Table 7-4, "Service and Error Messages," to see a pattern in ...the printer, remove any optional memory, then power the printer back on in a steady state. Note: Chronic fuser failures or fuser 2. Normal resistance is not measured replace the heating element 5. EN Printer error troubleshooting 123 Table 7-3 Service and error messages ROM/RAM Error. This ...

Service Manual
Page 185
See heating element fusing problems 83 fusing stage 62 G gear, paper pickup 92 Gold, HP LaserJet 6L 14 graphics, cut off 52 face-up /face-down lever. See paper path lever factory default settings, returning to 45 faded print, ...feeding operations 63 locating 19 Front Panel Button locating 19 using 40 FRUs (Field Replaceable Units) 22, 144 functional block diagram 54 fuser components, accessing 80 fuser errors 123 fuser exit roller cleaning 51 removing 89 fuser pressure plate, removing 82 fuser roller, testing 138 fuses locating 119 overcurrent protection 57 fusing element. See Front...
See heating element fusing problems 83 fusing stage 62 G gear, paper pickup 92 Gold, HP LaserJet 6L 14 graphics, cut off 52 face-up /face-down lever. See paper path lever factory default settings, returning to 45 faded print, ...feeding operations 63 locating 19 Front Panel Button locating 19 using 40 FRUs (Field Replaceable Units) 22, 144 functional block diagram 54 fuser components, accessing 80 fuser errors 123 fuser exit roller cleaning 51 removing 89 fuser pressure plate, removing 82 fuser roller, testing 138 fuses locating 119 overcurrent protection 57 fusing element. See Front...

Service Manual
Page 189
... 22 removing parts 70 repair assistance 24 repair method 22 repair offices, HP 28 repetitive defects, troubleshooting 128 repetitive image defect ruler 139 replacing consumables 48 parts 70 resetting printer 45 resistance, heating element 123 resolution ...14 Resolution Enhancement technology (REt) 59 Revision Level 15 rollers cleaning 51 exit, removing 79 fuser exit roller assembly,... Q quality, troubleshooting 126, 127 Quick Reference Service Guide, HP LaserJet Family 22 R RAM.
... 22 removing parts 70 repair assistance 24 repair method 22 repair offices, HP 28 repetitive defects, troubleshooting 128 repetitive image defect ruler 139 replacing consumables 48 parts 70 resetting printer 45 resistance, heating element 123 resolution ...14 Resolution Enhancement technology (REt) 59 Revision Level 15 rollers cleaning 51 exit, removing 79 fuser exit roller assembly,... Q quality, troubleshooting 126, 127 Quick Reference Service Guide, HP LaserJet Family 22 R RAM.

Service Manual
Page 190
...pages per minute 14 spilled toner checking for 126 cleaning 52 springs cleaning 135 fuser pressure plate 83 kick plate 102, 103 Paper Exit Sensor flag 90 transfer ...34 streaks, troubleshooting horizontal black 128 vertical black 127 vertical white 127, 128 subassemblies, replacing 22 subpads life expectancy 48 operations 63 removing 105 supplies and accessories 23 supplies, cleaning ...51 supplies, ordering 145 support Commercial Service and Support Organizations 144 HP Software and Accessory Distribution Center (SADC) 22 service options 28 worldwide 25 Support Assistant ...
...pages per minute 14 spilled toner checking for 126 cleaning 52 springs cleaning 135 fuser pressure plate 83 kick plate 102, 103 Paper Exit Sensor flag 90 transfer ...34 streaks, troubleshooting horizontal black 128 vertical black 127 vertical white 127, 128 subassemblies, replacing 22 subpads life expectancy 48 operations 63 removing 105 supplies and accessories 23 supplies, cleaning ...51 supplies, ordering 145 support Commercial Service and Support Organizations 144 HP Software and Accessory Distribution Center (SADC) 22 service options 28 worldwide 25 Support Assistant ...


