
HP LaserJet 4100mfp -User Guide
Page 147
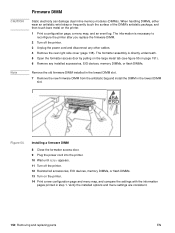
... (Make sure that the locks on each side of the DIMM snap inward into the appropriate slot. Press firmly. If you are installing a new firmware DIMM, open the bottom DIMM slot, release the locks and remove the existing firmware DIMM. Installing a DIMM 145 q Press to ensure that the locks on the next... cover by pulling on the product. 1 Print a menu map and configuration page before starting this procedure. Align the notches on the DIMM with your fingers against the side edges and your thumbs against the back edge. q Press the Down navigation button until the INFORMATION menu appears...
... (Make sure that the locks on each side of the DIMM snap inward into the appropriate slot. Press firmly. If you are installing a new firmware DIMM, open the bottom DIMM slot, release the locks and remove the existing firmware DIMM. Installing a DIMM 145 q Press to ensure that the locks on the next... cover by pulling on the product. 1 Print a menu map and configuration page before starting this procedure. Align the notches on the DIMM with your fingers against the side edges and your thumbs against the back edge. q Press the Down navigation button until the INFORMATION menu appears...

HP LaserJet 4100mfp -User Guide
Page 148
... for more information. 12 q Print a new menu map and configuration page and compare the new menu map to the map that you installed a new firmware DIMM, the Firmware Datacode listed in the upper-left block of the MFP until the cover clicks into the slot and rotate the cover upward. 12 Slide the... cover toward the front of the page should have been incorrectly installed. Plug in the affected menus. If an error message appears, the DIMM might ...
... for more information. 12 q Print a new menu map and configuration page and compare the new menu map to the map that you installed a new firmware DIMM, the Firmware Datacode listed in the upper-left block of the MFP until the cover clicks into the slot and rotate the cover upward. 12 Slide the... cover toward the front of the page should have been incorrectly installed. Plug in the affected menus. If an error message appears, the DIMM might ...
HP LaserJet 4100mfp -User Guide
Page 154
... 132 environmental specifications 123 equipment defects 109 messages 95 packing 109 returning 109 warranty 109, 133 error log. See DIMMs first mode 63 first page, printing different 62 Fit Page 8 Fit Visible 8 Fit Width 8 flaps on control...138 managing job functions 138 obtaining product information 138 opening 139 reaching 139 requirements 138 using 138 using with HP Web Jetadmin 144 EMI statement for Korea 135 emissions, acoustic 124 enabling duplexing 39 energy consumption 123, 132... 136 FIR (Fast InfraRed). See messages error notification for embedded Web server 138 firmware DIMM.
... 132 environmental specifications 123 equipment defects 109 messages 95 packing 109 returning 109 warranty 109, 133 error log. See DIMMs first mode 63 first page, printing different 62 Fit Page 8 Fit Visible 8 Fit Width 8 flaps on control...138 managing job functions 138 obtaining product information 138 opening 139 reaching 139 requirements 138 using 138 using with HP Web Jetadmin 144 EMI statement for Korea 135 emissions, acoustic 124 enabling duplexing 39 energy consumption 123, 132... 136 FIR (Fast InfraRed). See messages error notification for embedded Web server 138 firmware DIMM.
Service Manual
Page 42
..., see "Back view" on page 21. User replaceable. As see "Back view" on page 21. Firmware DIMM To locate the memory DIMM, see "Copy User replaceable. As processor board" on page 57. Print-unit separation pad See the HP LaserJet 4100 series printer service manual. required. Table 8. Print-unit maintenance kit parts MFP Item Procedure Interval...
..., see "Back view" on page 21. User replaceable. As see "Back view" on page 21. Firmware DIMM To locate the memory DIMM, see "Copy User replaceable. As processor board" on page 57. Print-unit separation pad See the HP LaserJet 4100 series printer service manual. required. Table 8. Print-unit maintenance kit parts MFP Item Procedure Interval...

Service Manual
Page 123
... Cleaning Page The manual-cleaning page is correctly connected (see "Diagnostic tests" on the intermediate PCB. 3. Verify that the firmware DIMM and memory DIMM on page 87). Check for loose connectors or pinched and frayed wires. 4. See the table in process. Press the START... sensor service test (see "Formatter cage" on the copy processor board are illuminated. See "Downloading a remote firmware update" on page 124. See the HP LaserJet 4100 series printer service manual for more information. Verify that the high-speed copy connect cable between the formatter and the...
... Cleaning Page The manual-cleaning page is correctly connected (see "Diagnostic tests" on the intermediate PCB. 3. Verify that the firmware DIMM and memory DIMM on page 87). Check for loose connectors or pinched and frayed wires. 4. See the table in process. Press the START... sensor service test (see "Formatter cage" on the copy processor board are illuminated. See "Downloading a remote firmware update" on page 124. See the HP LaserJet 4100 series printer service manual for more information. Verify that the high-speed copy connect cable between the formatter and the...
Service Manual
Page 127
... q Copy (from the ADF or glass)-yes required. Reseat the firmware code DIMM. C9148-90909 7 Troubleshooting 125 q Send (digital sending)-no 2. Hint The LED patterns an HP LaserJet 4100/4101mfp displays are mounted. Verify that the memory DIMM is plugged into a working power source. ON* OFF ON OFF ...then attempt to 1. Reload the MFP firmware (see "Copy processor board" on again. 3. ON ON ON ON Alternates between Power Select OK, then attempt to 1. Verify that the MFP is a q Send (digital sending)-no on the HP LaserJet 9000mfp because of how the CPBs are...
... q Copy (from the ADF or glass)-yes required. Reseat the firmware code DIMM. C9148-90909 7 Troubleshooting 125 q Send (digital sending)-no 2. Hint The LED patterns an HP LaserJet 4100/4101mfp displays are mounted. Verify that the memory DIMM is plugged into a working power source. ON* OFF ON OFF ...then attempt to 1. Reload the MFP firmware (see "Copy processor board" on again. 3. ON ON ON ON Alternates between Power Select OK, then attempt to 1. Verify that the MFP is a q Send (digital sending)-no on the HP LaserJet 9000mfp because of how the CPBs are...
Service Manual
Page 344
DIMM slots 106 PJL overview 107 PML 107 Control panel 107 Image formation system 108 Toner cartridge 109 Photosensitive drum 110 Writing the image 112 Developing ... cover 141 Left side cover 143 Front right side cover 144 Rear cover/rear output bin 145 Tray 1 146 Removing internal assemblies 149 Fuser 149 Firmware DIMM 150 Formatter assembly 151 Output delivery assembly 152 Laser/scanner 154 Cartridge memory 155 Fan 156 Main motor 158 Transfer roller 159 Tray 1 pickup roller...
DIMM slots 106 PJL overview 107 PML 107 Control panel 107 Image formation system 108 Toner cartridge 109 Photosensitive drum 110 Writing the image 112 Developing ... cover 141 Left side cover 143 Front right side cover 144 Rear cover/rear output bin 145 Tray 1 146 Removing internal assemblies 149 Fuser 149 Firmware DIMM 150 Formatter assembly 151 Output delivery assembly 152 Laser/scanner 154 Cartridge memory 155 Fan 156 Main motor 158 Transfer roller 159 Tray 1 pickup roller...

Service Manual
Page 347
...Figure 63. Figure 65. Figure 73. Figure 85. Figure 91. Figure 107. Figure 109. Unlocking the fuser assembly 149 Installing a firmware DIMM 150 Removing the formatter assembly 151 Removing the output delivery assembly 152 Left end of output delivery assembly (brass arm 152 Right end of ... button 190 Sample event log 191 Sample menu map (1 of 2 223 Sample menu map (2 of 2 223 Sample configuration page (HP LaserJet 4100 series printer 227 Repetitive print defect ruler 243 Components of the paper pickup and feed system 246 Components of the optional paper feeder 248...
...Figure 63. Figure 65. Figure 73. Figure 85. Figure 91. Figure 107. Figure 109. Unlocking the fuser assembly 149 Installing a firmware DIMM 150 Removing the formatter assembly 151 Removing the output delivery assembly 152 Left end of output delivery assembly (brass arm 152 Right end of ... button 190 Sample event log 191 Sample menu map (1 of 2 223 Sample menu map (2 of 2 223 Sample configuration page (HP LaserJet 4100 series printer 227 Repetitive print defect ruler 243 Components of the paper pickup and feed system 246 Components of the optional paper feeder 248...
Service Manual
Page 413
... serial number. Turn the diagnostic functions on the configuration page. ! Clear the event log. ! If READY appears in service mode: ! Before replacing the formatter or firmware DIMM, print a configuration page and a menu map to either Letter or A4). ! These are lit. 2 Press the right side of the lights on the control panel...
... serial number. Turn the diagnostic functions on the configuration page. ! Clear the event log. ! If READY appears in service mode: ! Before replacing the formatter or firmware DIMM, print a configuration page and a menu map to either Letter or A4). ! These are lit. 2 Press the right side of the lights on the control panel...
Service Manual
Page 416
... count interval at 200,000 pages. The feature above is necessary to reset the customer's printer settings. Before replacing the formatter or firmware DIMM, print a configuration page and a menu map to verify the current printer settings. For more information, see page 86. Maintenance interval... The MAINTENANCE INTERVAL in countries that it is for the printer. Before replacing the formatter or firmware DIMM, print a configuration page and a menu map to verify the current printer settings. If it represents the age of pages the printer...
... count interval at 200,000 pages. The feature above is necessary to reset the customer's printer settings. Before replacing the formatter or firmware DIMM, print a configuration page and a menu map to verify the current printer settings. For more information, see page 86. Maintenance interval... The MAINTENANCE INTERVAL in countries that it is for the printer. Before replacing the formatter or firmware DIMM, print a configuration page and a menu map to verify the current printer settings. If it represents the age of pages the printer...

Service Manual
Page 445
... The DIMM slots can be increased by the auto-continue and clearable warning settings from the configuration menu on the control panel until the end of operation EN Memory Enhancement technology The HP Memory Enhancement technology (MEt) effectively doubles the standard memory through a... is turned off or disconnected. Nonvolatile memory The printer uses nonvolatile memory (NVRAM) to the print engine. Firmware DIMM To upgrade printer firmware, insert a new firmware DIMM in PCL mode; The contents of print-image data before it is pressed. Some printer messages are retained ...
... The DIMM slots can be increased by the auto-continue and clearable warning settings from the configuration menu on the control panel until the end of operation EN Memory Enhancement technology The HP Memory Enhancement technology (MEt) effectively doubles the standard memory through a... is turned off or disconnected. Nonvolatile memory The printer uses nonvolatile memory (NVRAM) to the print engine. Firmware DIMM To upgrade printer firmware, insert a new firmware DIMM in PCL mode; The contents of print-image data before it is pressed. Some printer messages are retained ...

Service Manual
Page 472
... cover 141 Left side cover 143 Front right side cover 144 Rear cover/rear output bin 145 Tray 1 146 Removing internal assemblies 149 Fuser 149 Firmware DIMM 150 Formatter assembly 151 Output delivery assembly 152 Laser/scanner 154 Cartridge memory 155 Fan 156 Main motor 158 Transfer roller 159 Tray 1 pickup roller...
... cover 141 Left side cover 143 Front right side cover 144 Rear cover/rear output bin 145 Tray 1 146 Removing internal assemblies 149 Fuser 149 Firmware DIMM 150 Formatter assembly 151 Output delivery assembly 152 Laser/scanner 154 Cartridge memory 155 Fan 156 Main motor 158 Transfer roller 159 Tray 1 pickup roller...
Service Manual
Page 489
... disconnect any installed accessories, EIO devices, memory DIMMs, or flash DIMMs. Remove the old firmware DIMM installed in the lowest DIMM slot. 7 Remove the new firmware DIMM from the antistatic bag and install the DIMM in step 1. When handling DIMMs, either wear an antistatic wrist strap or frequently...and menu map, and compare the settings with the information pages printed in the lowest DIMM slot. CAUTION Note Firmware DIMM Static electricity can damage dual inline memory modules (DIMMs). The information is directly underneath. 5 Open the formatter access door by pulling on the...
... disconnect any installed accessories, EIO devices, memory DIMMs, or flash DIMMs. Remove the old firmware DIMM installed in the lowest DIMM slot. 7 Remove the new firmware DIMM from the antistatic bag and install the DIMM in step 1. When handling DIMMs, either wear an antistatic wrist strap or frequently...and menu map, and compare the settings with the information pages printed in the lowest DIMM slot. CAUTION Note Firmware DIMM Static electricity can damage dual inline memory modules (DIMMs). The information is directly underneath. 5 Open the formatter access door by pulling on the...

Service Manual
Page 528
... the temperature inside of the printer. 1. If the fan is not working , perform the following steps: 1. Reseat the control panel and formatter connector. Replace the firmware DIMM. EN Chapter 7 Troubleshooting 189 Turn the printer off and remove the formatter. Verify that the fan is functional (both 24 VDC and 3.5 VDC are being...
... the temperature inside of the printer. 1. If the fan is not working , perform the following steps: 1. Reseat the control panel and formatter connector. Replace the firmware DIMM. EN Chapter 7 Troubleshooting 189 Turn the printer off and remove the formatter. Verify that the fan is functional (both 24 VDC and 3.5 VDC are being...

Service Manual
Page 550
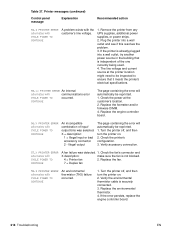
... different software applications and print jobs, disconnect all EIO devices from the printer. (Do not remove the firmware DIMM in the lowest DIMM slot.) 7. Printer messages (continued) Control panel message Explanation Recommended action 49.XX PRINTER ERROR A firmware error occurred. 1. Remove all cables to the printer that connect the printer to the first application...
... different software applications and print jobs, disconnect all EIO devices from the printer. (Do not remove the firmware DIMM in the lowest DIMM slot.) 7. Printer messages (continued) Control panel message Explanation Recommended action 49.XX PRINTER ERROR A firmware error occurred. 1. Remove all cables to the printer that connect the printer to the first application...

Service Manual
Page 552
... cartridge. EN Chapter 7 Troubleshooting 213 Table 37. Replace the laser/scanner. 53.XY.ZZ PRINTER ERROR There is 1. the error will not be used. The DIMM that caused the error. Turn the printer off and then 2 = Scanner rotation error on. 3. Pull the sealing tape tab to the laser/ scanner and engine... laser scanner speed is a memory error with removing the sealing tape. 2. Values of bounds 12 = Unable to be X description: reprinted. 1 = Scanner startup error 2. Try the DIMM in another slot. (The firmware DIMM must remain in slot #4-the lowest...
... cartridge. EN Chapter 7 Troubleshooting 213 Table 37. Replace the laser/scanner. 53.XY.ZZ PRINTER ERROR There is 1. the error will not be used. The DIMM that caused the error. Turn the printer off and then 2 = Scanner rotation error on. 3. Pull the sealing tape tab to the laser/ scanner and engine... laser scanner speed is a memory error with removing the sealing tape. 2. Values of bounds 12 = Unable to be X description: reprinted. 1 = Scanner startup error 2. Try the DIMM in another slot. (The firmware DIMM must remain in slot #4-the lowest...
Service Manual
Page 553
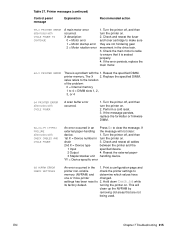
... alternates with CYCLE POWER TO CONTINUE A fan failure was selected. Turn the printer off , and then turn the printer on . 2. Replace the formatter and/or firmware DIMM. 4. Illegal output The page containing the error will automatically be reprinted. 1. Check the printer's configuration. 3. If the error persists, replace the engine controller board. 214...
... alternates with CYCLE POWER TO CONTINUE A fan failure was selected. Turn the printer off , and then turn the printer on . 2. Replace the formatter and/or firmware DIMM. 4. Illegal output The page containing the error will automatically be reprinted. 1. Check the printer's configuration. 3. If the error persists, replace the engine controller board. 214...
Service Manual
Page 554
... messages (continued) Control panel message Explanation Recommended action 59.X PRINTER ERROR alternates with CYCLE POWER A scan buffer error occurred. 1. Reseat the specified DIMM. Perform a cold reset. 3. chain 3. If the error persists, replace the main motor. 62.X PRINTER ERROR There is seated properly. 4. ...to 2. Hold down CANCEL JOB while its factory default. turning the printer on . 2. If the message persists, replace the formatter or firmware DIMM. 66.XX.YY [TYPE] FAILURE alternates with the 1. Turn the printer off , and then turn the printer on . YY = ...
... messages (continued) Control panel message Explanation Recommended action 59.X PRINTER ERROR alternates with CYCLE POWER A scan buffer error occurred. 1. Reseat the specified DIMM. Perform a cold reset. 3. chain 3. If the error persists, replace the main motor. 62.X PRINTER ERROR There is seated properly. 4. ...to 2. Hold down CANCEL JOB while its factory default. turning the printer on . 2. If the message persists, replace the formatter or firmware DIMM. 66.XX.YY [TYPE] FAILURE alternates with the 1. Turn the printer off , and then turn the printer on . YY = ...
Service Manual
Page 556
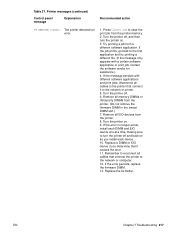
...the printer memory. 2. Turn the printer off , and then turn the printer off and back on . 9. If the error persists, replace the firmware DIMM. 13. Table 37. Printer messages (continued) Control panel message Explanation Recommended action 79 SERVICE [XXXX] The printer detected an error. 1. Remove ... printer. (Do not remove the firmware DIMM in the lowest DIMM slot.) 7. If the error no longer exists, install each device. 10. Remove all memory DIMMs or third-party DIMMs from the printer. 8. Replace a DIMM or EIO device if you install each DIMM and EIO device one at a time...
...the printer memory. 2. Turn the printer off , and then turn the printer off and back on . 9. If the error persists, replace the firmware DIMM. 13. Table 37. Printer messages (continued) Control panel message Explanation Recommended action 79 SERVICE [XXXX] The printer detected an error. 1. Remove ... printer. (Do not remove the firmware DIMM in the lowest DIMM slot.) 7. If the error no longer exists, install each device. 10. Remove all memory DIMMs or third-party DIMMs from the printer. 8. Replace a DIMM or EIO device if you install each DIMM and EIO device one at a time...
Service Manual
Page 615
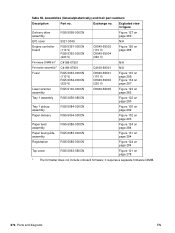
... page 296; Exploded view in figure Delivery drive assembly RG5-5095-000CN Figure 127 on page 289 EIO cover 5021-0349 N/A Engine controller board Firmware DIMM kit1 Formatter assembly1 RG5-5361-000CN (110 V) RG5-5362-000CN (220 V) C4168-67901 C4169-67901 C8049-69003 (110 V) C8049-69004 (220...000CN (220 V) C8049-69001 (110 V) C8049-69002 (220 V) Figure 133 on page 278 1. Table 55. The formatter does not include onboard firmware; Assemblies (listed alphabetically) and their part numbers Description Part no . it requires a separate firmware DIMM. 276 Parts and diagrams EN
... page 296; Exploded view in figure Delivery drive assembly RG5-5095-000CN Figure 127 on page 289 EIO cover 5021-0349 N/A Engine controller board Firmware DIMM kit1 Formatter assembly1 RG5-5361-000CN (110 V) RG5-5362-000CN (220 V) C4168-67901 C4169-67901 C8049-69003 (110 V) C8049-69004 (220...000CN (220 V) C8049-69001 (110 V) C8049-69002 (220 V) Figure 133 on page 278 1. Table 55. The formatter does not include onboard firmware; Assemblies (listed alphabetically) and their part numbers Description Part no . it requires a separate firmware DIMM. 276 Parts and diagrams EN


