HP LaserJet Printer Family - Print Media Specification Guide
Page 15
... direction of paper feeding to minimize tenting or feeding problems from the leading edge, or jamming and feeding problems can result. q Round all HP LaserJet printers. The paper should be printed. q Ensure that die-cutting of labels does not penetrate the liner sheet. q Do not run perforations...perforations or die-cuts: q So that edge trimmings will not scratch the photosensitive drum, punch cutouts and perforations from the side to be clean (no burrs) and free of edge rollover to prevent nesting, poor feeding, contamination, or wear on the printer. The specifications that are ...
... direction of paper feeding to minimize tenting or feeding problems from the leading edge, or jamming and feeding problems can result. q Round all HP LaserJet printers. The paper should be printed. q Ensure that die-cutting of labels does not penetrate the liner sheet. q Do not run perforations...perforations or die-cuts: q So that edge trimmings will not scratch the photosensitive drum, punch cutouts and perforations from the side to be clean (no burrs) and free of edge rollover to prevent nesting, poor feeding, contamination, or wear on the printer. The specifications that are ...

HP LaserJet Printer Family - Print Media Specification Guide
Page 16
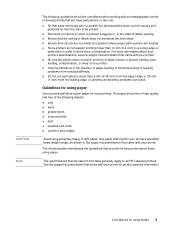
... your printer for specific information. Portrait feeding: long grain up to 5 percent groundwood can be smooth and clean with up to 350 Sheffield extended (fusing or feeding performance can be used. short grain for HP color LaserJet printers). Surface roughness 100 to 6.5 mil). Dimensional accuracy Cut sheet within 5 mm (0.2 inch). Curl Must lie...
... your printer for specific information. Portrait feeding: long grain up to 5 percent groundwood can be smooth and clean with up to 350 Sheffield extended (fusing or feeding performance can be used. short grain for HP color LaserJet printers). Surface roughness 100 to 6.5 mil). Dimensional accuracy Cut sheet within 5 mm (0.2 inch). Curl Must lie...
HP LaserJet Printer Family - Print Media Specification Guide
Page 21
... of the fusing process. The liner must provide stability for the reliable pickup and transport of the label stock through the printer to clean any contamination or label-stock adhesive that are preferred for the label material. Make sure to run several sheets of a die-cut,...processes are lifting or that box or lot-number of labels and discuss the problem with the heat and pressure of adhesive contamination. 2 Guidelines for HP color LaserJet printers). Polyester and vinyl labels require a topcoat to 205° C (401° F) for 0.1 second (0.2 second for using media 15 ...
... of the fusing process. The liner must provide stability for the reliable pickup and transport of the label stock through the printer to clean any contamination or label-stock adhesive that are preferred for the label material. Make sure to run several sheets of a die-cut,...processes are lifting or that box or lot-number of labels and discuss the problem with the heat and pressure of adhesive contamination. 2 Guidelines for HP color LaserJet printers). Polyester and vinyl labels require a topcoat to 205° C (401° F) for 0.1 second (0.2 second for using media 15 ...
HP LaserJet Printer Family - Print Media Specification Guide
Page 29
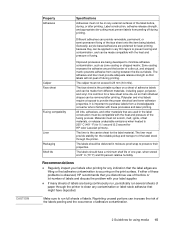
...too moist. Paper is too light or too flimsy. q Make sure that are appropriate for the correct output tray selection. For most HP LaserJet printers you can damage the printer. Chapter 3 Troubleshooting 23 Paper problems CAUTION Note This section provides information about conditions that can indicate paper ... does not exceed the paper might contain higher filler levels of talc and calcium carbonate. For more information. Doing so can use a cleaning page to the paper fibers, they can q Change the paper type or try another ream of multiple-sheet feeds, and post-image ...
...too moist. Paper is too light or too flimsy. q Make sure that are appropriate for the correct output tray selection. For most HP LaserJet printers you can damage the printer. Chapter 3 Troubleshooting 23 Paper problems CAUTION Note This section provides information about conditions that can indicate paper ... does not exceed the paper might contain higher filler levels of talc and calcium carbonate. For more information. Doing so can use a cleaning page to the paper fibers, they can q Change the paper type or try another ream of multiple-sheet feeds, and post-image ...

HP LaserJet 1020 Printer - Software Technical Reference
Page 7
... Document preview image 55 About button 56 Printer Properties tab set 56 Configure tab Features 56 Quick Sets 57 Jam Recovery 58 Status Messages 58 Cleaning Page 58 Print Density 58 Courier Font Type 58 Properties tab features - Windows 98 SE and Windows Me 58 4 Windows software installation Installation overview...62...
... Document preview image 55 About button 56 Printer Properties tab set 56 Configure tab Features 56 Quick Sets 57 Jam Recovery 58 Status Messages 58 Cleaning Page 58 Print Density 58 Courier Font Type 58 Properties tab features - Windows 98 SE and Windows Me 58 4 Windows software installation Installation overview...62...
HP LaserJet 1020 Printer - Software Technical Reference
Page 69
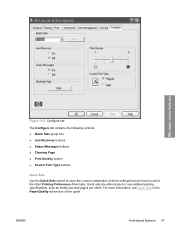
... Figure 3-15 Configure tab The Configure tab contains the following controls: ■ Quick Sets group box ■ Jam Recovery buttons ■ Status Messages buttons ■ Cleaning Page ■ Print Density control ■ Courier Font Type buttons Quick Sets Use the Quick Sets control to store the current combination of driver settings...
... Figure 3-15 Configure tab The Configure tab contains the following controls: ■ Quick Sets group box ■ Jam Recovery buttons ■ Status Messages buttons ■ Cleaning Page ■ Print Density control ■ Courier Font Type buttons Quick Sets Use the Quick Sets control to store the current combination of driver settings...
HP LaserJet 1020 Printer - Software Technical Reference
Page 70
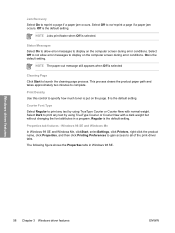
... process. NOTE The paper-out message still appears when Off is the default setting. Regular is selected Cleaning Page Click Start to print any text by using TrueType Courier or Courier New with normal weight. The following figure shows the Properties tabs in a ... to complete. Select Off to not allow error messages to specify how much toner is put on the computer screen during error conditions. This process cleans the product paper path and takes approximately two minutes to not reprint a page if a paper jam occurs.
... process. NOTE The paper-out message still appears when Off is the default setting. Regular is selected Cleaning Page Click Start to print any text by using TrueType Courier or Courier New with normal weight. The following figure shows the Properties tabs in a ... to complete. Select Off to not allow error messages to specify how much toner is put on the computer screen during error conditions. This process cleans the product paper path and takes approximately two minutes to not reprint a page if a paper jam occurs.

HP LaserJet 1020 - User Guide
Page 6
... and heavy media 20 Cardstock construction 20 Cardstock guidelines 21 Letterhead and preprinted forms 21 Choosing paper and other media ...22 HP media ...22 Media to avoid ...22 Media that might damage the printer 22 Loading media into the input trays ...24 Priority...paper (N-up printing 34 Printing booklets ...35 Printing watermarks ...37 3 Maintenance ...39 Cleaning the printer ...40 Cleaning the print cartridge area 40 Cleaning the printer media path 41 Changing the pickup roller ...43 Cleaning the pickup roller ...46 Changing the printer separation pad 47 Redistributing toner ...49 ...
... and heavy media 20 Cardstock construction 20 Cardstock guidelines 21 Letterhead and preprinted forms 21 Choosing paper and other media ...22 HP media ...22 Media to avoid ...22 Media that might damage the printer 22 Loading media into the input trays ...24 Priority...paper (N-up printing 34 Printing booklets ...35 Printing watermarks ...37 3 Maintenance ...39 Cleaning the printer ...40 Cleaning the print cartridge area 40 Cleaning the printer media path 41 Changing the pickup roller ...43 Cleaning the pickup roller ...46 Changing the printer separation pad 47 Redistributing toner ...49 ...

HP LaserJet 1020 - User Guide
Page 42
See Cleaning the printer on page 8 for instructions. 2. Select the appropriate binding option, and click OK. 3. See Printer properties (driver) on page 40 for that driver. 32 ...
See Cleaning the printer on page 8 for instructions. 2. Select the appropriate binding option, and click OK. 3. See Printer properties (driver) on page 40 for that driver. 32 ...
HP LaserJet 1020 - User Guide
Page 49
3 Maintenance This chapter provides information on the following topics: ● Cleaning the printer ● Changing the pickup roller ● Cleaning the pickup roller ● Changing the printer separation pad ● Redistributing toner ● Changing the print cartridge ENWW 39
3 Maintenance This chapter provides information on the following topics: ● Cleaning the printer ● Changing the pickup roller ● Cleaning the pickup roller ● Changing the printer separation pad ● Redistributing toner ● Changing the print cartridge ENWW 39
HP LaserJet 1020 - User Guide
Page 50
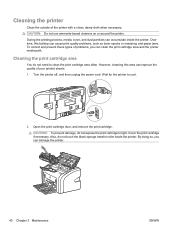
...printer. Open the print cartridge door, and remove the print cartridge. Turn the printer off, and then unplug the power cord. However, cleaning this buildup can cause print quality problems, such as toner specks or smearing, and paper jams. To correct and prevent these types of the... printer with a clean, damp cloth when necessary. Cleaning the printer Clean the outside of problems, you can improve the quality of your printed sheets. 1. During the printing process, media, toner, ...
...printer. Open the print cartridge door, and remove the print cartridge. Turn the printer off, and then unplug the power cord. However, cleaning this buildup can cause print quality problems, such as toner specks or smearing, and paper jams. To correct and prevent these types of the... printer with a clean, damp cloth when necessary. Cleaning the printer Clean the outside of problems, you can improve the quality of your printed sheets. 1. During the printing process, media, toner, ...

HP LaserJet 1020 - User Guide
Page 51
3. Plug the printer into the power outlet, and then turn on the fuser assembly and rollers. Replace the print cartridge, and close the print cartridge door. 5. Cleaning the media path might extend the life of the printer. ENWW Cleaning the printer 41 With a dry, lint-free cloth, wipe any residue from the media path area and the print cartridge cavity. 4. Cleaning the printer media path If you are experiencing toner specks or dots on the printouts, you can use the HP LaserJet cleaning utility to remove excess media and toner particles that can accumulate on the printer.
3. Plug the printer into the power outlet, and then turn on the fuser assembly and rollers. Replace the print cartridge, and close the print cartridge door. 5. Cleaning the media path might extend the life of the printer. ENWW Cleaning the printer 41 With a dry, lint-free cloth, wipe any residue from the media path area and the print cartridge cavity. 4. Cleaning the printer media path If you are experiencing toner specks or dots on the printouts, you can use the HP LaserJet cleaning utility to remove excess media and toner particles that can accumulate on the printer.

HP LaserJet 1020 - User Guide
Page 52
... has finished. Make sure that the printer is idle and the Ready light is on page 8 for instructions. The cleaning page will stop periodically during the cleaning process. Access the printer properties (or printing preferences in the input tray. 3. NOTE: For best results use copier-grade media, 70 ...to 90 g/m2 (18 to thoroughly clean the printer. 42 Chapter 3 Maintenance ENWW If you do not have any transparencies, you can use a sheet of transparency. Load the media in ...
... has finished. Make sure that the printer is idle and the Ready light is on page 8 for instructions. The cleaning page will stop periodically during the cleaning process. Access the printer properties (or printing preferences in the input tray. 3. NOTE: For best results use copier-grade media, 70 ...to 90 g/m2 (18 to thoroughly clean the printer. 42 Chapter 3 Maintenance ENWW If you do not have any transparencies, you can use a sheet of transparency. Load the media in ...

HP LaserJet 1020 - User Guide
Page 53
..., and remove the print cartridge. ENWW Changing the pickup roller 43 Changing the pickup roller Normal use of poor media might need to change or clean the pickup roller. CAUTION: Failure to order a new pickup roller. Wait for the printer to direct light. The use with a sheet of the pickup roller...
..., and remove the print cartridge. ENWW Changing the pickup roller 43 Changing the pickup roller Normal use of poor media might need to change or clean the pickup roller. CAUTION: Failure to order a new pickup roller. Wait for the printer to direct light. The use with a sheet of the pickup roller...

HP LaserJet 1020 - User Guide
Page 56
.... WARNING! Before you reinstall it , follow the instructions below: 1. Using a dry, lint-free cloth, wipe the pickup roller to dry completely. 3. Cleaning the pickup roller If you want to clean the pickup roller rather than replace it in the printer (see Changing the pickup roller on page 43. 2. Remove the pickup roller...
.... WARNING! Before you reinstall it , follow the instructions below: 1. Using a dry, lint-free cloth, wipe the pickup roller to dry completely. 3. Cleaning the pickup roller If you want to clean the pickup roller rather than replace it in the printer (see Changing the pickup roller on page 43. 2. Remove the pickup roller...

HP LaserJet 1020 - User Guide
Page 57
If the printer regularly pulls multiple sheets of media at a time, you change the separation pad. See Cleaning the pickup roller on page 92 to order a new printer separation pad. At the back of the printer, unscrew the two screws holding the separation ... supplies on page 46. 1. NOTE: Before you might require more frequent replacement of the separation pad. Wait for the printer to change the separation pad, clean the pickup roller. Turn the printer off, and then unplug the power cord from the printer. ENWW Changing the printer separation pad 47 Changing the...
If the printer regularly pulls multiple sheets of media at a time, you change the separation pad. See Cleaning the pickup roller on page 92 to order a new printer separation pad. At the back of the printer, unscrew the two screws holding the separation ... supplies on page 46. 1. NOTE: Before you might require more frequent replacement of the separation pad. Wait for the printer to change the separation pad, clean the pickup roller. Turn the printer off, and then unplug the power cord from the printer. ENWW Changing the printer separation pad 47 Changing the...

HP LaserJet 1020 - User Guide
Page 66
... printing might be too complex for the job to print. Processing data Wait for the printer's memory capacity. The printer is ready to two minutes. Cleaning mode A Cleaning page or a Printer Test page is out of memory. See Understanding print quality settings on " Symbol for more information. 56 Chapter 4 Problem solving ENWW...
... printing might be too complex for the job to print. Processing data Wait for the printer's memory capacity. The printer is ready to two minutes. Cleaning mode A Cleaning page or a Printer Test page is out of memory. See Understanding print quality settings on " Symbol for more information. 56 Chapter 4 Problem solving ENWW...

HP LaserJet 1020 - User Guide
Page 68
...the media input tray on page 58 ● Printer curled the media on page 59 ● Print job is clean. See Printer media considerations on page 11 for more information. See Cleaning the pickup roller on page 46 or Changing the pickup roller on page 40 for instructions. 58 Chapter 4 Problem ...media from the media input tray ● Make sure that the printer is not in manual feed mode. ● Make sure that meets specifications. See Cleaning the printer on page 43 for more information. More than one sheet of media feeds through the printer at one time ● The media input...
...the media input tray on page 58 ● Printer curled the media on page 59 ● Print job is clean. See Printer media considerations on page 11 for more information. See Cleaning the pickup roller on page 46 or Changing the pickup roller on page 40 for instructions. 58 Chapter 4 Problem ...media from the media input tray ● Make sure that the printer is not in manual feed mode. ● Make sure that meets specifications. See Cleaning the printer on page 43 for more information. More than one sheet of media feeds through the printer at one time ● The media input...

HP LaserJet 1020 - User Guide
Page 70
... connections are attached between the USB port on the computer and the printer. See Changing the print cartridge on page 51 for more information. ● Clean the printer, particularly the contacts between the computer and the printer. Try printing from another printer on page 61 ● Graphics quality on page 61...
... connections are attached between the USB port on the computer and the printer. See Changing the print cartridge on page 51 for more information. ● Clean the printer, particularly the contacts between the computer and the printer. Try printing from another printer on page 61 ● Graphics quality on page 61...

HP LaserJet 1020 - User Guide
Page 73
...The media might be defective. Try printing with new media. Dropouts ● A single sheet of media. ● The print cartridge might not meet HP's media specifications (for more information. The manufacturing processes can cause some areas to be turned on page 11 for more information. ● If the ...whole page is light, the print density adjustment is too light or EconoMode might be cleaned. See Saving toner on page 49 for example, the media is bad. NOTE: If these steps do not correct the problem, contact an...
...The media might be defective. Try printing with new media. Dropouts ● A single sheet of media. ● The print cartridge might not meet HP's media specifications (for more information. The manufacturing processes can cause some areas to be turned on page 11 for more information. ● If the ...whole page is light, the print density adjustment is too light or EconoMode might be cleaned. See Saving toner on page 49 for example, the media is bad. NOTE: If these steps do not correct the problem, contact an...

