HP LE1851w, LE2001w, and LE2001wm LCD Monitors
Page 1
HP LE1851w, LE2001w, and LE2001wm LCD Monitors User Guide
HP LE1851w, LE2001w, and LE2001wm LCD Monitors User Guide

HP LE1851w, LE2001w, and LE2001wm LCD Monitors
Page 5
...HP LCD Monitors ...1 2 Safety and Maintenance Guidelines Important Safety Information ...2 Maintenance Guidelines ...3 Cleaning the Monitor ...3 Shipping the Monitor ...3 3 Setting Up the Monitor Attaching the Monitor Base ...4 Rear Components ...5 Connecting the Cables ...6 LE1851w and LE2001w Models 6 LE2001wm Model ...7 Adjusting the Monitor ...8 Turning on the Monitor ...8 Mounting the Monitor Panel ...9 Locating the Rating Labels ...11 4 Operating the Monitor...Front Panel Controls ...15 Adjusting the Monitor Settings ...16 Using the On-Screen Display Menu 16 OSD Menu Selections 17...
...HP LCD Monitors ...1 2 Safety and Maintenance Guidelines Important Safety Information ...2 Maintenance Guidelines ...3 Cleaning the Monitor ...3 Shipping the Monitor ...3 3 Setting Up the Monitor Attaching the Monitor Base ...4 Rear Components ...5 Connecting the Cables ...6 LE1851w and LE2001w Models 6 LE2001wm Model ...7 Adjusting the Monitor ...8 Turning on the Monitor ...8 Mounting the Monitor Panel ...9 Locating the Rating Labels ...11 4 Operating the Monitor...Front Panel Controls ...15 Adjusting the Monitor Settings ...16 Using the On-Screen Display Menu 16 OSD Menu Selections 17...

HP LE1851w, LE2001w, and LE2001wm LCD Monitors
Page 6
Identifying Monitor Conditions ...22 Sleep Timer Mode ...23 HP Display LiteSaver ...24 Installing the HP Display LiteSaver Software 24 sRGB Support ...25 Changing the Color Temperature 25 Installing the sRGB ICM File for ... Technical Support ...28 Preparing to Call Technical Support 28 Appendix B Technical Specifications LE1851w Model ...30 LE2001w Model ...31 LE2001wm Model ...32 Recognizing Preset Display Resolutions 33 LE1851w Model ...33 LE2001w and LE2001wm Models 33 Entering User Modes ...34 Energy Saver Feature ...34 Appendix C Agency Regulatory Notices Federal Communications...
Identifying Monitor Conditions ...22 Sleep Timer Mode ...23 HP Display LiteSaver ...24 Installing the HP Display LiteSaver Software 24 sRGB Support ...25 Changing the Color Temperature 25 Installing the sRGB ICM File for ... Technical Support ...28 Preparing to Call Technical Support 28 Appendix B Technical Specifications LE1851w Model ...30 LE2001w Model ...31 LE2001wm Model ...32 Recognizing Preset Display Resolutions 33 LE1851w Model ...33 LE2001w and LE2001wm Models 33 Entering User Modes ...34 Energy Saver Feature ...34 Appendix C Agency Regulatory Notices Federal Communications...

HP LE1851w, LE2001w, and LE2001wm LCD Monitors
Page 9
1 Product Features HP LCD Monitors The LCD (liquid crystal display) monitors have an active matrix, thin-film transistor (TFT) panel. The monitor models and features include: ● Wide viewing angle to allow viewing from a sitting or standing position, or moving side-to-side ● Tilt capability ● Removable pedestal base for flexible monitor panel mounting solutions ● Video...
1 Product Features HP LCD Monitors The LCD (liquid crystal display) monitors have an active matrix, thin-film transistor (TFT) panel. The monitor models and features include: ● Wide viewing angle to allow viewing from a sitting or standing position, or moving side-to-side ● Tilt capability ● Removable pedestal base for flexible monitor panel mounting solutions ● Video...

HP LE1851w, LE2001w, and LE2001wm LCD Monitors
Page 13
... Components 5 Figure 3-3 LE2001wm Rear Components Table 3-2 LE2001wm Rear Components Component Function 1 AC Power Connector Connects the AC power cord to the monitor. 2 Audio Connector Connects the audio cable to the monitor. 3 DVI Connector Connects the DVI-D cable to the monitor. 4 VGA Connector Connects the VGA cable to the monitor. Rear Components Figure 3-2 LE1851w and LE2001w Rear Components...
... Components 5 Figure 3-3 LE2001wm Rear Components Table 3-2 LE2001wm Rear Components Component Function 1 AC Power Connector Connects the AC power cord to the monitor. 2 Audio Connector Connects the audio cable to the monitor. 3 DVI Connector Connects the DVI-D cable to the monitor. 4 VGA Connector Connects the VGA cable to the monitor. Rear Components Figure 3-2 LE1851w and LE2001w Rear Components...
HP LE1851w, LE2001w, and LE2001wm LCD Monitors
Page 15
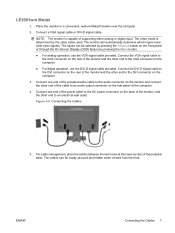
...; For analog operation, use the DVI-D signal cable provided. Connect the VGA signal cable to the VGA connector on the rear of the monitor and the other end to the VGA connector on the computer. 3. Figure 3-5 Connecting the Cables 5. The video mode is capable of the... section of the power cable to an electrical wall outlet. The cables can be neatly secured and hidden when viewed from the front. LE2001wm Model 1. The monitor will automatically determine which inputs have valid video signals. ENWW Connecting the Cables 7 The inputs can be selected by pressing the +/Source ...
...; For analog operation, use the DVI-D signal cable provided. Connect the VGA signal cable to the VGA connector on the rear of the monitor and the other end to the VGA connector on the computer. 3. Figure 3-5 Connecting the Cables 5. The video mode is capable of the... section of the power cable to an electrical wall outlet. The cables can be neatly secured and hidden when viewed from the front. LE2001wm Model 1. The monitor will automatically determine which inputs have valid video signals. ENWW Connecting the Cables 7 The inputs can be selected by pressing the +/Source ...

HP LE1851w, LE2001w, and LE2001wm LCD Monitors
Page 23
... OSD menu is inactive, press to activate the auto adjustment feature to optimize the screen image. 5 Power LED Green = Fully powered. Plus/source (LE2001wm model only) If the OSD menu is inactive, press to activate the source button that chooses the video signal input (VGA or DVI...) (LE2001wm model only) 4 OK/auto If the OSD menu is on or off. ENWW Front Panel Controls 15 Flashing Amber = Sleep Timer mode. 6 Power Turns the monitor on , press to select the highlighted menu item. Front Panel Controls ...
... OSD menu is inactive, press to activate the auto adjustment feature to optimize the screen image. 5 Power LED Green = Fully powered. Plus/source (LE2001wm model only) If the OSD menu is inactive, press to activate the source button that chooses the video signal input (VGA or DVI...) (LE2001wm model only) 4 OK/auto If the OSD menu is on or off. ENWW Front Panel Controls 15 Flashing Amber = Sleep Timer mode. 6 Power Turns the monitor on , press to select the highlighted menu item. Front Panel Controls ...

HP LE1851w, LE2001w, and LE2001wm LCD Monitors
Page 27
...hours and minutes ● Set Sleep Time-sets the time you want to place the monitor in which the OSD menu is needed if contacting HP technical support. Reports the total hours of the monitor speakers. The factory default is On. Table 4-2 OSD Menu (continued) Icon Main ...Menu Submenu DDC/CI Support Bezel Power LED Volume (LE2001wm model only) Sleep Timer Language Information Current ...
...hours and minutes ● Set Sleep Time-sets the time you want to place the monitor in which the OSD menu is needed if contacting HP technical support. Reports the total hours of the monitor speakers. The factory default is On. Table 4-2 OSD Menu (continued) Icon Main ...Menu Submenu DDC/CI Support Bezel Power LED Volume (LE2001wm model only) Sleep Timer Language Information Current ...

HP LE1851w, LE2001w, and LE2001wm LCD Monitors
Page 35
Connect the power cord. Refer to Chapter 3, Setting Up the Monitor on the keyboard or move the mouse to 1600 x 900 @ 60Hz (LE2001w and LE2001wm models) is off . Press any key on page 4 for 10 seconds to access the OSD menu. Image appears blurred, ...panel power button. Change Settings to the VGA connector on the computer and the VGA connector on front panel of the monitor is set higher than the monitor's native resolution. A Troubleshooting Solving Common Problems The following table lists possible problems, the possible cause of Range. Position...
Connect the power cord. Refer to Chapter 3, Setting Up the Monitor on the keyboard or move the mouse to 1600 x 900 @ 60Hz (LE2001w and LE2001wm models) is off . Press any key on page 4 for 10 seconds to access the OSD menu. Image appears blurred, ...panel power button. Change Settings to the VGA connector on the computer and the VGA connector on front panel of the monitor is set higher than the monitor's native resolution. A Troubleshooting Solving Common Problems The following table lists possible problems, the possible cause of Range. Position...

HP LE1851w, LE2001w, and LE2001wm LCD Monitors
Page 40
LE2001wm Model Table B-3 LE2001wm Specifications Display Type Viewable Image Size Speakers Tilt Maximum Weight (Unpacked) Dimensions (include base) Height Depth Width Maximum Graphic Resolution Optimum Graphic Resolution Text Mode ... Rate Environmental Requirements Temperature Operating Temperature Storage Temperature Relative Humidity Power Source Altitude: Operating Storage Power Consumption (maximum) Input Terminal 50.8 cm wide screen TFT LCD 50.8 cm diagonal 1 watt per channel -5 to 25° 5.04 kg 36.05 cm 20.6 cm 47.86 cm 1600 x 900 (60Hz) analog input 1600...
LE2001wm Model Table B-3 LE2001wm Specifications Display Type Viewable Image Size Speakers Tilt Maximum Weight (Unpacked) Dimensions (include base) Height Depth Width Maximum Graphic Resolution Optimum Graphic Resolution Text Mode ... Rate Environmental Requirements Temperature Operating Temperature Storage Temperature Relative Humidity Power Source Altitude: Operating Storage Power Consumption (maximum) Input Terminal 50.8 cm wide screen TFT LCD 50.8 cm diagonal 1 watt per channel -5 to 25° 5.04 kg 36.05 cm 20.6 cm 47.86 cm 1600 x 900 (60Hz) analog input 1600...

HP LE1851w, LE2001w, and LE2001wm LCD Monitors
Page 41
This monitor automatically recognized these preset modes and they will appear properly sized and centered on the screen. LE1851w Model Table B-4 Factory Preset Modes Preset Pixel Format ... x 1024 63.98 8 1366 x 768 47.7 Vert Freq (Hz) 59.940 70.087 60.317 60.004 60.00 60.00 60.02 60.00 LE2001w and LE2001wm Models Table B-5 Factory Preset Modes Preset Pixel Format Horz Freq (kHz) 1 640 x 480 31.469 2 720 x 400 31.469 3 800 x 600 37.879 4 1024...
This monitor automatically recognized these preset modes and they will appear properly sized and centered on the screen. LE1851w Model Table B-4 Factory Preset Modes Preset Pixel Format ... x 1024 63.98 8 1366 x 768 47.7 Vert Freq (Hz) 59.940 70.087 60.317 60.004 60.00 60.00 60.02 60.00 LE2001w and LE2001wm Models Table B-5 Factory Preset Modes Preset Pixel Format Horz Freq (kHz) 1 640 x 480 31.469 2 720 x 400 31.469 3 800 x 600 37.879 4 1024...

HP LE1851w, LE2001w, and LE2001wm LCD Monitors
Page 42
...standard graphics adapter. ● You are 10 user modes (LE1851w model) or 15 user modes (LE2001w and LE2001wm models) that have energy saver features. When the monitor's Energy Saver utility causes the monitor to enter the reduced power state, the power light blinks amber. 34 Appendix B Technical Specifications ENWW ... Refer to the computer manual for a mode that is a brief warm up period before the monitor will utilize less than 18 watts (LE1851w model) or 26 watts (LE2001w and LE2001wm models) and the Power light is in memory. The reduced power state will be made to ...
...standard graphics adapter. ● You are 10 user modes (LE1851w model) or 15 user modes (LE2001w and LE2001wm models) that have energy saver features. When the monitor's Energy Saver utility causes the monitor to enter the reduced power state, the power light blinks amber. 34 Appendix B Technical Specifications ENWW ... Refer to the computer manual for a mode that is a brief warm up period before the monitor will utilize less than 18 watts (LE1851w model) or 26 watts (LE2001w and LE2001wm models) and the Power light is in memory. The reduced power state will be made to ...