HP L2045w LCD Monitor User Guide
Page 9
1 Product Features HP L2045w The flat panel monitor has an active matrix, thin-film transistor (TFT), liquid crystal display (LCD). The monitor features include: ● Large 20.1-inch (51 cm) wide-screen display with 1680 × 1050 resolution, plus full-screen support for lower ...● Removable pedestal base with VESA 40mm mounting holes for mounting an HP Thin Client with the optional HP Quick Release ● Video inputs that support DVI digital signal and VGA analog inputs ● One power cable and one VGA signal cable included ● USB 2.0 hub with one upstream (connects ...
1 Product Features HP L2045w The flat panel monitor has an active matrix, thin-film transistor (TFT), liquid crystal display (LCD). The monitor features include: ● Large 20.1-inch (51 cm) wide-screen display with 1680 × 1050 resolution, plus full-screen support for lower ...● Removable pedestal base with VESA 40mm mounting holes for mounting an HP Thin Client with the optional HP Quick Release ● Video inputs that support DVI digital signal and VGA analog inputs ● One power cable and one VGA signal cable included ● USB 2.0 hub with one upstream (connects ...
HP L2045w LCD Monitor User Guide
Page 13
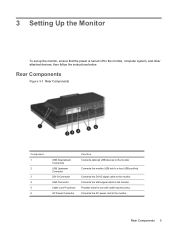
... monitor. Connects the VGA signal cable to the monitor. Provides slots for use with cable security locks. Rear Components 5 Connects the monitor USB hub to the monitor, computer system, and other attached devices, then follow the instructions below. 3 Setting Up the Monitor To set up the monitor..., ensure that the power is turned off to a host USB port/hub. Rear Components Figure 3-1 Rear Components Component 1 2 3 4 5 6 USB Downstream Connectors USB Upstream Connector DVI-D Connector VGA Connector Cable Lock Provisions AC ...
... monitor. Connects the VGA signal cable to the monitor. Provides slots for use with cable security locks. Rear Components 5 Connects the monitor USB hub to the monitor, computer system, and other attached devices, then follow the instructions below. 3 Setting Up the Monitor To set up the monitor..., ensure that the power is turned off to a host USB port/hub. Rear Components Figure 3-1 Rear Components Component 1 2 3 4 5 6 USB Downstream Connectors USB Upstream Connector DVI-D Connector VGA Connector Cable Lock Provisions AC ...

HP L2045w LCD Monitor User Guide
Page 14
...mode. D connector on the computer. ● For analog operation, use an optional DVI-D signal cable. Connect the VGA signal cable to a VGA connector on the computer. 6 Chapter 3 Setting Up the Monitor The monitor features two sets of supporting either digital or analog input. Use the top mounting holes to allow the display... head to be lowered 18.05 mm closer to the VGA connector on the monitor and the other end to a DVI- Figure 3-2 Two Sets of VESA 100mm Mounting Holes Selecting the Signal Connectors and Cables The...
...mode. D connector on the computer. ● For analog operation, use an optional DVI-D signal cable. Connect the VGA signal cable to a VGA connector on the computer. 6 Chapter 3 Setting Up the Monitor The monitor features two sets of supporting either digital or analog input. Use the top mounting holes to allow the display... head to be lowered 18.05 mm closer to the VGA connector on the monitor and the other end to a DVI- Figure 3-2 Two Sets of VESA 100mm Mounting Holes Selecting the Signal Connectors and Cables The...

HP L2045w LCD Monitor User Guide
Page 15
Connecting the Monitor 7 The inputs can be selected through the On-Screen Display (OSD) feature by pressing the Input Select button on the front panel. Place the monitor in a convenient, well-ventilated location near the computer. The monitor will automatically determine which inputs have valid video signals. Figure 3-3 Connecting the DVI-D Signal Cable (not included with monitor) Figure 3-4 Connecting the VGA Signal Cable Connecting the Monitor 1.
Connecting the Monitor 7 The inputs can be selected through the On-Screen Display (OSD) feature by pressing the Input Select button on the front panel. Place the monitor in a convenient, well-ventilated location near the computer. The monitor will automatically determine which inputs have valid video signals. Figure 3-3 Connecting the DVI-D Signal Cable (not included with monitor) Figure 3-4 Connecting the VGA Signal Cable Connecting the Monitor 1.
HP L2045w LCD Monitor User Guide
Page 27
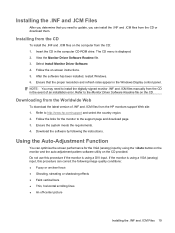
...-screen instructions. 5. Using the Auto-Adjustment Function You can correct the following the instructions. If the monitor is displayed. 2. Select Install Monitor Driver Software. 4. Follow the links for the VGA (analog) input by following image quality conditions: ● Fuzzy or unclear focus ● Ghosting, ...an installation error. Ensure that you need to install the digitally signed monitor .INF and .ICM files manually from the HP monitors support Web site: 1. NOTE: You may need to http://www.hp.com/support and select the country region. 2. Insert the CD in ...
...-screen instructions. 5. Using the Auto-Adjustment Function You can correct the following the instructions. If the monitor is displayed. 2. Select Install Monitor Driver Software. 4. Follow the links for the VGA (analog) input by following image quality conditions: ● Fuzzy or unclear focus ● Ghosting, ...an installation error. Ensure that you need to install the digitally signed monitor .INF and .ICM files manually from the HP monitors support Web site: 1. NOTE: You may need to http://www.hp.com/support and select the country region. 2. Insert the CD in ...

HP L2045w LCD Monitor User Guide
Page 29
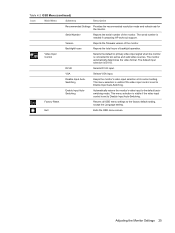
Front Panel Controls Table 4-1 Monitor Front Panel Controls Control Function 1 Menu/Select Opens, selects or exits the OSD menu. 2 − (Minus)/Auto ● Navigates backward through the OSD menu and ... feature to optimize the screen image. 3 + (Plus) Navigates forward through the OSD menu and increases adjustment levels. 4 Input Select Selects the video input (DVI-D or VGA) 5 Power LED Fully powered = Green. Front Panel Controls 21 Sleep Timer mode = Flashing Amber. 6 Power Turns the...
Front Panel Controls Table 4-1 Monitor Front Panel Controls Control Function 1 Menu/Select Opens, selects or exits the OSD menu. 2 − (Minus)/Auto ● Navigates backward through the OSD menu and ... feature to optimize the screen image. 3 + (Plus) Navigates forward through the OSD menu and increases adjustment levels. 4 Input Select Selects the video input (DVI-D or VGA) 5 Power LED Fully powered = Green. Front Panel Controls 21 Sleep Timer mode = Flashing Amber. 6 Power Turns the...
HP L2045w LCD Monitor User Guide
Page 33
... the OSD menu screen. Enable Input AutoSwitching Automatically returns the monitor's video input to two active and valid video sources. VGA Selects VGA input. Factory Reset Returns all OSD menu settings to Disable Input Auto-Switching. The default input selection is needed if contacting HP technical support. DVI-D Selects DVI-D input. This menu selection...
... the OSD menu screen. Enable Input AutoSwitching Automatically returns the monitor's video input to two active and valid video sources. VGA Selects VGA input. Factory Reset Returns all OSD menu settings to Disable Input Auto-Switching. The default input selection is needed if contacting HP technical support. DVI-D Selects DVI-D input. This menu selection...
HP L2045w LCD Monitor User Guide
Page 39
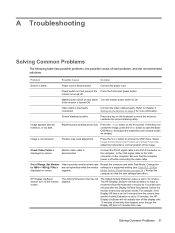
...and enter Safe Mode. Change the settings to a supported setting (see Table B-2 L2045w Model Factory Preset Modes on the front panel. For example, if the Display Off time is set to 10... minutes, the HP Display LiteSaver will wait to detect no input or movement from the current time and the... blank. If this does not correct the image, press the Menu button to the VGA connector on the computer. Set Monitor to inactivate the screen blanking utility. Connect the video cable properly. Restart the computer so...
...and enter Safe Mode. Change the settings to a supported setting (see Table B-2 L2045w Model Factory Preset Modes on the front panel. For example, if the Display Off time is set to 10... minutes, the HP Display LiteSaver will wait to detect no input or movement from the current time and the... blank. If this does not correct the image, press the Menu button to the VGA connector on the computer. Set Monitor to inactivate the screen blanking utility. Connect the video cable properly. Restart the computer so...
HP L2045w LCD Monitor User Guide
Page 42
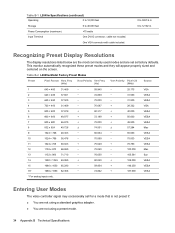
Table B-1 L2045w Specifications (continued) Operating 0 to 12,000 feet Storage 0 to 40,000 feet Power Consumption (maximum)
Table B-1 L2045w Specifications (continued) Operating 0 to 12,000 feet Storage 0 to 40,000 feet Power Consumption (maximum)


