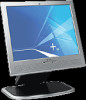
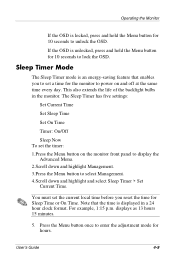
User's Guide L1530 and L1730 Flat Panel Monitors
Page 1
User's Guide L1530 and L1730 Flat Panel Monitors Document Part Number: 335576-B21 July 2003 This guide provides information on setting up the monitor, installing drivers, using the on-screen display menu, troubleshooting and technical specifications.
User's Guide L1530 and L1730 Flat Panel Monitors
Page 2
... Reader are trademarks of Hewlett-Packard Company. No part of any kind, including, but not limited to another language without notice. User's Guide L1530 and L1730 Flat Panel Monitors First Edition (July 2003) Document Part Number: 335576-B21 and other product names mentioned herein may be liable for technical or editorial errors or omissions contained herein or for incidental or consequential...
User's Guide L1530 and L1730 Flat Panel Monitors
Page 3
... Guidelines Important Safety Information 2-1 Maintenance Guidelines 2-2 Cleaning the Monitor 2-4 Shipping the Monitor 2-4 3 Setting Up the Monitor Connecting the Monitor 3-1 Adjusting the Monitor 3-4 Changing the Viewing Position 3-5 Removing the Monitor Base 3-7 Mounting the Monitor 3-9 4 Operating the Monitor Installing the Information Files 4-1 Front Panel Components 4-2 Adjusting Monitor Settings 4-3 Using the On-Screen Display 4-4 Adjusting Screen Quality 4-7 Optimizing Analog Conversion 4-7 Identifying Monitor Conditions 4-8 Sleep Timer Mode 4-9 User's Guide iii
User's Guide L1530 and L1730 Flat Panel Monitors
Page 4
... Common Problems A-1 Using the Worldwide Web A-3 Preparing to call Technical Support A-3 B Technical Specifications Entering User Modes B-4 Energy Saver Feature B-5 C Agency Regulatory Notices Federal Communications Commission Notice C-1 Modifications C-1 Cables C-2 Declaration of Conformity for Products Marked with FCC Logo, United States Only C-2 Canadian Notice C-3 Avis Canadien C-3 European Notice C-3 Japanese Notice C-3 Korean Notice C-4 EPA Energy Star Compliance C-4 Power Cord Set Requirements C-4 Recycling Information C-5 D LCD Monitor...
User's Guide L1530 and L1730 Flat Panel Monitors
Page 5
...), Image color Matching File (ICM), and product documentation. 1 Product Features The Flat Panel Display has an active matrix, thin-film transistor (TFT), liquid crystal display (LCD). Plug and play capability if supported by your system. Removable pedestal and VESA 75mm and 100mm mounting holes for lower resolutions. Security lock slot. Wide viewing angle to allow viewing from a sitting or standing position, or moving side-to-side. The monitor features include: L1530 Model 15-inch...
User's Guide L1530 and L1730 Flat Panel Monitors
Page 6
.... Tilt and swivel adjustment capabilities. Removable pedestal and VESA 75mm and 100mm mounting holes for Energy Star Compliance. Software and Reference Library CD includes an information file (INF), Image color Matching File (ICM), and product documentation. AssetControl. Speakers on the front panel. 1-2 User's Guide Compliant with the following seven different languages: English, French, German, Italian, Spanish, Simplified Chinese, and Japanese for lower resolutions. On-screen Display (OSD) adjustments in...
User's Guide L1530 and L1730 Flat Panel Monitors
Page 9
... Replacement Policy so you can easily reach. Use only a power source and connection appopriate for each device. Never disconnect the monitor by grasping the plug firmly and pulling it from the outlet. Turn your monitor off the monitor when not in use . 2-2 User's Guide Maintenance Guidelines To enhance the performance and extend the life of your monitor: Do not open your monitor cabinet or attempt to service...
User's Guide L1530 and L1730 Flat Panel Monitors
Page 12
... your computer. 2. 3 Setting Up the Monitor To set the Video Input Select on the on-screen display (OSD) menu to specify which monitor input has priority. User's Guide 3-1 Connecting the Monitor The monitor has two video signal connectors on the rear panel of the DVI-D cable to chapter 4, "Operating the Monitor" for use with the DVI-D cable. When two computers are connected, you to connect the monitor to up the monitor, ensure that the power is turned off to the monitor, computer system...
User's Guide L1530 and L1730 Flat Panel Monitors
Page 14
... period of time. Setting Up the Monitor Connecting the DVI-D Signal Cable 4. Image retention is not in use for instructions on attaching it to your monitor screen, you should always activate a screen saver application or turn off the monitor when it is a condition that may occur on monitors that display the same static image on all LCD screens. 5. User's Guide 3-3 Turn on your monitor. CAUTION: Burn-in image damage on the power source for a prolonged period...
User's Guide L1530 and L1730 Flat Panel Monitors
Page 22
Operating the Monitor Front Panel Components L1530 and L1730 Monitor Components No. Control 1 Speakers 2 Menu button 3 (Minus button) 4 Volume Control Function Audio feature for music, alarms, etc. (multimedia models only) Launches the On-Screen Display (OSD) menu and selects functions. • When OSD is inactive, press to auto-adjust the screen image. • When OSD is active, press to navigate in reverse through the OSD and adjust OSD scale settings. Controls the volume level of the monitor speakers. 4-2 User's Guide
User's Guide L1530 and L1730 Flat Panel Monitors
Page 23
... monitor on your viewing preferences. Adjusting Monitor Settings Use the On-Screen Display (OSD) to turn on the monitor's front panel. To access the OSD Menu, press the Menu button on the monitor. 2. User's Guide 4-3 Sleep mode = Amber. To access the OSD, do the following: 1. Fully powered = Green. Operating the Monitor No. When the OSD is inactive, press to navigate through the OSD and adjust OSD scale settings. Control 5 + (Plus button) 6 Power LED 7 Power Switch Function When the OSD is not already on, press the Power switch to adjust the screen image based...
User's Guide L1530 and L1730 Flat Panel Monitors
Page 26
... the Monitor Advanced OSD Menu Levels (Continued) Level 1 Level 2 Level 3 Factory Reset Custom Color Custom Color Adjustment Cancel Save and Return Language Deutsch English N Espanol Francais Italiano Simplified Chinese Japanese Cancel Save and Return Management Power Saver On / Off Selection N Power On Recall On / Off Selection N Mode Display On / Off Selection N Sleep Timer Timer Menu Video Input Select VGA/DVI Selection Basic Menu Cancel Save and Return OSD Control Horizontal OSD Adjustment Scale Y Position Vertical OSD Position Adjustment Scale Y OSD...
User's Guide L1530 and L1730 Flat Panel Monitors
Page 27
... displayed. User's Guide 4-7 For more precise adjustments, run the Auto-Adjust software on the CD and press the - (Minus) button on the monitor front panel to minimize any vertical bars or stripes visible on the screen background. Operating the Monitor Advanced OSD Menu Levels (Continued) Level 1 Level 2 Level 3 Factory Reset No Exit Adjusting Screen Quality Allow the monitor to fine-tune the image. Optimizing Analog Conversion This monitor contains advanced circuitry that allows the flat panel screen...
User's Guide L1530 and L1730 Flat Panel Monitors
Page 28
... the Menu button on the CDROM. Restart your computer for five seconds. 4-8 User's Guide If the OSD is entering a sleep mode. When using the controls, you will appear on -screen display. For 17" monitors, set higher than the monitor supports. Check Video Cable- OSD Lock-The OSD can be enabled or disabled by using the Auto-Adjustment pattern application provided on the front panel for 10 seconds. Going to Sleep- Indicates the monitor does not support the input signal because the resolution...
User's Guide L1530 and L1730 Flat Panel Monitors
Page 29
... Mode The Sleep Timer mode is displayed in the monitor. Operating the Monitor If the OSD is unlocked, press and hold the Menu button for the monitor to power on the monitor front panel to display the Advanced Menu. 2.Scroll down and highlight Management. 3.Press the Menu button to unlock the OSD. If the OSD is locked, press and hold the Menu button for 10 seconds to lock the OSD. The Sleep Timer has five settings: Set Current Time Set Sleep...
User's Guide L1530 and L1730 Flat Panel Monitors
Page 32
... video cable. Position may need adjustment. when the computer starts to open the Basic OSD Menu, and adjust the brightness and contrast scales as needed. adjust the screen. disconnected. If that the computer power is not centered. Be sure that doesn't work, press the Menu button to boot up. When OSD is inactive, press (minus button) to the VGA connector on screen. Connect the 15-pin monitor video cable to auto-adjust the screen image. than what your settings to adjust the horizontal or vertical position of Video resolution...
User's Guide L1530 and L1730 Flat Panel Monitors
Page 35
Technical Specifications 15-inch Flat Panel Monitor (Continued) Relative Humidity 20 to 80% Altitude: Operating 0 to 12,000 ft. 0 to 3657.6 m Non-operating 0 to 40,000 ft. 0 to 12192 m Power Source 100 -- 240 VAC, 50 - 60 Hz Power Consumption
User's Guide L1530 and L1730 Flat Panel Monitors
Page 36
TFT LCD 17.0-inch diagonal 15.43 lb. 43.18 cm 43.18 cm 7 kg (unpacked) 13.94 to 16.46 in. 354 to 12192 m 100 - 240 VAC, 50 - 60 Hz User's Guide B-3 Technical Specifications L1730 Model 17-inch Flat Panel Monitor Display Type Viewable Image Size Maximum Weight (Unpacked) Dimensions (include pedestal) Height (adjustable) Depth Width Preferred Mode Text Mode Dot Pitch Horizontal Frequency Vertical Refresh Rate Environmental Requirements Temperature: Operating Temperature Non...
User's Guide L1530 and L1730 Flat Panel Monitors
Page 37
Technical Specifications L1730 Model 17-inch Flat Panel Monitor (Continued) Power Consumption Input Terminal Tilt Stand Maximum tilt angle range (Tilt range may vary depending on height adjustment)
User's Guide L1530 and L1730 Flat Panel Monitors
Page 38
... monitor also supports a reduced power state. The above energy saver feature only works when connected to your computer manual for instructions on setting energy saver features (sometimes called power management features). User's Guide B-5 The reduced power state is a brief warm up period before the monitor returns to enter the reduced power state, the power light blinks amber. Refer to computers that have energy saver features. When the monitor...