Bluetooth Wireless Technology Basics
Page 9
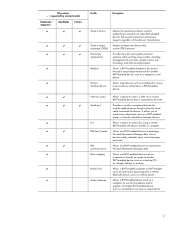
... a BWT-enabled device. Allows a BWT-enabled device (such as a computer) to use the OBEX protocol. or transfer information between devices. Allows input devices such as a keyboard or mouse to be used by selected models Notebooks/ Tablet PCs Handhelds Printers D D D D D D D D D D D D D D D D D D D D D...BWT-enabled devices to synchronize Personal Information Manager data. Provides a wireless connection that is connected to the LAN. HP products D = supported by applications as though a physical serial cable connected the devices. Enables printing from devices ...
... a BWT-enabled device. Allows a BWT-enabled device (such as a computer) to use the OBEX protocol. or transfer information between devices. Allows input devices such as a keyboard or mouse to be used by selected models Notebooks/ Tablet PCs Handhelds Printers D D D D D D D D D D D D D D D D D D D D D...BWT-enabled devices to synchronize Personal Information Manager data. Provides a wireless connection that is connected to the LAN. HP products D = supported by applications as though a physical serial cable connected the devices. Enables printing from devices ...
Computer Setup - Windows XP and Windows Vista
Page 7
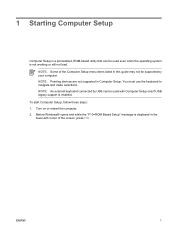
... may not be supported by USB can be used even when the operating system is not working or will not load. ENWW 1 NOTE: An external keyboard connected by your computer. Turn on or restart the computer. 2. 1 Starting Computer Setup Computer Setup is a preinstalled, ROM-based utility that can be used with...
... may not be supported by USB can be used even when the operating system is not working or will not load. ENWW 1 NOTE: An external keyboard connected by your computer. Turn on or restart the computer. 2. 1 Starting Computer Setup Computer Setup is a preinstalled, ROM-based utility that can be used with...
Computer Setup - Windows XP and Windows Vista
Page 10
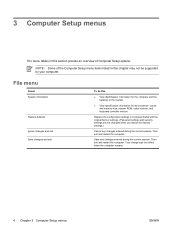
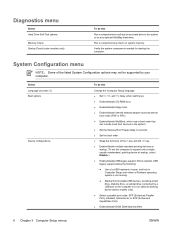
... for the computer and the batteries in the system. ● View specification information for the processor, cache and memory size, system ROM, video revision, and keyboard controller version. Then exit and restart the computer. 3 Computer Setup menus The menu tables in Computer Setup with the original factory settings. (Password settings and...
... for the computer and the batteries in the system. ● View specification information for the processor, cache and memory size, system ROM, video revision, and keyboard controller version. Then exit and restart the computer. 3 Computer Setup menus The menu tables in Computer Setup with the original factory settings. (Password settings and...
Computer Setup - Windows XP and Windows Vista
Page 12
... boot devices in the system. ● Set the Express Boot Popup delay in seconds. ● Set the boot order. ● Swap the functions of a USB keyboard, mouse, and hub in the system or on system memory. When enabled, USB legacy support allows the following: ● Use of the fn key and...
... boot devices in the system. ● Set the Express Boot Popup delay in seconds. ● Set the boot order. ● Swap the functions of a USB keyboard, mouse, and hub in the system or on system memory. When enabled, USB legacy support allows the following: ● Use of the fn key and...
Drives - Windows Vista
Page 8
... handling drives. Security devices with , shipping, or storing a drive. Avoid exposing a drive to magnetic fields. If a drive must be sure that check carry-on the keyboard or move a computer or external hard drive from the drive bay, or traveling with magnetic fields include airport walk-through the operating system. Do not...
... handling drives. Security devices with , shipping, or storing a drive. Avoid exposing a drive to magnetic fields. If a drive must be sure that check carry-on the keyboard or move a computer or external hard drive from the drive bay, or traveling with magnetic fields include airport walk-through the operating system. Do not...
Drives - Windows XP
Page 8
... are fragile computer components that must be handled with the procedures to liquids. Do not touch the connector pins on a removable drive or on the keyboard or move a computer or external hard drive from the drive bay, or traveling with, shipping, or storing a drive. Handle a drive carefully; When the battery is...
... are fragile computer components that must be handled with the procedures to liquids. Do not touch the connector pins on a removable drive or on the keyboard or move a computer or external hard drive from the drive bay, or traveling with, shipping, or storing a drive. Handle a drive carefully; When the battery is...

External Devices - Windows Vista
Page 7
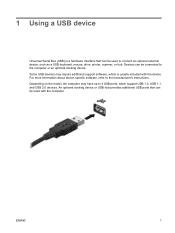
... the computer. Devices can be connected to the manufacturer's instructions. Some USB devices may have up to connect an optional external device, such as a USB keyboard, mouse, drive, printer, scanner, or hub. An optional docking device or USB hub provides additional USB ports that can be used to 4 USB ports, which...
... the computer. Devices can be connected to the manufacturer's instructions. Some USB devices may have up to connect an optional external device, such as a USB keyboard, mouse, drive, printer, scanner, or hub. An optional docking device or USB hub provides additional USB ports that can be used to 4 USB ports, which...
External Devices - Windows Vista
Page 8
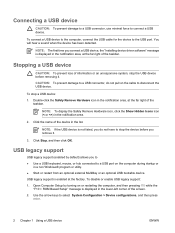
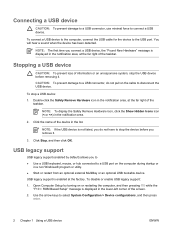
CAUTION: To prevent damage to a USB connector, do not pull on the cable to connect a USB device. Double-click the Safely Remove Hardware icon in the notification area, at the far right of information or an unresponsive system, stop a USB device: 1. Connecting a USB device CAUTION: To prevent damage to a USB connector, use minimal force to disconnect the USB device. NOTE: To display the Safely Remove Hardware icon, click the Show Hidden Icons icon (< or Stopping a USB device CAUTION: To prevent loss of the taskbar. To connect a USB device to the computer, connect the USB cable ...
CAUTION: To prevent damage to a USB connector, do not pull on the cable to connect a USB device. Double-click the Safely Remove Hardware icon in the notification area, at the far right of information or an unresponsive system, stop a USB device: 1. Connecting a USB device CAUTION: To prevent damage to a USB connector, use minimal force to disconnect the USB device. NOTE: To display the Safely Remove Hardware icon, click the Show Hidden Icons icon (< or Stopping a USB device CAUTION: To prevent loss of the taskbar. To connect a USB device to the computer, connect the USB cable ...
External Devices - Windows XP
Page 7
... about device-specific software, refer to 4 USB ports, which is a hardware interface that can be connected to connect an optional external device, such as a USB keyboard, mouse, drive, printer, scanner, or hub. ENWW 1 Devices can be used with the device. An optional docking device or USB hub provides additional USB ports...
... about device-specific software, refer to 4 USB ports, which is a hardware interface that can be connected to connect an optional external device, such as a USB keyboard, mouse, drive, printer, scanner, or hub. ENWW 1 Devices can be used with the device. An optional docking device or USB hub provides additional USB ports...
External Devices - Windows XP
Page 8
CAUTION: To prevent damage to a USB connector, do not pull on the cable to connect a USB device. Double-click the Safely Remove Hardware icon in the notification area, at the far right of information or an unresponsive system, stop a USB device: 1. Stopping a USB device CAUTION: To prevent loss of the taskbar. To stop the USB device before removing it. You will hear a sound when the device has been detected. NOTE: To display the Safely Remove Hardware icon, click the Show Hidden Icons icon (< or Connecting a USB device CAUTION: To prevent damage to a USB connector, use ...
CAUTION: To prevent damage to a USB connector, do not pull on the cable to connect a USB device. Double-click the Safely Remove Hardware icon in the notification area, at the far right of information or an unresponsive system, stop a USB device: 1. Stopping a USB device CAUTION: To prevent loss of the taskbar. To stop the USB device before removing it. You will hear a sound when the device has been detected. NOTE: To display the Safely Remove Hardware icon, click the Show Hidden Icons icon (< or Connecting a USB device CAUTION: To prevent damage to a USB connector, use ...
Memory Modules - Windows Vista
Page 7
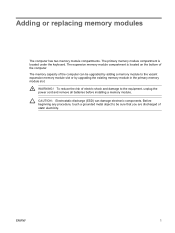
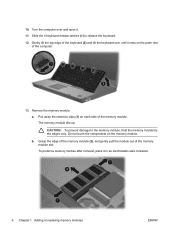
... installing a memory module. WARNING! Adding or replacing memory modules The computer has two memory module compartments. The expansion memory module compartment is located under the keyboard. Before beginning any procedure, touch a grounded metal object to be upgraded by upgrading the existing memory module in the primary memory module slot.
... installing a memory module. WARNING! Adding or replacing memory modules The computer has two memory module compartments. The expansion memory module compartment is located under the keyboard. Before beginning any procedure, touch a grounded metal object to be upgraded by upgrading the existing memory module in the primary memory module slot.

Memory Modules - Windows Vista
Page 12
... and open it rests on the palm rest of the memory module. CAUTION: To prevent damage to release the keyboard. 12. Loosen the 3 keyboard access screws. 10. 9. Remove the memory module: a. Pull away the retention clips (1) on the memory module. 6 Adding or replacing memory modules ENWW The memory module ...
... and open it rests on the palm rest of the memory module. CAUTION: To prevent damage to release the keyboard. 12. Loosen the 3 keyboard access screws. 10. 9. Remove the memory module: a. Pull away the retention clips (1) on the memory module. 6 Adding or replacing memory modules ENWW The memory module ...
Memory Modules - Windows Vista
Page 13
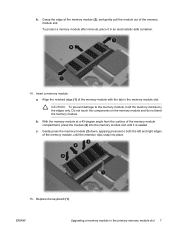
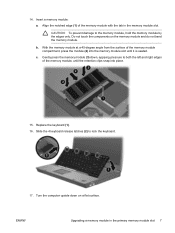
... module at a 45-degree angle from the surface of the memory module slot. ENWW Upgrading a memory module in an electrostatic-safe container. 14. Replace the keyboard (1). c. Grasp the edge of the memory module (2), and gently pull the module out of the memory module compartment, press the module (2) into place. 15. CAUTION...
... module at a 45-degree angle from the surface of the memory module slot. ENWW Upgrading a memory module in an electrostatic-safe container. 14. Replace the keyboard (1). c. Grasp the edge of the memory module (2), and gently pull the module out of the memory module compartment, press the module (2) into place. 15. CAUTION...
Memory Modules - Windows Vista
Page 14
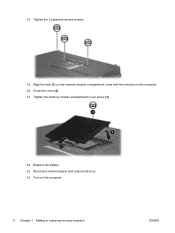
Align the tabs (1) on the memory module compartment cover with the notches on a flat surface. 18. Turn the computer upside down on the computer. 20. Tighten the 3 keyboard access screws. 19. Slide the 4 keyboard release latches (2) to lock the keyboard. 17. Close the cover (2). 8 Adding or replacing memory modules ENWW 16.
Align the tabs (1) on the memory module compartment cover with the notches on a flat surface. 18. Turn the computer upside down on the computer. 20. Tighten the 3 keyboard access screws. 19. Slide the 4 keyboard release latches (2) to lock the keyboard. 17. Close the cover (2). 8 Adding or replacing memory modules ENWW 16.
Memory Modules - Windows Vista
Page 16
Index K keyboard screws removing 6 replacing 8 M memory replacing memory modules 2, 5 memory module inserting 7 removing 2, 6 replacing 2, 5 upgrading primary 5 memory module compartment cover removing 2 replacing 3 10 Index ENWW
Index K keyboard screws removing 6 replacing 8 M memory replacing memory modules 2, 5 memory module inserting 7 removing 2, 6 replacing 2, 5 upgrading primary 5 memory module compartment cover removing 2 replacing 3 10 Index ENWW
Memory Modules - Windows XP
Page 7
... components. ENWW 1 CAUTION: Electrostatic discharge (ESD) can be sure that you are discharged of static electricity. The expansion memory module compartment is located under the keyboard. WARNING! 1 Adding or replacing memory modules The computer has two memory module compartments.
... components. ENWW 1 CAUTION: Electrostatic discharge (ESD) can be sure that you are discharged of static electricity. The expansion memory module compartment is located under the keyboard. WARNING! 1 Adding or replacing memory modules The computer has two memory module compartments.
Memory Modules - Windows XP
Page 11
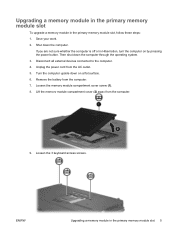
... compartment cover screw (1). 8. ENWW Upgrading a memory module in the primary memory module slot, follow these steps: 1. Remove the battery from the AC outlet. 5. Loosen the 3 keyboard access screws. If you are not sure whether the computer is off or in Hibernation, turn the computer on a flat surface. 6. Turn the computer upside...
... compartment cover screw (1). 8. ENWW Upgrading a memory module in the primary memory module slot, follow these steps: 1. Remove the battery from the AC outlet. 5. Loosen the 3 keyboard access screws. If you are not sure whether the computer is off or in Hibernation, turn the computer on a flat surface. 6. Turn the computer upside...
Memory Modules - Windows XP
Page 12
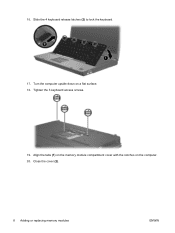
...hold the memory module by the edges only. Remove the memory module: a. The memory module tilts up. CAUTION: To prevent damage to release the keyboard. 12. Turn the computer over until it rests on the palm rest of the memory module. Do not touch the components on each side of... the computer. 13. Grasp the edge of the memory module (2), and gently pull the module out of the keyboard (2) and tilt the keyboard over and open it in an electrostatic-safe container. 6 Chapter 1 Adding or replacing memory modules ENWW Pull away the retention clips (1) on...
...hold the memory module by the edges only. Remove the memory module: a. The memory module tilts up. CAUTION: To prevent damage to release the keyboard. 12. Turn the computer over until it rests on the palm rest of the memory module. Do not touch the components on each side of... the computer. 13. Grasp the edge of the memory module (2), and gently pull the module out of the keyboard (2) and tilt the keyboard over and open it in an electrostatic-safe container. 6 Chapter 1 Adding or replacing memory modules ENWW Pull away the retention clips (1) on...
Memory Modules - Windows XP
Page 13
Slide the 4 keyboard release latches (2) to the memory module, hold the memory module by the edges only. Do not touch the components on a flat surface.... Gently press the memory module (3) down on the memory module and do not bend the memory module. CAUTION: To prevent damage to lock the keyboard. 17. Insert a memory module: a. Turn the computer upside down , applying pressure to both the left and right edges of the memory module ... edge (1) of the memory module, until the retention clips snap into the memory module slot until it is seated. b. Replace the keyboard (1). 16.
Slide the 4 keyboard release latches (2) to the memory module, hold the memory module by the edges only. Do not touch the components on a flat surface.... Gently press the memory module (3) down on the memory module and do not bend the memory module. CAUTION: To prevent damage to lock the keyboard. 17. Insert a memory module: a. Turn the computer upside down , applying pressure to both the left and right edges of the memory module ... edge (1) of the memory module, until the retention clips snap into the memory module slot until it is seated. b. Replace the keyboard (1). 16.
Memory Modules - Windows XP
Page 14
18. Replace the battery. 23. Reconnect external power and external devices. 24. Tighten the memory module compartment cover screw (3). 22. Tighten the 3 keyboard access screws. 19. Turn on the computer. 20. Close the cover (2). 21. Align the tabs (1) on the memory module compartment cover with the notches on the computer. 8 Chapter 1 Adding or replacing memory modules ENWW
18. Replace the battery. 23. Reconnect external power and external devices. 24. Tighten the memory module compartment cover screw (3). 22. Tighten the 3 keyboard access screws. 19. Turn on the computer. 20. Close the cover (2). 21. Align the tabs (1) on the memory module compartment cover with the notches on the computer. 8 Chapter 1 Adding or replacing memory modules ENWW


