HP TouchSmart Desktop PCs - User Guide
Page 4
... opening the HP TouchSmart PC 46 After closing the HP TouchSmart PC 46 Removing the rear cover ...47 Replacing the rear cover ...48 Removing the vertical cover ...48 Replacing the vertical cover ...49 Adding Memory...49 Removing a memory module...49 Installing a memory module ...50 Removing and Replacing the Hard Disk Drive 51 Removing the hard disk drive 51 Replacing the hard disk drive 52...
... opening the HP TouchSmart PC 46 After closing the HP TouchSmart PC 46 Removing the rear cover ...47 Replacing the rear cover ...48 Removing the vertical cover ...48 Replacing the vertical cover ...49 Adding Memory...49 Removing a memory module...49 Installing a memory module ...50 Removing and Replacing the Hard Disk Drive 51 Removing the hard disk drive 51 Replacing the hard disk drive 52...
HP TouchSmart Desktop PCs - User Guide
Page 52
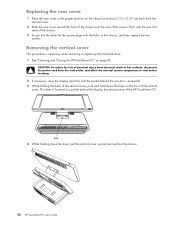
... the proper position on the chassis and about 1/2 in (1.27 cm) back from the chassis. 48 HP TouchSmart PC User Guide This lever is located in the chassis, and then replace the two screws. CAUTION: To reduce the risk of personal injury from electrical shock or hot surfaces, ...display (monitor) portion of the HP TouchSmart PC. Lever 4 While holding the back of the chassis. 3 Ensure that the holes for the screws align with the holes in a pocket behind the monitor is necessary when removing or replacing the hard disk drive. 1 See "Opening and Closing the HP TouchSmart PC" on page 45.
... the proper position on the chassis and about 1/2 in (1.27 cm) back from the chassis. 48 HP TouchSmart PC User Guide This lever is located in the chassis, and then replace the two screws. CAUTION: To reduce the risk of personal injury from electrical shock or hot surfaces, ...display (monitor) portion of the HP TouchSmart PC. Lever 4 While holding the back of the chassis. 3 Ensure that the holes for the screws align with the holes in a pocket behind the monitor is necessary when removing or replacing the hard disk drive. 1 See "Opening and Closing the HP TouchSmart PC" on page 45.
HP TouchSmart Desktop PCs - User Guide
Page 55
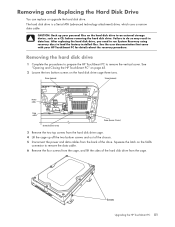
... out of the chassis. 5 Disconnect the power and data cables from the back of the hard disk drive from the hard disk drive cage. 4 Lift the cage up your HP TouchSmart PC for details about the recovery procedure. After replacing the hard disk drive, you need to run System Recovery using recovery discs to remove the data cable. 6 Remove...
... out of the chassis. 5 Disconnect the power and data cables from the back of the hard disk drive from the hard disk drive cage. 4 Lift the cage up your HP TouchSmart PC for details about the recovery procedure. After replacing the hard disk drive, you need to run System Recovery using recovery discs to remove the data cable. 6 Remove...
HP TouchSmart Desktop PCs - User Guide
Page 56
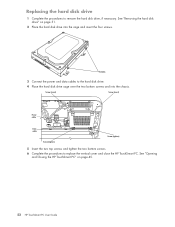
Replacing the hard disk drive 1 Complete the procedures to replace the vertical cover and close the HP TouchSmart PC. Screw (insert) Screw (insert) Power cable Data cable Screw (tighten) Screw (tighten) 5 Insert the two top screws and tighten the two bottom screws. 6 Complete the procedures to remove the hard disk drive, if necessary. Screws 3 Connect the power and data...
Replacing the hard disk drive 1 Complete the procedures to replace the vertical cover and close the HP TouchSmart PC. Screw (insert) Screw (insert) Power cable Data cable Screw (tighten) Screw (tighten) 5 Insert the two top screws and tighten the two bottom screws. 6 Complete the procedures to remove the hard disk drive, if necessary. Screws 3 Connect the power and data...


