
Compaq Presario CQ61 Notebook PC and HP G61 Notebook PC - Maintenance and Service Guide
Page 4
... 4-8 Hard drive 4-10 RTC battery 4-12 Memory module 4-13 Wireless module 4-14 Modem 4-16 Keyboard 4-17 Switch cover 4-20 Power button board 4-22 Display assembly 4-23 Top cover 4-30 Audio board 4-32 Speakers 4-33 USB board 4-34 Bluetooth module 4-35 System board 4-36 Fan/heat sink assembly 4-38 Processor 4-42 Power connector cable 4-44 RJ-11 connector 4-45 5 Setup Utility Starting Setup Utility 5-1 Changing the language of the Setup Utility 5-1 Navigating and selecting in the Setup Utility 5-2 Displaying system information 5-2 Restoring default settings in Setup Utility...
... 4-8 Hard drive 4-10 RTC battery 4-12 Memory module 4-13 Wireless module 4-14 Modem 4-16 Keyboard 4-17 Switch cover 4-20 Power button board 4-22 Display assembly 4-23 Top cover 4-30 Audio board 4-32 Speakers 4-33 USB board 4-34 Bluetooth module 4-35 System board 4-36 Fan/heat sink assembly 4-38 Processor 4-42 Power connector cable 4-44 RJ-11 connector 4-45 5 Setup Utility Starting Setup Utility 5-1 Changing the language of the Setup Utility 5-1 Navigating and selecting in the Setup Utility 5-2 Displaying system information 5-2 Restoring default settings in Setup Utility...
Compaq Presario CQ61 Notebook PC and HP G61 Notebook PC - Maintenance and Service Guide
Page 18
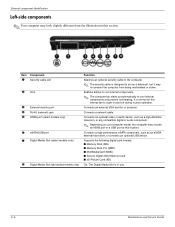
... use. 2-6 Maintenance and Service Guide Item Component 1 Security cable slot 2 Vent 3 External monitor port 4 RJ-45 (network) jack 5 HDMI port (select models only) 6 eSATA/USB port 7 Digital Media Slot (select models only) 8 Digital Media Slot light (select models only) Function Attaches an optional security cable to act as an eSATA external hard drive, or connects an optional USB device. Connects an optional video or audio device, such as a high-definition television, or any compatible digital or audio component. ✎ Depending on and off during routine operation. Connects...
... use. 2-6 Maintenance and Service Guide Item Component 1 Security cable slot 2 Vent 3 External monitor port 4 RJ-45 (network) jack 5 HDMI port (select models only) 6 eSATA/USB port 7 Digital Media Slot (select models only) 8 Digital Media Slot light (select models only) Function Attaches an optional security cable to act as an eSATA external hard drive, or connects an optional USB device. Connects an optional video or audio device, such as a high-definition television, or any compatible digital or audio component. ✎ Depending on and off during routine operation. Connects...
Compaq Presario CQ61 Notebook PC and HP G61 Notebook PC - Maintenance and Service Guide
Page 27
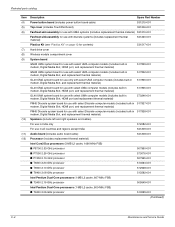
... Spare Part Number Power button board (includes power button board cable) 531215-001 Top cover (includes TouchPad board) 531206-001 Fan/heat sink assembly for use with UMA systems (includes replacement thermal material) 531210-001 Fan/heat sink assembly for use with discrete systems (includes replacement thermal material) 531220-001 Plastics Kit (see "Plastics Kit" on page 12 for contents) 531517-001 Hard drive cover Wireless module compartment cover System board GM45 UMA system board for use...
... Spare Part Number Power button board (includes power button board cable) 531215-001 Top cover (includes TouchPad board) 531206-001 Fan/heat sink assembly for use with UMA systems (includes replacement thermal material) 531210-001 Fan/heat sink assembly for use with discrete systems (includes replacement thermal material) 531220-001 Plastics Kit (see "Plastics Kit" on page 12 for contents) 531517-001 Hard drive cover Wireless module compartment cover System board GM45 UMA system board for use...

Compaq Presario CQ61 Notebook PC and HP G61 Notebook PC - Maintenance and Service Guide
Page 56
... memory module, follow these steps: 1. Remove the memory module: 1. Reverse this procedure to the computer. 3. Disconnect all external devices connected to install a memory module. Maintenance and Service Guide 4-13 If you are designed with a notch 3 to prevent incorrect insertion into the memory module slot. Remove the memory module 2 by first unplugging the power cord from the AC outlet and then unplugging the AC adapter from the computer. 4. Remove hard drive cover (see "Battery" on page 4-7). 5. Remove the battery (see "Hard drive...
... memory module, follow these steps: 1. Remove the memory module: 1. Reverse this procedure to the computer. 3. Disconnect all external devices connected to install a memory module. Maintenance and Service Guide 4-13 If you are designed with a notch 3 to prevent incorrect insertion into the memory module slot. Remove the memory module 2 by first unplugging the power cord from the AC outlet and then unplugging the AC adapter from the computer. 4. Remove hard drive cover (see "Battery" on page 4-7). 5. Remove the battery (see "Hard drive...

Compaq Presario CQ61 Notebook PC and HP G61 Notebook PC - Maintenance and Service Guide
Page 60
Remove the hard drive cover (see "Wireless module" on page 4-14). Disconnect the power from the computer by first unplugging the power cord from the AC outlet and then unplugging the AC adapter from the computer. 4. Remove the hard wireless module cover (see "Hard drive" on page 4-10). 6. Remove the battery ("Battery" on page 4-7). 5. Maintenance and Service Guide 4-17 Shut down through the operating system. 2. If you are unsure whether the computer is off...
Remove the hard drive cover (see "Wireless module" on page 4-14). Disconnect the power from the computer by first unplugging the power cord from the AC outlet and then unplugging the AC adapter from the computer. 4. Remove the hard wireless module cover (see "Hard drive" on page 4-10). 6. Remove the battery ("Battery" on page 4-7). 5. Maintenance and Service Guide 4-17 Shut down through the operating system. 2. If you are unsure whether the computer is off...
Compaq Presario CQ61 Notebook PC and HP G61 Notebook PC - Maintenance and Service Guide
Page 93
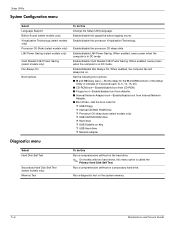
...Service Guide When enabled, saves power when the computer is in intervals of 5 seconds each (0, 5, 10, 15, 20). ■ CD-ROM boot-Enable/disable boot from CD-ROM. ■ Floppy boot-Enable/disable boot from diskette. ■ Internal Network Adapter boot-Enable/disable boot from Internal Network Adapter. ■ Boot Order-Set the boot order for the f9 and f10 functions of the Setup Utility in DC mode. When enabled, saves power when the computer is in DC mode. Enabled/disable Fan Always On. Setup Utility System Configuration menu Select Language Support Button Sound (select models...
...Service Guide When enabled, saves power when the computer is in intervals of 5 seconds each (0, 5, 10, 15, 20). ■ CD-ROM boot-Enable/disable boot from CD-ROM. ■ Floppy boot-Enable/disable boot from diskette. ■ Internal Network Adapter boot-Enable/disable boot from Internal Network Adapter. ■ Boot Order-Set the boot order for the f9 and f10 functions of the Setup Utility in DC mode. When enabled, saves power when the computer is in DC mode. Enabled/disable Fan Always On. Setup Utility System Configuration menu Select Language Support Button Sound (select models...
Compaq Presario CQ61 Notebook PC and HP G61 Notebook PC - Maintenance and Service Guide
Page 136
...backups 8-2 Screw Kit contents 3-13 spare part number 3-11, 7-1 screw listing 7-1 security cable slot location 2-6 security, product description 1-5 serial number 3-1, 4-5 serviceability, product description 1-6 Setup Utility accessing 5-1 changing the language 5-1 Diagnostics menu 5-4 displaying system information 5-2 Index-4 exiting 5-3 Main menu 5-3 navigating and selecting 5-2 restoring default settings 5-2 System Configuration menu 5-4 speaker removal 4-33 spare part number 3-4, 4-33 specifications Blu-ray ROM with LightScribe DVD±RW SuperMulti Double-Layer Drive 6-5 display 6-2 DVD...
...backups 8-2 Screw Kit contents 3-13 spare part number 3-11, 7-1 screw listing 7-1 security cable slot location 2-6 security, product description 1-5 serial number 3-1, 4-5 serviceability, product description 1-6 Setup Utility accessing 5-1 changing the language 5-1 Diagnostics menu 5-4 displaying system information 5-2 Index-4 exiting 5-3 Main menu 5-3 navigating and selecting 5-2 restoring default settings 5-2 System Configuration menu 5-4 speaker removal 4-33 spare part number 3-4, 4-33 specifications Blu-ray ROM with LightScribe DVD±RW SuperMulti Double-Layer Drive 6-5 display 6-2 DVD...

Software Update, Backup and Recovery - Windows Vista
Page 8
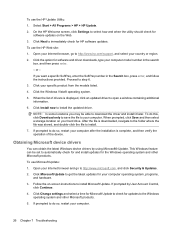
... http://www.hp.com/support, and select your computer model number in the Search box, press enter, and follow these steps: To use the HP Web site: 1. Updating programs and drivers To download and install software other than a BIOS update, follow the instructions provided. Open your Internet browser, go to install. 7. Click the option for software and driver downloads, type your country or region. 2. NOTE: In some locations you want a specific SoftPaq, enter the SoftPaq number in...
... http://www.hp.com/support, and select your computer model number in the Search box, press enter, and follow these steps: To use the HP Web site: 1. Updating programs and drivers To download and install software other than a BIOS update, follow the instructions provided. Open your Internet browser, go to install. 7. Click the option for software and driver downloads, type your country or region. 2. NOTE: In some locations you want a specific SoftPaq, enter the SoftPaq number in...
Wireless (Select Models Only) - Windows Vista
Page 24
... Help and Support. 18 Chapter 5 Troubleshooting wireless connection problems Select Start > Computer > System properties. 2. You may include the term wireless, wireless LAN, WLAN, or 802.11. If no WLAN device is listed, either your permission or password for your computer does not have a problem connecting to a WLAN, confirm that the integrated WLAN device is not properly installed. Identify the WLAN device from the Network adapters list. The listing for a WLAN device may...
... Help and Support. 18 Chapter 5 Troubleshooting wireless connection problems Select Start > Computer > System properties. 2. You may include the term wireless, wireless LAN, WLAN, or 802.11. If no WLAN device is listed, either your permission or password for your computer does not have a problem connecting to a WLAN, confirm that the integrated WLAN device is not properly installed. Identify the WLAN device from the Network adapters list. The listing for a WLAN device may...
Drives - Windows Vista
Page 18
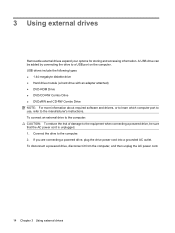
A USB drive can be sure that the AC power cord is unplugged. 1. 3 Using external drives Removable external drives expand your options for storing and accessing information. Connect the drive to a USB port on the computer. USB drives include the following types: ● 1.44-megabyte diskette drive ● Hard drive module (a hard drive with an adapter attached) ● DVD-ROM Drive ● DVD/CD-RW Combo Drive ● DVD±RW and CD-RW Combo Drive NOTE: For more information about required software and drivers, or...
A USB drive can be sure that the AC power cord is unplugged. 1. 3 Using external drives Removable external drives expand your options for storing and accessing information. Connect the drive to a USB port on the computer. USB drives include the following types: ● 1.44-megabyte diskette drive ● Hard drive module (a hard drive with an adapter attached) ● DVD-ROM Drive ● DVD/CD-RW Combo Drive ● DVD±RW and CD-RW Combo Drive NOTE: For more information about required software and drivers, or...
Drives - Windows Vista
Page 30
... for example, DVD/CD-ROMs, Modems, and so on -screen instructions to obtain HP device drivers. 26 Chapter 6 Troubleshooting Repeat for your system for installed hardware and installs default drivers for hardware changes icon in the Start Search box. If prompted by User Account Control, click Continue. 5. Remove any devices requiring drivers. Try running your drivers using Microsoft® Update. To use Microsoft Update: 1. Follow the on ) unless the minus sign (-) is already showing. 5. Reopen Device Manager, if...
... for example, DVD/CD-ROMs, Modems, and so on -screen instructions to obtain HP device drivers. 26 Chapter 6 Troubleshooting Repeat for your system for installed hardware and installs default drivers for hardware changes icon in the Start Search box. If prompted by User Account Control, click Continue. 5. Remove any devices requiring drivers. Try running your drivers using Microsoft® Update. To use Microsoft Update: 1. Follow the on ) unless the minus sign (-) is already showing. 5. Reopen Device Manager, if...
Drives - Windows Vista
Page 31
... enter, and follow the instructions provided. To use the HP Web site: 1. After the file is displayed, click an updated driver to download the driver and install it later. Click the Windows Vista® operating system. 5. A device driver must be able to open a window containing additional information. 6. Select Start > All Programs > HP > HP Update. 2. On the HP Welcome screen, click Settings and select a time when the utility should check for software and driver downloads, type your computer after the installation...
... enter, and follow the instructions provided. To use the HP Web site: 1. After the file is displayed, click an updated driver to download the driver and install it later. Click the Windows Vista® operating system. 5. A device driver must be able to open a window containing additional information. 6. Select Start > All Programs > HP > HP Update. 2. On the HP Welcome screen, click Settings and select a time when the utility should check for software and driver downloads, type your computer after the installation...
Drives - Windows Vista
Page 32
... DL support 4 T troubleshooting burning discs 24 device driver 26 disc play 22, 23 HP device drivers 26 optical disc tray 20 optical drive detection 21 Windows drivers 26 optical drive DVD burning 12, 24 changing region setting 9 copying 11 playing 7 removing 13 DVD drive 2, 14 DVD region settings 9 E external drive 14 H hard disk drive external 14 installing 17 removing 16 replacing 16 hard drive external 14 installing 17 removing 16 replacing 16 M maintenance Disk Cleanup 15 Disk Defragmenter 15 O optical disc playing 7 removing 13 optical drive 2, 14 R region codes, DVD 9 S software Disk...
... DL support 4 T troubleshooting burning discs 24 device driver 26 disc play 22, 23 HP device drivers 26 optical disc tray 20 optical drive detection 21 Windows drivers 26 optical drive DVD burning 12, 24 changing region setting 9 copying 11 playing 7 removing 13 DVD drive 2, 14 DVD region settings 9 E external drive 14 H hard disk drive external 14 installing 17 removing 16 replacing 16 hard drive external 14 installing 17 removing 16 replacing 16 M maintenance Disk Cleanup 15 Disk Defragmenter 15 O optical disc playing 7 removing 13 optical drive 2, 14 R region codes, DVD 9 S software Disk...

Notebook Tour - Windows Vista
Page 16
... use. 10 Chapter 2 Components NOTE: Depending on and off during routine operation. Enables airflow to cool internal components and prevent overheating. Component (1) Security cable slot (2) Vent (3) External monitor port (4) RJ-45 (network) jack (5) HDMI port (select models only) (6) eSATA/USB port (7) Digital Media Slot (select models only) (8) Digital Media Slot light Description Attaches an optional security cable to act as a deterrent, but it may include an HDMI port or a USB port at this section. Connects an external VGA monitor or projector. Connects...
... use. 10 Chapter 2 Components NOTE: Depending on and off during routine operation. Enables airflow to cool internal components and prevent overheating. Component (1) Security cable slot (2) Vent (3) External monitor port (4) RJ-45 (network) jack (5) HDMI port (select models only) (6) eSATA/USB port (7) Digital Media Slot (select models only) (8) Digital Media Slot light Description Attaches an optional security cable to act as a deterrent, but it may include an HDMI port or a USB port at this section. Connects an external VGA monitor or projector. Connects...
Pointing Devices and Keyboard - Windows Vista
Page 9
... hotkey can also alternate images among display devices connected to the system. QuickLock protects your information by the fn+f4 hotkey: ● LCD (computer display) ● External VGA (most external monitors) ● HDMI (televisions, camcorders, DVD players, VCRs, and video capture cards with examples of devices that use them, are supported by displaying the operating system Log On window. For example, you have set up your Internet or network services, the fn+f3 hotkey opens the Windows Internet Connection...
... hotkey can also alternate images among display devices connected to the system. QuickLock protects your information by the fn+f4 hotkey: ● LCD (computer display) ● External VGA (most external monitors) ● HDMI (televisions, camcorders, DVD players, VCRs, and video capture cards with examples of devices that use them, are supported by displaying the operating system Log On window. For example, you have set up your Internet or network services, the fn+f3 hotkey opens the Windows Internet Connection...
Multimedia - Windows Vista
Page 14
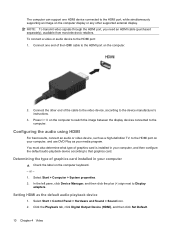
... then configure the default audio playback device according to the device manufacturer's instructions. 3. Connect the other supported external display. or - 1. NOTE: To transmit video signals through the HDMI port, you need an HDMI cable (purchased separately), available from most electronic retailers. You must also determine what type of the cable to the video device, according to that graphics card. Select Start > Control Panel > Hardware and Sound > Sound icon. 2. Select Start > Computer > System properties. 2. In the left pane, click Device Manager...
... then configure the default audio playback device according to the device manufacturer's instructions. 3. Connect the other supported external display. or - 1. NOTE: To transmit video signals through the HDMI port, you need an HDMI cable (purchased separately), available from most electronic retailers. You must also determine what type of the cable to the video device, according to that graphics card. Select Start > Control Panel > Hardware and Sound > Sound icon. 2. Select Start > Computer > System properties. 2. In the left pane, click Device Manager...
Multimedia - Windows Vista
Page 30
... enter. - After the file is displayed, click an updated driver to install the updated driver. To use the HP Web site: 1. Follow the on the Web. 3. Open your Internet browser, go to automatically check for and install updates for HP software updates. Open your specific product from the models listed. 4. Click Change settings and select a time for Microsoft Update to check for software updates on -screen instructions to the Windows operating system and other Microsoft products. To use the HP Update Utility: 1. Select Start...
... enter. - After the file is displayed, click an updated driver to install the updated driver. To use the HP Web site: 1. Follow the on the Web. 3. Open your Internet browser, go to automatically check for and install updates for HP software updates. Open your specific product from the models listed. 4. Click Change settings and select a time for Microsoft Update to check for software updates on -screen instructions to the Windows operating system and other Microsoft products. To use the HP Update Utility: 1. Select Start...
Power Management - Windows Vista
Page 5
... exit Sleep in Windows® Control Panel. NOTE: You cannot initiate any type of networking connection or perform any computer functions while the computer is saved to a hibernation file on the hard drive and the computer turns off. If the computer is closed, open the display. ● Press a key on the keyboard or button on the remote control (select models only). ● Activate the TouchPad. Power settings and timeouts can be changed using Power Options in...
... exit Sleep in Windows® Control Panel. NOTE: You cannot initiate any type of networking connection or perform any computer functions while the computer is saved to a hibernation file on the hard drive and the computer turns off. If the computer is closed, open the display. ● Press a key on the keyboard or button on the remote control (select models only). ● Activate the TouchPad. Power settings and timeouts can be changed using Power Options in...
Power Management - Windows Vista
Page 24
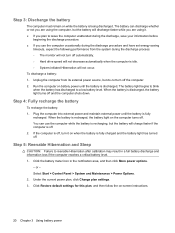
... into external power and maintain external power until the battery is discharged. Under the current power plan, click Change plan settings. 3. Step 3: Discharge the battery The computer must remain on battery power until the battery is fully recharged. Click Restore default settings for this plan, and then follow the on the computer turns off . 2. To discharge a battery: 1. Select Start > Control Panel > System and Maintenance > Power Options. 2. When the battery is fully charged and the battery light has turned...
... into external power and maintain external power until the battery is discharged. Under the current power plan, click Change plan settings. 3. Step 3: Discharge the battery The computer must remain on battery power until the battery is fully recharged. Click Restore default settings for this plan, and then follow the on the computer turns off . 2. To discharge a battery: 1. Select Start > Control Panel > System and Maintenance > Power Options. 2. When the battery is fully charged and the battery light has turned...
Power Management - Windows Vista
Page 27
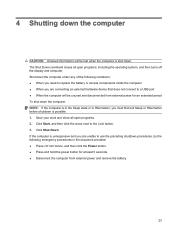
... connecting an external hardware device that does not connect to the Lock button. 3. Click Start, and then click the arrow next to a USB port ● When the computer will be unused and disconnected from external power for at least 5 seconds. ● Disconnect the computer from external power and remove the battery. 23 The Shut Down command closes all open programs, including the operating system, and then turns off the display...
... connecting an external hardware device that does not connect to the Lock button. 3. Click Start, and then click the arrow next to a USB port ● When the computer will be unused and disconnected from external power for at least 5 seconds. ● Disconnect the computer from external power and remove the battery. 23 The Shut Down command closes all open programs, including the operating system, and then turns off the display...


