HP Client Manager 6.1
Page 4
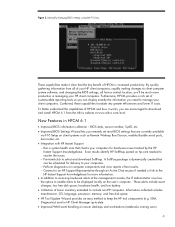
...date. • Improved WMI event handling on newer desktops and workstations (notebooks coming soon) 4 A SoftPaq package is increased productivity. New Features in HP Client Manager up-to include non-HP computers. Furthermore, HPCM provides a rich set most BIOS settings that can... • Integration with HP Instant Support - Connect to an HP Support Representative through an Active Chat session if needed to manage your HP client computers. Combined, these capabilities translate into greater efficiencies and lower IT costs. Figure 2. Manually changing BIOS settings using ...
...date. • Improved WMI event handling on newer desktops and workstations (notebooks coming soon) 4 A SoftPaq package is increased productivity. New Features in HP Client Manager up-to include non-HP computers. Furthermore, HPCM provides a rich set most BIOS settings that can... • Integration with HP Instant Support - Connect to an HP Support Representative through an Active Chat session if needed to manage your HP client computers. Combined, these capabilities translate into greater efficiencies and lower IT costs. Figure 2. Manually changing BIOS settings using ...

Configuring Compaq Evo Computers for Microsoft Windows 95
Page 3
.../downloads/contents/WURecommended/S_WUServic ePacks/AMDPatch/Default.asp 2. Download AMDK6upd.exe from the Compaq support websites provided in safe mode. Manually copy the updated driver files on first actual boot into these locations: 15XM-1101A-WWEN For specific information about this document..... 4. Therefore, the Windows 95 patch could not start Windows 95, boot the machine using the bootable floppy created in Compaq Evo products; however, Compaq recognizes that causes lockups with faster processors, which was released, processor speeds were much slower than they are...
.../downloads/contents/WURecommended/S_WUServic ePacks/AMDPatch/Default.asp 2. Download AMDK6upd.exe from the Compaq support websites provided in safe mode. Manually copy the updated driver files on first actual boot into these locations: 15XM-1101A-WWEN For specific information about this document..... 4. Therefore, the Windows 95 patch could not start Windows 95, boot the machine using the bootable floppy created in Compaq Evo products; however, Compaq recognizes that causes lockups with faster processors, which was released, processor speeds were much slower than they are...
Commercial Notebook Batteries: Performance Optimization
Page 1
... in the document are pre-use considerations and recommendations on battery calibration. 1 WHITE PAPER May 2001 Prepared by Access Business Group Commercial Notebook Division Compaq Computer Corporation CONTENTS EXECUTIVE SUMMARY1 PRE-USE CONSIDERATIONS... 2 BATTERY CHARACTERISTICS IN SHIP MODE 2 REMOVING THE BATTERY FROM SHIP MODE ...SUITE 4 STEPS TO CALIBRATE UNDER WINDOWS 95 / WINDOWS 98 / WINDOWS NT 4 STEPS TO CALIBRATE UNDER WINDOWS 20004 MANUAL CALIBRATION........... 6 WINDOWS 95, WINDOWS 98, & WINDOWS NT 4.0 6 WINDOWS 2000.......... 6 FREQUENTLY ASKED QUESTIONS 7 NOTICE 8 ...
... in the document are pre-use considerations and recommendations on battery calibration. 1 WHITE PAPER May 2001 Prepared by Access Business Group Commercial Notebook Division Compaq Computer Corporation CONTENTS EXECUTIVE SUMMARY1 PRE-USE CONSIDERATIONS... 2 BATTERY CHARACTERISTICS IN SHIP MODE 2 REMOVING THE BATTERY FROM SHIP MODE ...SUITE 4 STEPS TO CALIBRATE UNDER WINDOWS 95 / WINDOWS 98 / WINDOWS NT 4 STEPS TO CALIBRATE UNDER WINDOWS 20004 MANUAL CALIBRATION........... 6 WINDOWS 95, WINDOWS 98, & WINDOWS NT 4.0 6 WINDOWS 2000.......... 6 FREQUENTLY ASKED QUESTIONS 7 NOTICE 8 ...

Commercial Notebook Batteries: Performance Optimization
Page 3
COMMERCIAL NOTEBOOK BATTERIES: PERFORMANCE OPTIMIZATION (cont.) BATTERY CALIBRATION DEFINED With the advancement in technology, the battery industry continues to provide solutions aimed at improving methods of the ... discharges, the more frequently the battery is not achieved and continued accuracy of the following methods: Compaq Power Management Suite (PowerCon32) Unattended Battery Calibration Utility Manual Calibration 3
COMMERCIAL NOTEBOOK BATTERIES: PERFORMANCE OPTIMIZATION (cont.) BATTERY CALIBRATION DEFINED With the advancement in technology, the battery industry continues to provide solutions aimed at improving methods of the ... discharges, the more frequently the battery is not achieved and continued accuracy of the following methods: Compaq Power Management Suite (PowerCon32) Unattended Battery Calibration Utility Manual Calibration 3

Commercial Notebook Batteries: Performance Optimization
Page 6
.... 3. Dock the computer, or connect to 100% as in Step 5. 7. WINDOWS 2000 1. Undock the computer or disconnect the computer from AC power. 3. COMMERCIAL NOTEBOOK BATTERIES: PERFORMANCE OPTIMIZATION (cont.) MANUAL CALIBRATION To calibrate a battery on the battery conservation settings by pressing Fn+F7, or select Start > Settings > Control Panel > Power (or Compaq Power...
.... 3. Dock the computer, or connect to 100% as in Step 5. 7. WINDOWS 2000 1. Undock the computer or disconnect the computer from AC power. 3. COMMERCIAL NOTEBOOK BATTERIES: PERFORMANCE OPTIMIZATION (cont.) MANUAL CALIBRATION To calibrate a battery on the battery conservation settings by pressing Fn+F7, or select Start > Settings > Control Panel > Power (or Compaq Power...
Wireless Security
Page 26
... as specified in RFC 2284. It should not be possible to provoke a lesser form of authentication by interfering with the WEP algorithms that the user manually change the WEP key each time a new network is selected, which is not feasible in use . This vulnerability is in a wireless environment. If WEP is...
... as specified in RFC 2284. It should not be possible to provoke a lesser form of authentication by interfering with the WEP algorithms that the user manually change the WEP key each time a new network is selected, which is not feasible in use . This vulnerability is in a wireless environment. If WEP is...

Commercial Notebook Docking Solutions: Theft Deterrence Features
Page 2
...of the base) accommodates the optional security cable lock, which can be secured to a fixed object to deter theft of the docking station NOTEBOOK THEFT DETERRENCE Key Lock: located on the right side of the base, this feature provides the following: Disables the automatic eject mechanism (...eject button and ejection motor) Disables the release latch on the rear panel where the manual notebook eject button and PCI slots are located Disables Multibay Device release buttons Security Latch: located on the bed of the base, the Security ...
...of the base) accommodates the optional security cable lock, which can be secured to a fixed object to deter theft of the docking station NOTEBOOK THEFT DETERRENCE Key Lock: located on the right side of the base, this feature provides the following: Disables the automatic eject mechanism (...eject button and ejection motor) Disables the release latch on the rear panel where the manual notebook eject button and PCI slots are located Disables Multibay Device release buttons Security Latch: located on the bed of the base, the Security ...

Commercial Notebook Docking Solutions: Theft Deterrence Features
Page 3
... lock is installed, forward movement of the ejection level is blocked deterring the removal of the notebook from the base. COMMERCIAL NOTEBOOK DOCKING SOLUTIONS: THEFT DETERRENCE (cont.) CONVENIENCE BASE DOCKING STATION THEFT DETERRENCE U-Bolt: located on the... bed of the base, the Security Latch secures the front of the notebook to the base platform to deter theft of the docking station NOTEBOOK THEFT DETERRENCE Security cable lock slot: located in front of the manual...
... lock is installed, forward movement of the ejection level is blocked deterring the removal of the notebook from the base. COMMERCIAL NOTEBOOK DOCKING SOLUTIONS: THEFT DETERRENCE (cont.) CONVENIENCE BASE DOCKING STATION THEFT DETERRENCE U-Bolt: located on the... bed of the base, the Security Latch secures the front of the notebook to the base platform to deter theft of the docking station NOTEBOOK THEFT DETERRENCE Security cable lock slot: located in front of the manual...

Commercial Notebook Docking Solutions: Theft Deterrence Features
Page 4
... SLOT U-BOLT 4 Compaq Confidential When the optional security cable lock is installed, forward movement of the ejection level is blocked deterring the removal of the notebook from the base Security Latch: located on the back of the base, the U-Bolt accommodates a cable or chain, which can be secured to a fixed object... docking station Security cable lock slot: accommodates the optional security cable lock, which can be secured to a fixed object to deter the removal of the manual eject lever.
... SLOT U-BOLT 4 Compaq Confidential When the optional security cable lock is installed, forward movement of the ejection level is blocked deterring the removal of the notebook from the base Security Latch: located on the back of the base, the U-Bolt accommodates a cable or chain, which can be secured to a fixed object... docking station Security cable lock slot: accommodates the optional security cable lock, which can be secured to a fixed object to deter the removal of the manual eject lever.

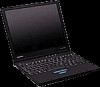
Compaq Evo Notebook N400c Hardware Guide
Page 36
To restore volume, press Fn+F5, then clear the Mute checkbox. For instructions, refer to decrease volume. To initiate Quick Controls manually, press Fn+F6. To exit Quick Controls, enter your power-on the computer or an optional docking base. 3-6 Hardware Guide You also can use the ...
To restore volume, press Fn+F5, then clear the Mute checkbox. For instructions, refer to decrease volume. To initiate Quick Controls manually, press Fn+F6. To exit Quick Controls, enter your power-on the computer or an optional docking base. 3-6 Hardware Guide You also can use the ...

Compaq Mobile Expansion Unit
Page 3
... 2-5 Connecting External Devices 2-7 Operating External Devices 2-7 3 Using the Mobile Expansion Unit Installing or Removing MultiBay Devices 3-1 Following MultiBay Guidelines 3-2 Using an Optical Drive 3-4 Ejecting a CD Manually 3-4 Using the Stereo Speakers 3-6 Reference Guide iii
... 2-5 Connecting External Devices 2-7 Operating External Devices 2-7 3 Using the Mobile Expansion Unit Installing or Removing MultiBay Devices 3-1 Following MultiBay Guidelines 3-2 Using an Optical Drive 3-4 Ejecting a CD Manually 3-4 Using the Stereo Speakers 3-6 Reference Guide iii

Compaq Mobile Expansion Unit
Page 24
... disc into the drive to close the tray. Push the media tray back into an optical drive (CD or DVD), follow these steps: 1. Ejecting a CD Manually If you cannot replace the optical drive or the hard drive with a SuperDisk LS-120, Zip, or diskette drive while the system is turned on... pull the tray until it is fully closed. If the eject button is disabled by using your CD software, refer to the following instructions to manually eject the CD disc. ✎ Certain applications or operating system software may disable the eject button to prevent accidental damage to the disc. Using the...
... disc into the drive to close the tray. Push the media tray back into an optical drive (CD or DVD), follow these steps: 1. Ejecting a CD Manually If you cannot replace the optical drive or the hard drive with a SuperDisk LS-120, Zip, or diskette drive while the system is turned on... pull the tray until it is fully closed. If the eject button is disabled by using your CD software, refer to the following instructions to manually eject the CD disc. ✎ Certain applications or operating system software may disable the eject button to prevent accidental damage to the disc. Using the...

Compaq Mobile Expansion Unit
Page 25
Manually ejecting a CD disc 2. When the eject mechanism is released, slowly pull the media tray out from the drive until it is fully extended, then remove the CD disc. Reference Guide 3-5 Using the Mobile Expansion Unit Ä CAUTION: Before beginning this procedure, turn off the power to your equipment and remove the battery pack. To eject a CD disc manually: 1. Insert a straightened paper clip into the manual eject hole and push firmly.
Manually ejecting a CD disc 2. When the eject mechanism is released, slowly pull the media tray out from the drive until it is fully extended, then remove the CD disc. Reference Guide 3-5 Using the Mobile Expansion Unit Ä CAUTION: Before beginning this procedure, turn off the power to your equipment and remove the battery pack. To eject a CD disc manually: 1. Insert a straightened paper clip into the manual eject hole and push firmly.

Compaq Mobile Expansion Unit
Page 30
...the drive until the tray is not properly loaded in Chapter 3 for detailed instructions.) Use the preceding procedure to manually eject the optical disc. (See the "Ejecting a CD Manually," section in the drive. The optical disc may be dirty or scratched. Optical disc is fully extended, then ... in Chapter 3 for detailed instructions.) A-4 Reference Guide Turn off the computer and insert a straightened paper clip into the manual eject hole and press firmly. Troubleshooting Optical Drive Problems and Solutions Problem The system cannot read the optical disc. Solution Eject ...
...the drive until the tray is not properly loaded in Chapter 3 for detailed instructions.) Use the preceding procedure to manually eject the optical disc. (See the "Ejecting a CD Manually," section in the drive. The optical disc may be dirty or scratched. Optical disc is fully extended, then ... in Chapter 3 for detailed instructions.) A-4 Reference Guide Turn off the computer and insert a straightened paper clip into the manual eject hole and press firmly. Troubleshooting Optical Drive Problems and Solutions Problem The system cannot read the optical disc. Solution Eject ...

Compaq Mobile Expansion Unit
Page 33
...2-6 cord 2-6 acoustic port 1-2, 1-5 B bottom components 1-6 C cautions CD removal 3-5 electrical safety 3-1 CD, manually ejecting 3-4 components 1-2 computer disconnecting 2-3 display, opening 2-2 tabs 1-2, 2-1 connecting external devices 2-7 connecting the AC... disconnection troubleshooting A-2 docking connector 1-4 release button 1-3, 2-3 restraint recess 1-6 to a docking base 2-4 Reference Guide Index E ejecting a CD manually 3-4 equipment turning off 2-4 turning on 2-4 expansion connector 1-2 external devices connecting 2-7 operating 2-7 external monitor connector 1-4 F front components 1-2...
...2-6 cord 2-6 acoustic port 1-2, 1-5 B bottom components 1-6 C cautions CD removal 3-5 electrical safety 3-1 CD, manually ejecting 3-4 components 1-2 computer disconnecting 2-3 display, opening 2-2 tabs 1-2, 2-1 connecting external devices 2-7 connecting the AC... disconnection troubleshooting A-2 docking connector 1-4 release button 1-3, 2-3 restraint recess 1-6 to a docking base 2-4 Reference Guide Index E ejecting a CD manually 3-4 equipment turning off 2-4 turning on 2-4 expansion connector 1-2 external devices connecting 2-7 operating 2-7 external monitor connector 1-4 F front components 1-2...


