
User Guide
Page 5
... 16 Connecting an HP notebook computer and installing drivers to enable USB Type-A docking 17 Charging a non-USB Type-C HP computer ...18 2 Using the monitor ...19 Downloading software and utilities ...19 The Information file ...19 The Image Color Matching file ...19 Using the on-screen display (OSD) menu ...20 Using the function buttons ...21 Using the camera ...22 Using Auto-Sleep Mode ...22 Changing the Power Mode setting ...23 Selecting the Low Blue Light mode ...23 DisplayPort multistreaming over USB Type-C ...23 3 Support and troubleshooting...
... 16 Connecting an HP notebook computer and installing drivers to enable USB Type-A docking 17 Charging a non-USB Type-C HP computer ...18 2 Using the monitor ...19 Downloading software and utilities ...19 The Information file ...19 The Image Color Matching file ...19 Using the on-screen display (OSD) menu ...20 Using the function buttons ...21 Using the camera ...22 Using Auto-Sleep Mode ...22 Changing the Power Mode setting ...23 Selecting the Low Blue Light mode ...23 DisplayPort multistreaming over USB Type-C ...23 3 Support and troubleshooting...

User Guide
Page 6
... ...40 HP links ...41 Contacting support ...41 vi Using the auto-adjustment function (analog input 26 Optimizing image performance (analog input 27 Contacting support ...28 Preparing to call technical support ...28 Locating the serial number and product number 29 4 Maintaining the monitor ...30 Maintenance guidelines ...30 Cleaning the monitor ...30 Shipping the monitor ...31 Appendix A Technical specifications ...32 68.5 cm (27 in) monitor ...32 60.5 cm (23.8 in) monitor ...33 Preset display resolutions ...34 Entering user modes...
... ...40 HP links ...41 Contacting support ...41 vi Using the auto-adjustment function (analog input 26 Optimizing image performance (analog input 27 Contacting support ...28 Preparing to call technical support ...28 Locating the serial number and product number 29 4 Maintaining the monitor ...30 Maintenance guidelines ...30 Cleaning the monitor ...30 Shipping the monitor ...31 Appendix A Technical specifications ...32 68.5 cm (27 in) monitor ...32 60.5 cm (23.8 in) monitor ...33 Preset display resolutions ...34 Entering user modes...
User Guide
Page 7
... work habits for this capability. Use a power strip whose manufacturer offers a damage replacement policy so that you use another cord, use with the monitor, see the Product Notices provided in a controlled luminous environment to use only a power source and connection appropriate for computer users. Consider placing the monitor in your monitor. 1 Getting started Important safety information An AC adapter and power cord might cause disturbing reflections from surrounding light and bright surfaces...
... work habits for this capability. Use a power strip whose manufacturer offers a damage replacement policy so that you use another cord, use with the monitor, see the Product Notices provided in a controlled luminous environment to use only a power source and connection appropriate for computer users. Consider placing the monitor in your monitor. 1 Getting started Important safety information An AC adapter and power cord might cause disturbing reflections from surrounding light and bright surfaces...
User Guide
Page 8
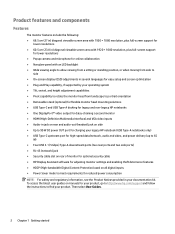
...; Nonglare panel with an LED backlight ● Wide viewing angle to allow viewing from a sitting or standing position, or when moving from side to side ● On-screen display (OSD) adjustments in several languages for easy setup and screen optimization ● Plug and Play capability, if supported by your operating system ● Tilt, swivel, and height adjustment capabilities ● Pivot capability to rotate the monitor head from landscape to portrait orientation ● Removable stand...
...; Nonglare panel with an LED backlight ● Wide viewing angle to allow viewing from a sitting or standing position, or when moving from side to side ● On-screen display (OSD) adjustments in several languages for easy setup and screen optimization ● Plug and Play capability, if supported by your operating system ● Tilt, swivel, and height adjustment capabilities ● Pivot capability to rotate the monitor head from landscape to portrait orientation ● Removable stand...

User Guide
Page 10
.... (6) Power button (with power Turns the monitor on page 21 for more information. 4 Chapter 1 Getting started An indicator is activated above the buttons indicate their descriptions (continued) Component Function (13) USB Type-A port Connects a USB device. (14) Audio-out (headset) jack Connects optional headphones, earbuds, a headset, or a television audio cable. To reduce the risk of these functions, see the Product Notices provided in the OSD menu to quickly...
.... (6) Power button (with power Turns the monitor on page 21 for more information. 4 Chapter 1 Getting started An indicator is activated above the buttons indicate their descriptions (continued) Component Function (13) USB Type-A port Connects a USB device. (14) Audio-out (headset) jack Connects optional headphones, earbuds, a headset, or a television audio cable. To reduce the risk of these functions, see the Product Notices provided in the OSD menu to quickly...
User Guide
Page 11
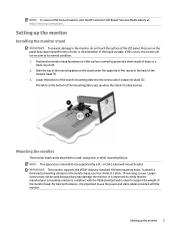
... is compliant with the monitor. Setting up the monitor Installing the monitor stand IMPORTANT: To prevent damage to use four 4 mm, 0.7 pitch, 10 mm-long screws. NOTE: To view an OSD menu simulator, visit the HP Customer Self Repair Services Media Library at http://www.hp.com/go/sml. Lower the bottom of the stand's mounting plate into the recess until it is locked in the back of...
... is compliant with the monitor. Setting up the monitor Installing the monitor stand IMPORTANT: To prevent damage to use four 4 mm, 0.7 pitch, 10 mm-long screws. NOTE: To view an OSD menu simulator, visit the HP Customer Self Repair Services Media Library at http://www.hp.com/go/sml. Lower the bottom of the stand's mounting plate into the recess until it is locked in the back of...
User Guide
Page 21
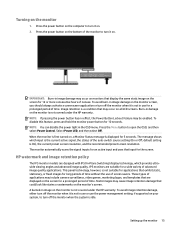
... of the monitor to open the OSD, and then select Power Control. Burn-in damage on , a Monitor Status message is displayed for 5 seconds. Select Power LED, and then select Off. When the monitor is first turned on the monitor is not covered under the HP warranty. default setting is a condition that may cause image retention damage that input for the screen. To disable this feature, press and hold the monitor power button for...
... of the monitor to open the OSD, and then select Power Control. Burn-in damage on , a Monitor Status message is displayed for 5 seconds. Select Power LED, and then select Off. When the monitor is first turned on the monitor is not covered under the HP warranty. default setting is a condition that may cause image retention damage that input for the screen. To disable this feature, press and hold the monitor power button for...
User Guide
Page 23
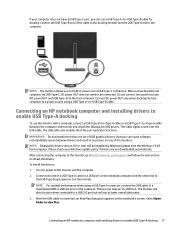
... and monitor and install the DisplayLink USB drivers. After the USB cable is sent over a USB Type-C connection. Turn on the monitor. Please check your computer does not have an SS-USB icon. To install the drivers: 1. Connecting an HP notebook computer and installing drivers to obtain the drivers. If your Windows update policy if drivers are not downloaded automatically. When connecting the host computer via USB Type-C, DC power OUT does not need to -Type-A cable between drivers...
... and monitor and install the DisplayLink USB drivers. After the USB cable is sent over a USB Type-C connection. Turn on the monitor. Please check your computer does not have an SS-USB icon. To install the drivers: 1. Connecting an HP notebook computer and installing drivers to obtain the drivers. If your Windows update policy if drivers are not downloaded automatically. When connecting the host computer via USB Type-C, DC power OUT does not need to -Type-A cable between drivers...
User Guide
Page 24
... box does not appear, open Control Panel, select Hardware and Sound, and then select AutoPlay. 2. Install the DisplayLink USB driver software. Clear the check box for Use AutoPlay for the DC power OUT connection. For updates to the driver software, go to 90 W power delivery. Use DC power OUT only when using USB Type-A to connect to the host computer for power. Select your HP notebook or desktop computer. In Windows, open Windows Explorer, navigate to...
... box does not appear, open Control Panel, select Hardware and Sound, and then select AutoPlay. 2. Install the DisplayLink USB driver software. Clear the check box for Use AutoPlay for the DC power OUT connection. For updates to the driver software, go to 90 W power delivery. Use DC power OUT only when using USB Type-A to connect to the host computer for power. Select your HP notebook or desktop computer. In Windows, open Windows Explorer, navigate to...
User Guide
Page 25
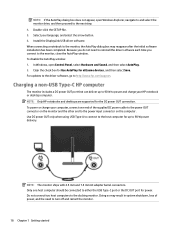
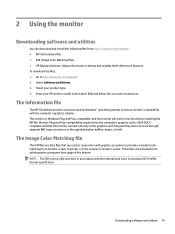
... the monitor connects directly to the graphics card. The Image Color Matching file The ICM files are data files that are activated from http://www.hp.com/support: ● INF (Information) file ● ICM (Image Color Matching) files ● HP Display Assistant: Adjusts the monitor settings and enables theft-deterrence features To download the files: 1. NOTE: The ICM color profile is Windows Plug and Play-compatible, and the monitor will work...
... the monitor connects directly to the graphics card. The Image Color Matching file The ICM files are data files that are activated from http://www.hp.com/support: ● INF (Information) file ● ICM (Image Color Matching) files ● HP Display Assistant: Adjusts the monitor settings and enables theft-deterrence features To download the files: 1. NOTE: The ICM color profile is Windows Plug and Play-compatible, and the monitor will work...

User Guide
Page 26
... Brightness Contrast Color Control Input Control Image Control Power Control Menu Control Management USB Host Selection Information Exit Adjusts the brightness level of the screen. Selects and adjusts the screen color. Selects the video input signal. Adjusts the power settings. Exits the OSD menu screen. 20 Chapter 2 Using the monitor If the monitor is not already on, press the power button to turn on -screen display (OSD) and function button controls. Adjusts the contrast level of the screen. Use the three function buttons to open the OSD. 3. Adjusts the screen image...
... Brightness Contrast Color Control Input Control Image Control Power Control Menu Control Management USB Host Selection Information Exit Adjusts the brightness level of the screen. Selects and adjusts the screen color. Selects the video input signal. Adjusts the power settings. Exits the OSD menu screen. 20 Chapter 2 Using the monitor If the monitor is not already on, press the power button to turn on -screen display (OSD) and function button controls. Adjusts the contrast level of the screen. Use the three function buttons to open the OSD. 3. Adjusts the screen image...

User Guide
Page 28
... on -screen display (OSD) menu option called Auto-Sleep Mode that allows you to enable or disable a reduced power state for example, if you activate the mouse or keyboard). Upon entering this reduced power state. Using Auto-Sleep Mode The monitor supports an on the monitor in this reduced power state (sleep mode), the monitor screen is blanked, the backlight is turned off, and the power light indicator turns amber. The monitor draws less than 0.5 W of either horizontal or vertical sync signal.
... on -screen display (OSD) menu option called Auto-Sleep Mode that allows you to enable or disable a reduced power state for example, if you activate the mouse or keyboard). Upon entering this reduced power state. Using Auto-Sleep Mode The monitor supports an on the monitor in this reduced power state (sleep mode), the monitor screen is blanked, the backlight is turned off, and the power light indicator turns amber. The monitor draws less than 0.5 W of either horizontal or vertical sync signal.
User Guide
Page 29
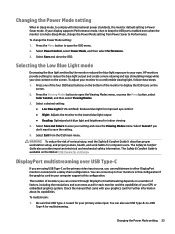
... primary video input source, you don't want to other DisplayPort monitors connected in this configuration. You can multistream to save your GPU or embedded graphics system. Select Save and close the Viewing Modes menu. HP monitors provide settings to display the OSD icons on a number of factors, including the resolutions and scan rates used for improved eye comfort ● Night: Adjusts the monitor to open the OSD menu. 2. Select Exit from Power Saver to keep the USB ports...
... primary video input source, you don't want to other DisplayPort monitors connected in this configuration. You can multistream to save your GPU or embedded graphics system. Select Save and close the Viewing Modes menu. HP monitors provide settings to display the OSD icons on a number of factors, including the resolutions and scan rates used for improved eye comfort ● Night: Adjusts the monitor to open the OSD menu. 2. Select Exit from Power Saver to keep the USB ports...

User Guide
Page 31
... 25 Video cable is displayed. System is turned off when connecting the video cable. Open the OSD menu and select Power Control, select AutoSleep Mode, and then set higher than the monitor supports. "OSD Lockout" is not connected. Open the OSD menu and select Brightness to a supported setting. The monitor's OSD Lockout function is disabled. Connect the appropriate video signal cable between the source device and monitor. The monitor's sleep mode is enabled. Monitor is in sleep mode. Image appears too dark. "Input Signal Not Found" is disconnected. Power Button...
... 25 Video cable is displayed. System is turned off when connecting the video cable. Open the OSD menu and select Power Control, select AutoSleep Mode, and then set higher than the monitor supports. "OSD Lockout" is not connected. Open the OSD menu and select Brightness to a supported setting. The monitor's OSD Lockout function is disabled. Connect the appropriate video signal cable between the source device and monitor. The monitor's sleep mode is enabled. Monitor is in sleep mode. Image appears too dark. "Input Signal Not Found" is disconnected. Power Button...
User Guide
Page 32
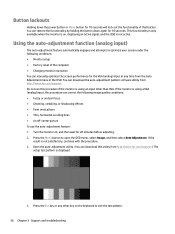
.... Turn the monitor on , displaying an active signal, and the OSD is using an input other key on the keyboard to open the OSD menu, select Image, and then select Auto Adjustment. Open the auto-adjustment utility. (You can restore the functionality by holding the button down the power button or Menu button for 10 seconds will lock out the functionality of the computer ● Changing monitor resolution You can download the auto-adjustment pattern software utility from the Auto Adjustment menu...
.... Turn the monitor on , displaying an active signal, and the OSD is using an input other key on the keyboard to open the OSD menu, select Image, and then select Auto Adjustment. Open the auto-adjustment utility. (You can restore the functionality by holding the button down the power button or Menu button for 10 seconds will lock out the functionality of the computer ● Changing monitor resolution You can download the auto-adjustment pattern software utility from the Auto Adjustment menu...

User Guide
Page 33
Optimizing image performance (analog input) You can download this utility from http://www.hp.com/support. Use these controls only when the auto-adjustment function does not provide a satisfactory image. To eliminate vertical bars (Clock): 1. To remove flickering or blurring (Phase): 1. Select Phase, and then use the OSD buttons on the computer or graphics controller card installed. To correct screen position (Horizontal Position or Vertical Position): 1. The Clock must first be eliminated, depending on the monitor that display up and...
Optimizing image performance (analog input) You can download this utility from http://www.hp.com/support. Use these controls only when the auto-adjustment function does not provide a satisfactory image. To eliminate vertical bars (Clock): 1. To remove flickering or blurring (Phase): 1. Select Phase, and then use the OSD buttons on the computer or graphics controller card installed. To correct screen position (Horizontal Position or Vertical Position): 1. The Clock must first be eliminated, depending on the monitor that display up and...
User Guide
Page 34
... power cord, the AC adapter (select products only), or any other cables that display up or down arrow icons to contact HP and open a support case. Have the following information available when you call technical support If you cannot solve a problem using 28 Chapter 3 Support and troubleshooting Use this section, you are using the troubleshooting tips in the display area of the monitor. Preparing to call : ● Monitor model number ● Monitor serial number...
... power cord, the AC adapter (select products only), or any other cables that display up or down arrow icons to contact HP and open a support case. Have the following information available when you call technical support If you cannot solve a problem using 28 Chapter 3 Support and troubleshooting Use this section, you are using the troubleshooting tips in the display area of the monitor. Preparing to call : ● Monitor model number ● Monitor serial number...

User Guide
Page 36
... cord. ● Keep the monitor in the operating instructions. Disconnect the monitor by grasping the plug firmly and pulling it from the AC outlet. 2. Doing this product yourself. For more difficult cleaning situations, use cleaners that you can cause damage to the monitor. NOTE: A burned-in use and use a screen saver program. It may damage the monitor. Cleaning the monitor 1. Turn off when it on the power cord...
... cord. ● Keep the monitor in the operating instructions. Disconnect the monitor by grasping the plug firmly and pulling it from the AC outlet. 2. Doing this product yourself. For more difficult cleaning situations, use cleaners that you can cause damage to the monitor. NOTE: A burned-in use and use a screen saver program. It may damage the monitor. Cleaning the monitor 1. Turn off when it on the power cord...

User Guide
Page 40
... specifications Model number: TPC-AA501 Output rating: 19.5 V / 9.23 A Measured power consumption Full power Typical settings Sleep Off 155 W (without DC power out, with power delivery) 38 W 0.5 W 0.5 W USB Type-C power supply output 5 V DC, 3.0 A 9 V DC, 3.0 A 10 V DC, 5.0 A 12 V DC, 5.0 A 15 V DC, 4.3 A 20 V DC, 3.25 A Input terminal One USB Type-C port, one HDMI port, one VGA port Preset display resolutions The following display resolutions are the most commonly used modes, and are set as factory defaults. Table A-2 60.5 cm (23.8 in) monitor specifications...
... specifications Model number: TPC-AA501 Output rating: 19.5 V / 9.23 A Measured power consumption Full power Typical settings Sleep Off 155 W (without DC power out, with power delivery) 38 W 0.5 W 0.5 W USB Type-C power supply output 5 V DC, 3.0 A 9 V DC, 3.0 A 10 V DC, 5.0 A 12 V DC, 5.0 A 15 V DC, 4.3 A 20 V DC, 3.25 A Input terminal One USB Type-C port, one HDMI port, one VGA port Preset display resolutions The following display resolutions are the most commonly used modes, and are set as factory defaults. Table A-2 60.5 cm (23.8 in) monitor specifications...

User Guide
Page 41
... the monitor screen by using the on-screen display menu. When the monitor is not preset: ● You are not using a preset mode. In addition to its normal operating mode. Entering user modes 35 Upon detecting the absence of these modes and saved in the reduced power state, the monitor will utilize 0.5 W of either the horizontal sync signal or the vertical sync signal. There is turned off, and the power light turns amber. The reduced power state...
... the monitor screen by using the on-screen display menu. When the monitor is not preset: ● You are not using a preset mode. In addition to its normal operating mode. Entering user modes 35 Upon detecting the absence of these modes and saved in the reduced power state, the monitor will utilize 0.5 W of either the horizontal sync signal or the vertical sync signal. There is turned off, and the power light turns amber. The reduced power state...


