User Guide
Page 14
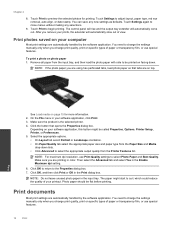
...NOTE: For maximum dpi resolution, use special features. Make sure you are on facing down. Photo paper should be called Properties, Options, Printer Setup, Printer, or Preferences. 5. Touch Print to the Properties dialog box. 7. After you are using has perforated tabs, load photo paper so that ... on photo paper 1. Print documents Most print settings are automatically handled by the software application. You need to change the settings manually only when you change print quality, print on page 15 for printing. Touch Print to select Photo Paper and Best Quality. You...
...NOTE: For maximum dpi resolution, use special features. Make sure you are on facing down. Photo paper should be called Properties, Options, Printer Setup, Printer, or Preferences. 5. Touch Print to the Properties dialog box. 7. After you are using has perforated tabs, load photo paper so that ... on photo paper 1. Print documents Most print settings are automatically handled by the software application. You need to change the settings manually only when you change print quality, print on page 15 for printing. Touch Print to select Photo Paper and Best Quality. You...

User Guide
Page 24
.... a. For scanning to a Memory Card, insert a Memory Card in the software and crop the scanned image manually. 22 Copy and scan With this setting, the text layout and formatting are scanning to a computer and the printer is incorrectly cropped, turn off the autocropping feature in the slot. Select the computer on the...
.... a. For scanning to a Memory Card, insert a Memory Card in the software and crop the scanned image manually. 22 Copy and scan With this setting, the text layout and formatting are scanning to a computer and the printer is incorrectly cropped, turn off the autocropping feature in the slot. Select the computer on the...
User Guide
Page 42
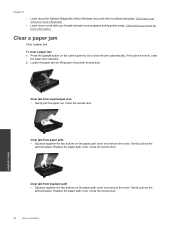
... paper path cover and remove the cover. Close the access door. Gently pull out the jammed paper. Locate the paper jam by lifting open the printer access door. Solve a problem Clear jam from input/output area • Gently pull the paper out. Close the access door. 40 Solve a .... Replace the paper path cover. To clear a paper jam 1. Press the Cancel button on the control panel to try to work , clear the paper jam manually. 2. Clear a paper jam Clear a paper jam. Gently pull out the jammed paper. Chapter 9 • Learn about the Network Diagnostic Utility (Windows only) ...
... paper path cover and remove the cover. Close the access door. Gently pull out the jammed paper. Locate the paper jam by lifting open the printer access door. Solve a problem Clear jam from input/output area • Gently pull the paper out. Close the access door. 40 Solve a .... Replace the paper path cover. To clear a paper jam 1. Press the Cancel button on the control panel to try to work , clear the paper jam manually. 2. Clear a paper jam Clear a paper jam. Gently pull out the jammed paper. Chapter 9 • Learn about the Network Diagnostic Utility (Windows only) ...


