Notebook PC User Guide - Windows 7
Page 8
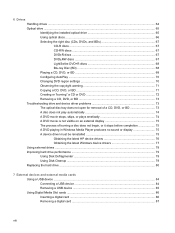
... completion 75 A DVD playing in Windows Media Player produces no sound or display 75 A device driver must be reinstalled 75 Obtaining the latest HP device drivers 76 Obtaining the latest Windows device drivers 77 Using external drives ...78 Improving hard drive performance ...79 Using Disk Defragmenter 79 Using Disk Cleanup ...79 Replacing the hard drive ...80 7 External devices and external media cards Using a USB device ...84 Connecting a USB device 84 Removing a USB device ...85 Using Digital Media Slot cards ...86 Inserting a digital card ...86 Removing a digital card ...87 viii
... completion 75 A DVD playing in Windows Media Player produces no sound or display 75 A device driver must be reinstalled 75 Obtaining the latest HP device drivers 76 Obtaining the latest Windows device drivers 77 Using external drives ...78 Improving hard drive performance ...79 Using Disk Defragmenter 79 Using Disk Cleanup ...79 Replacing the hard drive ...80 7 External devices and external media cards Using a USB device ...84 Connecting a USB device 84 Removing a USB device ...85 Using Digital Media Slot cards ...86 Inserting a digital card ...86 Removing a digital card ...87 viii

Notebook PC User Guide - Windows 7
Page 12
... unmarked scroll zone inside the right edge of the TouchPad button to Using TouchPad gestures on an external mouse. *This table describes factory settings. For more information about TouchPad features, refer to execute functions performed by the left button on an external mouse. (4) Right TouchPad button* Press the right side of the TouchPad. There is off. (2) TouchPad* Moves the pointer and selects or activates items on the screen. (3) Left TouchPad button* Press...
... unmarked scroll zone inside the right edge of the TouchPad button to Using TouchPad gestures on an external mouse. *This table describes factory settings. For more information about TouchPad features, refer to execute functions performed by the left button on an external mouse. (4) Right TouchPad button* Press the right side of the TouchPad. There is off. (2) TouchPad* Moves the pointer and selects or activates items on the screen. (3) Left TouchPad button* Press...
Notebook PC User Guide - Windows 7
Page 17
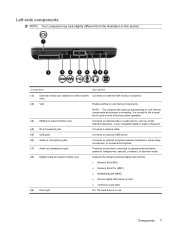
...) ● Secure Digital (SD) Memory Card ● xD-Picture Card (XD) On: The hard drive is normal for the internal fan to cool internal components. It is in (microphone) jack Connects an optional video or audio device, such as a highdefinition television, or any compatible digital or audio component. Component Description (1) External monitor port (labeled on and off during routine operation. (3) HDMI port (select models only) (4) RJ-45 (network) jack (5) USB ports (6) Audio-in use. Left-side components NOTE: Your...
...) ● Secure Digital (SD) Memory Card ● xD-Picture Card (XD) On: The hard drive is normal for the internal fan to cool internal components. It is in (microphone) jack Connects an optional video or audio device, such as a highdefinition television, or any compatible digital or audio component. Component Description (1) External monitor port (labeled on and off during routine operation. (3) HDMI port (select models only) (4) RJ-45 (network) jack (5) USB ports (6) Audio-in use. Left-side components NOTE: Your...
Notebook PC User Guide - Windows 7
Page 30
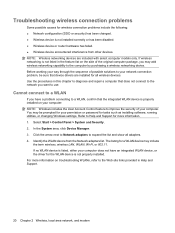
... troubleshooting WLANs, refer to your network connection problem, be prompted for your computer. Select Start > Control Panel > System and Security. 2. The listing for tasks such as installing software, running utilities, or changing Windows settings. Cannot connect to a WLAN If you have an integrated WLAN device, or the driver for the WLAN device is not installed correctly or has been disabled. ● Wireless device or router hardware has failed. ● Wireless device encountered interference from the Network adapters list...
... troubleshooting WLANs, refer to your network connection problem, be prompted for your computer. Select Start > Control Panel > System and Security. 2. The listing for tasks such as installing software, running utilities, or changing Windows settings. Cannot connect to a WLAN If you have an integrated WLAN device, or the driver for the WLAN device is not installed correctly or has been disabled. ● Wireless device or router hardware has failed. ● Wireless device encountered interference from the Network adapters list...
Notebook PC User Guide - Windows 7
Page 42
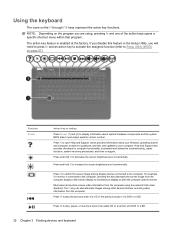
... the Setup Utility, you will need to press fn and an action key to activate the assigned function (refer to decrease the screen brightness level incrementally. Press and hold f2 to Setup Utility (BIOS) on both the computer and the monitor. Press f4 to play, pause, or resume a track of an audio CD or a section of the action keys opens a specific shortcut menu within that are receiving video...
... the Setup Utility, you will need to press fn and an action key to activate the assigned function (refer to decrease the screen brightness level incrementally. Press and hold f2 to Setup Utility (BIOS) on both the computer and the monitor. Press f4 to play, pause, or resume a track of an audio CD or a section of the action keys opens a specific shortcut menu within that are receiving video...

Notebook PC User Guide - Windows 7
Page 52
... display devices connected to an optional video or audio device, such as a high-definition television, or any compatible digital or audio component. Connect the other supported external display. Connecting an HDMI device (select models only) Select computer models include an HDMI (High Definition Multimedia Interface) port. NOTE: To transmit video signals through the HDMI port, you need an HDMI cable (purchased separately), available from most electronic retailers. To connect a video or audio device to the device manufacturer's instructions. 3. The computer can support...
... display devices connected to an optional video or audio device, such as a high-definition television, or any compatible digital or audio component. Connect the other supported external display. Connecting an HDMI device (select models only) Select computer models include an HDMI (High Definition Multimedia Interface) port. NOTE: To transmit video signals through the HDMI port, you need an HDMI cable (purchased separately), available from most electronic retailers. To connect a video or audio device to the device manufacturer's instructions. 3. The computer can support...
Notebook PC User Guide - Windows 7
Page 70
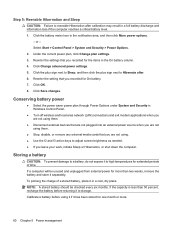
... Change plan settings. 3. Conserving battery power ● Select the power saver power plan through Power Options under System and Security in Windows Control Panel. ● Turn off wireless and local area network (LAN) connections and exit modem applications when you are not using them. ● Disconnect external devices that are not plugged into an external power source when you are not using them. ● Stop, disable, or remove any external media cards that you leave your work, initiate Sleep...
... Change plan settings. 3. Conserving battery power ● Select the power saver power plan through Power Options under System and Security in Windows Control Panel. ● Turn off wireless and local area network (LAN) connections and exit modem applications when you are not using them. ● Disconnect external devices that are not plugged into an external power source when you are not using them. ● Stop, disable, or remove any external media cards that you leave your work, initiate Sleep...
Notebook PC User Guide - Windows 7
Page 85
... switch between the two displays. 2. Select Start > Control Panel > System and Security. In the Device Manager window, click the arrow next to delete the device, but do not restart the computer. Repeat for example, DVD/CD-ROMs, Modems, and so on any display designated as a printer, scanner, camera, or handheld device. Specify a primary display and a secondary display. Troubleshooting drive and device driver problems 75 Configure the monitor settings to delete. Click OK. ◦ Disconnect external devices...
... switch between the two displays. 2. Select Start > Control Panel > System and Security. In the Device Manager window, click the arrow next to delete the device, but do not restart the computer. Repeat for example, DVD/CD-ROMs, Modems, and so on any display designated as a printer, scanner, camera, or handheld device. Specify a primary display and a secondary display. Troubleshooting drive and device driver problems 75 Configure the monitor settings to delete. Click OK. ◦ Disconnect external devices...
Notebook PC User Guide - Windows 7
Page 86
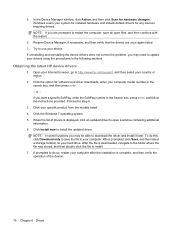
... location on your country or region. 2. Obtaining the latest HP device drivers 1. When the list of the device. 76 Chapter 6 Drives If prompted to do this, click Download only to your computer. Try to update your computer model number in the Search box, press enter, and follow the instructions provided. NOTE: If you may need to use your specific product from the models listed. 4. Click the Windows 7 operating system. 5. Click Install...
... location on your country or region. 2. Obtaining the latest HP device drivers 1. When the list of the device. 76 Chapter 6 Drives If prompted to do this, click Download only to your computer. Try to update your computer model number in the Search box, press enter, and follow the instructions provided. NOTE: If you may need to use your specific product from the models listed. 4. Click the Windows 7 operating system. 5. Click Install...
Notebook PC User Guide - Windows 7
Page 88
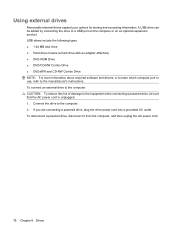
.... 2. Connect the drive to the equipment when connecting a powered drive, be added by connecting the drive to the manufacturer's instructions. Using external drives Removable external drives expand your options for storing and accessing information. To disconnect a powered drive, disconnect it from the computer, and then unplug the AC power cord. 78 Chapter 6 Drives USB drives include the following types: ● 1.44 MB disk drive ● Hard drive module (a hard drive with an adapter attached) ● DVD-ROM Drive ● DVD/CD-RW Combo Drive ● DVD±...
.... 2. Connect the drive to the equipment when connecting a powered drive, be added by connecting the drive to the manufacturer's instructions. Using external drives Removable external drives expand your options for storing and accessing information. To disconnect a powered drive, disconnect it from the computer, and then unplug the AC power cord. 78 Chapter 6 Drives USB drives include the following types: ● 1.44 MB disk drive ● Hard drive module (a hard drive with an adapter attached) ● DVD-ROM Drive ● DVD/CD-RW Combo Drive ● DVD±...

Notebook PC User Guide - Windows 7
Page 89
... your permission or password for tasks such as installing software, running utilities, or changing Windows settings. Select Start > All Programs > Accessories > System Tools > Disk Defragmenter. 2. Disk Defragmenter consolidates the fragmented files and folders on a monthly schedule, but you can run more than an hour to the Disk Defragmenter software Help. Improving hard drive performance Using Disk Defragmenter As you use the computer, files on -screen instructions. Select Start > All Programs...
... your permission or password for tasks such as installing software, running utilities, or changing Windows settings. Select Start > All Programs > Accessories > System Tools > Disk Defragmenter. 2. Disk Defragmenter consolidates the fragmented files and folders on a monthly schedule, but you can run more than an hour to the Disk Defragmenter software Help. Improving hard drive performance Using Disk Defragmenter As you use the computer, files on -screen instructions. Select Start > All Programs...

Notebook PC User Guide - Windows 7
Page 90
... power button. Disconnect all external devices connected to the computer. 4. Lift the hard drive cover away from the AC outlet. 5. Unplug the power cord from the computer (1). 80 Chapter 6 Drives Replacing the hard drive CAUTION: To prevent information loss or an unresponsive system: Shut down the computer before removing the hard drive from the computer. 7. Then shut down the computer and close the display. 3. Save your work. 2. Remove the battery...
... power button. Disconnect all external devices connected to the computer. 4. Lift the hard drive cover away from the AC outlet. 5. Unplug the power cord from the computer (1). 80 Chapter 6 Drives Replacing the hard drive CAUTION: To prevent information loss or an unresponsive system: Shut down the computer before removing the hard drive from the computer. 7. Then shut down the computer and close the display. 3. Save your work. 2. Remove the battery...
Notebook PC User Guide - Windows 7
Page 102
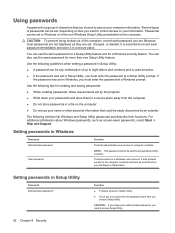
... enter the password each password you access Setup Utility. Several types of the computer, record each time you set , you must be used to record each password immediately and store it is case-sensitive. ● If the password was set in Windows Password Administrator password User password Function Protects administrator-level access to Setup Utility. ● Once set . For additional information about Windows passwords, such as they are not displayed as screen-saver passwords, select Start > Help and Support...
... enter the password each password you access Setup Utility. Several types of the computer, record each time you set , you must be used to record each password immediately and store it is case-sensitive. ● If the password was set in Windows Password Administrator password User password Function Protects administrator-level access to Setup Utility. ● Once set . For additional information about Windows passwords, such as they are not displayed as screen-saver passwords, select Start > Help and Support...
Notebook PC User Guide - Windows 7
Page 111
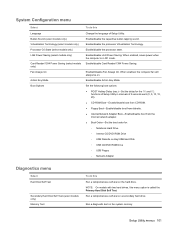
... 15, 20). ● CD-ROM Boot―Enable/disable boot from CD-ROM. ● Floppy Boot―Enable/disable boot from diskette. ● Internal Network Adapter Boot―Enable/disable boot from the internal network adapter. ● Boot Order―Set the boot order for: ◦ Notebook Hard Drive ◦ Internal CD/DVD ROM Drive ◦ USB Diskette on the system memory. When enabled, saves power when the computer is called the Primary Hard Disk Self Test. Enable/disable Action Key Mode. Enable/disable the processor Virtualization Technology. Setup Utility menus 101
... 15, 20). ● CD-ROM Boot―Enable/disable boot from CD-ROM. ● Floppy Boot―Enable/disable boot from diskette. ● Internal Network Adapter Boot―Enable/disable boot from the internal network adapter. ● Boot Order―Set the boot order for: ◦ Notebook Hard Drive ◦ Internal CD/DVD ROM Drive ◦ USB Diskette on the system memory. When enabled, saves power when the computer is called the Primary Hard Disk Self Test. Enable/disable Action Key Mode. Enable/disable the processor Virtualization Technology. Setup Utility menus 101
Notebook PC User Guide - Windows 7
Page 112
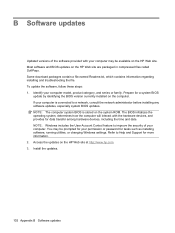
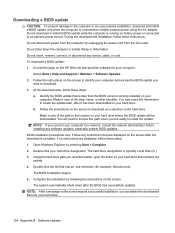
... a network, consult the network administrator before installing any software updates, especially system BIOS updates. NOTE: Windows includes the User Account Control feature to Help and Support for tasks such as installing software, running utilities, or changing Windows settings. To update the software, follow these steps: 1. Refer to improve the security of the software provided with the hardware devices, and provides for a system BIOS update by identifying the BIOS version currently installed on the HP Web site. Some download...
... a network, consult the network administrator before installing any software updates, especially system BIOS updates. NOTE: Windows includes the User Account Control feature to Help and Support for tasks such as installing software, running utilities, or changing Windows settings. To update the software, follow these steps: 1. Refer to improve the security of the software provided with the hardware devices, and provides for a system BIOS update by identifying the BIOS version currently installed on the HP Web site. Some download...
Notebook PC User Guide - Windows 7
Page 114
... or initiate Sleep or Hibernation. Identify the BIOS update that has an .exe extension (for your hard drive. 104 Appendix B Software updates Make a note of the path to a network, consult the network administrator before installing any device, cable, or cord. b. Open Windows Explorer by following the instructions on battery power or connected to reliable external power using the AC adapter. Downloading a BIOS update CAUTION: To prevent damage to the computer or an unsuccessful installation, download and install a BIOS update only when...
... or initiate Sleep or Hibernation. Identify the BIOS update that has an .exe extension (for your hard drive. 104 Appendix B Software updates Make a note of the path to a network, consult the network administrator before installing any device, cable, or cord. b. Open Windows Explorer by following the instructions on battery power or connected to reliable external power using the AC adapter. Downloading a BIOS update CAUTION: To prevent damage to the computer or an unsuccessful installation, download and install a BIOS update only when...

Notebook PC User Guide - Windows 7
Page 115
...: To use the HP Web site: 1. or - After the file is displayed, click an updated driver to http://www.hp.com/support, and then select your specific product from the models listed. 4. Updating programs and drivers 105 Open your web browser, go to open a window containing additional information. 6. Proceed to install the updated driver. Click Install now to step 6. 3. When the list of the device. Click the option for software and driver downloads, enter your computer...
...: To use the HP Web site: 1. or - After the file is displayed, click an updated driver to http://www.hp.com/support, and then select your specific product from the models listed. 4. Updating programs and drivers 105 Open your web browser, go to open a window containing additional information. 6. Proceed to install the updated driver. Click Install now to step 6. 3. When the list of the device. Click the option for software and driver downloads, enter your computer...

Notebook PC User Guide - Windows 7
Page 122
... Bluetooth label 12 boot options 101 112 Index boot order 101 button sound 101 buttons power 4 TouchPad 2 TouchPad off indicator 28 TouchPad right/left 28 C cables LAN 27 modem 23 security 96 USB 84 calibrating battery 57 caps lock light, identifying 3 Card Reader Power Saving 101 CD burning 72 copying 71 playing 68 removing 73 CD drive 78 Certificate of Authenticity label 12 changing the language of Setup Utility 98 charging batteries 55, 57 checking audio functions 40 compartments memory module 8 components additional hardware...
... Bluetooth label 12 boot options 101 112 Index boot order 101 button sound 101 buttons power 4 TouchPad 2 TouchPad off indicator 28 TouchPad right/left 28 C cables LAN 27 modem 23 security 96 USB 84 calibrating battery 57 caps lock light, identifying 3 Card Reader Power Saving 101 CD burning 72 copying 71 playing 68 removing 73 CD drive 78 Certificate of Authenticity label 12 changing the language of Setup Utility 98 charging batteries 55, 57 checking audio functions 40 compartments memory module 8 components additional hardware...
Notebook PC User Guide - Windows 7
Page 123
... 36 internal microphones, identifying 9 Internet connection setup 16 issues, resolving 20, 73 J jacks audio-in (microphone) 37 audio-out (headphone) 36 RJ-11 (modem) 6 RJ-45 (network) 7 K keys action 5 esc 5 fn 5 Windows applications 5 Windows logo 5 L labels Bluetooth 12 Microsoft Certificate of Authenticity 12 modem approval 12 regulatory 12 service tag 12 wireless certification 12 WLAN 12 LAN Power Saving 101 language support 101 latch, battery release 8 lights caps lock 3 optical drive 6 power 3, 6 TouchPad 2 TouchPad off indicator 28 webcam 9 webcam light 9 wireless...
... 36 internal microphones, identifying 9 Internet connection setup 16 issues, resolving 20, 73 J jacks audio-in (microphone) 37 audio-out (headphone) 36 RJ-11 (modem) 6 RJ-45 (network) 7 K keys action 5 esc 5 fn 5 Windows applications 5 Windows logo 5 L labels Bluetooth 12 Microsoft Certificate of Authenticity 12 modem approval 12 regulatory 12 service tag 12 wireless certification 12 WLAN 12 LAN Power Saving 101 language support 101 latch, battery release 8 lights caps lock 3 optical drive 6 power 3, 6 TouchPad 2 TouchPad off indicator 28 webcam 9 webcam light 9 wireless...
Notebook PC User Guide - Windows 7
Page 125
... 74 drive and device driver problems 73 DVD movie play 74 external display 75 HP device drivers 76 modem 26 optical disc tray 73 Windows device drivers 77 wireless connection problems 20 turning off the computer 63 U unresponsive system 63 USB cable, connecting 84 USB devices connecting 84 description 84 removing 85 USB hubs 84 USB port, identifying 6, 7 USB ports, identifying 84 using Setup Utility 98 using system restore 110 V vents, identifying 7, 8 video, using 41 Virtualization Technology 101 volume down action key 36 volume mute action key 36 volume up action key 36 volume, adjusting...
... 74 drive and device driver problems 73 DVD movie play 74 external display 75 HP device drivers 76 modem 26 optical disc tray 73 Windows device drivers 77 wireless connection problems 20 turning off the computer 63 U unresponsive system 63 USB cable, connecting 84 USB devices connecting 84 description 84 removing 85 USB hubs 84 USB port, identifying 6, 7 USB ports, identifying 84 using Setup Utility 98 using system restore 110 V vents, identifying 7, 8 video, using 41 Virtualization Technology 101 volume down action key 36 volume mute action key 36 volume up action key 36 volume, adjusting...


