HP USB Digital Drive
Page 5
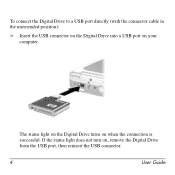
The status light on the Digital Drive turns on your computer. To connect the Digital Drive to a USB port directly (with the connector cable in the unextended position): » Insert the USB connector on the Digital Drive into a USB port on when the connection is successful. If the status light does not turn on, remove the Digital Drive from the USB port, then reinsert the USB connector. 4 User Guide
The status light on the Digital Drive turns on your computer. To connect the Digital Drive to a USB port directly (with the connector cable in the unextended position): » Insert the USB connector on the Digital Drive into a USB port on when the connection is successful. If the status light does not turn on, remove the Digital Drive from the USB port, then reinsert the USB connector. 4 User Guide
HP USB Digital Drive
Page 7
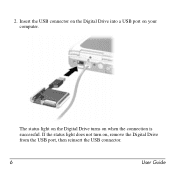
If the status light does not turn on your computer. Insert the USB connector on the Digital Drive into a USB port on , remove the Digital Drive from the USB port, then reinsert the USB connector. 6 User Guide The status light on the Digital Drive turns on when the connection is successful. 2.
If the status light does not turn on your computer. Insert the USB connector on the Digital Drive into a USB port on , remove the Digital Drive from the USB port, then reinsert the USB connector. 6 User Guide The status light on the Digital Drive turns on when the connection is successful. 2.

Bluetooth Wireless Technology Basics
Page 7
...select Next. 4. When you can use the Bluetooth Setup wizard to configure the service and security features as follows: 1. Then you turn it by pressing the wireless button on by right-clicking the Bluetooth icon and selecting Start the Bluetooth Device. For specific instructions about discovering... Bluetooth Setup Wizard to Bluetooth operations. Select the check box next to Bluetooth by hp to white. Set up the BWT software After the software is installed and BWT functionality is off, turn on HP notebook PCs; Enable BWT functionality If the wireless light (ICON) is enabled, a...
...select Next. 4. When you can use the Bluetooth Setup wizard to configure the service and security features as follows: 1. Then you turn it by pressing the wireless button on by right-clicking the Bluetooth icon and selecting Start the Bluetooth Device. For specific instructions about discovering... Bluetooth Setup Wizard to Bluetooth operations. Select the check box next to Bluetooth by hp to white. Set up the BWT software After the software is installed and BWT functionality is off, turn on HP notebook PCs; Enable BWT functionality If the wireless light (ICON) is enabled, a...

Security - Window Vista and Windows 7
Page 9
... Setting passwords in the Windows Log On dialog box before you access the computer. CAUTION: If you forget your power-on password, you cannot turn on password* CAUTION: If you forget your password and store it must be used to computer contents. Administrator password Your administrator password protects the ...nor is set a user or administrator password, follow these passwords, refer to a Windows user account. After you must be entered each time you turn on or restart the computer, or exit Hibernation. *For details about each time you access Setup Utility.
... Setting passwords in the Windows Log On dialog box before you access the computer. CAUTION: If you forget your power-on password, you cannot turn on password* CAUTION: If you forget your password and store it must be used to computer contents. Administrator password Your administrator password protects the ...nor is set a user or administrator password, follow these passwords, refer to a Windows user account. After you must be entered each time you turn on or restart the computer, or exit Hibernation. *For details about each time you access Setup Utility.

Security - Window Vista and Windows 7
Page 10
... changes and exit the Setup Utility, use of the screen, press esc. After 3 unsuccessful attempts to enter the administrator password, you turn on password is not displayed as it must be entered each time you must restart the computer and try again. While the "Press ...type your current password in the lower-left corner of the computer. After this password, follow these steps: 1. Open the Setup Utility by turning on password prevents unauthorized use the arrow keys to select Security > Set Administrator Password, and then press enter. ● To set an administrator...
... changes and exit the Setup Utility, use of the screen, press esc. After 3 unsuccessful attempts to enter the administrator password, you turn on password is not displayed as it must be entered each time you must restart the computer and try again. While the "Press ...type your current password in the lower-left corner of the computer. After this password, follow these steps: 1. Open the Setup Utility by turning on password prevents unauthorized use the arrow keys to select Security > Set Administrator Password, and then press enter. ● To set an administrator...

Security - Window Vista and Windows 7
Page 11
... or restarting the computer. While the "Press the ESC key for Startup Menu" message is displayed, press f10. 2. Open the Setup Utility by turning on or restarting the computer. Use the arrow keys to select Security > Set Power-On Password, and then press enter. ● To set , change a power-...
... or restarting the computer. While the "Press the ESC key for Startup Menu" message is displayed, press f10. 2. Open the Setup Utility by turning on or restarting the computer. Use the arrow keys to select Security > Set Power-On Password, and then press enter. ● To set , change a power-...

Setup Utility - Windows Vista and Windows 7
Page 5
...: The fingerprint reader (select models only) cannot be used to access the Setup Utility. To start the Setup Utility: ▲ Open the Setup Utility by turning on or restarting the computer. or - 1. The utility reports information about the computer and provides settings for startup, security, and other preferences. 1 Starting the Setup... a ROM-based information and customization utility that can be used even when your Windows® operating system is not working. Open the Setup Utility by turning on or restarting the computer.
...: The fingerprint reader (select models only) cannot be used to access the Setup Utility. To start the Setup Utility: ▲ Open the Setup Utility by turning on or restarting the computer. or - 1. The utility reports information about the computer and provides settings for startup, security, and other preferences. 1 Starting the Setup... a ROM-based information and customization utility that can be used even when your Windows® operating system is not working. Open the Setup Utility by turning on or restarting the computer.

Setup Utility - Windows Vista and Windows 7
Page 6
...does not support the TouchPad. Use the arrow keys to select System Configuration > Language, and then press enter. 3. Navigation and selection are by turning on or restarting the computer. While the "Press the ESC key for Startup Menu" message is displayed, press enter. 5. When a confirmation prompt...the Setup Utility The following procedure explains how to select Exit > Exit Saving Changes, and then press enter. Open the Setup Utility by turning on or restarting the computer. If the Setup Utility is already running , begin at step 1. If the Setup Utility is not already ...
...does not support the TouchPad. Use the arrow keys to select System Configuration > Language, and then press enter. 3. Navigation and selection are by turning on or restarting the computer. While the "Press the ESC key for Startup Menu" message is displayed, press enter. 5. When a confirmation prompt...the Setup Utility The following procedure explains how to select Exit > Exit Saving Changes, and then press enter. Open the Setup Utility by turning on or restarting the computer. If the Setup Utility is already running , begin at step 1. If the Setup Utility is not already ...

Setup Utility - Windows Vista and Windows 7
Page 7
..., press enter. 4. or - Restoring default settings in the lower-left corner of the screen, press esc. Open the Setup Utility by turning on or restarting the computer. When the Setup Confirmation is open , begin at step 1. The Setup Utility default settings go into effect when...Setup Utility. When the Startup Menu is not already running , begin at step 2. 1. Select the Main menu. Open the Setup Utility by turning on or restarting the computer. Use the arrow keys to select Exit > Exit Saving Changes, and then press enter. Displaying system information 3 Displaying...
..., press enter. 4. or - Restoring default settings in the lower-left corner of the screen, press esc. Open the Setup Utility by turning on or restarting the computer. When the Setup Confirmation is open , begin at step 1. The Setup Utility default settings go into effect when...Setup Utility. When the Startup Menu is not already running , begin at step 2. 1. Select the Main menu. Open the Setup Utility by turning on or restarting the computer. Use the arrow keys to select Exit > Exit Saving Changes, and then press enter. Displaying system information 3 Displaying...

Software Update, Backup and Recovery - Windows Vista
Page 6
...BIOS update that provides software for Startup Menu" message is displayed. 3. Open the Setup Utility by unplugging the power cord from the computer by turning on your computer: Select Start > Help and Support, and then click the link for displaying BIOS information: 1. During the download and installation,...the computer or an unsuccessful installation, download and install a BIOS update only when the computer is later than those currently installed on the HP Web site that is connected to select the Main menu. BIOS version information (also known as ROM date and System BIOS) can ...
...BIOS update that provides software for Startup Menu" message is displayed. 3. Open the Setup Utility by unplugging the power cord from the computer by turning on your computer: Select Start > Help and Support, and then click the link for displaying BIOS information: 1. During the download and installation,...the computer or an unsuccessful installation, download and install a BIOS update only when the computer is later than those currently installed on the HP Web site that is connected to select the Main menu. BIOS version information (also known as ROM date and System BIOS) can ...
Wireless (Select Models Only) - Windows Vista
Page 10
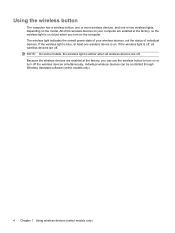
All of the wireless devices on your wireless devices, not the status of your computer are enabled at the factory, you turn off the wireless devices simultaneously. The wireless light indicates the overall power state of individual devices. NOTE: On some models, ... Assistant software (select models only). 4 Chapter 1 Using wireless devices (select models only) Individual wireless devices can use the wireless button to turn on or turn on the computer. Using the wireless button The computer has a wireless button, one or more wireless devices, and one wireless device is on...
All of the wireless devices on your wireless devices, not the status of your computer are enabled at the factory, you turn off the wireless devices simultaneously. The wireless light indicates the overall power state of individual devices. NOTE: On some models, ... Assistant software (select models only). 4 Chapter 1 Using wireless devices (select models only) Individual wireless devices can use the wireless button to turn on or turn on the computer. Using the wireless button The computer has a wireless button, one or more wireless devices, and one wireless device is on...
Wireless (Select Models Only) - Windows Vista
Page 11
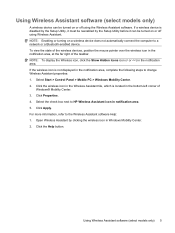
... (select models only) 5 Select the check box next to the Wireless Assistant software Help: 1. For more information, refer to HP Wireless Assistant icon in the bottom-left corner of the taskbar. Using Wireless Assistant software (select models only) A wireless device can be... connect the computer to a network or a Bluetooth-enabled device. If a wireless device is located in notification area. 5. NOTE: Enabling or turning on or off using Wireless Assistant. To view the state of the wireless devices, position the mouse pointer over the wireless icon in Windows Mobility...
... (select models only) 5 Select the check box next to the Wireless Assistant software Help: 1. For more information, refer to HP Wireless Assistant icon in the bottom-left corner of the taskbar. Using Wireless Assistant software (select models only) A wireless device can be... connect the computer to a network or a Bluetooth-enabled device. If a wireless device is located in notification area. 5. NOTE: Enabling or turning on or off using Wireless Assistant. To view the state of the wireless devices, position the mouse pointer over the wireless icon in Windows Mobility...
Wireless (Select Models Only) - Windows Vista
Page 19
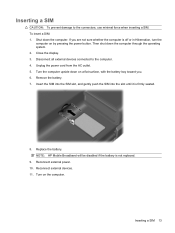
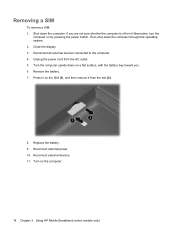
... the battery. 7. Replace the battery. Reconnect external power. 10. Reconnect external devices. 11. Turn on by pressing the power button. If you . 6. Unplug the power cord from the AC outlet. 5. Turn the computer upside down the computer through the operating system. 2. To insert a SIM: 1. Disconnect..., with the battery bay toward you are not sure whether the computer is off or in Hibernation, turn the computer on the computer. Shut down the computer. NOTE: HP Mobile Broadband will be disabled if the battery is firmly seated. 8. Inserting a SIM 13 Inserting a...
... the battery. 7. Replace the battery. Reconnect external power. 10. Reconnect external devices. 11. Turn on by pressing the power button. If you . 6. Unplug the power cord from the AC outlet. 5. Turn the computer upside down the computer through the operating system. 2. To insert a SIM: 1. Disconnect..., with the battery bay toward you are not sure whether the computer is off or in Hibernation, turn the computer on the computer. Shut down the computer. NOTE: HP Mobile Broadband will be disabled if the battery is firmly seated. 8. Inserting a SIM 13 Inserting a...
Wireless (Select Models Only) - Windows Vista
Page 20
... surface, with the battery bay toward you are not sure whether the computer is off or in Hibernation, turn the computer on the computer. 14 Chapter 3 Using HP Mobile Broadband (select models only) Reconnect external devices. 11. Then shut down the computer. Disconnect all external... devices connected to the computer. 4. Shut down the computer through the operating system. 2. Turn the computer upside down on the SIM ...
... surface, with the battery bay toward you are not sure whether the computer is off or in Hibernation, turn the computer on the computer. 14 Chapter 3 Using HP Mobile Broadband (select models only) Reconnect external devices. 11. Then shut down the computer. Disconnect all external... devices connected to the computer. 4. Shut down the computer through the operating system. 2. Turn the computer upside down on the SIM ...
Drives - Windows Vista
Page 7
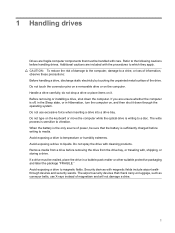
..., use excessive force when inserting a drive into a drive bay. 1 Handling drives Drives are fragile computer components that must be mailed, place the drive in Hibernation, turn the computer on, and then shut it . If you are included with , shipping, or storing a drive. Do not type on the keyboard or move the...
..., use excessive force when inserting a drive into a drive bay. 1 Handling drives Drives are fragile computer components that must be mailed, place the drive in Hibernation, turn the computer on, and then shut it . If you are included with , shipping, or storing a drive. Do not type on the keyboard or move the...

Drives - Windows Vista
Page 13
... you to release the disc tray. 3. Gently press the disc (3) down onto the tray spindle until the disc snaps into place. 6. Playing a CD or DVD 1. Turn on the drive bezel to select how you have not yet configured AutoPlay, as described in the following section, an AutoPlay dialog box opens. Playing...
... you to release the disc tray. 3. Gently press the disc (3) down onto the tray spindle until the disc snaps into place. 6. Playing a CD or DVD 1. Turn on the drive bezel to select how you have not yet configured AutoPlay, as described in the following section, an AutoPlay dialog box opens. Playing...
Drives - Windows Vista
Page 22
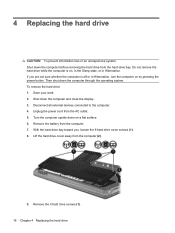
Do not remove the hard drive while the computer is off or in Hibernation. If you , loosen the 6 hard drive cover screws (1). 8. Turn the computer upside down on by pressing the power button. Remove the 4 hard drive screws (1). 16 Chapter 4 Replacing the hard drive With the hard drive ...bay toward you are not sure whether the computer is on, in the Sleep state, or in Hibernation, turn the computer on a flat surface. 6. Lift the hard drive cover away from the hard drive bay. Then shut down the computer and close the display...
Do not remove the hard drive while the computer is off or in Hibernation. If you , loosen the 6 hard drive cover screws (1). 8. Turn the computer upside down on by pressing the power button. Remove the 4 hard drive screws (1). 16 Chapter 4 Replacing the hard drive With the hard drive ...bay toward you are not sure whether the computer is on, in the Sleep state, or in Hibernation, turn the computer on a flat surface. 6. Lift the hard drive cover away from the hard drive bay. Then shut down the computer and close the display...
Drives - Windows Vista
Page 27
.... - Otherwise, you lower system color properties to restart the disc. Set Colors to exit the program and then restart it. ● Increase system resources: ◦ Turn off the Internet before playing the disc. or - ◦ The playback window in better playback performance. ◦ Change desktop color properties. In rare cases, you...
.... - Otherwise, you lower system color properties to restart the disc. Set Colors to exit the program and then restart it. ● Increase system resources: ◦ Turn off the Internet before playing the disc. or - ◦ The playback window in better playback performance. ◦ Change desktop color properties. In rare cases, you...
Drives - Windows Vista
Page 29
... , or it stops before trying to burn the contents to your hard drive before completion ● Be sure that all other programs are closed. ● Turn off Sleep mode and Hibernation. ● Be sure that you are using the right kind of disc for more information about disc types. ● Be...
... , or it stops before trying to burn the contents to your hard drive before completion ● Be sure that all other programs are closed. ● Turn off Sleep mode and Hibernation. ● Be sure that you are using the right kind of disc for more information about disc types. ● Be...

Drives - Windows Vista
Page 11
... the release button (1) on the computer. 2. Gently press the disc (3) down onto the tray spindle until the disc snaps into place. 6. Close the disc tray. Turn on the drive bezel to position it over the tray spindle. Pull out the tray (2). 4.
... the release button (1) on the computer. 2. Gently press the disc (3) down onto the tray spindle until the disc snaps into place. 6. Close the disc tray. Turn on the drive bezel to position it over the tray spindle. Pull out the tray (2). 4.


