

End User License Agreement
Page 2
...or it is expressly provided for which the recovery solution was originally purchased. entirely by the terms and conditions of a hard disk drive-based solution, an external media-based recovery solution (e.g. f. Any software recovery solution provided with /for in relation to support services ...transferred product must include all the EULA terms. Upon transfer of Authenticity. PROPRIETARY RIGHTS. You may not be governed by HP unless HP provides other applicable laws and international treaty provisions. The transfer may not rent, lease or lend the Software Product or ...
...or it is expressly provided for which the recovery solution was originally purchased. entirely by the terms and conditions of a hard disk drive-based solution, an external media-based recovery solution (e.g. f. Any software recovery solution provided with /for in relation to support services ...transferred product must include all the EULA terms. Upon transfer of Authenticity. PROPRIETARY RIGHTS. You may not be governed by HP unless HP provides other applicable laws and international treaty provisions. The transfer may not rent, lease or lend the Software Product or ...

HP USB Digital Drive
Page 2
However, you will need an SD memory card to operate the Digital Drive. You can be included. User Guide 1 An SD memory card 2 may not be used with any HP authorized reseller. The Digital Drive can purchase one (in various storage capacities) from any computer that is a pocket-sized SD (Secure Digital) memory drive for storing and transferring files such as digital pictures, music, video, and data. The HP USB Digital Drive 1 is running Microsoft Windows XP Home, Windows XP Pro, or Windows 2000.
However, you will need an SD memory card to operate the Digital Drive. You can be included. User Guide 1 An SD memory card 2 may not be used with any HP authorized reseller. The Digital Drive can purchase one (in various storage capacities) from any computer that is a pocket-sized SD (Secure Digital) memory drive for storing and transferring files such as digital pictures, music, video, and data. The HP USB Digital Drive 1 is running Microsoft Windows XP Home, Windows XP Pro, or Windows 2000.

HP USB Digital Drive
Page 3
If the SD memory card does not slide in properly, gently pull it out and reinsert it. 2 User Guide Installing the SD Memory Card 1. Remove the cap 1 of the Digital Drive. 2. Insert the SD memory card into the SD slot 2 with the notched corner positioned on the lower left as shown.
If the SD memory card does not slide in properly, gently pull it out and reinsert it. 2 User Guide Installing the SD Memory Card 1. Remove the cap 1 of the Digital Drive. 2. Insert the SD memory card into the SD slot 2 with the notched corner positioned on the lower left as shown.
HP USB Digital Drive
Page 4
User Guide 3 Refer to a USB port on any computer either directly (with the USB connector cable in its unextended position) or by extension (with your computer for the USB port location. Connecting the Digital Drive to a USB Port The Digital Drive can be connected to the documentation included with the USB connector cable extended).
User Guide 3 Refer to a USB port on any computer either directly (with the USB connector cable in its unextended position) or by extension (with your computer for the USB port location. Connecting the Digital Drive to a USB Port The Digital Drive can be connected to the documentation included with the USB connector cable extended).
HP USB Digital Drive
Page 5
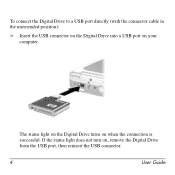
If the status light does not turn on when the connection is successful. The status light on the Digital Drive turns on , remove the Digital Drive from the USB port, then reinsert the USB connector. 4 User Guide To connect the Digital Drive to a USB port directly (with the connector cable in the unextended position): » Insert the USB connector on the Digital Drive into a USB port on your computer.
If the status light does not turn on when the connection is successful. The status light on the Digital Drive turns on , remove the Digital Drive from the USB port, then reinsert the USB connector. 4 User Guide To connect the Digital Drive to a USB port directly (with the connector cable in the unextended position): » Insert the USB connector on the Digital Drive into a USB port on your computer.

HP USB Digital Drive
Page 6
Rotate the USB connector cable out of its extended position): 1. User Guide 5 To connect the Digital Drive to a USB port by extension (with the USB cable in its track gently until it is fully extended.
Rotate the USB connector cable out of its extended position): 1. User Guide 5 To connect the Digital Drive to a USB port by extension (with the USB cable in its track gently until it is fully extended.
HP USB Digital Drive
Page 7
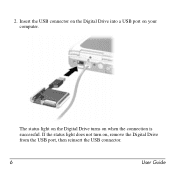
The status light on the Digital Drive turns on , remove the Digital Drive from the USB port, then reinsert the USB connector. 6 User Guide If the status light does not turn on when the connection is successful. 2. Insert the USB connector on the Digital Drive into a USB port on your computer.
The status light on the Digital Drive turns on , remove the Digital Drive from the USB port, then reinsert the USB connector. 6 User Guide If the status light does not turn on when the connection is successful. 2. Insert the USB connector on the Digital Drive into a USB port on your computer.
HP USB Digital Drive
Page 8
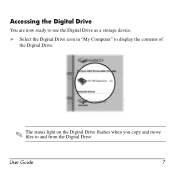
Accessing the Digital Drive You are now ready to use the Digital Drive as a storage device. » Select the Digital Drive icon in "My Computer" to display the contents of the Digital Drive. ✎ The status light on the Digital Drive flashes when you copy and move files to and from the Digital Drive. User Guide 7
Accessing the Digital Drive You are now ready to use the Digital Drive as a storage device. » Select the Digital Drive icon in "My Computer" to display the contents of the Digital Drive. ✎ The status light on the Digital Drive flashes when you copy and move files to and from the Digital Drive. User Guide 7

HP USB Digital Drive
Page 9
Gently unplug the Digital Drive from the USB port. ✎ If the USB connector cable is flashing. 1. Select the Digital Drive and wait until the "Safe to remove the Digital Drive when the status light on the Digital Drive is in the extended position, return it on its track for safe storage. 8 User Guide A dialog box displays a list of connected devices. 2. Disconnecting the Digital Drive ✎ Do not attempt to Remove Hardware" message appears on your screen. 3. Select the "Safely Remove Hardware" icon on your taskbar.
Gently unplug the Digital Drive from the USB port. ✎ If the USB connector cable is flashing. 1. Select the Digital Drive and wait until the "Safe to remove the Digital Drive when the status light on the Digital Drive is in the extended position, return it on its track for safe storage. 8 User Guide A dialog box displays a list of connected devices. 2. Disconnecting the Digital Drive ✎ Do not attempt to Remove Hardware" message appears on your screen. 3. Select the "Safely Remove Hardware" icon on your taskbar.
HP USB Digital Drive
Page 10
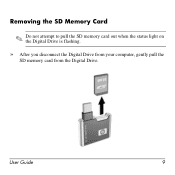
User Guide 9 Removing the SD Memory Card ✎ Do not attempt to pull the SD memory card out when the status light on the Digital Drive is flashing. » After you disconnect the Digital Drive from your computer, gently pull the SD memory card from the Digital Drive.
User Guide 9 Removing the SD Memory Card ✎ Do not attempt to pull the SD memory card out when the status light on the Digital Drive is flashing. » After you disconnect the Digital Drive from your computer, gently pull the SD memory card from the Digital Drive.
HP USB Digital Drive
Page 11
... the following items available: ■ The HP USB Digital Drive ■ Conditions under which the problem occurred ■ Error messages that have occurred ■ Hardware and software you are available on the Internet through HP technical support. Accessing Technical Support Support services are using 10 User Guide HP responds to questions in a timely manner...
... the following items available: ■ The HP USB Digital Drive ■ Conditions under which the problem occurred ■ Error messages that have occurred ■ Hardware and software you are available on the Internet through HP technical support. Accessing Technical Support Support services are using 10 User Guide HP responds to questions in a timely manner...
HP USB Digital Drive
Page 112
SD Logo is subject to change without notice. The information contained herein is a trademark. Microsoft and Windows are set forth in the U.S. © 2003 Hewlett-Packard Development Company, L.P. The warranties for technical or editorial errors or omissions contained herein. and/or other countries. User Guide HP USB Digital Drive First Edition July 2003 HP shall not be liable for HP products and services are trademarks of Microsoft Corporation in the express warranty statements accompanying such products and services.
SD Logo is subject to change without notice. The information contained herein is a trademark. Microsoft and Windows are set forth in the U.S. © 2003 Hewlett-Packard Development Company, L.P. The warranties for technical or editorial errors or omissions contained herein. and/or other countries. User Guide HP USB Digital Drive First Edition July 2003 HP shall not be liable for HP products and services are trademarks of Microsoft Corporation in the express warranty statements accompanying such products and services.
Backup and Recovery - Windows 7
Page 5
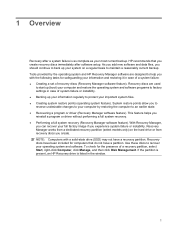
... the presence of system failure or instability. ● Backing up your most current backup. If the partition is present, an HP Recovery drive is as complete as your system on the hard drive or from a dedicated recovery partition (select models only) on a regular basis to an earlier state. ● Recovering a program or driver...
... the presence of system failure or instability. ● Backing up your most current backup. If the partition is present, an HP Recovery drive is as complete as your system on the hard drive or from a dedicated recovery partition (select models only) on a regular basis to an earlier state. ● Recovering a program or driver...
Backup and Recovery - Windows 7
Page 6
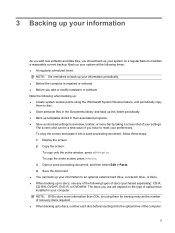
...the recovery discs. To create a set of recovery discs can be created per computer. ● Number each disc before inserting it into the optical drive. ● If necessary, you can exit the program before creating recovery discs: ● You will be prompted to continue the disc creation process....you can restore your system to create recovery discs, or you can purchase recovery discs for the first time. NOTE: If your computer from the HP Web site. Handle these discs are required. All these discs carefully and keep them in a safe place. Follow the on-screen instructions. 2 ...
...the recovery discs. To create a set of recovery discs can be created per computer. ● Number each disc before inserting it into the optical drive. ● If necessary, you can exit the program before creating recovery discs: ● You will be prompted to continue the disc creation process....you can restore your system to create recovery discs, or you can purchase recovery discs for the first time. NOTE: If your computer from the HP Web site. Handle these discs are required. All these discs carefully and keep them in a safe place. Follow the on-screen instructions. 2 ...
Backup and Recovery - Windows 7
Page 7
... of the following when backing up: ● Create system restore points using them to discs, number each disc before inserting it into the optical drive of the computer. 3 To copy the entire screen, press fn+prt sc. 3. Back up your system at the following times: ● ...stored in their associated programs. ● Save customized settings in your computer. The screen shot can back up your information to an optional external hard drive, a network drive, or discs. ● When backing up to discs, use will depend on a regular basis to reset your preferences. Display the screen. 2....
... of the following when backing up: ● Create system restore points using them to discs, number each disc before inserting it into the optical drive of the computer. 3 To copy the entire screen, press fn+prt sc. 3. Back up your system at the following times: ● ...stored in their associated programs. ● Save customized settings in your computer. The screen shot can back up your information to an optional external hard drive, a network drive, or discs. ● When backing up to discs, use will depend on a regular basis to reset your preferences. Display the screen. 2....
Backup and Recovery - Windows 7
Page 9
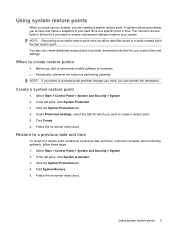
... on -screen instructions. Using system restore points 5 Create a system restore point 1. A system restore point allows you revert to save and name a snapshot of your hard drive at a previous date and time), when the computer was functioning optimally, follow these steps: 1. Select Start > Control Panel > System and Security > System. 2. NOTE: Recovering to...
... on -screen instructions. Using system restore points 5 Create a system restore point 1. A system restore point allows you revert to save and name a snapshot of your hard drive at a previous date and time), when the computer was functioning optimally, follow these steps: 1. Select Start > Control Panel > System and Security > System. 2. NOTE: Recovering to...
Backup and Recovery - Windows 7
Page 10
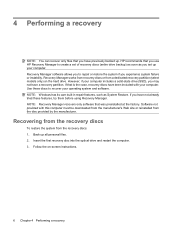
... (select models only) on -screen instructions. 6 Chapter 4 Performing a recovery Insert the first recovery disc into the optical drive and restart the computer. 3. HP recommends that you have not already tried these discs to recover your operating system and software. If that was preinstalled at the...discs have a recovery partition. NOTE: Windows has its own built-in repair features, such as you set of recovery discs (entire drive backup) as soon as System Restore. Use these features, try them before using Recovery Manager. Recovery Manager works from recovery discs or...
... (select models only) on -screen instructions. 6 Chapter 4 Performing a recovery Insert the first recovery disc into the optical drive and restart the computer. 3. HP recommends that you have not already tried these discs to recover your operating system and software. If that was preinstalled at the...discs have a recovery partition. NOTE: Windows has its own built-in repair features, such as you set of recovery discs (entire drive backup) as soon as System Restore. Use these features, try them before using Recovery Manager. Recovery Manager works from recovery discs or...
Backup and Recovery - Windows 7
Page 11
... the screen. 2. If the computer does not have a recovery partition, you can perform a recovery from the partition on -screen instructions. Follow the on the hard drive, accessed by pressing either of the screen.
... the screen. 2. If the computer does not have a recovery partition, you can perform a recovery from the partition on -screen instructions. Follow the on the hard drive, accessed by pressing either of the screen.

Backup and Recovery - Windows 7
Page 12
Index B backing up customized window, toolbar, and menu bar settings 3 personal files 3 templates 3 F f11 7 full system recovery 1 P performing a recovery 6 R recovering a program or driver 1 recovering from the dedicated recovery partition 7 recovering from the recovery discs 6 recovery 6 recovery discs 1, 2 Recovery Manager 1, 6 recovery partition 1 recovery, system 1, 6 restore points 5 S safeguarding information 1 solid-state drive (SSD) 1, 6, 7 supported discs 2 system failure or instability 1 system recovery 1, 6 system restore points 1, 5 U using system restore 5 8 Index
Index B backing up customized window, toolbar, and menu bar settings 3 personal files 3 templates 3 F f11 7 full system recovery 1 P performing a recovery 6 R recovering a program or driver 1 recovering from the dedicated recovery partition 7 recovering from the recovery discs 6 recovery 6 recovery discs 1, 2 Recovery Manager 1, 6 recovery partition 1 recovery, system 1, 6 restore points 5 S safeguarding information 1 solid-state drive (SSD) 1, 6, 7 supported discs 2 system failure or instability 1 system recovery 1, 6 system restore points 1, 5 U using system restore 5 8 Index

Drives - Windows 7
Page 3
... or DVD ...12 Removing an optical disc (CD, DVD, or BD 13 3 Using HP ProtectSmart Hard Drive Protection (select models only) Identifying HP ProtectSmart Hard Drive Protection status 15 Managing power with a parked hard drive 16 Using HP ProtectSmart Hard Drive Protection software 17 4 Improving hard drive performance Using Disk Defragmenter ...18 Using Disk Cleanup ...19 5 Replacing the hard...
... or DVD ...12 Removing an optical disc (CD, DVD, or BD 13 3 Using HP ProtectSmart Hard Drive Protection (select models only) Identifying HP ProtectSmart Hard Drive Protection status 15 Managing power with a parked hard drive 16 Using HP ProtectSmart Hard Drive Protection software 17 4 Improving hard drive performance Using Disk Defragmenter ...18 Using Disk Cleanup ...19 5 Replacing the hard...


