
Drives - Windows 7
Page 24
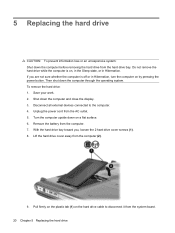
To remove the hard drive: 1. Shut down the computer through the operating system. Unplug the power cord from the computer (2). 9. Disconnect all external devices connected to disconnect it from the system board. 20 Chapter 5 Replacing the hard drive Turn the computer upside ... you , loosen the 2 hard drive cover screws (1). 8. With the hard drive bay toward you are not sure whether the computer is on by pressing the power button. Then shut down the computer and close the display. 3.
To remove the hard drive: 1. Shut down the computer through the operating system. Unplug the power cord from the computer (2). 9. Disconnect all external devices connected to disconnect it from the system board. 20 Chapter 5 Replacing the hard drive Turn the computer upside ... you , loosen the 2 hard drive cover screws (1). 8. With the hard drive bay toward you are not sure whether the computer is on by pressing the power button. Then shut down the computer and close the display. 3.
Memory Modules - Windows Vista
Page 5
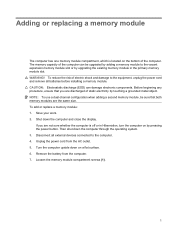
...risk of the computer. If you are the same size. Unplug the power cord from the computer. 7. Loosen the memory module compartment screws (1). 1 Adding...module: 1. The memory capacity of static electricity by adding a memory module to the equipment, unplug the power cord and remove all external devices connected to the computer. 4. Then shut down the computer and close the ...display. Turn the computer upside down on by pressing the power button. Before beginning any procedure, ensure that both memory modules are discharged of the computer can...
...risk of the computer. If you are the same size. Unplug the power cord from the computer. 7. Loosen the memory module compartment screws (1). 1 Adding...module: 1. The memory capacity of static electricity by adding a memory module to the equipment, unplug the power cord and remove all external devices connected to the computer. 4. Then shut down the computer and close the ...display. Turn the computer upside down on by pressing the power button. Before beginning any procedure, ensure that both memory modules are discharged of the computer can...
Notebook Tour - Windows 7
Page 20
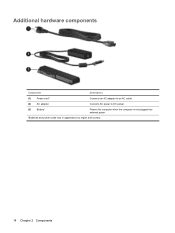
Additional hardware components Component Description (1) Power cord* Connects an AC adapter to an AC outlet. (2) AC adapter Converts AC power to DC power. (3) Battery* Powers the computer when the computer is not plugged into external power. *Batteries and power cords vary in appearance by region and country. 14 Chapter 2 Components
Additional hardware components Component Description (1) Power cord* Connects an AC adapter to an AC outlet. (2) AC adapter Converts AC power to DC power. (3) Battery* Powers the computer when the computer is not plugged into external power. *Batteries and power cords vary in appearance by region and country. 14 Chapter 2 Components

Notebook Tour - Windows 7
Page 23
... Symbols/Numerics 1394 port, identifying 10 A AC adapter, identifying 14 antennas 13 applications key, Windows 6 audio-in (microphone) jack, identifying 8 audio-...11, 15 hard drive 11 Bluetooth label 16 buttons power 5 TouchPad 3 TouchPad on/off 3 volume mute 6 front 8 left-side 10 rear 9 right-side 9 top 3 connectors, power 9 cord, power 14 D Digital Media Slot, identifying 10 display cleaning...12 H hard drive bay, identifying 11 HDMI port, identifying 10 headphone (audio-out) jack 8 HP Mobile Broadband Module serial number label 16 I IEEE 1394 port, identifying 10 infrared lens, identifying 8...
... Symbols/Numerics 1394 port, identifying 10 A AC adapter, identifying 14 antennas 13 applications key, Windows 6 audio-in (microphone) jack, identifying 8 audio-...11, 15 hard drive 11 Bluetooth label 16 buttons power 5 TouchPad 3 TouchPad on/off 3 volume mute 6 front 8 left-side 10 rear 9 right-side 9 top 3 connectors, power 9 cord, power 14 D Digital Media Slot, identifying 10 display cleaning...12 H hard drive bay, identifying 11 HDMI port, identifying 10 headphone (audio-out) jack 8 HP Mobile Broadband Module serial number label 16 I IEEE 1394 port, identifying 10 infrared lens, identifying 8...

Notebook Tour - Windows 7
Page 24
...memory module 11 security cable 9 speakers, identifying 5 Windows applications key, identifying 6 Windows logo key, identifying 6 wireless antennas 13 wireless certification label 16 wireless light, identifying 5 WLAN device 16 WLAN label 16 WLAN module compartment, identifying 11 N num lock..., identifying 9 P ports 1394 10 eSATA/USB 10 expansion 10 external monitor 10 HDMI 10 USB 9, 10 power button, identifying 5 power connector, identifying 9 power cord, identifying 14 power light, identifying 4, 8 Product Key 15 product name and number, computer 15 T TouchPad buttons, identifying 3 ...
...memory module 11 security cable 9 speakers, identifying 5 Windows applications key, identifying 6 Windows logo key, identifying 6 wireless antennas 13 wireless certification label 16 wireless light, identifying 5 WLAN device 16 WLAN label 16 WLAN module compartment, identifying 11 N num lock..., identifying 9 P ports 1394 10 eSATA/USB 10 expansion 10 external monitor 10 HDMI 10 USB 9, 10 power button, identifying 5 power connector, identifying 9 power cord, identifying 14 power light, identifying 4, 8 Product Key 15 product name and number, computer 15 T TouchPad buttons, identifying 3 ...

Software Update - Windows Vista and Windows 7
Page 6
...displayed, use the Setup Utility for Startup Menu" message is later than those currently installed on the HP Web site that is displayed in Windows) or by unplugging the power cord from the computer by opening the Setup Utility. Do not download or install a BIOS update while ..., first determine what BIOS version you want to reliable external power using the AC adapter. To download a BIOS update: 1. You may need to an optional power source. Do not insert, remove, connect, or disconnect any device, cable, or cord. Follow the instructions on or restarting the computer.
...displayed, use the Setup Utility for Startup Menu" message is later than those currently installed on the HP Web site that is displayed in Windows) or by unplugging the power cord from the computer by opening the Setup Utility. Do not download or install a BIOS update while ..., first determine what BIOS version you want to reliable external power using the AC adapter. To download a BIOS update: 1. You may need to an optional power source. Do not insert, remove, connect, or disconnect any device, cable, or cord. Follow the instructions on or restarting the computer.
Wireless (Select Models Only) - Windows 7
Page 18
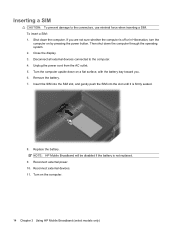
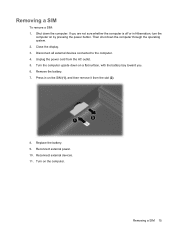
..., and gently push the SIM into the slot until it is off or in Hibernation, turn the computer on by pressing the power button. Unplug the power cord from the AC outlet. 5. Turn on a flat surface, with the battery bay toward you are not sure whether the computer ...is firmly seated. 8. Then shut down the computer. Replace the battery. If you . 6. Remove the battery. 7. Reconnect external devices. 11. Close the display. 3. NOTE: HP Mobile ...
..., and gently push the SIM into the slot until it is off or in Hibernation, turn the computer on by pressing the power button. Unplug the power cord from the AC outlet. 5. Turn on a flat surface, with the battery bay toward you are not sure whether the computer ...is firmly seated. 8. Then shut down the computer. Replace the battery. If you . 6. Remove the battery. 7. Reconnect external devices. 11. Close the display. 3. NOTE: HP Mobile ...
Wireless (Select Models Only) - Windows 7
Page 19
... is off or in on the computer. Close the display. 3. Remove the battery. 7. Replace the battery. 9. Then shut down the computer. Unplug the power cord from the slot (2). 8. Reconnect external power. 10. Disconnect all external devices connected to the computer. 4. Shut down the computer through the operating system. 2. If you . 6. Press in Hibernation...
... is off or in on the computer. Close the display. 3. Remove the battery. 7. Replace the battery. 9. Then shut down the computer. Unplug the power cord from the slot (2). 8. Reconnect external power. 10. Disconnect all external devices connected to the computer. 4. Shut down the computer through the operating system. 2. If you . 6. Press in Hibernation...

Power Management - Windows 7
Page 11
... outlet. Do not disable the power cord grounding pin, for example, by unplugging the power cord from the AC outlet (not by attaching a 2-pin adapter. Plug the power cord into an AC outlet (3). To reduce the risk of the power cord into the AC adapter (2). 3. Disconnect power from the computer by unplugging the power cord from the computer). To connect the...
... outlet. Do not disable the power cord grounding pin, for example, by unplugging the power cord from the AC outlet (not by attaching a 2-pin adapter. Plug the power cord into an AC outlet (3). To reduce the risk of the power cord into the AC adapter (2). 3. Disconnect power from the computer by unplugging the power cord from the computer). To connect the...

