HP Color LaserJet CP1510 Series - Software Technical Reference
Page 94
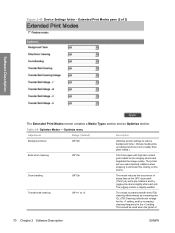
... Optimize section. Table 2-8 Optimize Modes - Optimize menu Adjustment Range (*default) Description Background toner Off*/On Optimize printer settings to eliminate this coating on the imaging drums and degrades the image quality. Figure 2-45 Device Settings folder - The jogging motion is slightly audible. Extended... (2 of 70 Chapter 2 Software Description ENWW The printer will use extra cleaning rotations when stopping to reduce background toner. (Glossy media picks up background toner more readily than plain media.) Extra drum cleaning Off*/On Talc from paper with high talc ...
... Optimize section. Table 2-8 Optimize Modes - Optimize menu Adjustment Range (*default) Description Background toner Off*/On Optimize printer settings to eliminate this coating on the imaging drums and degrades the image quality. Figure 2-45 Device Settings folder - The jogging motion is slightly audible. Extended... (2 of 70 Chapter 2 Software Description ENWW The printer will use extra cleaning rotations when stopping to reduce background toner. (Glossy media picks up background toner more readily than plain media.) Extra drum cleaning Off*/On Talc from paper with high talc ...
HP Color LaserJet CP1510 Series - Software Technical Reference
Page 95
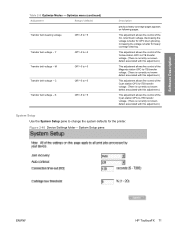
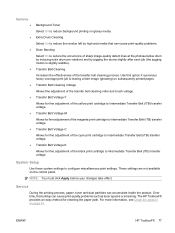
...no known defect associated with this adjustment.) System Setup Use the System Setup pane to change the system defaults for the printer. Increasing the voltage is currently no known defect associated with this adjustment.) This adjustment allows fine control of the Cyan ...control of the Magenta station OPC-to -ITB transfer voltage. (There is better for OPC drum ghosting. M Transfer belt voltage - Software Description Table 2-8 Optimize Modes - System Setup pane ENWW HP ToolboxFX 71 Decreasing the voltage is better for heavy coverage cleaning. C Transfer belt voltage ...
...no known defect associated with this adjustment.) System Setup Use the System Setup pane to change the system defaults for the printer. Increasing the voltage is currently no known defect associated with this adjustment.) This adjustment allows fine control of the Cyan ...control of the Magenta station OPC-to -ITB transfer voltage. (There is better for OPC drum ghosting. M Transfer belt voltage - Software Description Table 2-8 Optimize Modes - System Setup pane ENWW HP ToolboxFX 71 Decreasing the voltage is better for heavy coverage cleaning. C Transfer belt voltage ...

HP Color LaserJet CP1510 Series - Software Technical Reference
Page 332
...238, 240 Macintosh settings 282 Paper Options 190 Paper/Quality tab 189 PostScript Passthrough 232 presets (Macintosh) 282 Printer Features tab 174 Services tab 221 settings 236 version numbers 23 Drum low threshold settings 72 duplexing Print on Both Sides (Manually) check box 209 duplexing unit custom paper sizes...31 Euro symbol 231 Event Log page, EWS (Windows) 98, 266 Event Log screen, HP ToolboxFX 44 EWS (Macintosh) about 244, 255 accessing 255 EWS (Windows) accessing 88, 255 Advanced page 113, 281 Color Usage Job Log 97, 265 Device Configuration page 91, 259 Device Information page 99, ...
...238, 240 Macintosh settings 282 Paper Options 190 Paper/Quality tab 189 PostScript Passthrough 232 presets (Macintosh) 282 Printer Features tab 174 Services tab 221 settings 236 version numbers 23 Drum low threshold settings 72 duplexing Print on Both Sides (Manually) check box 209 duplexing unit custom paper sizes...31 Euro symbol 231 Event Log page, EWS (Windows) 98, 266 Event Log screen, HP ToolboxFX 44 EWS (Macintosh) about 244, 255 accessing 255 EWS (Windows) accessing 88, 255 Advanced page 113, 281 Color Usage Job Log 97, 265 Device Configuration page 91, 259 Device Information page 99, ...
HP Color LaserJet CP1510 Series Printer - Manage and Maintain
Page 8
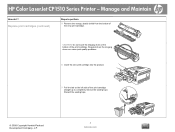
HP Color LaserJet CP1510 Series Printer - Manage and Maintain How do I? Discard the sealing tape. © 2008 Copyright Hewlett-Packard Development Company, L.P. 2 www.hp.com Replace print cartridges (continued) Steps to perform 5 Remove the orange, plastic shield from the bottom of the print cartridge...remove the sealing tape. Fingerprints on the imaging drum can cause print-quality problems. 6 Insert the new print cartridge into the product. 7 Pull the tab on the bottom of the print cartridge. CAUTION: Do not touch the imaging drum on the left side of the new print ...
HP Color LaserJet CP1510 Series Printer - Manage and Maintain How do I? Discard the sealing tape. © 2008 Copyright Hewlett-Packard Development Company, L.P. 2 www.hp.com Replace print cartridges (continued) Steps to perform 5 Remove the orange, plastic shield from the bottom of the print cartridge...remove the sealing tape. Fingerprints on the imaging drum can cause print-quality problems. 6 Insert the new print cartridge into the product. 7 Pull the tab on the bottom of the print cartridge. CAUTION: Do not touch the imaging drum on the left side of the new print ...

HP Color LaserJet CP1510 Series - User Guide
Page 86
... the fuser temperature to make sure that correspond to the various media types found in the printer driver. Dry paper. Increases the transfer bias voltage to factory default settings, select Restore modes... transfer bias voltage for duplex print jobs. This mode has the same options as drum and transfer belt cleaning. Decreases the fuser temperature to prevent print-quality transfer problems ...fusing. Extended Print Modes CAUTION: These advanced settings should only be a problem for each color that is applied to the page to prevent print-quality problems like toner scatter in high ...
... the fuser temperature to make sure that correspond to the various media types found in the printer driver. Dry paper. Increases the transfer bias voltage to factory default settings, select Restore modes... transfer bias voltage for duplex print jobs. This mode has the same options as drum and transfer belt cleaning. Decreases the fuser temperature to prevent print-quality transfer problems ...fusing. Extended Print Modes CAUTION: These advanced settings should only be a problem for each color that is applied to the page to prevent print-quality problems like toner scatter in high ...
HP Color LaserJet CP1510 Series - User Guide
Page 87
...-rotations and by jogging the drums slightly after each job (the jogging motion is leaving a faint image (ghosting) on glossy media. Transfer Belt Cleaning Voltage Allows fine adjustment of the transfer belt cleaning process. The HP ToolboxFX provides an easy method for... Transfer Belt Voltage-C Allows for fine adjustment of the yellow print cartridge to reduce background printing on subsequently printed pages. ENWW HP ToolboxFX 77 Transfer Belt Voltage-M Allows for fine adjustment of the black print cartridge to configure miscellaneous print settings. Service During...
...-rotations and by jogging the drums slightly after each job (the jogging motion is leaving a faint image (ghosting) on glossy media. Transfer Belt Cleaning Voltage Allows fine adjustment of the transfer belt cleaning process. The HP ToolboxFX provides an easy method for... Transfer Belt Voltage-C Allows for fine adjustment of the yellow print cartridge to reduce background printing on subsequently printed pages. ENWW HP ToolboxFX 77 Transfer Belt Voltage-M Allows for fine adjustment of the black print cartridge to configure miscellaneous print settings. Service During...

HP Color LaserJet CP1510 Series - User Guide
Page 96
5. Fingerprints on the left side of the print cartridge straight up to completely remove the sealing tape. Pull the tab on the imaging drum can cause print-quality problems. 6. Discard the sealing tape. 86 Chapter 9 Manage and maintain ENWW Insert the new print cartridge into the product. 7. CAUTION: Do not touch the imaging drum on the bottom of the new print cartridge. Remove the orange, plastic shield from the bottom of the print cartridge.
5. Fingerprints on the left side of the print cartridge straight up to completely remove the sealing tape. Pull the tab on the imaging drum can cause print-quality problems. 6. Discard the sealing tape. 86 Chapter 9 Manage and maintain ENWW Insert the new print cartridge into the product. 7. CAUTION: Do not touch the imaging drum on the bottom of the new print cartridge. Remove the orange, plastic shield from the bottom of the print cartridge.


