
Drives - Linux
Page 20
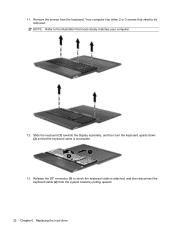
Your computer has either 2 or 3 screws that need to the illustration that the keyboard cable is attached, and then disconnect the keyboard cable (2) from the keyboard. Slide the keyboard (1) towards the display assembly, and then turn the keyboard upside down (2) so that most closely matches your computer. 12. Remove the screws from the system board by pulling upward. 16 Chapter 4 Replacing the hard drive NOTE: Refer to be removed. Release the ZIF connector (1) to which the keyboard cable is accessible. 13. 11.
Your computer has either 2 or 3 screws that need to the illustration that the keyboard cable is attached, and then disconnect the keyboard cable (2) from the keyboard. Slide the keyboard (1) towards the display assembly, and then turn the keyboard upside down (2) so that most closely matches your computer. 12. Remove the screws from the system board by pulling upward. 16 Chapter 4 Replacing the hard drive NOTE: Refer to be removed. Release the ZIF connector (1) to which the keyboard cable is accessible. 13. 11.
Drives - Windows Vista
Page 26
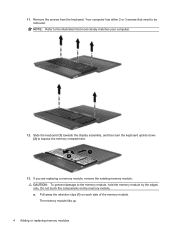
Release the ZIF connector (1) to the illustration that most closely matches your computer. 12. 11. NOTE: Refer to which the keyboard cable is accessible. 13. Remove the screws from the system board by pulling upward. 22 Chapter 6 Replacing the hard drive Your computer has either 2 or 3 screws that the keyboard cable is attached, and then disconnect the keyboard cable (2) from the keyboard. Slide the keyboard (1) towards the display assembly, and then turn the keyboard upside down (2) so that need to be removed.
Release the ZIF connector (1) to the illustration that most closely matches your computer. 12. 11. NOTE: Refer to which the keyboard cable is accessible. 13. Remove the screws from the system board by pulling upward. 22 Chapter 6 Replacing the hard drive Your computer has either 2 or 3 screws that the keyboard cable is attached, and then disconnect the keyboard cable (2) from the keyboard. Slide the keyboard (1) towards the display assembly, and then turn the keyboard upside down (2) so that need to be removed.

Drives - Windows XP
Page 26
Your computer has either 2 or 3 screws that most closely matches your computer. 12. Slide the keyboard (1) towards the display assembly, and then turn the keyboard upside down (2) so that the keyboard cable is attached, and then disconnect the keyboard cable (2) from the keyboard. Release the ZIF connector (1) to be removed. Remove the screws from the system board by pulling upward. 22 Chapter 6 Replacing the hard drive NOTE: Refer to the illustration that need to which the keyboard cable is accessible. 13. 11.
Your computer has either 2 or 3 screws that most closely matches your computer. 12. Slide the keyboard (1) towards the display assembly, and then turn the keyboard upside down (2) so that the keyboard cable is attached, and then disconnect the keyboard cable (2) from the keyboard. Release the ZIF connector (1) to be removed. Remove the screws from the system board by pulling upward. 22 Chapter 6 Replacing the hard drive NOTE: Refer to the illustration that need to which the keyboard cable is accessible. 13. 11.
Memory Modules - Linux
Page 8
Slide the keyboard (1) towards the display assembly, and then turn the keyboard upside down (2) to the memory module, hold the memory module by the edges only. Pull away the retention clips (1) on the memory module. If you ... side of the memory module. NOTE: Refer to be removed. The memory module tilts up. 4 Adding or replacing memory modules Remove the screws from the keyboard. 11. Your computer has either 2 or 3 screws that need to the illustration that most closely matches your computer. 12.
Slide the keyboard (1) towards the display assembly, and then turn the keyboard upside down (2) to the memory module, hold the memory module by the edges only. Pull away the retention clips (1) on the memory module. If you ... side of the memory module. NOTE: Refer to be removed. The memory module tilts up. 4 Adding or replacing memory modules Remove the screws from the keyboard. 11. Your computer has either 2 or 3 screws that need to the illustration that most closely matches your computer. 12.

Memory Modules - Windows Vista
Page 8
... clips (1) on the memory module. The memory module tilts up. 4 Adding or replacing memory modules Remove the screws from the keyboard. Slide the keyboard (1) towards the display assembly, and then turn the keyboard upside down (2) to the illustration that need to the memory module, hold the memory module by the edges only. Do not...
... clips (1) on the memory module. The memory module tilts up. 4 Adding or replacing memory modules Remove the screws from the keyboard. Slide the keyboard (1) towards the display assembly, and then turn the keyboard upside down (2) to the illustration that need to the memory module, hold the memory module by the edges only. Do not...

Memory Modules - Windows XP
Page 8
Remove the screws from the keyboard. Your computer has either 2 or 3 screws that most closely matches your computer. 12. Pull away the retention clips (1) on the memory module. Do not touch ... removed. If you are replacing a memory module, remove the existing memory module: CAUTION: To prevent damage to expose the memory compartment. 13. 11. Slide the keyboard (1) towards the display assembly, and then turn the keyboard upside down (2) to the memory module, hold the memory module by the edges only.
Remove the screws from the keyboard. Your computer has either 2 or 3 screws that most closely matches your computer. 12. Pull away the retention clips (1) on the memory module. Do not touch ... removed. If you are replacing a memory module, remove the existing memory module: CAUTION: To prevent damage to expose the memory compartment. 13. 11. Slide the keyboard (1) towards the display assembly, and then turn the keyboard upside down (2) to the memory module, hold the memory module by the edges only.


