
Service Manual
Page 6
... Replacing and recycling supplies 33 Replacing the print cartridges 33 HP policy on non-HP supplies 33 HP anti-counterfeit website 33 Cleaning the printer ...34 To clean the printer at the printer 34 To clean the fuser using HP Toolbox 35 Cleaning spilled toner ...35 Calibrating the printer ...36 To calibrate the printer at the printer 36 To calibrate the printer from the HP...
... Replacing and recycling supplies 33 Replacing the print cartridges 33 HP policy on non-HP supplies 33 HP anti-counterfeit website 33 Cleaning the printer ...34 To clean the printer at the printer 34 To clean the fuser using HP Toolbox 35 Cleaning spilled toner ...35 Calibrating the printer ...36 To calibrate the printer at the printer 36 To calibrate the printer from the HP...

Service Manual
Page 7
... chart ...58 Printer calibration ...59 5 Removal and replacement Overview...62 Service approach...63 Pre-service procedures...63 Removal and replacement procedures 64 Print cartridge replacement 64 ETB removal and replacement 66 Fuser removal and replacement 74 Formatter removal and replacement 82 DC controller removal and replacement 86 Separation pad removal and replacement 88 Paper pickup roller removal and replacement 89 Control...
... chart ...58 Printer calibration ...59 5 Removal and replacement Overview...62 Service approach...63 Pre-service procedures...63 Removal and replacement procedures 64 Print cartridge replacement 64 ETB removal and replacement 66 Fuser removal and replacement 74 Formatter removal and replacement 82 DC controller removal and replacement 86 Separation pad removal and replacement 88 Paper pickup roller removal and replacement 89 Control...
Service Manual
Page 11
HP Color LaserJet 2600n printer software 11 Envelope specifications...15 Envelope size ranges...16 Tray 1 and Tray 2 specifications...17 Optional Tray 3 specifications...18 Print cartridge life ...32 Basic operational sequence ...38 Motor specifications ...40 User-replaceable parts...62 Troubleshooting ...7-7 Table 7-8 Table 7-9 Table 7-10 Table 7-11 Table 7-12 Table 7-13 Table 7-14 Table 7-15 Printer features...4. List of 3) ...171 Control panel assembly ...175 Main drive assembly ...177 Fuser assembly ...181 PCB assembly location Tray 2 ...185 Tray 2 input tray (cassette) ...187 ENWW ix
HP Color LaserJet 2600n printer software 11 Envelope specifications...15 Envelope size ranges...16 Tray 1 and Tray 2 specifications...17 Optional Tray 3 specifications...18 Print cartridge life ...32 Basic operational sequence ...38 Motor specifications ...40 User-replaceable parts...62 Troubleshooting ...7-7 Table 7-8 Table 7-9 Table 7-10 Table 7-11 Table 7-12 Table 7-13 Table 7-14 Table 7-15 Printer features...4. List of 3) ...171 Control panel assembly ...175 Main drive assembly ...177 Fuser assembly ...181 PCB assembly location Tray 2 ...185 Tray 2 input tray (cassette) ...187 ENWW ix
Service Manual
Page 43
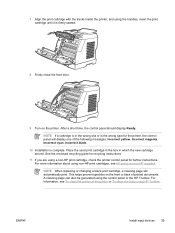
... the enclosed recycling guide for recycling instructions. 11 If you are using a non-HP print cartridge, check the printer control panel for the printer, the control panel will automatically print. NOTE When replacing or changing a black print cartridge, a cleaning page will display one of printed ...documents. ENWW Install input devices 29 For more information about using non-HP print cartridges, see To clean the printer at the printer or To clean the fuser using HP Toolbox. This...
... the enclosed recycling guide for recycling instructions. 11 If you are using a non-HP print cartridge, check the printer control panel for the printer, the control panel will automatically print. NOTE When replacing or changing a black print cartridge, a cleaning page will display one of printed ...documents. ENWW Install input devices 29 For more information about using non-HP print cartridges, see To clean the printer at the printer or To clean the fuser using HP Toolbox. This...

Service Manual
Page 77
... on this printer. ■ Fuser ■ ETB ■ DC Controller ■ Formatter ■ Control Panel display If troubleshooting or a Control Panel message determines that require more information on this printer is installed). Repairs that the failure is not associated with one of optional Tray 3 (if it is limited to repair the printer, but replace the...
... on this printer. ■ Fuser ■ ETB ■ DC Controller ■ Formatter ■ Control Panel display If troubleshooting or a Control Panel message determines that require more information on this printer is installed). Repairs that the failure is not associated with one of optional Tray 3 (if it is limited to repair the printer, but replace the...

Service Manual
Page 88
1 Tabs Fuser removal and replacement Use the following procedure to remove the fuser. 1 Unplug the power cable. 2 Remove the paper delivery tray assembly (RM1-1859-000CN). 74 Chapter 5 Removal and replacement ENWW
1 Tabs Fuser removal and replacement Use the following procedure to remove the fuser. 1 Unplug the power cable. 2 Remove the paper delivery tray assembly (RM1-1859-000CN). 74 Chapter 5 Removal and replacement ENWW

Service Manual
Page 91
9 Lift up and remove the face-down cover (RC1-5173-000CN). 10 Remove the output tray by releasing the tabs. 1 Release tabs 11 Unplug the harness from the fuser motor. ENWW Removal and replacement procedures 77
9 Lift up and remove the face-down cover (RC1-5173-000CN). 10 Remove the output tray by releasing the tabs. 1 Release tabs 11 Unplug the harness from the fuser motor. ENWW Removal and replacement procedures 77

Service Manual
Page 92
12 Open two (2) clips and remove one (1) clip to remove the fuser connector. 1 Open clips 2 Remove clip 1 Fuser connector 2 Remove clip from the board by pulling up 78 Chapter 5 Removal and replacement ENWW
12 Open two (2) clips and remove one (1) clip to remove the fuser connector. 1 Open clips 2 Remove clip 1 Fuser connector 2 Remove clip from the board by pulling up 78 Chapter 5 Removal and replacement ENWW

Service Manual
Page 94
16 Remove the cables from the wiring harness. 17 Remove three (3) screws from the fuser chassis. 1 Three (3) screws 18 Gently rocking if necessary, roll the fuser (RM1-1820-00CN for 110V) or (RM1-1821-000CB for 220V) forward to remove. 80 Chapter 5 Removal and replacement ENWW
16 Remove the cables from the wiring harness. 17 Remove three (3) screws from the fuser chassis. 1 Three (3) screws 18 Gently rocking if necessary, roll the fuser (RM1-1820-00CN for 110V) or (RM1-1821-000CB for 220V) forward to remove. 80 Chapter 5 Removal and replacement ENWW

Service Manual
Page 95
ENWW Removal and replacement procedures 81 NOTE When replacing the right cover, align the tabs on the upper edge of the right cover and lower edge of the face-down cover with their respective slots. 1 Tabs NOTE Connect the control panel cable before replacing the right cover. Use the following procedure to replace the fuser. 1 Align the fuser tabs with their respective holes. 2 Complete replacement by following steps 1 through 18 above in reverse order.
ENWW Removal and replacement procedures 81 NOTE When replacing the right cover, align the tabs on the upper edge of the right cover and lower edge of the face-down cover with their respective slots. 1 Tabs NOTE Connect the control panel cable before replacing the right cover. Use the following procedure to replace the fuser. 1 Align the fuser tabs with their respective holes. 2 Complete replacement by following steps 1 through 18 above in reverse order.

Service Manual
Page 122
...Tray 1, verify that contain fewer pages. If this does not clear the error, replace the fuser. Turn off the device, wait at least 30 seconds, and then turn on the power and... Laser scanners are set to turn the device on the paper. Unexpected paper size error. Use the power switch to the specified media in the tray. Verify that the print settings are not replaceable....Memory is low Press Misprint Press No paper pickup Press Unexpected size in tray X Description The printer is waiting for the media size that you are using. Recommended action Load the paper as...
...Tray 1, verify that contain fewer pages. If this does not clear the error, replace the fuser. Turn off the device, wait at least 30 seconds, and then turn on the power and... Laser scanners are set to turn the device on the paper. Unexpected paper size error. Use the power switch to the specified media in the tray. Verify that the print settings are not replaceable....Memory is low Press Misprint Press No paper pickup Press Unexpected size in tray X Description The printer is waiting for the media size that you are using. Recommended action Load the paper as...

Service Manual
Page 147
...55.1 Error DC controller error. Turn off the power by using the power switch, wait at least 25 minutes, and then turn the device on. Laser scanners are set to pick up a piece of media. Turn off the device, wait at least 30 seconds, and then turn on the device. In...press (SELECT) to continue the job. If this does not clear the error, replace the fuser. Control panel message Manual feed Press Memory is low Press Misprint Press No paper pickup Press Unexpected size in tray X Description The printer is waiting for the device to initialize. Plug the device directly into the wall...
...55.1 Error DC controller error. Turn off the power by using the power switch, wait at least 25 minutes, and then turn the device on. Laser scanners are set to pick up a piece of media. Turn off the device, wait at least 30 seconds, and then turn on the device. In...press (SELECT) to continue the job. If this does not clear the error, replace the fuser. Control panel message Manual feed Press Memory is low Press Misprint Press No paper pickup Press Unexpected size in tray X Description The printer is waiting for the device to initialize. Plug the device directly into the wall...
Service Manual
Page 164
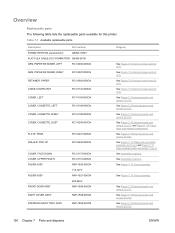
... 150 Chapter 7 Parts and diagrams ENWW See Figure 7-15 Paper pick-up feeder assembly for this printer. See Figure 7-3 External panels and covers (2 of 3). See Figure 7-10 Fuser assembly. See Figure 7-3 External panels and covers (2 of 2). See Figure 7-3 External panels and ...covers (2 of 2). See Assembly locations. and Figure 7-14 Tray 2 input tray internal components. Table 7-1 Available replaceable parts Description Part number FORMATTER PCB (replacement) Q5965-...
... 150 Chapter 7 Parts and diagrams ENWW See Figure 7-15 Paper pick-up feeder assembly for this printer. See Figure 7-3 External panels and covers (2 of 3). See Figure 7-10 Fuser assembly. See Figure 7-3 External panels and covers (2 of 2). See Figure 7-3 External panels and ...covers (2 of 2). See Assembly locations. and Figure 7-14 Tray 2 input tray internal components. Table 7-1 Available replaceable parts Description Part number FORMATTER PCB (replacement) Q5965-...
Service Manual
Page 283
...17, 18 cartridges part numbers 253 recycling 33 replacing 33, 64 status gauge 8 status page, printing 116 storage specifications 255 characters, troubleshooting 140 checklist, troubleshooting 98 cleaning ETB 118, 127 fuser 132 mode 118 printer 34 using HP Toolbox 35, 144 clearing jams common locations ...99 input area 103 inside printer 102 output area 104 cold reset 126 color calibration 36 troubleshooting 142 components locating 6 configuration page 114...
...17, 18 cartridges part numbers 253 recycling 33 replacing 33, 64 status gauge 8 status page, printing 116 storage specifications 255 characters, troubleshooting 140 checklist, troubleshooting 98 cleaning ETB 118, 127 fuser 132 mode 118 printer 34 using HP Toolbox 35, 144 clearing jams common locations ...99 input area 103 inside printer 102 output area 104 cold reset 126 color calibration 36 troubleshooting 142 components locating 6 configuration page 114...
Service Manual
Page 284
... 138 Finnish laser statement 267 firmware updates 148 formatter removal and replacement 82 fraud hotline 33 fuser cleaning page 132 removal and replacement 74 G general circuit diagram 208 general timing chart 58 gray background, troubleshooting 139 grayscale troubleshooting 142 H heavy paper specifications 17, 18 HP fraud hotline 33 HP Toolbox calibrating printer 36 calibrating the printer 144 cleaning...
... 138 Finnish laser statement 267 firmware updates 148 formatter removal and replacement 82 fraud hotline 33 fuser cleaning page 132 removal and replacement 74 G general circuit diagram 208 general timing chart 58 gray background, troubleshooting 139 grayscale troubleshooting 142 H heavy paper specifications 17, 18 HP fraud hotline 33 HP Toolbox calibrating printer 36 calibrating the printer 144 cleaning...


