
HP Notebook Hard Drives & Solid State Drives Identifying, Preventing, Diagnosing and Recovering from Drive Failures Care and Mai
Page 6
.../support/SupportManual/c01600726/c01600726.pdf. The latest device driver versions address multiple known issues that are released to the Intel Matrix Storage Manager driver are configured with Serial ATA hard disk drives. Updates to address known issues. Intel Matrix Storage Technology driver HP offers the Intel Matrix Storage Manager driver for the SATA Advanced Host Controller (AHCI) Interface. Intel Matrix Storage Manager Driver provides support for notebook PC models that could affect hard disk drive...
.../support/SupportManual/c01600726/c01600726.pdf. The latest device driver versions address multiple known issues that are released to the Intel Matrix Storage Manager driver are configured with Serial ATA hard disk drives. Updates to address known issues. Intel Matrix Storage Technology driver HP offers the Intel Matrix Storage Manager driver for the SATA Advanced Host Controller (AHCI) Interface. Intel Matrix Storage Manager Driver provides support for notebook PC models that could affect hard disk drive...
HP 2000 Notebook PC and Compaq CQ58 Notebook PC - Maintenance and Service Guide
Page 14
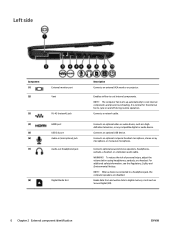
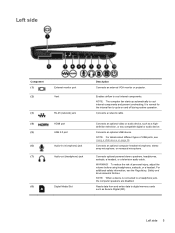
... headset microphone, stereo array microphone, or monaural microphone. Connects an optional video or audio device, such as Secure Digital (SD). 6 Chapter 2 External component identification ENWW Left side Component (1) (2) External monitor port Vent (3) RJ-45 (network) jack (4) HDMI port (5) USB 2.0 port (6) Audio-in (microphone) jack (7) Audio-out (headphone) jack (8) Digital Media Slot Description Connects an external VGA monitor or projector. NOTE: The computer fan starts up automatically to cool internal components and prevent overheating. Connects an optional USB device...
... headset microphone, stereo array microphone, or monaural microphone. Connects an optional video or audio device, such as Secure Digital (SD). 6 Chapter 2 External component identification ENWW Left side Component (1) (2) External monitor port Vent (3) RJ-45 (network) jack (4) HDMI port (5) USB 2.0 port (6) Audio-in (microphone) jack (7) Audio-out (headphone) jack (8) Digital Media Slot Description Connects an external VGA monitor or projector. NOTE: The computer fan starts up automatically to cool internal components and prevent overheating. Connects an optional USB device...
HP 2000 Notebook PC and Compaq CQ58 Notebook PC - Maintenance and Service Guide
Page 44
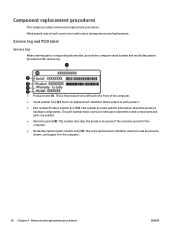
Component replacement procedures This chapter provides removal and replacement procedures. This is the product name affixed to locate documents, drivers, and support for the computer. ● Model description (select models only) (5). This number provides specific information about the product's hardware components. This number describes the duration (in years) of the computer. ● Serial number (s/n) (2). This is an alphanumeric identifier that is the alphanumeric identifier used to...
Component replacement procedures This chapter provides removal and replacement procedures. This is the product name affixed to locate documents, drivers, and support for the computer. ● Model description (select models only) (5). This number provides specific information about the product's hardware components. This number describes the duration (in years) of the computer. ● Serial number (s/n) (2). This is an alphanumeric identifier that is the alphanumeric identifier used to...
HP 2000 Notebook PC and Compaq CQ58 Notebook PC - Maintenance and Service Guide
Page 59
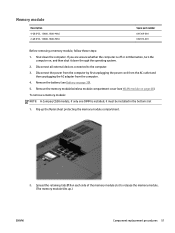
...). 5. Remove the memory module/wireless module compartment cover (see Battery on page 48). Shut down through the operating system. 2. Memory module Description 4-GB (PC3, 12800, 1600-MHz) 2-GB (PC3, 12800, 1600-MHz) Spare part number 641369-001 652972-001 Before removing a memory module, follow these steps: 1. Flip up .) ENWW Component replacement procedures 51 Spread the retaining tabs (1) on , and then shut it must be installed in Hibernation, turn...
...). 5. Remove the memory module/wireless module compartment cover (see Battery on page 48). Shut down through the operating system. 2. Memory module Description 4-GB (PC3, 12800, 1600-MHz) 2-GB (PC3, 12800, 1600-MHz) Spare part number 641369-001 652972-001 Before removing a memory module, follow these steps: 1. Flip up .) ENWW Component replacement procedures 51 Spread the retaining tabs (1) on , and then shut it must be installed in Hibernation, turn...
HP 2000 Notebook PC and Compaq CQ58 Notebook PC - Maintenance and Service Guide
Page 108
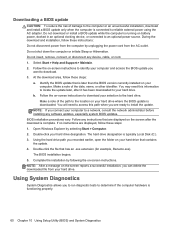
... to the computer or an unsuccessful installation, download and install a BIOS update only when the computer is downloaded. Follow the on -screen instructions. If the update is more recent than your hard drive where the BIOS update is connected to an optional power source. NOTE: After a message on the screen reports a successful installation, you recorded earlier, open the folder on battery power, docked in an optional docking device, or connected to reliable external power using the AC...
... to the computer or an unsuccessful installation, download and install a BIOS update only when the computer is downloaded. Follow the on -screen instructions. If the update is more recent than your hard drive where the BIOS update is connected to an optional power source. NOTE: After a message on the screen reports a successful installation, you recorded earlier, open the folder on battery power, docked in an optional docking device, or connected to reliable external power using the AC...
HP 2000 Notebook PC and Compaq CQ58 Notebook PC - Maintenance and Service Guide
Page 118
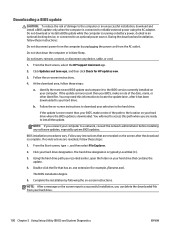
... to reset your system. For more information, see Recovering using HP Recovery Manager on your computer or were purchased from the Windows Store, consider using Windows Refresh. Windows creates system restore points automatically during a Windows update and other system maintenance events. Minimized Image Recovery installs only drivers and hardware-enabling applications. For more information, see Help and Support. Restore and recovery There are several options for recovering your computer using a minimized image, you created. From the Start screen, type h, and...
... to reset your system. For more information, see Recovering using HP Recovery Manager on your computer or were purchased from the Windows Store, consider using Windows Refresh. Windows creates system restore points automatically during a Windows update and other system maintenance events. Minimized Image Recovery installs only drivers and hardware-enabling applications. For more information, see Help and Support. Restore and recovery There are several options for recovering your computer using a minimized image, you created. From the Start screen, type h, and...
HP 2000 Notebook PC and Compaq CQ58 Notebook PC - Maintenance and Service Guide
Page 121
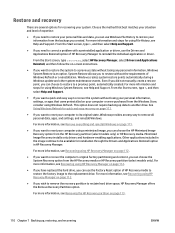
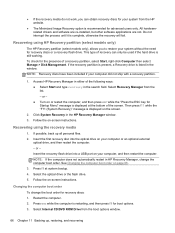
... a USB port on your computer or into the optical drive on -screen instructions. NOTE: If the computer does not automatically restart in HP Recovery Manager, change the boot order: 1. To change the computer boot order. Press and hold esc while the computer is the order of devices listed in HP Recovery Manager, you created. 2. Removing the HP Recovery partition HP Recovery Manager software allows you to remove the HP Recovery partition to ensure you created into an optional external optical drive, and then restart the computer. - Create HP Recovery media before removing...
... a USB port on your computer or into the optical drive on -screen instructions. NOTE: If the computer does not automatically restart in HP Recovery Manager, change the boot order: 1. To change the computer boot order. Press and hold esc while the computer is the order of devices listed in HP Recovery Manager, you created. 2. Removing the HP Recovery partition HP Recovery Manager software allows you to remove the HP Recovery partition to ensure you created into an optional external optical drive, and then restart the computer. - Create HP Recovery media before removing...
HP 2000 Notebook PC and Compaq CQ58 Notebook PC - Maintenance and Service Guide
Page 133
... downloading an update 100 updating 99 boot order changing HP Recovery Manager 113 buttons left TouchPad 9 optical drive eject 5 power 11 right TouchPad 9 TouchPad on/off 9 C cables service considerations 31 caps lock light identifying 10 chipset product description 2 components bottom 13 display 8 front 7 left side 6 right side 5 top 9 computer feet locating 38 spare part number 27 computer major components illustrated 15 computer reset 111 computer specifications 103 connectors service considerations 31 D deleted files restoring 110 Digital Media Slot identifying 6 display...
... downloading an update 100 updating 99 boot order changing HP Recovery Manager 113 buttons left TouchPad 9 optical drive eject 5 power 11 right TouchPad 9 TouchPad on/off 9 C cables service considerations 31 caps lock light identifying 10 chipset product description 2 components bottom 13 display 8 front 7 left side 6 right side 5 top 9 computer feet locating 38 spare part number 27 computer major components illustrated 15 computer reset 111 computer specifications 103 connectors service considerations 31 D deleted files restoring 110 Digital Media Slot identifying 6 display...

HP 2000 Notebook PC and Compaq CQ58 Notebook PC - Maintenance and Service Guide
Page 135
... 1 removing 96 spare part number 25, 26, 27 product description audio 3 chipset 2 display panel 2 Ethernet 3 external media cards 3 graphics 2 hard drive 3 keyboard 4 memory module 2 microphone 3 operating system 4 optical drive 3 pointing device 4 ports 3 power requirements 4 processor 1 product name 1 security 4 serviceability 4 video 3 wireless 3 product name 1 R recovery 110, 111 discs 109, 113 HP Recovery Manager 112 media 113 starting 112 supported discs 109 system 112 USB flash drive 113 using HP Recovery media 109 recovery media creating 108 creating using HP Recovery Manager 109...
... 1 removing 96 spare part number 25, 26, 27 product description audio 3 chipset 2 display panel 2 Ethernet 3 external media cards 3 graphics 2 hard drive 3 keyboard 4 memory module 2 microphone 3 operating system 4 optical drive 3 pointing device 4 ports 3 power requirements 4 processor 1 product name 1 security 4 serviceability 4 video 3 wireless 3 product name 1 R recovery 110, 111 discs 109, 113 HP Recovery Manager 112 media 113 starting 112 supported discs 109 system 112 USB flash drive 113 using HP Recovery media 109 recovery media creating 108 creating using HP Recovery Manager 109...
User Guide - Windows 7
Page 5
... hardware and software information 3 Front ...3 Right side ...4 Left side ...5 Display ...7 Top ...8 TouchPad ...8 Lights ...9 Buttons ...10 Keys ...11 Bottom ...12 Labels ...13 3 Connecting to a network ...14 Connecting to a wireless network ...14 Using the wireless controls 14 Using the wireless button 14 Using operating system controls 14 Using a WLAN ...15 Using an Internet service provider 15 Setting up a WLAN 16 Configuring a wireless router 16 Protecting your WLAN 16 Connecting to a WLAN 17 Using Bluetooth wireless devices (select models only 17 Connecting to a wired network...
... hardware and software information 3 Front ...3 Right side ...4 Left side ...5 Display ...7 Top ...8 TouchPad ...8 Lights ...9 Buttons ...10 Keys ...11 Bottom ...12 Labels ...13 3 Connecting to a network ...14 Connecting to a wireless network ...14 Using the wireless controls 14 Using the wireless button 14 Using operating system controls 14 Using a WLAN ...15 Using an Internet service provider 15 Setting up a WLAN 16 Configuring a wireless router 16 Protecting your WLAN 16 Connecting to a WLAN 17 Using Bluetooth wireless devices (select models only 17 Connecting to a wired network...
User Guide - Windows 7
Page 7
...a hard drive ...45 Using Disk Defragmenter 48 Using Disk Cleanup ...48 Adding or replacing memory modules 49 Updating programs and drivers ...51 Cleaning your computer ...51 Cleaning the display, sides, and cover 52 Cleaning the TouchPad and keyboard 52 Traveling with or shipping your computer 52 9 Securing your computer and information 54 Locating your security software ...54 Using passwords ...54 Setting Windows passwords 55 Setting Setup Utility (BIOS) passwords 56 Using Internet security software ...56 Using antivirus software ...56 Using firewall software ...57 Installing software...
...a hard drive ...45 Using Disk Defragmenter 48 Using Disk Cleanup ...48 Adding or replacing memory modules 49 Updating programs and drivers ...51 Cleaning your computer ...51 Cleaning the display, sides, and cover 52 Cleaning the TouchPad and keyboard 52 Traveling with or shipping your computer 52 9 Securing your computer and information 54 Locating your security software ...54 Using passwords ...54 Setting Windows passwords 55 Setting Setup Utility (BIOS) passwords 56 Using Internet security software ...56 Using antivirus software ...56 Using firewall software ...57 Installing software...
User Guide - Windows 7
Page 8
... specific files ...65 Restoring specific files using Windows Backup and Restore 65 Recovering the original system using HP Recovery Manager 65 What you need to know 65 Recovering using HP Recovery partition (select models only 66 Recovering using the recovery media 66 Changing the computer boot order 66 12 Specifications ...68 Input power ...68 Operating environment ...68 13 Troubleshooting and support ...69 Troubleshooting ...70 Disc drive problems ...70 Wireless connection problems 70 Cannot connect to a WLAN 71 Cannot connect to a preferred network 71 Current network security codes...
... specific files ...65 Restoring specific files using Windows Backup and Restore 65 Recovering the original system using HP Recovery Manager 65 What you need to know 65 Recovering using HP Recovery partition (select models only 66 Recovering using the recovery media 66 Changing the computer boot order 66 12 Specifications ...68 Input power ...68 Operating environment ...68 13 Troubleshooting and support ...69 Troubleshooting ...70 Disc drive problems ...70 Wireless connection problems 70 Cannot connect to a WLAN 71 Cannot connect to a preferred network 71 Current network security codes...
User Guide - Windows 7
Page 15
... optional video or audio device, such as Secure Digital (SD). NOTE: For details about different types of personal injury, adjust the volume before using headphones, earbuds, or a headset. WARNING! NOTE: When a device is normal for the internal fan to cycle on page 39. Left side 5 It is connected to cool internal components. Connects an optional USB device. Left side Component (1) (2) External monitor port Vent (3) RJ-45 (network) jack (4) HDMI port (5) USB 2.0 port (6) Audio-in (microphone) jack (7) Audio-out (headphone) jack (8) Digital Media Slot...
... optional video or audio device, such as Secure Digital (SD). NOTE: For details about different types of personal injury, adjust the volume before using headphones, earbuds, or a headset. WARNING! NOTE: When a device is normal for the internal fan to cycle on page 39. Left side 5 It is connected to cool internal components. Connects an optional USB device. Left side Component (1) (2) External monitor port Vent (3) RJ-45 (network) jack (4) HDMI port (5) USB 2.0 port (6) Audio-in (microphone) jack (7) Audio-out (headphone) jack (8) Digital Media Slot...

User Guide - Windows 7
Page 27
... area, at the far right of the connection. After the connection is on . Using Bluetooth wireless devices (select models only) A Bluetooth device provides short-range wireless communications that replace the physical cable connections that allows you to , click Open Network and Sharing Center, and then click Set up a personal area network (PAN) of working wirelessly), or if you want to connect to enter a security code. Type the code, and then click OK to verify...
... area, at the far right of the connection. After the connection is on . Using Bluetooth wireless devices (select models only) A Bluetooth device provides short-range wireless communications that replace the physical cable connections that allows you to , click Open Network and Sharing Center, and then click Set up a personal area network (PAN) of working wirelessly), or if you want to connect to enter a security code. Type the code, and then click OK to verify...

User Guide - Windows 7
Page 30
..., a headset, or television audio. Connects an optional computer headset microphone, stereo array microphone, or monaural microphone. To connect high-definition speakers to your instant messaging software, capture and share video, and take still photos. To connect wireless headphones or speakers to USB ports (or the audio-out jack) on your computer, follow the device manufacturer's instructions. Component (7) (8) (9) (10) Audio-out (headphone) jack Audio-in (microphone) jack HDMI port External monitor port Description Produces sound when connected to communicate up...
..., a headset, or television audio. Connects an optional computer headset microphone, stereo array microphone, or monaural microphone. To connect high-definition speakers to your instant messaging software, capture and share video, and take still photos. To connect wireless headphones or speakers to USB ports (or the audio-out jack) on your computer, follow the device manufacturer's instructions. Component (7) (8) (9) (10) Audio-out (headphone) jack Audio-in (microphone) jack HDMI port External monitor port Description Produces sound when connected to communicate up...

User Guide - Windows 7
Page 43
... a specific period of information, do not initiate Sleep or Hibernation while reading from or writing to manage how your work is not available to charge the battery, it was when you have set at the factory to monitor and conserve the battery charge. NOTE: If you stopped working. Your computer supports power plans to a disc or an external media card. CAUTION: To reduce the risk of possible audio and video...
... a specific period of information, do not initiate Sleep or Hibernation while reading from or writing to manage how your work is not available to charge the battery, it was when you have set at the factory to monitor and conserve the battery charge. NOTE: If you stopped working. Your computer supports power plans to a disc or an external media card. CAUTION: To reduce the risk of possible audio and video...

User Guide - Windows 7
Page 58
... information, access the Disk Defragmenter software Help. Disk Defragmenter consolidates (or physically reorganizes) the fragmented files and folders on your computer manually at least once a month. To install a hard drive, reverse this , the hard drive works harder to complete. Connect the computer to run Disk Defragmenter: 1. Select Start > All Programs > Accessories > System Tools > Disk Defragmenter. 3. Remove the hard drive (3) from the bracket. A fragmented drive means data on the hard drive so...
... information, access the Disk Defragmenter software Help. Disk Defragmenter consolidates (or physically reorganizes) the fragmented files and folders on your computer manually at least once a month. To install a hard drive, reverse this , the hard drive works harder to complete. Connect the computer to run Disk Defragmenter: 1. Select Start > All Programs > Accessories > System Tools > Disk Defragmenter. 3. Remove the hard drive (3) from the bracket. A fragmented drive means data on the hard drive so...
User Guide - Windows 7
Page 70
... reliable external power using the AC adapter. Select Start > Help and Support > Maintain. 2. You may need to access this information to locate the update later, after the download is downloaded. BIOS installation procedures vary. The hard drive designation is running on battery power, docked in an optional docking device, or connected to the location on your hard drive where the BIOS update is complete. Do not shut down the computer or initiate Sleep or Hibernation. Identify the BIOS update...
... reliable external power using the AC adapter. Select Start > Help and Support > Maintain. 2. You may need to access this information to locate the update later, after the download is downloaded. BIOS installation procedures vary. The hard drive designation is running on battery power, docked in an optional docking device, or connected to the location on your hard drive where the BIOS update is complete. Do not shut down the computer or initiate Sleep or Hibernation. Identify the BIOS update...
User Guide - Windows 7
Page 76
... still working. Access HP Recovery Manager in the window. Recovering using HP Recovery partition (select models only) The HP Recovery partition (select models only), allows you can only be used if the hard drive is restarting, and then press f9 for boot options. 3. This type of the screen. ● If the recovery media do not work, you to restore your computer or an optional external optical drive, and then restart the computer. - All hardwarerelated drivers and software are re-installed, but other software applications...
... still working. Access HP Recovery Manager in the window. Recovering using HP Recovery partition (select models only) The HP Recovery partition (select models only), allows you can only be used if the hard drive is restarting, and then press f9 for boot options. 3. This type of the screen. ● If the recovery media do not work, you to restore your computer or an optional external optical drive, and then restart the computer. - All hardwarerelated drivers and software are re-installed, but other software applications...
User Guide - Windows 7
Page 88
... connection setup 16 Internet security software, using 56 J jacks audio-in (microphone) 5, 20 audio-out (headphone) 5, 20 network 5 RJ-45 (network) 5 K keys action 11 esc 11 fn 11 Windows applications 11 Windows logo 11 L labels Bluetooth 13 Microsoft Certificate of Authenticity 13 regulatory 13 serial number 13 service 13 wireless certification 13 WLAN 13 latch, battery release 12 lights AC adapter 4 caps lock 9 hard drive 6 optical drive 4 power 6, 9 TouchPad 8, 27 webcam 7, 19 wireless 9 M maintenance Disk Cleanup 48 Disk Defragmenter 48 memory module inserting 50 removing 49 replacing...
... connection setup 16 Internet security software, using 56 J jacks audio-in (microphone) 5, 20 audio-out (headphone) 5, 20 network 5 RJ-45 (network) 5 K keys action 11 esc 11 fn 11 Windows applications 11 Windows logo 11 L labels Bluetooth 13 Microsoft Certificate of Authenticity 13 regulatory 13 serial number 13 service 13 wireless certification 13 WLAN 13 latch, battery release 12 lights AC adapter 4 caps lock 9 hard drive 6 optical drive 4 power 6, 9 TouchPad 8, 27 webcam 7, 19 wireless 9 M maintenance Disk Cleanup 48 Disk Defragmenter 48 memory module inserting 50 removing 49 replacing...


