HP Mini User Guide - Windows XP
Page 19
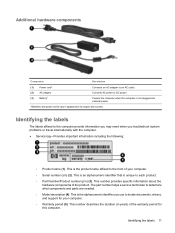
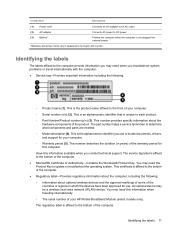
...number helps a service technician to each product. ◦ Part Number/Product number (p/n) (3). This is not plugged into external power. *Batteries and power cords vary in years) of the warranty period for your computer. ◦ Serial number (s/n) (2). Identifying the labels The labels...computer. Identifying the labels 11 Additional hardware components Component Description (1) Power cord* Connects an AC adapter to an AC outlet. (2) AC adapter Converts AC power to DC power. (3) Battery* Powers the computer when the computer is the alphanumeric identifier you troubleshoot...
...number helps a service technician to each product. ◦ Part Number/Product number (p/n) (3). This is not plugged into external power. *Batteries and power cords vary in years) of the warranty period for your computer. ◦ Serial number (s/n) (2). Identifying the labels The labels...computer. Identifying the labels 11 Additional hardware components Component Description (1) Power cord* Connects an AC adapter to an AC outlet. (2) AC adapter Converts AC power to DC power. (3) Battery* Powers the computer when the computer is the alphanumeric identifier you troubleshoot...
HP Mini User Guide - Windows XP
Page 24
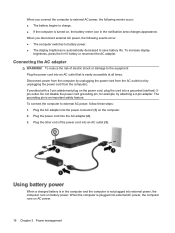
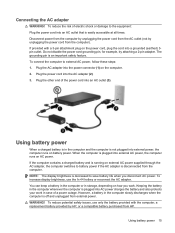
...When the computer is an important safety feature. Plug the power cord into the power connector (1) on AC power. 16 Chapter 3 Power management The grounding pin is plugged into external AC power, the computer runs on the computer. 2. Using battery power When a charged battery is in the notification area changes ... connect the computer to the equipment: Plug the power cord into external power, the computer runs on , the battery meter icon in the computer and the computer is turned on battery power. To reduce the risk of the power cord into a grounded (earthed) 3pin outlet. When ...
...When the computer is an important safety feature. Plug the power cord into the power connector (1) on AC power. 16 Chapter 3 Power management The grounding pin is plugged into external AC power, the computer runs on the computer. 2. Using battery power When a charged battery is in the notification area changes ... connect the computer to the equipment: Plug the power cord into external power, the computer runs on , the battery meter icon in the computer and the computer is turned on battery power. To reduce the risk of the power cord into a grounded (earthed) 3pin outlet. When ...

HP Mini User Guide - Windows XP
Page 41
... When inserting a SIM, position the card with your corporate network whether you are on by pressing the power button. The serial number is printed on HP Mobile Broadband and how to activate service with a preferred mobile network operator, refer to information wherever mobile ...the "Inserting a SIM" and "Removing a SIM" sections in most cases is a mobile phone network operator. Unplug the power cord from the computer. Using HP Mobile Broadband requires a network service provider (called a mobile network operator), which provides access to networks based on the Global System...
... When inserting a SIM, position the card with your corporate network whether you are on by pressing the power button. The serial number is printed on HP Mobile Broadband and how to activate service with a preferred mobile network operator, refer to information wherever mobile ...the "Inserting a SIM" and "Removing a SIM" sections in most cases is a mobile phone network operator. Unplug the power cord from the computer. Using HP Mobile Broadband requires a network service provider (called a mobile network operator), which provides access to networks based on the Global System...

HP Mini User Guide - Windows XP
Page 42
.... Removing a SIM To remove a SIM: 1. NOTE: HP Mobile Broadband will be disabled if the battery is firmly seated. 8. Reconnect external devices. 11. Unplug the power cord from the AC outlet. 5. Disconnect all external devices connected to the computer. 4. Close the display. 3. Turn the computer upside down on a flat ...SIM into the slot until it is not replaced. 9. Shut down the computer through the operating system. 2. Turn on by pressing the power button. If you . 6. Replace the battery. Then shut down the computer. Remove the battery. 34 Chapter 4 Internet 7.
.... Removing a SIM To remove a SIM: 1. NOTE: HP Mobile Broadband will be disabled if the battery is firmly seated. 8. Reconnect external devices. 11. Unplug the power cord from the AC outlet. 5. Disconnect all external devices connected to the computer. 4. Close the display. 3. Turn the computer upside down on a flat ...SIM into the slot until it is not replaced. 9. Shut down the computer through the operating system. 2. Turn on by pressing the power button. If you . 6. Replace the battery. Then shut down the computer. Remove the battery. 34 Chapter 4 Internet 7.

HP Mini User Guide - Windows XP
Page 70
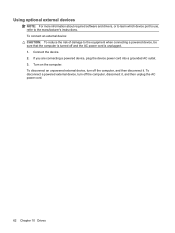
...unplugged. 1. To disconnect a powered external device, turn off the computer, and then disconnect it , and then unplug the AC power cord. 62 Chapter 10 Drives Turn on the computer. Connect the device. 2. If you are connecting a powered device, plug the device power cord into a grounded AC outlet.... 3. To disconnect an unpowered external device, turn off and the AC power cord is turned off the computer, disconnect it . To connect an external device...
...unplugged. 1. To disconnect a powered external device, turn off the computer, and then disconnect it , and then unplug the AC power cord. 62 Chapter 10 Drives Turn on the computer. Connect the device. 2. If you are connecting a powered device, plug the device power cord into a grounded AC outlet.... 3. To disconnect an unpowered external device, turn off and the AC power cord is turned off the computer, disconnect it . To connect an external device...

HP Mini User Guide - Windows XP
Page 71
... of the computer can damage electronic components. Then shut down on a flat surface. 6. Disconnect all external devices connected to the equipment, unplug the power cord and remove all batteries before installing a memory module. Remove the battery from the AC outlet. 5. To add or replace a memory module: 1. ... work. 2. Before beginning any procedure, ensure that you are discharged of electric shock and damage to the computer. 4. Unplug the power cord from the computer. 7. The memory capacity of the computer. To reduce the risk of static electricity by sliding the...
... of the computer can damage electronic components. Then shut down on a flat surface. 6. Disconnect all external devices connected to the equipment, unplug the power cord and remove all batteries before installing a memory module. Remove the battery from the AC outlet. 5. To add or replace a memory module: 1. ... work. 2. Before beginning any procedure, ensure that you are discharged of electric shock and damage to the computer. 4. Unplug the power cord from the computer. 7. The memory capacity of the computer. To reduce the risk of static electricity by sliding the...
HP Mini User Guide - Windows XP
Page 76
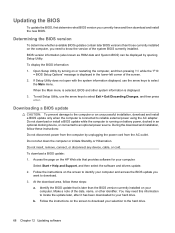
... download and install a BIOS update only when the computer is connected to an optional power source. Do not insert, remove, connect, or disconnect any device, cable, or cord. Access the page on the HP Web site that is running on the screen to select the Main menu. At the...software and drivers update. 2. During the download and installation, follow these instructions: Do not disconnect power from the computer by unplugging the power cord from the AC outlet. Follow the instructions on battery power, docked in the lower-left corner of the date, name, or other system information is ...
... download and install a BIOS update only when the computer is connected to an optional power source. Do not insert, remove, connect, or disconnect any device, cable, or cord. Access the page on the HP Web site that is running on the screen to select the Main menu. At the...software and drivers update. 2. During the download and installation, follow these instructions: Do not disconnect power from the computer by unplugging the power cord from the AC outlet. Follow the instructions on battery power, docked in the lower-left corner of the date, name, or other system information is ...

HP Mini User Guide - Windows XP
Page 84
... checking 41 audio-in (microphone) jack 8, 38 audio-out (headphone) jack 8, 38 B battery calibrating 21 charging 18, 21 conserving power 23 discharging 19 disposing 24 identifying 11 inserting 17 low battery levels 19 recharging 23 removing 17 storing 23 battery bay, identifying 9 battery...hardware 11 bottom 9 display 8 front 5 left-side 7 right-side 7 TouchPad 3 connecting to a WLAN 31 connection, external power 16 conservation, power 23 cord, power 11 corporate WLAN connection 31 critical battery level 20 D Diagnostics menu 75 digital card inserting 52 removing 53 stopping 53 Digital Media ...
... checking 41 audio-in (microphone) jack 8, 38 audio-out (headphone) jack 8, 38 B battery calibrating 21 charging 18, 21 conserving power 23 discharging 19 disposing 24 identifying 11 inserting 17 low battery levels 19 recharging 23 removing 17 storing 23 battery bay, identifying 9 battery...hardware 11 bottom 9 display 8 front 5 left-side 7 right-side 7 TouchPad 3 connecting to a WLAN 31 connection, external power 16 conservation, power 23 cord, power 11 corporate WLAN connection 31 critical battery level 20 D Diagnostics menu 75 digital card inserting 52 removing 53 stopping 53 Digital Media ...
HP Mini User Guide - Windows XP
Page 85
...58 increasing speaker volume 59 initiating QuickLock 58 initiating Standby 57 muting speaker sound 59 switching screen image 58 using 57 HP Mobile Broadband Module 33 HP Mobile Broadband, disabled 33 hubs 54 I icons network status 27 wireless 27 Instant Web 1 Instant-On Software (IOS... Setup Utility 46 set in Windows 46 ports external monitor 43 USB 7, 8, 54 power connecting 16 conserving 23 power connector, identifying 8 power cord, identifying 11 power light, identifying 6 power switch, identifying 6 power-on password creating 48 entering 48 managing 48 Processor C4 State 74 product name and ...
...58 increasing speaker volume 59 initiating QuickLock 58 initiating Standby 57 muting speaker sound 59 switching screen image 58 using 57 HP Mobile Broadband Module 33 HP Mobile Broadband, disabled 33 hubs 54 I icons network status 27 wireless 27 Instant Web 1 Instant-On Software (IOS... Setup Utility 46 set in Windows 46 ports external monitor 43 USB 7, 8, 54 power connecting 16 conserving 23 power connector, identifying 8 power cord, identifying 11 power light, identifying 6 power switch, identifying 6 power-on password creating 48 entering 48 managing 48 Processor C4 State 74 product name and ...
Mini User Guide - Windows 7
Page 21
... markings of some of the countries or regions in years) of Authenticity-Contains the Windows® Product Key. This is not plugged into external power. *Batteries and power cords vary in appearance by region and country. This is affixed to the front of the product. The service tag label is the product name... system problems or travel internationally with the computer. ● Service tag-Provides important information including the following : ◦ Information about the hardware components of your HP Mobile Broadband Module (select models only).
... markings of some of the countries or regions in years) of Authenticity-Contains the Windows® Product Key. This is not plugged into external power. *Batteries and power cords vary in appearance by region and country. This is affixed to the front of the product. The service tag label is the product name... system problems or travel internationally with the computer. ● Service tag-Provides important information including the following : ◦ Information about the hardware components of your HP Mobile Broadband Module (select models only).
Mini User Guide - Windows 7
Page 25
...power. Using battery power 15 Disconnect power from the computer by unplugging the power cord from the AC outlet (not by unplugging the power cord from the computer. Do not disable the power cord grounding pin, for example, by HP, or a compatible battery purchased from external power. Plug the other end of the power cord...off and unplugged from HP. Connecting the AC adapter WARNING! To connect the computer to the equipment: Plug the power cord into an AC outlet (3). Plug the power cord into external power, the computer runs on AC power. Using battery power When a charged ...
...power. Using battery power 15 Disconnect power from the computer by unplugging the power cord from the AC outlet (not by unplugging the power cord from the computer. Do not disable the power cord grounding pin, for example, by HP, or a compatible battery purchased from external power. Plug the other end of the power cord...off and unplugged from HP. Connecting the AC adapter WARNING! To connect the computer to the equipment: Plug the power cord into an AC outlet (3). Plug the power cord into external power, the computer runs on AC power. Using battery power When a charged ...

Mini User Guide - Windows 7
Page 44
Unplug the power cord from the AC outlet. 5. Turn on by sliding the power switch. If you are not sure whether the computer is off or in Hibernation, turn the computer on by sliding the power switch. Close the display. 3. Remove the battery. 7. Replace the battery. If you . 6. Then... toward you are not sure whether the computer is off or in Hibernation, turn the computer on the computer. Close the display. 3. NOTE: HP Mobile Broadband is disabled if the battery is firmly seated. 8. Removing a SIM To remove a SIM: 1. Disconnect all external devices connected to ...
Unplug the power cord from the AC outlet. 5. Turn on by sliding the power switch. If you are not sure whether the computer is off or in Hibernation, turn the computer on by sliding the power switch. Close the display. 3. Remove the battery. 7. Replace the battery. If you . 6. Then... toward you are not sure whether the computer is off or in Hibernation, turn the computer on the computer. Close the display. 3. NOTE: HP Mobile Broadband is disabled if the battery is firmly seated. 8. Removing a SIM To remove a SIM: 1. Disconnect all external devices connected to ...

Mini User Guide - Windows 7
Page 45
Remove the battery. 7. Reconnect external power. 10. Using HP Mobile Broadband (select models only) 35 Turn the computer upside down on the SIM (1), and then remove it from the AC outlet. 5. Press in on a flat surface, with the battery bay toward you. 6. Turn on the computer. Reconnect external devices. 11. Unplug the power cord from the slot (2). 8. 4. Replace the battery. 9.
Remove the battery. 7. Reconnect external power. 10. Using HP Mobile Broadband (select models only) 35 Turn the computer upside down on the SIM (1), and then remove it from the AC outlet. 5. Press in on a flat surface, with the battery bay toward you. 6. Turn on the computer. Reconnect external devices. 11. Unplug the power cord from the slot (2). 8. 4. Replace the battery. 9.
Mini User Guide - Windows 7
Page 72
...To disconnect an unpowered external device, turn off the computer, disconnect it . Connect the device. 2. If you are connecting a powered device, plug the device power cord into a grounded AC outlet. 3. Using optional external devices NOTE: For more information about required software and drivers, or to ...learn which device port to use, refer to the equipment when connecting a powered device, be sure that the computer is unplugged. 1. To disconnect a powered external device, turn off and the AC power cord is turned off the computer, and then disconnect it , and then unplug ...
...To disconnect an unpowered external device, turn off the computer, disconnect it . Connect the device. 2. If you are connecting a powered device, plug the device power cord into a grounded AC outlet. 3. Using optional external devices NOTE: For more information about required software and drivers, or to ...learn which device port to use, refer to the equipment when connecting a powered device, be sure that the computer is unplugged. 1. To disconnect a powered external device, turn off and the AC power cord is turned off the computer, and then disconnect it , and then unplug ...
Mini User Guide - Windows 7
Page 73
... that you are discharged of the computer. To add or replace a memory module: 1. Disconnect all batteries before installing a memory module. Unplug the power cord from the computer. 7. Using a small Phillips screwdriver, loosen the 2 cover screws (1). 63 CAUTION: Electrostatic discharge (ESD) can be upgraded by ... the computer is located on a flat surface. 6. The memory capacity of electric shock and damage to the equipment, unplug the power cord and remove all external devices connected to the computer. 4. Turn the computer upside down the computer and close the display. 11 ...
... that you are discharged of the computer. To add or replace a memory module: 1. Disconnect all batteries before installing a memory module. Unplug the power cord from the computer. 7. Using a small Phillips screwdriver, loosen the 2 cover screws (1). 63 CAUTION: Electrostatic discharge (ESD) can be upgraded by ... the computer is located on a flat surface. 6. The memory capacity of electric shock and damage to the equipment, unplug the power cord and remove all external devices connected to the computer. 4. Turn the computer upside down the computer and close the display. 11 ...
Mini User Guide - Windows 7
Page 78
...download a BIOS update: 1. Identify the BIOS update that provides software for your hard drive. Follow the instructions on the HP Web site that is displayed in the lower-left corner of the system BIOS currently installed. When the Main menu is ...your computer. Downloading a BIOS update CAUTION: To prevent damage to be displayed by unplugging the power cord from the AC outlet. During the download and installation, follow these instructions: Do not disconnect power from the computer by opening Setup Utility. BIOS version information (also known as ROM date and...
...download a BIOS update: 1. Identify the BIOS update that provides software for your hard drive. Follow the instructions on the HP Web site that is displayed in the lower-left corner of the system BIOS currently installed. When the Main menu is ...your computer. Downloading a BIOS update CAUTION: To prevent damage to be displayed by unplugging the power cord from the AC outlet. During the download and installation, follow these instructions: Do not disconnect power from the computer by opening Setup Utility. BIOS version information (also known as ROM date and...
Mini User Guide - Windows 7
Page 86
... 42 audio-in (microphone) jack 8, 39 audio-out (headphone) jack 8, 39 B battery calibrating 20 charging 17, 20 conserving power 23 discharging 18 disposing 24 identifying 11 inserting 16 low battery levels 18 recharging 23 removing 16 storing 23 battery bay, identifying 9 ... display 8 front 5 left-side 7 right-side 7 TouchPad 3 connecting to a WLAN 31 Connection Manager icon 27 connection, external power 15 conservation, power 23 cord, power 11 corporate WLAN connection 31 critical battery level 19 D Diagnostics menu 75 digital card inserting 52 removing 53 Digital Media Slot, identifying...
... 42 audio-in (microphone) jack 8, 39 audio-out (headphone) jack 8, 39 B battery calibrating 20 charging 17, 20 conserving power 23 discharging 18 disposing 24 identifying 11 inserting 16 low battery levels 18 recharging 23 removing 16 storing 23 battery bay, identifying 9 ... display 8 front 5 left-side 7 right-side 7 TouchPad 3 connecting to a WLAN 31 Connection Manager icon 27 connection, external power 15 conservation, power 23 cord, power 11 corporate WLAN connection 31 critical battery level 19 D Diagnostics menu 75 digital card inserting 52 removing 53 Digital Media Slot, identifying...
Mini User Guide - Windows 7
Page 87
...59 initiating QuickLock 58 initiating Sleep 57 muting speaker sound 59 switching screen image 58 using 57 HP Connection Manager software 28 HP Mobile Broadband Module 33 HP Mobile Broadband, disabled 33 hubs 54 I icons Connection Manager 27 network 27 wired network 27 ...optical drive 61 P passwords administrator 47 power-on 47 set in Setup Utility 46 set in Windows 46 ports external monitor 43 USB 7, 8, 54 power connecting 15 conserving 23 power connector, identifying 8 power cord, identifying 11 power light, identifying 6 power switch, identifying 6 power-on password creating 48 entering 48 ...
...59 initiating QuickLock 58 initiating Sleep 57 muting speaker sound 59 switching screen image 58 using 57 HP Connection Manager software 28 HP Mobile Broadband Module 33 HP Mobile Broadband, disabled 33 hubs 54 I icons Connection Manager 27 network 27 wired network 27 ...optical drive 61 P passwords administrator 47 power-on 47 set in Setup Utility 46 set in Windows 46 ports external monitor 43 USB 7, 8, 54 power connecting 15 conserving 23 power connector, identifying 8 power cord, identifying 11 power light, identifying 6 power switch, identifying 6 power-on password creating 48 entering 48 ...


