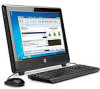
Illustrated Parts & Service Map HP 100B All-in-One
Page 2
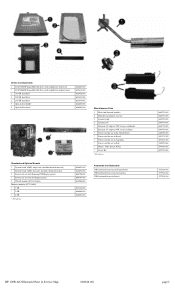
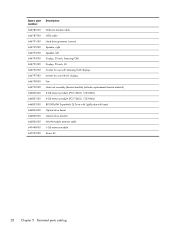
...) * System board, AMD, dual core (includes thermal material) 2 Inverter for use with Samsung/CMI display panels * Inverter for use with LG display panels 3 WLAN module (802.11a/b/g/n) Memory modules (PC3-10600) * 1 GB * 2 GB * 4 GB * Not shown 644693-001 644692-001 646796-001 646797-001 634906-001 647448-001 646800-001 646801-001 Miscellaneous...-001 646793-001 646778-001 646779-001 246959-001 490371-202 403811-201 246959-061 596410-001 647523-001 537924-001 537924-161 537924-201 HP 100B AIO Illustrated Parts & Service Map 640046-001 page 2
...) * System board, AMD, dual core (includes thermal material) 2 Inverter for use with Samsung/CMI display panels * Inverter for use with LG display panels 3 WLAN module (802.11a/b/g/n) Memory modules (PC3-10600) * 1 GB * 2 GB * 4 GB * Not shown 644693-001 644692-001 646796-001 646797-001 634906-001 647448-001 646800-001 646801-001 Miscellaneous...-001 646793-001 646778-001 646779-001 246959-001 490371-202 403811-201 246959-061 596410-001 647523-001 537924-001 537924-161 537924-201 HP 100B AIO Illustrated Parts & Service Map 640046-001 page 2

Illustrated Parts & Service Map HP 100B All-in-One
Page 3
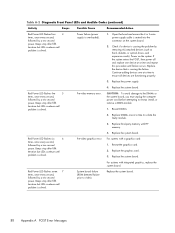
... Connectors and Jumpers (component location may be through the embedded solution or one of the installed NIC cards. Replace system board 103-System Board Failure DMA or timers 1. Verify proper module type. 201-Memory Size Error RSM failure 1. Check keyboard connection or keys. 3. Reseat ...DriveLock Security-Lets you execute self-tests on next boot • SOL Terminal Emulation Mode • SOL Local Keyboard (enable/disable) HP 100B AIO Illustrated Parts & Service Map 640046-001 page 3 Enable/disable • After Power Loss - Device Options - Allows you to...
... Connectors and Jumpers (component location may be through the embedded solution or one of the installed NIC cards. Replace system board 103-System Board Failure DMA or timers 1. Verify proper module type. 201-Memory Size Error RSM failure 1. Check keyboard connection or keys. 3. Reseat ...DriveLock Security-Lets you execute self-tests on next boot • SOL Terminal Emulation Mode • SOL Local Keyboard (enable/disable) HP 100B AIO Illustrated Parts & Service Map 640046-001 page 3 Enable/disable • After Power Loss - Device Options - Allows you to...
Maintenance & Service Guide HP 100B All-in-One
Page 6
... Sequential part number listing 27 6 Removal and Replacement Procedures All-in One (AIO) Chassis 29 Preparing to Disassemble the Computer 29 Rear Cover ...30 Feet ...33 Stand ...34 Optical Drive ...36 Hard Drive ...38 Memory ...42 Fan ...45 Speakers ...48 Webcam Module and Cable 52 Hard Drive Cable ...55 Optical Drive Cable ...57...
... Sequential part number listing 27 6 Removal and Replacement Procedures All-in One (AIO) Chassis 29 Preparing to Disassemble the Computer 29 Rear Cover ...30 Feet ...33 Stand ...34 Optical Drive ...36 Hard Drive ...38 Memory ...42 Fan ...45 Speakers ...48 Webcam Module and Cable 52 Hard Drive Cable ...55 Optical Drive Cable ...57...
Maintenance & Service Guide HP 100B All-in-One
Page 34
not illustrated) 4-GB 2-GB 1-GB AC adapter 90W (external; Item Description Hard drive (not illustrated) 750-GB 500-GB 250-GB Hard drive grommets (screws) Memory modules (PC3-10600, 1333-MHz; not illustrated) For use worldwide For use in India Keyboard, USB (not illustrated) Brazil Latin America United States Mouse, USB, optical. ...
not illustrated) 4-GB 2-GB 1-GB AC adapter 90W (external; Item Description Hard drive (not illustrated) 750-GB 500-GB 250-GB Hard drive grommets (screws) Memory modules (PC3-10600, 1333-MHz; not illustrated) For use worldwide For use in India Keyboard, USB (not illustrated) Brazil Latin America United States Mouse, USB, optical. ...
Maintenance & Service Guide HP 100B All-in-One
Page 36
... displays 646797-001 Inverter for use with LG displays 646798-001 Fan 646799-001 Heat sink assembly (thermal module) (includes replacement thermal material) 646800-001 2-GB memory module (PC3-10600, 1333-MHz) 646801-001 4-GB memory module (PC3-10600, 1333-MHz) 646803-001 8X DVD±RW SuperMulti DL Drive with LightScribe with bezel 646804...
... displays 646797-001 Inverter for use with LG displays 646798-001 Fan 646799-001 Heat sink assembly (thermal module) (includes replacement thermal material) 646800-001 2-GB memory module (PC3-10600, 1333-MHz) 646801-001 4-GB memory module (PC3-10600, 1333-MHz) 646803-001 8X DVD±RW SuperMulti DL Drive with LightScribe with bezel 646804...

Maintenance & Service Guide HP 100B All-in-One
Page 50
Remove the rear cover (see Preparing to Disassemble the Computer on page 29). 2. The computer has two memory slots. Prepare the computer for disassembly (see Rear Cover on the right side of the computer (when viewed from behind) under the memory cover. Figure 6-17 Memory location To remove a memory module: 1. Memory Description 4-GB 2-GB 1-GB Spare part number 646801-001 646800-001 647448-001 Memory modules are located on page 30). 42 Chapter 6 Removal and Replacement Procedures All-in One (AIO) Chassis
Remove the rear cover (see Preparing to Disassemble the Computer on page 29). 2. The computer has two memory slots. Prepare the computer for disassembly (see Rear Cover on the right side of the computer (when viewed from behind) under the memory cover. Figure 6-17 Memory location To remove a memory module: 1. Memory Description 4-GB 2-GB 1-GB Spare part number 646801-001 646800-001 647448-001 Memory modules are located on page 30). 42 Chapter 6 Removal and Replacement Procedures All-in One (AIO) Chassis

Maintenance & Service Guide HP 100B All-in-One
Page 52
Open both cards, you must remove the upper one before removing the lower one. 5. Figure 6-20 Removing the memory module Figure 6-21 Removing the memory module NOTE: If you are removing both latches of the memory module socket, and then remove the memory module from the socket. To install a memory module, reverse the removal procedures. 44 Chapter 6 Removal and Replacement Procedures All-in One (AIO) Chassis
Open both cards, you must remove the upper one before removing the lower one. 5. Figure 6-20 Removing the memory module Figure 6-21 Removing the memory module NOTE: If you are removing both latches of the memory module socket, and then remove the memory module from the socket. To install a memory module, reverse the removal procedures. 44 Chapter 6 Removal and Replacement Procedures All-in One (AIO) Chassis
Maintenance & Service Guide HP 100B All-in-One
Page 80
... cables from the rear), under the system board shield. Remove the system board shield (see Memory on page 66). 5. Prepare the computer for reinstallation. 72 Chapter 6 Removal and Replacement Procedures All-in One (AIO) Chassis Remove the memory modules (see System Board Shield on page 42). 4. It is secured with AMD single core processor...
... cables from the rear), under the system board shield. Remove the system board shield (see Memory on page 66). 5. Prepare the computer for reinstallation. 72 Chapter 6 Removal and Replacement Procedures All-in One (AIO) Chassis Remove the memory modules (see System Board Shield on page 42). 4. It is secured with AMD single core processor...
Maintenance & Service Guide HP 100B All-in-One
Page 89
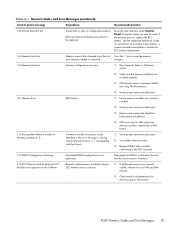
... incorrect. 1. If the error persists after replacing memory modules, replace the system board. 213-Incompatible Memory Module in configuration memory. If third-party memory has been added, test using HP-only memory. 4. Remove and replace the identified faulty memory module(s). 4. If additional memory was recently added, remove it to save the memory boot (memory added or removed). Check product documentation for RTC battery...
... incorrect. 1. If the error persists after replacing memory modules, replace the system board. 213-Incompatible Memory Module in configuration memory. If third-party memory has been added, test using HP-only memory. 4. Remove and replace the identified faulty memory module(s). 4. If additional memory was recently added, remove it to save the memory boot (memory added or removed). Check product documentation for RTC battery...
Maintenance & Service Guide HP 100B All-in-One
Page 91
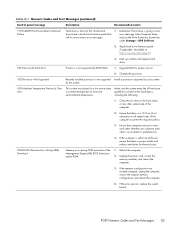
...ME) BIOS Extensions option ROM. 1. Make sure the system meets the HP enclosure guidelines as listed in a low power state to prevent damage due to proper version. 2. Unplug the power cord, re-seat the memory modules, and reboot the computer. 3. POST Numeric Codes and Text Messages 83...that error message. Determine if hard drive is proper intake and exhaust ventilation for the enclosure. 2200-PMM Allocation Error during MEBx Download Memory error during POST execution of the computer. 2. Back up contents and replace hard drive. 1801-Microcode Patch Error Processor is about ...
...ME) BIOS Extensions option ROM. 1. Make sure the system meets the HP enclosure guidelines as listed in a low power state to prevent damage due to proper version. 2. Unplug the power cord, re-seat the memory modules, and reboot the computer. 3. POST Numeric Codes and Text Messages 83...that error message. Determine if hard drive is proper intake and exhaust ventilation for the enclosure. 2200-PMM Allocation Error during MEBx Download Memory error during POST execution of the computer. 2. Back up contents and replace hard drive. 1801-Microcode Patch Error Processor is about ...

Maintenance & Service Guide HP 100B All-in-One
Page 92
... 2. Update to match current functionality contained in the SODIMM1 socket and that it is a memory module in the system BIOS. 1. Reboot the computer. 2. If the error persists, replace the system board. 2211-Memory not configured correctly for provisioning. 2. If the error still persists, replace the system board.... POST execution of the Management Engine (ME) BIOS Extensions option ROM. 1. Unplug the power cord, re-seat the memory modules, and reboot the computer. 3. Try a different USB key device for proper MEBx execution SODIMM1 is not properly responding ...
... 2. Update to match current functionality contained in the SODIMM1 socket and that it is a memory module in the system BIOS. 1. Reboot the computer. 2. If the error persists, replace the system board. 2211-Memory not configured correctly for provisioning. 2. If the error still persists, replace the system board.... POST execution of the Management Engine (ME) BIOS Extensions option ROM. 1. Unplug the power cord, re-seat the memory modules, and reboot the computer. 3. Try a different USB key device for proper MEBx execution SODIMM1 is not properly responding ...
Maintenance & Service Guide HP 100B All-in-One
Page 96
... LEDs continue until problem is seated into the connector on the system. Continue adding devices one at a time to isolate the faulty module. 3. Replace the power supply. 4. Replace DIMMs one device at a time to ensure all devices are functioning properly. 3. Replace the system board... is causing the problem by removing ALL attached devices (such as hard, diskette, or optical drives, and expansion cards). For systems with HP memory. 4. Replace the graphics card. 3. Replace the device that is solved. Red Power LED flashes five 5 times, once every second, followed...
... LEDs continue until problem is seated into the connector on the system. Continue adding devices one at a time to isolate the faulty module. 3. Replace the power supply. 4. Replace DIMMs one device at a time to ensure all devices are functioning properly. 3. Replace the system board... is causing the problem by removing ALL attached devices (such as hard, diskette, or optical drives, and expansion cards). For systems with HP memory. 4. Replace the graphics card. 3. Replace the device that is solved. Red Power LED flashes five 5 times, once every second, followed...
Maintenance & Service Guide HP 100B All-in-One
Page 104
M mass storage devices, spare part numbers 26 memory module removing 42 spare part numbers 26, 28 microphone pin assignments 91 mouse cleaning 21 spare ...number 26 R rear cover removing 30 spare part number 25, 27, 30 removal and replacement procedures All-in One chassis 29 bezel 74 display panel 76 feet 33 hard drive 38 hard drive cable 55 heat sink 68 inverter... 30 small fan 45 speakers 48 stand 34 system board 72 system board shield 66 thermal module 68 webcam module 52 WLAN module 69 WLAN module cable and antenna 69 S safety precautions cleaning 20 SATA connectors on system board 14 data ...
M mass storage devices, spare part numbers 26 memory module removing 42 spare part numbers 26, 28 microphone pin assignments 91 mouse cleaning 21 spare ...number 26 R rear cover removing 30 spare part number 25, 27, 30 removal and replacement procedures All-in One chassis 29 bezel 74 display panel 76 feet 33 hard drive 38 hard drive cable 55 heat sink 68 inverter... 30 small fan 45 speakers 48 stand 34 system board 72 system board shield 66 thermal module 68 webcam module 52 WLAN module 69 WLAN module cable and antenna 69 S safety precautions cleaning 20 SATA connectors on system board 14 data ...


