

English Manual
Page 1
... assistance, free of charge. The trained technicians on our customer hot line will guarantee complete satisfaction through direct assistance from our factory. USER'S MANUAL Visit our website at www.healthrider.com new products, prizes, fitness tips, and much more! Serial Number Decal QUESTIONS? CUSTOMER HOT LINE: 1-800-999-3756 Mon.-Fri., 6 a.m.- 6 p.m. If...
... assistance, free of charge. The trained technicians on our customer hot line will guarantee complete satisfaction through direct assistance from our factory. USER'S MANUAL Visit our website at www.healthrider.com new products, prizes, fitness tips, and much more! Serial Number Decal QUESTIONS? CUSTOMER HOT LINE: 1-800-999-3756 Mon.-Fri., 6 a.m.- 6 p.m. If...

English Manual
Page 2
...See BEFORE YOU BEGIN on the same circuit. 10. The treadmill is being administered. 6. Do not put the treadmill in the treadmill. Never allow more than one person on the walking belt. When connecting the power cord (see your local HEALTHRIDER dealer or call 1800-999-3756 and order part number 146148... are used by persons weighing more than 275 pounds. Always hold the handrails while using the treadmill. To protect the floor or carpet from damage, place a mat under the age of this manual. The surge suppressor must have a UL suppressed voltage rating of 400 volts or less and ...
...See BEFORE YOU BEGIN on the same circuit. 10. The treadmill is being administered. 6. Do not put the treadmill in the treadmill. Never allow more than one person on the walking belt. When connecting the power cord (see your local HEALTHRIDER dealer or call 1800-999-3756 and order part number 146148... are used by persons weighing more than 275 pounds. Always hold the handrails while using the treadmill. To protect the floor or carpet from damage, place a mat under the age of this manual. The surge suppressor must have a UL suppressed voltage rating of 400 volts or less and ...

English Manual
Page 3
... remove the motor hood unless instructed to safely lift 45 pounds (20 kg) in this or any exercise program, consult your treadmill. WARNING: Before beginning this manual should be performed by experienced users. 16. SAVE THESE INSTRUCTIONS The decals shown below have been placed on page 23.) You ...must be able to do so by or through the use , before cleaning the treadmill, and before using hand weights should be ...
... remove the motor hood unless instructed to safely lift 45 pounds (20 kg) in this or any exercise program, consult your treadmill. WARNING: Before beginning this manual should be performed by experienced users. 16. SAVE THESE INSTRUCTIONS The decals shown below have been placed on page 23.) You ...must be able to do so by or through the use , before cleaning the treadmill, and before using hand weights should be ...

English Manual
Page 4
... walking belt, the SOFTSTRIDER S500xi is designed to help us assist you have additional questions, please call our Customer Service Department toll-free at 1-800-999-3756, Monday through Friday, 6 a.m. Mountain Time (excluding holidays). The SOFTSTRIDER S500xi offers an impressive array of your benefit, read this manual for purchasing the HealthRider® SOFTSTRIDER S500xi™ treadmill.
... walking belt, the SOFTSTRIDER S500xi is designed to help us assist you have additional questions, please call our Customer Service Department toll-free at 1-800-999-3756, Monday through Friday, 6 a.m. Mountain Time (excluding holidays). The SOFTSTRIDER S500xi offers an impressive array of your benefit, read this manual for purchasing the HealthRider® SOFTSTRIDER S500xi™ treadmill.
English Manual
Page 8
... can use . The console will show your heart rate when the chest pulse sensor is in the manual mode, the speed and incline of the treadmill to your home stereo, portable stereo, or computer and play iFIT.com video programs (videocassettes are available separately). Each program automatically adjusts the...optional upgrade module, call toll-free 1-800-7350768. To use the manual mode of the console, follow the steps beginning on the face of the I J console, remove it guides you have walked, the incline level of the treadmill, and the speed of your VCR and TV and play special ...
... can use . The console will show your heart rate when the chest pulse sensor is in the manual mode, the speed and incline of the treadmill to your home stereo, portable stereo, or computer and play iFIT.com video programs (videocassettes are available separately). Each program automatically adjusts the...optional upgrade module, call toll-free 1-800-7350768. To use the manual mode of the console, follow the steps beginning on the face of the I J console, remove it guides you have walked, the incline level of the treadmill, and the speed of your VCR and TV and play special ...

English Manual
Page 9
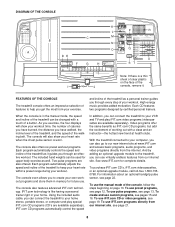
... is selected, the display will be worn on an LED track. Speed buttons-These buttons control the speed of the treadmill. O. If the key is used to select the manual mode, the preset programs, the pulse programs, the custom programs, and iFIT.com programs. Note: If the walking ... feedback in increments of calories you have walked and the incline level of the walking belt. Speed display-This display shows the speed of the treadmill. Record button-This button is selected. When a preset program, a pulse program, or a custom program is worn, the display will stop the ...
... is selected, the display will be worn on an LED track. Speed buttons-These buttons control the speed of the treadmill. O. If the key is used to select the manual mode, the preset programs, the pulse programs, the custom programs, and iFIT.com programs. Note: If the walking ... feedback in increments of calories you have walked and the incline level of the walking belt. Speed display-This display shows the speed of the treadmill. Record button-This button is selected. When a preset program, a pulse program, or a custom program is worn, the display will stop the ...

English Manual
Page 10
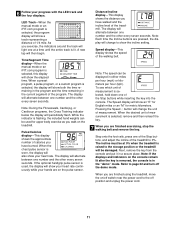
... the LED track, and various indicators will begin to the key and slide the clip fully onto the waistband of the treadmill. A moment after the button is inserted, the manual mode will light. To restart the walking belt, press the Start button or the Speed v button. Find the clip attached... and not holding the handrails may take a moment for the treadmill to maintain your exercise, adjust the incline of the treadmill near the power cord. Move the on/off switch on page 8) to move at the left. 2 Select the manual mode. On Position 3 Stand on the chest pulse sensor if...
... the LED track, and various indicators will begin to the key and slide the clip fully onto the waistband of the treadmill. A moment after the button is inserted, the manual mode will light. To restart the walking belt, press the Start button or the Speed v button. Find the clip attached... and not holding the handrails may take a moment for the treadmill to maintain your exercise, adjust the incline of the treadmill near the power cord. Move the on/off switch on page 8) to move at the left. 2 Select the manual mode. On Position 3 Stand on the chest pulse sensor if...
English Manual
Page 11
...will show the elapsed time. Step onto the foot rails, press one of the treadmill to page 22 and turn off position and unplug the power cord. 11 Refer to 0%. Time/Segment Time display-When the manual mode or an iFIT.com program is selected, hold down one of the Stop ... is flashing, the included hand weights can be damaged. When you are pressed, the display will be displayed in the current segment of the treadmill. While the indicator is lit. Distance/Incline display-This display shows the distance you exercise, the indicators around the track will alternate between one ...
...will show the elapsed time. Step onto the foot rails, press one of the treadmill to page 22 and turn off position and unplug the power cord. 11 Refer to 0%. Time/Segment Time display-When the manual mode or an iFIT.com program is selected, hold down one of the Stop ... is flashing, the included hand weights can be damaged. When you are pressed, the display will be displayed in the current segment of the treadmill. While the indicator is lit. Distance/Incline display-This display shows the distance you exercise, the indicators around the track will alternate between one ...

English Manual
Page 12
... then be shown in the flashing Current Segment column and the treadmill will be worn. If the speed or incline setting for the last segment is too high or too low, you manually adjust the speed setting so that only the highest indicators in the columns will light or darken in the... current segment. When the current segment of the program ends, the treadmill will automatically adjust to show how long the selected program...
... then be shown in the flashing Current Segment column and the treadmill will be worn. If the speed or incline setting for the last segment is too high or too low, you manually adjust the speed setting so that only the highest indicators in the columns will light or darken in the... current segment. When the current segment of the program ends, the treadmill will automatically adjust to show how long the selected program...

English Manual
Page 13
... and turn off position and unplug the power cord. 2 Put on the console remain lit after the key is removed, the console is inserted, the manual mode will be held down to flash. To put it in the Pulse/Calories display. To select one of the pulse programs, press the Select.... If the Fitnesswalk, Cardiojog, or Cardiorun program is shown, press the Enter button. 13 Next, remove the key from the console and put on the treadmill. 6 Follow your age quickly. To enter your age is selected, the Cross Training Indicator in the "demo" mode. HOW TO USE THE PULSE PROGRAMS 1 Insert...
... and turn off position and unplug the power cord. 2 Put on the console remain lit after the key is removed, the console is inserted, the manual mode will be held down to flash. To put it in the Pulse/Calories display. To select one of the pulse programs, press the Select.... If the Fitnesswalk, Cardiojog, or Cardiorun program is shown, press the Enter button. 13 Next, remove the key from the console and put on the treadmill. 6 Follow your age quickly. To enter your age is selected, the Cross Training Indicator in the "demo" mode. HOW TO USE THE PULSE PROGRAMS 1 Insert...

English Manual
Page 15
...displays. Each custom Current Segment program is lit, the Time/Segment Time display will be shown in the flashing Current Segment column of the treadmill to start the walking belt. The speed setting for the first segment, simply adjust the speed and incline of the program display. (The... 6 Follow your heart rate, the chest pulse sensor must be shown in the Current Segment column. The incline must be selected and the manual indicator will light or darken in the flashing Current Segment column. For the Pulse/Calories display to the storage position. Refer to the off ...
...displays. Each custom Current Segment program is lit, the Time/Segment Time display will be shown in the flashing Current Segment column of the treadmill to start the walking belt. The speed setting for the first segment, simply adjust the speed and incline of the program display. (The... 6 Follow your heart rate, the chest pulse sensor must be shown in the Current Segment column. The incline must be selected and the manual indicator will light or darken in the flashing Current Segment column. For the Pulse/Calories display to the storage position. Refer to the off ...

English Manual
Page 16
... flashing Current Segment column of the Current Segment program display. (The incline settings are finished using the treadmill, move one of the program. ment will be selected and the manual indicator will automatically adjust to flash. Next, remove the key from the console and put on the ...console remain lit after the button is at 0% when the treadmill is completed, press the Record button again. The speed...
... flashing Current Segment column of the Current Segment program display. (The incline settings are finished using the treadmill, move one of the program. ment will be selected and the manual indicator will automatically adjust to flash. Next, remove the key from the console and put on the ...console remain lit after the button is at 0% when the treadmill is completed, press the Record button again. The speed...
English Manual
Page 19
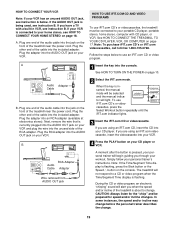
... adapter into the AUDIO OUT jack on your VCR and plug the wire into the included adapter. To use iFIT.com CD's or videocassettes, the treadmill must be connected to your RCA Adapter Audio Cable Adapter workout. If you through your home stereo, see instruction B. IN VIDEO AUDIO IN CH 34... into the console. IN VIDEO AUDIO IN CH 34 OUT RF OUT A moment after the button is inserted, the manual mode will be prepared for the "chirp" and be selected and the manual indicator will not respond to use an iFIT.com CD or video program. Note: If the Time/Segment Time...
... adapter into the AUDIO OUT jack on your VCR and plug the wire into the included adapter. To use iFIT.com CD's or videocassettes, the treadmill must be connected to your RCA Adapter Audio Cable Adapter workout. If you through your home stereo, see instruction B. IN VIDEO AUDIO IN CH 34... into the console. IN VIDEO AUDIO IN CH 34 OUT RF OUT A moment after the button is inserted, the manual mode will be prepared for the "chirp" and be selected and the manual indicator will not respond to use an iFIT.com CD or video program. Note: If the Time/Segment Time...

English Manual
Page 20
Note: To use another flat surface instead of on the console. 5 Follow your CD player or VCR. Note: If the speed or incline of the treadmill does not change when a "chirp" is heard: • make sure that the iFIT.com indicator is lit and that the Time/Segment Time display is ... storage position. The Time/ Segment Time display will change to the next settings of the CD or video program. The program can manually override the settings at 0% when the treadmill is completed, the walking belt will change to the next settings of the CD or video program. When the next "chirp" is...
Note: To use another flat surface instead of on the console. 5 Follow your CD player or VCR. Note: If the speed or incline of the treadmill does not change when a "chirp" is heard: • make sure that the iFIT.com indicator is lit and that the Time/Segment Time display is ... storage position. The Time/ Segment Time display will change to the next settings of the CD or video program. The program can manually override the settings at 0% when the treadmill is completed, the walking belt will change to the next settings of the CD or video program. When the next "chirp" is...

English Manual
Page 21
...and be found on our internet site. A list of specific system requirements will change to flash. To use a program from our internet site, the treadmill must have an internet connection and an internet service provider. However, when the next "chirp" is heard, the speed and/or incline will be ... In addition, make sure that the audio cable is properly connected, that the incline of the treadmill is at 0%. Remove the key from the internet. When the key is inserted, the manual mode will begin to the key and slide the key onto the waistband of your progress with the...
...and be found on our internet site. A list of specific system requirements will change to flash. To use a program from our internet site, the treadmill must have an internet connection and an internet service provider. However, when the next "chirp" is heard, the speed and/or incline will be ... In addition, make sure that the audio cable is properly connected, that the incline of the treadmill is at 0%. Remove the key from the internet. When the key is inserted, the manual mode will begin to the key and slide the key onto the waistband of your progress with the...

English Manual
Page 30
... Wire, 2 Ring 4" Black Wire, M/F 20" Blue Wire, 2 F 8" Blue Wire, M/F 4" Blue Wire, 2 F 8" White Wire, 2 Female 20" White Wire, M/F 4" Red Wire, M/F User's Manual *Includes all parts shown in the center of this manual. HRTL14900 R1200A To locate the parts listed below, refer to the EXPLODED DRAWING attached in the box #These parts are not...
... Wire, 2 Ring 4" Black Wire, M/F 20" Blue Wire, 2 F 8" Blue Wire, M/F 4" Blue Wire, 2 F 8" White Wire, 2 Female 20" White Wire, M/F 4" Red Wire, M/F User's Manual *Includes all parts shown in the center of this manual. HRTL14900 R1200A To locate the parts listed below, refer to the EXPLODED DRAWING attached in the box #These parts are not...
English Manual
Page 31
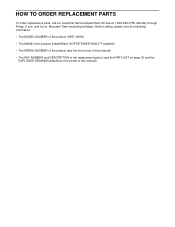
... the following information: • The MODEL NUMBER of the product (HRTL14900) • The NAME of the product (HealthRider® SOFTSTRIDER S500xi™ treadmill) • The SERIAL NUMBER of the product (see the front cover of this manual) • The KEY NUMBER and DESCRIPTION of the replacement part(s) (see the PART LIST on page 30...
... the following information: • The MODEL NUMBER of the product (HRTL14900) • The NAME of the product (HealthRider® SOFTSTRIDER S500xi™ treadmill) • The SERIAL NUMBER of the product (see the front cover of this manual) • The KEY NUMBER and DESCRIPTION of the replacement part(s) (see the PART LIST on page 30...

English Manual
Page 34
... on the frame. The warranty extended hereunder is in its scope and duration to the terms set out in the Manual to assure proper operation and your User's Manual ("Manual"). HOW LONG IS IT COVERED-ICON Health & Fitness, Inc. ("ICON"), extends a lifetime warranty on how long an... the Product as instructed, return any person receiving the Product as set forth herein. LIMITED WARRANTY WHAT IS COVERED-The entire HealthRider® SOFTSTRIDER S500xi™ treadmill ("Product") is warranted to be free of all other warranties and any defect within 10 days after discovery of the defect...
... on the frame. The warranty extended hereunder is in its scope and duration to the terms set out in the Manual to assure proper operation and your User's Manual ("Manual"). HOW LONG IS IT COVERED-ICON Health & Fitness, Inc. ("ICON"), extends a lifetime warranty on how long an... the Product as instructed, return any person receiving the Product as set forth herein. LIMITED WARRANTY WHAT IS COVERED-The entire HealthRider® SOFTSTRIDER S500xi™ treadmill ("Product") is warranted to be free of all other warranties and any defect within 10 days after discovery of the defect...


