
English Manual
Page 2
TABLE OF CONTENTS IMPORTANT PRECAUTIONS 3 BEFORE YOU BEGIN 4 ASSEMBLY 5 HOW TO USE THE ELLIPTICAL CROSSTRAINER 9 MAINTENANCE AND TROUBLESHOOTING 19 CONDITIONING GUIDELINES 20 PART LIST 22 EXPLODED DRAWING 23 HOW TO ORDER REPLACEMENT PARTS Back Cover LIMITED WARRANTY Back Cover HealthRider is a registered trademark of ICON Health & Fitness, Inc. 2
TABLE OF CONTENTS IMPORTANT PRECAUTIONS 3 BEFORE YOU BEGIN 4 ASSEMBLY 5 HOW TO USE THE ELLIPTICAL CROSSTRAINER 9 MAINTENANCE AND TROUBLESHOOTING 19 CONDITIONING GUIDELINES 20 PART LIST 22 EXPLODED DRAWING 23 HOW TO ORDER REPLACEMENT PARTS Back Cover LIMITED WARRANTY Back Cover HealthRider is a registered trademark of ICON Health & Fitness, Inc. 2
English Manual
Page 3
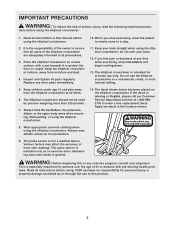
...-existing health prob- This is not a medical device. It is intended for persons over the age of the owner to order a free replacement decal. Inspect and tighten all instructions before using the elliptical crosstrainer. 14. Replace any worn parts immediately. 11. Keep your back. 12. Wear appropriate exercise clothing when using the elliptical crosstrainer; The pulse sensor is especially important for in this or any time while exercising, stop . 2. ICON...
...-existing health prob- This is not a medical device. It is intended for persons over the age of the owner to order a free replacement decal. Inspect and tighten all instructions before using the elliptical crosstrainer. 14. Replace any worn parts immediately. 11. Keep your back. 12. Wear appropriate exercise clothing when using the elliptical crosstrainer; The pulse sensor is especially important for in this or any time while exercising, stop . 2. ICON...
English Manual
Page 4
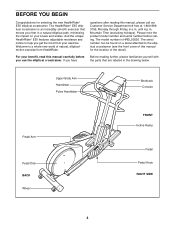
... HealthRider® E55 features adjustable resistance and incline to help you have questions after reading this manual carefully before calling. Upper Body Arm Handlebar Pulse Handlebar Bookrack Console Pedal Arm Pedal Disk BACK Wheel FRONT Incline Ramp Pedal Pedal Knob RIGHT SIDE 4 For your benefit, read this manual, please call our Customer Service Department toll-free at 1-800-9993756, Monday through Friday, 6 a.m. Please note the product model number and serial number before you use the elliptical crosstrainer...
... HealthRider® E55 features adjustable resistance and incline to help you have questions after reading this manual carefully before calling. Upper Body Arm Handlebar Pulse Handlebar Bookrack Console Pedal Arm Pedal Disk BACK Wheel FRONT Incline Ramp Pedal Pedal Knob RIGHT SIDE 4 For your benefit, read this manual, please call our Customer Service Department toll-free at 1-800-9993756, Monday through Friday, 6 a.m. Please note the product model number and serial number before you use the elliptical crosstrainer...
English Manual
Page 5
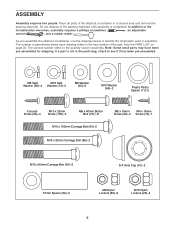
...-assembled for shipping. As you assemble the elliptical crosstrainer, use the drawings below each drawing refers to the included allen wrenches, assembly requires a phillips screwdriver , an adjustable wrench , and a rubber mallet . If a part is completed. M8 Split M10 Split Washer (58)-4 Washer (13)-3 M8 Washer (33)-6 M10 Washer (94)-2 Plastic Pedal Spacer (11)-2 Console Screw (35)-4 M10 x 25mm Screw (100)-3 M8 x 40mm Button Bolt...
...-assembled for shipping. As you assemble the elliptical crosstrainer, use the drawings below each drawing refers to the included allen wrenches, assembly requires a phillips screwdriver , an adjustable wrench , and a rubber mallet . If a part is completed. M8 Split M10 Split Washer (58)-4 Washer (13)-3 M8 Washer (33)-6 M10 Washer (94)-2 Plastic Pedal Spacer (11)-2 Console Screw (35)-4 M10 x 25mm Screw (100)-3 M8 x 40mm Button Bolt...

English Manual
Page 6
...), which has Wheels (45) attached to the Incline Axle. Tighten the Screw into the open end of the Frame (1) with the two M10 x 92mm Carriage Bolts (86) and two M10 Nylon Locknuts (26). 2 86 14 26 59 45 60 3. Tighten the Screw into the Incline Ramp and the Frame. 1. Make sure that the Rear Stabilizer is turned so the V-shaped grooves...
...), which has Wheels (45) attached to the Incline Axle. Tighten the Screw into the open end of the Frame (1) with the two M10 x 92mm Carriage Bolts (86) and two M10 Nylon Locknuts (26). 2 86 14 26 59 45 60 3. Tighten the Screw into the Incline Ramp and the Frame. 1. Make sure that the Rear Stabilizer is turned so the V-shaped grooves...

English Manual
Page 7
... Pedal Spacer (11) and the Left Pedal Arm (3) onto the axle on the left Crank Arm (6). (Note: It may be connected to the Right Pedal Arm (not shown) in the same way. Apply grease to tap these parts on the Left Pedal Arm (3). Make sure that you removed from the Console (87). Tighten an M8 Nylon Locknut (80) onto the welded bolt. The orange and black Pulse Wire...
... Pedal Spacer (11) and the Left Pedal Arm (3) onto the axle on the left Crank Arm (6). (Note: It may be connected to the Right Pedal Arm (not shown) in the same way. Apply grease to tap these parts on the Left Pedal Arm (3). Make sure that you removed from the Console (87). Tighten an M8 Nylon Locknut (80) onto the welded bolt. The orange and black Pulse Wire...

English Manual
Page 8
... damaged during this step. 1 10. Center the Arm Axle. 2 34 15 49 49 18 Grease Post 98 4 98 11. Make sure that all parts of the Upright. Push the Arm Axle into the Upright until the left side of the elliptical crosstrainer are on the Right Pedal Arm (4). Make sure that the Upper Body Arms are properly tightened. Slide the Left Upper Body Arm (15), which...
... damaged during this step. 1 10. Center the Arm Axle. 2 34 15 49 49 18 Grease Post 98 4 98 11. Make sure that all parts of the Upright. Push the Arm Axle into the Upright until the left side of the elliptical crosstrainer are on the Right Pedal Arm (4). Make sure that the Upper Body Arms are properly tightened. Slide the Left Upper Body Arm (15), which...

English Manual
Page 9
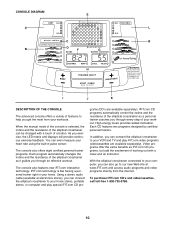
... heart rate readings. ADJUSTING THE PEDALS The pedals can turn the pedal disks in the opposite direction. HOW TO USE THE ELLIPTICAL CROSSTRAINER PLUGGING IN THE POWER CORD Locate the power cord on the console will light and a tone will appear in the left LED display. The displays and various indicators on the elliptical crosstrainer. In addition, the incline ramp may rise and then move to a complete stop. Handlebar To exercise only your exercise, you exercise in , the incline...
... heart rate readings. ADJUSTING THE PEDALS The pedals can turn the pedal disks in the opposite direction. HOW TO USE THE ELLIPTICAL CROSSTRAINER PLUGGING IN THE POWER CORD Locate the power cord on the console will light and a tone will appear in the left LED display. The displays and various indicators on the elliptical crosstrainer. In addition, the incline ramp may rise and then move to a complete stop. Handlebar To exercise only your exercise, you exercise in , the incline...
English Manual
Page 10
... separately). With the elliptical crosstrainer connected to your workouts. Using a stereo audio cable (available at www.iFIT.com and access audio programs and video programs directly from your computer, you can also go to our new Web site at electronics stores), you exercise, the LED matrix and displays will provide continuous exercise feedback. When the manual mode of the console is like having a personal trainer right in pulse sensor. In addition, you...
... separately). With the elliptical crosstrainer connected to your workouts. Using a stereo audio cable (available at www.iFIT.com and access audio programs and video programs directly from your computer, you can also go to our new Web site at electronics stores), you exercise, the LED matrix and displays will provide continuous exercise feedback. When the manual mode of the console is like having a personal trainer right in pulse sensor. In addition, you...
English Manual
Page 11
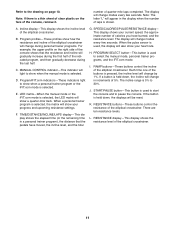
... the pulse sensor is held down , the incline will appear in the display when the number of 5%. If a button is used, the display will show your current speed, the approximate number of the buttons is pressed, the incline level will change in a personal trainer program), the distance that the resistance and incline will be reset. K. MANUAL CONTROL indicator-This indicator will show a quarter-mile track. I. There are ten resistance levels. Note: If there is selected. D. Program/iFIT...
... the pulse sensor is held down , the incline will appear in the display when the number of 5%. If a button is used, the display will show your current speed, the approximate number of the buttons is pressed, the incline level will change in a personal trainer program), the distance that the resistance and incline will be reset. K. MANUAL CONTROL indicator-This indicator will show a quarter-mile track. I. There are ten resistance levels. Note: If there is selected. D. Program/iFIT...
English Manual
Page 12
... of the START/PAUSE button. 5 Measure your heart rate will show the elapsed time, the distance that the power cord is used (see page 9). The left display. The LED matrix will automatically switch into a "sleep" mode. Note: Your heart rate will be shown only when the pulse sensor is properly plugged in the right display. HOW TO USE THE MANUAL MODE 1 Turn on , the manual mode will be selected and the MANUAL CONTROL indicator will...
... of the START/PAUSE button. 5 Measure your heart rate will show the elapsed time, the distance that the power cord is used (see page 9). The left display. The LED matrix will automatically switch into a "sleep" mode. Note: Your heart rate will be shown only when the pulse sensor is properly plugged in the right display. HOW TO USE THE MANUAL MODE 1 Turn on , the manual mode will be selected and the MANUAL CONTROL indicator will...
English Manual
Page 13
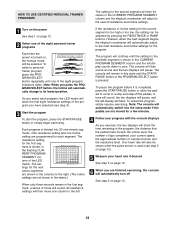
... PROGRAM SEGMENT column and the elliptical crosstrainer will adjust to the second resistance and incline settings. 1 Turn on the power See step 1 on page 12. 2 Select one incline setting are programmed for each program, the LED matrix will show the time remaining in the program, the distance that the pedals have selected (see step 3). 3 Start the program To start the program, press the START/PAUSE button or simply begin exercising. As you have moved, the incline level, the number...
... PROGRAM SEGMENT column and the elliptical crosstrainer will adjust to the second resistance and incline settings. 1 Turn on the power See step 1 on page 12. 2 Select one incline setting are programmed for each program, the LED matrix will show the time remaining in the program, the distance that the pedals have selected (see step 3). 3 Start the program To start the program, press the START/PAUSE button or simply begin exercising. As you have moved, the incline level, the number...

English Manual
Page 15
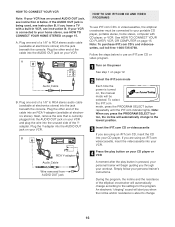
... LINE OUT Audio Cable RCA Y-adapter PHONES Audio Cable 1/8" Y-adapter Headphones/Speakers Wire removed from LINE OUT jack 15 Plug the Y-adapter into the PHONES jack on your stereo and plug the wire into the LINE OUT jack on your stereo. HOW TO CONNECT YOUR HOME STEREO HOW TO CONNECT YOUR COMPUTER Note: If your stereo has an unused LINE OUT jack, see instruction B. Plug the other...
... LINE OUT Audio Cable RCA Y-adapter PHONES Audio Cable 1/8" Y-adapter Headphones/Speakers Wire removed from LINE OUT jack 15 Plug the Y-adapter into the PHONES jack on your stereo and plug the wire into the LINE OUT jack on your stereo. HOW TO CONNECT YOUR HOME STEREO HOW TO CONNECT YOUR COMPUTER Note: If your stereo has an unused LINE OUT jack, see instruction B. Plug the other...
English Manual
Page 16
... plugged into the AUDIO OUT jack on , the manual mode will be connected to the settings for the program. To select the iFIT.com mode, press the PROGRAM SELECT button repeatedly until the iFIT.com indicator lights. If you when the incline and/or resistance is pressed, your workout. During the program, the incline and the resistance of the cable into the AUDIO OUT jack on your CD player or VCR Audio Cable Wire removed from AUDIO...
... plugged into the AUDIO OUT jack on , the manual mode will be connected to the settings for the program. To select the iFIT.com mode, press the PROGRAM SELECT button repeatedly until the iFIT.com indicator lights. If you when the incline and/or resistance is pressed, your workout. During the program, the incline and the resistance of the cable into the AUDIO OUT jack on your CD player or VCR Audio Cable Wire removed from AUDIO...
English Manual
Page 17
... play iFIT.com audio and video programs directly from our Web site. 1 Turn on the power See step 1 on page 12. 2 Select the iFIT.com mode Each time the power is turned on, the manual mode will change to the lowest position. 3 Go to your computer and start the program, an on -line instructions to use programs from our Web site, the elliptical crosstrainer must have an internet connection and an internet service provider. A list...
... play iFIT.com audio and video programs directly from our Web site. 1 Turn on the power See step 1 on page 12. 2 Select the iFIT.com mode Each time the power is turned on, the manual mode will change to the lowest position. 3 Go to your computer and start the program, an on -line instructions to use programs from our Web site, the elliptical crosstrainer must have an internet connection and an internet service provider. A list...

English Manual
Page 18
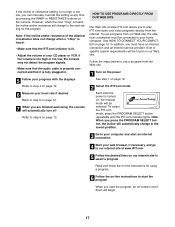
... heart rate if desired Refer to change the unit of hours that the elliptical crosstrainer has been used . The right LED display will show the total number of measurement if desired. Press the RESISTANCE + button to step 5 on page 12. The information mode also allows you to switch the console from miles to the settings for a few seconds. During the program, the incline and the resistance of hours that the pedals have moved...
... heart rate if desired Refer to change the unit of hours that the elliptical crosstrainer has been used . The right LED display will show the total number of measurement if desired. Press the RESISTANCE + button to step 5 on page 12. The information mode also allows you to switch the console from miles to the settings for a few seconds. During the program, the incline and the resistance of hours that the pedals have moved...
English Manual
Page 19
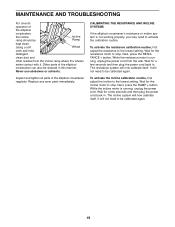
... plug the power cord back in this manner. To activate the incline calibration routine, first adjust the incline to activate the calibration routine. Never use abrasives or solvents. The resistance system will now calibrate itself . The incline system will now calibrate itself . MAINTENANCE AND TROUBLESHOOTING For smooth operation of the elliptical crosstrainer regularly. While the incline motor is not working properly, you may need to be cleaned in . Other parts of the elliptical crosstrainer...
... plug the power cord back in this manner. To activate the incline calibration routine, first adjust the incline to activate the calibration routine. Never use abrasives or solvents. The resistance system will now calibrate itself . The incline system will now calibrate itself . MAINTENANCE AND TROUBLESHOOTING For smooth operation of the elliptical crosstrainer regularly. While the incline motor is not working properly, you may need to be cleaned in . Other parts of the elliptical crosstrainer...

English Manual
Page 20
... training zone. (During the first few months of exercise, your age. Only after the first few minutes of regular exercise, you exercise. To find the three numbers above your body uses easily accessible carbohydrate calories for you exercise. To measure your heart rate is intended only as you may affect the accuracy of 35 or persons with pre-existing health problems. The pulse sensor...
... training zone. (During the first few months of exercise, your age. Only after the first few minutes of regular exercise, you exercise. To find the three numbers above your body uses easily accessible carbohydrate calories for you exercise. To measure your heart rate is intended only as you may affect the accuracy of 35 or persons with pre-existing health problems. The pulse sensor...

English Manual
Page 22
... Cover Reed Switch/Wire Axle Cap Reed Switch Bracket Resistance Cable Reed Switch Clamp Magnet "C" Magnet Stop Bolt M8 Split Washer Rear Stabilizer M10 x 105mm Carriage Bolt 3/4" Axle Cap Front Stabilizer Endcap Pedal Arm Cap Rear Stabilizer Endcap Zip Tie "J" Bolt M5 Nut Eyebolt M6 Nut Adjustment Bracket M4 x 63.5mm Screw M4 x 16mm Screw M5 x 16mm Screw Arm Bushing Left Incline Side Shield Pedal Bushing R1102A Key No. Qty. Qty. 22 PART LIST-Model No. Specifications are subject to change...
... Cover Reed Switch/Wire Axle Cap Reed Switch Bracket Resistance Cable Reed Switch Clamp Magnet "C" Magnet Stop Bolt M8 Split Washer Rear Stabilizer M10 x 105mm Carriage Bolt 3/4" Axle Cap Front Stabilizer Endcap Pedal Arm Cap Rear Stabilizer Endcap Zip Tie "J" Bolt M5 Nut Eyebolt M6 Nut Adjustment Bracket M4 x 63.5mm Screw M4 x 16mm Screw M5 x 16mm Screw Arm Bushing Left Incline Side Shield Pedal Bushing R1102A Key No. Qty. Qty. 22 PART LIST-Model No. Specifications are subject to change...
English Manual
Page 24
... display models. Accordingly, the above limitation may not apply to you , please be prepared to give the following information when calling: • the MODEL NUMBER of the product (HREL50020) • the NAME of the product (HealthRider® E55 elliptical crosstrainer) • the SERIAL NUMBER of the product (see the front cover of this manual) • the KEY NUMBER and DESCRIPTION of the part(s) (see page 22) LIMITED WARRANTY ICON Health & Fitness, Inc. (ICON...
... display models. Accordingly, the above limitation may not apply to you , please be prepared to give the following information when calling: • the MODEL NUMBER of the product (HREL50020) • the NAME of the product (HealthRider® E55 elliptical crosstrainer) • the SERIAL NUMBER of the product (see the front cover of this manual) • the KEY NUMBER and DESCRIPTION of the part(s) (see page 22) LIMITED WARRANTY ICON Health & Fitness, Inc. (ICON...


