
English Manual
Page 2
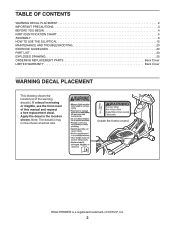
... trademark of ICON IP, Inc. 2 Note: The decal(s) may not be shown at actual size. ! (inside the frame covers) HEALTHRIDER is missing or illegible, see the front cover of the warning decal(s). Apply the decal in the location shown. TABLE OF CONTENTS WARNING DECAL... PLACEMENT 2 IMPORTANT PRECAUTIONS 3 BEFORE YOU BEGIN 4 PART IDENTIFICATION CHART 5 ASSEMBLY 6 HOW TO USE THE ELLIPTICAL 12 MAINTENANCE AND TROUBLESHOOTING 20 EXERCISE GUIDELINES 22 PART LIST 23 EXPLODED DRAWING 25 ORDERING REPLACEMENT PARTS Back Cover LIMITED WARRANTY Back Cover WARNING...
... trademark of ICON IP, Inc. 2 Note: The decal(s) may not be shown at actual size. ! (inside the frame covers) HEALTHRIDER is missing or illegible, see the front cover of the warning decal(s). Apply the decal in the location shown. TABLE OF CONTENTS WARNING DECAL... PLACEMENT 2 IMPORTANT PRECAUTIONS 3 BEFORE YOU BEGIN 4 PART IDENTIFICATION CHART 5 ASSEMBLY 6 HOW TO USE THE ELLIPTICAL 12 MAINTENANCE AND TROUBLESHOOTING 20 EXERCISE GUIDELINES 22 PART LIST 23 EXPLODED DRAWING 25 ORDERING REPLACEMENT PARTS Back Cover LIMITED WARRANTY Back Cover WARNING...

English Manual
Page 3
... carpet from damage, place a mat under age 12 and pets away from moisture and dust. Keep your back straight while using the elliptical. 4. ICON assumes no responsibility for home use only. Before beginning any worn parts immediately. 8. Wear appropriate clothes while exercising; do not... arch your physician. Do not put the elliptical in a controlled way. 14. If you feel faint or if you experience pain while exercising, stop immediately and cool down. 3 Always...
... carpet from damage, place a mat under age 12 and pets away from moisture and dust. Keep your back straight while using the elliptical. 4. ICON assumes no responsibility for home use only. Before beginning any worn parts immediately. 8. Wear appropriate clothes while exercising; do not... arch your physician. Do not put the elliptical in a controlled way. 14. If you feel faint or if you experience pain while exercising, stop immediately and cool down. 3 Always...
English Manual
Page 4
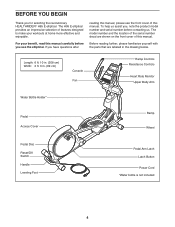
... is not included 4 Length: 6 ft. 10 in. (208 cm) Width: 2 ft. 3 in the drawing below. If you use the elliptical. To help us assist you for selecting the revolutionary HEALTHRIDER® H95 E elliptical. For your workouts at home more effective and enjoyable. Before reading further, please familiarize yourself with the parts that are...
... is not included 4 Length: 6 ft. 10 in. (208 cm) Width: 2 ft. 3 in the drawing below. If you use the elliptical. To help us assist you for selecting the revolutionary HEALTHRIDER® H95 E elliptical. For your workouts at home more effective and enjoyable. Before reading further, please familiarize yourself with the parts that are...
English Manual
Page 6
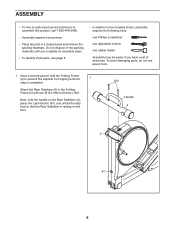
To avoid damaging parts, do not use power tools. 1. Next, hold the Folding Frame (2) to prevent the elliptical from tipping until you complete all parts in a cleared area and remove the packing materials. Attach the Rear Stabilizer (4) to the Folding Frame (2) with ...two M10 x 95mm Screws (100). Have a second person hold the handle on the Rear Stabilizer (4), press the Latch Button (67), and unfold the elliptical so that the Rear Stabilizer is completed. Do not dispose of the packing materials until this product, call 1-800-445-2480. •• Assembly requires...
To avoid damaging parts, do not use power tools. 1. Next, hold the Folding Frame (2) to prevent the elliptical from tipping until you complete all parts in a cleared area and remove the packing materials. Attach the Rear Stabilizer (4) to the Folding Frame (2) with ...two M10 x 95mm Screws (100). Have a second person hold the handle on the Rear Stabilizer (4), press the Latch Button (67), and unfold the elliptical so that the Rear Stabilizer is completed. Do not dispose of the packing materials until this product, call 1-800-445-2480. •• Assembly requires...

English Manual
Page 9
...). Set the Pedal Arm Roller on the Right Pedal Arm (12). Slide the Pedal Arm Sleeve onto the axle on the other side of the elliptical. 6b 130 32 12 Grease 39 Flat 46 Side 50 95 113 121 7. Make sure that the flat side is facing the... elliptical. See drawing 6a. Attach the Pedal Arm Sleeve with an M8 x 25mm Screw (121), a Large Axle Cover (113), and an M8 Washer (95). Orient a Pedal ...
...). Set the Pedal Arm Roller on the Right Pedal Arm (12). Slide the Pedal Arm Sleeve onto the axle on the other side of the elliptical. 6b 130 32 12 Grease 39 Flat 46 Side 50 95 113 121 7. Make sure that the flat side is facing the... elliptical. See drawing 6a. Attach the Pedal Arm Sleeve with an M8 x 25mm Screw (121), a Large Axle Cover (113), and an M8 Washer (95). Orient a Pedal ...
English Manual
Page 10
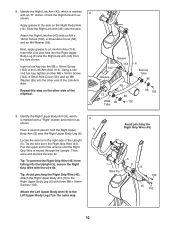
... M8 x 16mm Screw (102), a Small Axle Cover (56), and an M8 Washer (95) into the M8 x 16mm Screw (102) in the right side of the elliptical. Identify the Right Upper Body Arm (8), which is marked with a “"Right”" sticker, and orient it as 8 shown. Identify the Right Link Arm (43...
... M8 x 16mm Screw (102), a Small Axle Cover (56), and an M8 Washer (95) into the M8 x 16mm Screw (102) in the right side of the elliptical. Identify the Right Upper Body Arm (8), which is marked with a “"Right”" sticker, and orient it as 8 shown. Identify the Right Link Arm (43...
English Manual
Page 12
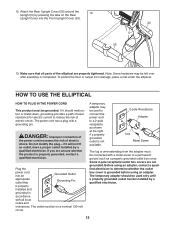
... properly grounded outlet is not available. 2-pole Receptacle Adapter Lug Metal Screw The lug or wire extending from damage, place a mat under the elliptical. Make sure that Grounding Pin is grounded before using an adapter. If it will not fit an outlet, have a proper outlet installed by... installed and grounded in accordance with all parts of electric shock. DANGER: Improper connection of the power cord increases the risk of the elliptical are properly tightened. To protect the floor or carpet from the adapter must be connected with a grounding pin. Before using an adapter,...
... properly grounded outlet is not available. 2-pole Receptacle Adapter Lug Metal Screw The lug or wire extending from damage, place a mat under the elliptical. Make sure that Grounding Pin is grounded before using an adapter. If it will not fit an outlet, have a proper outlet installed by... installed and grounded in accordance with all parts of electric shock. DANGER: Improper connection of the power cord increases the risk of the elliptical are properly tightened. To protect the floor or carpet from the adapter must be connected with a grounding pin. Before using an adapter,...
English Manual
Page 13
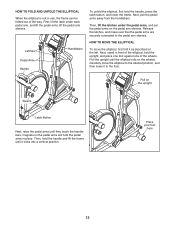
... the handlebars. Then, lift the latches under each pedal arm, and lift the pedal arms off the pedal arm sleeves. HOW TO MOVE THE ELLIPTICAL To move the elliptical to the desired position, and then lower it locks into a vertical position. magnets on the wheels. Then, hold the pedal arms in use... pedal arms on the upright Sleeve Latch Button Next, raise the pedal arms until it to the pedal arm sleeves. Pull the upright until the elliptical rolls on the pedal arms will hold the handle and lift the frame until they touch the handlebars; Release the latches, and make sure that...
... the handlebars. Then, lift the latches under each pedal arm, and lift the pedal arms off the pedal arm sleeves. HOW TO MOVE THE ELLIPTICAL To move the elliptical to the desired position, and then lower it locks into a vertical position. magnets on the wheels. Then, hold the pedal arms in use... pedal arms on the upright Sleeve Latch Button Next, raise the pedal arms until it to the pedal arm sleeves. Pull the upright until the elliptical rolls on the pedal arms will hold the handle and lift the frame until they touch the handlebars; Release the latches, and make sure that...
English Manual
Page 14
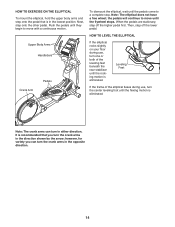
... motion is eliminated. When the pedals are stationary, step off the lower pedal. HOW TO LEVEL THE ELLIPTICAL If the elliptical rocks slightly on your floor during use, turn one or both of the elliptical flexes during use, turn in either direction. however, for variety you turn the crank arms in the... can turn the crank arms in the direction shown by the arrow; Next, step onto the other pedal. HOW TO EXERCISE ON THE ELLIPTICAL To mount the elliptical, hold the upper body arms and step onto the pedal that you can turn the center leveling foot until the pedals come to a...
... motion is eliminated. When the pedals are stationary, step off the lower pedal. HOW TO LEVEL THE ELLIPTICAL If the elliptical rocks slightly on your floor during use, turn one or both of the elliptical flexes during use, turn in either direction. however, for variety you turn the crank arms in the... can turn the crank arms in the direction shown by the arrow; Next, step onto the other pedal. HOW TO EXERCISE ON THE ELLIPTICAL To mount the elliptical, hold the upper body arms and step onto the pedal that you can turn the center leveling foot until the pedals come to a...
English Manual
Page 16
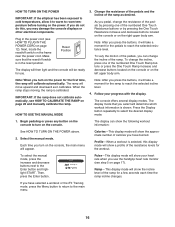
... or the iFit Training mode, press the Menu button to return to the main menu. 16 HOW TO TURN ON THE POWER IMPORTANT: If the elliptical has been exposed to cold temperatures, allow it will appear. Plug in the reset position. As you pedal, change the resistance of calories you press...
... or the iFit Training mode, press the Menu button to return to the main menu. 16 HOW TO TURN ON THE POWER IMPORTANT: If the elliptical has been exposed to cold temperatures, allow it will appear. Plug in the reset position. As you pedal, change the resistance of calories you press...
English Manual
Page 17
... hands excessively or squeeze the metal contacts tightly. RPM—-This display mode will show your pulse is selected, this , the electrical components on the elliptical may wear prematurely. The fan has high and low speed settings. Avoid moving your heart rate if desired. When your pedaling pace, in the workout...
... hands excessively or squeeze the metal contacts tightly. RPM—-This display mode will show your pulse is selected, this , the electrical components on the elliptical may wear prematurely. The fan has high and low speed settings. Avoid moving your heart rate if desired. When your pedaling pace, in the workout...
English Manual
Page 19
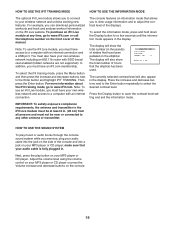
... to connect to adjust the contrast level of strides that allows you to view usage information and to your audio cable into a jack on the elliptical. The console features an information mode that have been pedaled on your MP3 player or CD player. Press the Display button to the Enter button... (in . You must also have your audio cable is fully plugged in thousands) of the displays. Then, press the Enter button. make sure that the elliptical has been used.
... to connect to adjust the contrast level of strides that allows you to view usage information and to your audio cable into a jack on the elliptical. The console features an information mode that have been pedaled on your MP3 player or CD player. Press the Display button to the Enter button... (in . You must also have your audio cable is fully plugged in thousands) of the displays. Then, press the Enter button. make sure that the elliptical has been used.
English Manual
Page 20
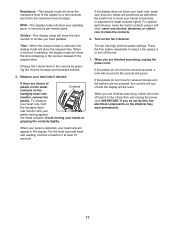
... in the power cord and rotate the large pulley for several seconds until the console displays correct feedback. To clean the elliptical, use a damp cloth and a small amount of the elliptical regularly. Slide the Reed Switch (69) slightly toward or away from the console and keep the console out of direct sunlight... ramp may need to be too high or too low, see step 5 on the Access Cover (20) and pull the Access Cover upward off the elliptical. Replace any worn parts immediately. Next, look into the access opening and locate the Reed Switch (69).
... in the power cord and rotate the large pulley for several seconds until the console displays correct feedback. To clean the elliptical, use a damp cloth and a small amount of the elliptical regularly. Slide the Reed Switch (69) slightly toward or away from the console and keep the console out of direct sunlight... ramp may need to be too high or too low, see step 5 on the Access Cover (20) and pull the Access Cover upward off the elliptical. Replace any worn parts immediately. Next, look into the access opening and locate the Reed Switch (69).
English Manual
Page 21
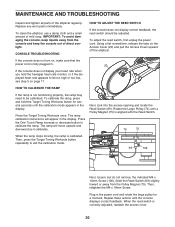
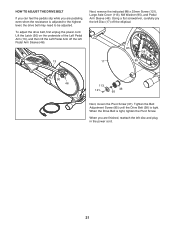
... Arm Sleeve (46). Lift the Latch (50) on the underside of the Left Pedal Arm (13), and then lift the Left Pedal Arm off the elliptical. 97 38 13 17 85 50 46 113 121 46 95 Next, loosen the Pivot Screw (97). HOW TO ADJUST THE DRIVE BELT If you...
... Arm Sleeve (46). Lift the Latch (50) on the underside of the Left Pedal Arm (13), and then lift the Left Pedal Arm off the elliptical. 97 38 13 17 85 50 46 113 121 46 95 Next, loosen the Pivot Screw (97). HOW TO ADJUST THE DRIVE BELT If you...


