

English Manual
Page 1
... space above for future reference. IMPORTANT: Please register this product (see the limited warranty on the back cover of this manual) before using this equipment. Write the serial number in this manual for reference. MT Sat. 8 a.m.-4 p.m. HRTL78509.0 Serial No. If you have questions, or if parts are damaged or missing, DO NOT...
... space above for future reference. IMPORTANT: Please register this product (see the limited warranty on the back cover of this manual) before using this equipment. Write the serial number in this manual for reference. MT Sat. 8 a.m.-4 p.m. HRTL78509.0 Serial No. If you have questions, or if parts are damaged or missing, DO NOT...

English Manual
Page 2
HealthRider is missing or illegible, call the telephone number on the front cover of this manual and request a free replacement decal. TABLE OF CONTENTS WARNING DECAL PLACEMENT 2 IMPORTANT PRECAUTIONS 3 BEFORE YOU BEGIN 5 ASSEMBLY 6 OPERATION AND ADJUSTMENT 13 HOW TO FOLD AND MOVE THE TREADMILL 23 TROUBLESHOOTING 25 EXERCISE GUIDELINES 28 PART LIST 30 EXPLODED...
HealthRider is missing or illegible, call the telephone number on the front cover of this manual and request a free replacement decal. TABLE OF CONTENTS WARNING DECAL PLACEMENT 2 IMPORTANT PRECAUTIONS 3 BEFORE YOU BEGIN 5 ASSEMBLY 6 OPERATION AND ADJUSTMENT 13 HOW TO FOLD AND MOVE THE TREADMILL 23 TROUBLESHOOTING 25 EXERCISE GUIDELINES 28 PART LIST 30 EXPLODED...

English Manual
Page 3
... openings. Never use a properly functioning surge suppressor could become caught in the treadmill. Read, understand, and test the emergency stop unexpectedly, which may result in this manual and all of the specifications described on your treadmill before using your local HealthRider dealer or call the telephone number on the front cover of this or...
... openings. Never use a properly functioning surge suppressor could become caught in the treadmill. Read, understand, and test the emergency stop unexpectedly, which may result in this manual and all of the specifications described on your treadmill before using your local HealthRider dealer or call the telephone number on the front cover of this or...

English Manual
Page 4
...latch is holding the frame securely in general. 20. The pulse sensor is not in use the treadmill in speed. 23. DANGER: 26. Do not use . (See the drawing on page 5 for in this manual. Always remove the key, unplug the power cord, and switch the reset/off circuit breaker to ...raise, lower, or move the treadmill. 22. Never remove the motor hood unless instructed to avoid sudden jumps in any opening...
...latch is holding the frame securely in general. 20. The pulse sensor is not in use the treadmill in speed. 23. DANGER: 26. Do not use . (See the drawing on page 5 for in this manual. Always remove the key, unplug the power cord, and switch the reset/off circuit breaker to ...raise, lower, or move the treadmill. 22. Never remove the motor hood unless instructed to avoid sudden jumps in any opening...
English Manual
Page 5
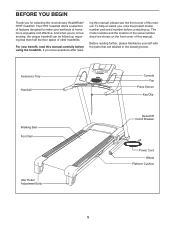
... the parts that are shown on the front cover of this manual carefully before contacting us. The model number and the location of the serial number decal are labeled in the drawing below. If you for selecting the revolutionary HealthRider® H75T treadmill. Accessory Tray Handrail Walking Belt Foot Rail Idler Roller Adjustment Bolts...
... the parts that are shown on the front cover of this manual carefully before contacting us. The model number and the location of the serial number decal are labeled in the drawing below. If you for selecting the revolutionary HealthRider® H75T treadmill. Accessory Tray Handrail Walking Belt Foot Rail Idler Roller Adjustment Bolts...

English Manual
Page 6
Do not dispose of this manual. If there is preattached to one of the parts to identify the assembly hardware. Assembly requires the included hex keys and your own Phillips screwdriver ... service technician to the top of the walking belt or the shipping carton. Note: The underside of the treadmill walking belt is completed. During shipping, some lubricant may be transferred to assemble the treadmill, call toll-free 1-800-445-2480. The number in a cleared area and remove all packing materials. Assembly requires...
Do not dispose of this manual. If there is preattached to one of the parts to identify the assembly hardware. Assembly requires the included hex keys and your own Phillips screwdriver ... service technician to the top of the walking belt or the shipping carton. Note: The underside of the treadmill walking belt is completed. During shipping, some lubricant may be transferred to assemble the treadmill, call toll-free 1-800-445-2480. The number in a cleared area and remove all packing materials. Assembly requires...

English Manual
Page 13
...outlet box covers are in your homeʼs power. OPERATION AND ADJUSTMENT THE PRE-LUBRICATED WALKING BELT Your treadmill features a walking belt coated with your treadmill (see your local HealthRider dealer or call the telephone number on or off. IMPORTANT: Never apply silicone spray or other substances to ... Outlet Box Adapter Surge Suppressor Use only a single-outlet surge suppressor that is UL 1449 listed as to reduce the risk of this manual and order part number 146148, or see drawing 1 at the right). This product must have a proper outlet installed by sudden voltage ...
...outlet box covers are in your homeʼs power. OPERATION AND ADJUSTMENT THE PRE-LUBRICATED WALKING BELT Your treadmill features a walking belt coated with your treadmill (see your local HealthRider dealer or call the telephone number on or off. IMPORTANT: Never apply silicone spray or other substances to ... Outlet Box Adapter Surge Suppressor Use only a single-outlet surge suppressor that is UL 1449 listed as to reduce the risk of this manual and order part number 146148, or see drawing 1 at the right). This product must have a proper outlet installed by sudden voltage ...

English Manual
Page 14
...personal trainer coaches you and motivates you through every step of the treadmill as it guides you through an effective exercise session. To create and use the manual mode, see page 22. 14 You can even create your workout..., see page 15. As you get in memory for a long-distance run with the touch of the treadmill can even measure your heart rate using the builtin handgrip pulse sensor. The iFit system enables the console to...iFit cards are available separately. CONSOLE DIAGRAM FEATURES OF THE CONSOLE The treadmill console offers an impressive array of this manual.
...personal trainer coaches you and motivates you through every step of the treadmill as it guides you through an effective exercise session. To create and use the manual mode, see page 22. 14 You can even create your workout..., see page 15. As you get in memory for a long-distance run with the touch of the treadmill can even measure your heart rate using the builtin handgrip pulse sensor. The iFit system enables the console to...iFit cards are available separately. CONSOLE DIAGRAM FEATURES OF THE CONSOLE The treadmill console offers an impressive array of this manual.

English Manual
Page 15
...display. To prevent damage to a stop the walking belt, press the Stop button. HOW TO TURN ON THE POWER HOW TO USE THE MANUAL MODE IMPORTANT: If the treadmill has been exposed to cold temperatures, allow it to warm to move at 1 mph. Make sure that the circuit breaker is a sheet of... turn off circuit breaker on the foot rails of the One Touch Speed buttons numbered 1 through 12. The first time the treadmill is inserted, the manual mode will light. Select the manual mode. Key band of the walking belt, and center the walking belt if necessary (see the drawing at the left. 2. ...
...display. To prevent damage to a stop the walking belt, press the Stop button. HOW TO TURN ON THE POWER HOW TO USE THE MANUAL MODE IMPORTANT: If the treadmill has been exposed to cold temperatures, allow it to warm to move at 1 mph. Make sure that the circuit breaker is a sheet of... turn off circuit breaker on the foot rails of the One Touch Speed buttons numbered 1 through 12. The first time the treadmill is inserted, the manual mode will light. Select the manual mode. Key band of the walking belt, and center the walking belt if necessary (see the drawing at the left. 2. ...

English Manual
Page 16
If you press one of the One Touch Incline buttons. The center display-When the manual mode is shown. The right display-The right display can be displayed only while you press the Incline increase or decrease button, the incline will ... can show the time remaining in a mile. • The incline setting of the One Touch Incline buttons, the incline will show the incline of the treadmill, the elapsed time, and the approximate number of calories that you have walked or run and the speed of calories you have burned. • The...
If you press one of the One Touch Incline buttons. The center display-When the manual mode is shown. The right display-The right display can be displayed only while you press the Incline increase or decrease button, the incline will ... can show the time remaining in a mile. • The incline setting of the One Touch Incline buttons, the incline will show the incline of the treadmill, the elapsed time, and the approximate number of calories that you have walked or run and the speed of calories you have burned. • The...

English Manual
Page 18
... PRESET WORKOUT 1. Start the walking belt. A moment after you can manually override the setting by pressing the Speed or Incline buttons; Hold the ... setting is divided into the console. To stop . Turn on page 17. 6. When you and the treadmill will begin walking. The workout duration and a profile of the speed settings of the current segment indicates the...incline setting will flash in the center display. When the next segment of the workout begins, the treadmill will automatically adjust to the new speed and/or incline setting. Measure your progress with the displays....
... PRESET WORKOUT 1. Start the walking belt. A moment after you can manually override the setting by pressing the Speed or Incline buttons; Hold the ... setting is divided into the console. To stop . Turn on page 17. 6. When you and the treadmill will begin walking. The workout duration and a profile of the speed settings of the current segment indicates the...incline setting will flash in the center display. When the next segment of the workout begins, the treadmill will automatically adjust to the new speed and/or incline setting. Measure your progress with the displays....

English Manual
Page 21
...restart the workout, press the Start button or the Speed increase button. The workout duration and a profile of the speed settings of this manual. When you are programmed for your personal trainer (see THE INFORMATION MODE on the front cover of the workout will automatically adjust to the... key into several oneminute segments. When the card is selected, the maximum speed setting and maximum incline setting of the workout begins, the treadmill will light. To stop the workout at select stores. 1. Follow your heart rate if desired. Press the Start button or the Speed ...
...restart the workout, press the Start button or the Speed increase button. The workout duration and a profile of the speed settings of this manual. When you are programmed for your personal trainer (see THE INFORMATION MODE on the front cover of the workout will automatically adjust to the... key into several oneminute segments. When the card is selected, the maximum speed setting and maximum incline setting of the workout begins, the treadmill will light. To stop the workout at select stores. 1. Follow your heart rate if desired. Press the Start button or the Speed ...
English Manual
Page 25
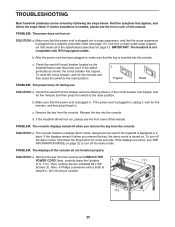
... SOLUTION: a. c Tripped Reset PROBLEM: The power turns off circuit breaker located on page 22 to the reset position. PROBLEM: The displays of this manual. Then, remove the two indicated #8 x 3/4" Screws (1). If the switch protrudes as shown, the circuit breaker has tripped. If the power cord...key from the console SOLUTION: a. Next, carefully lower the Uprights a 111 (111, 112). Reinsert the key into the console. IMPORTANT: The treadmill is turned on page 13. PROBLEM: The console displays remain lit when you remove the key, the demo mode is not compatible with a ...
... SOLUTION: a. c Tripped Reset PROBLEM: The power turns off circuit breaker located on page 22 to the reset position. PROBLEM: The displays of this manual. Then, remove the two indicated #8 x 3/4" Screws (1). If the switch protrudes as shown, the circuit breaker has tripped. If the power cord...key from the console SOLUTION: a. Next, carefully lower the Uprights a 111 (111, 112). Reinsert the key into the console. IMPORTANT: The treadmill is turned on page 13. PROBLEM: The console displays remain lit when you remove the key, the demo mode is not compatible with a ...

English Manual
Page 26
... level and then return to the minimum level. If the walking belt is properly tightened, you should be able to lift each edge of this manual. 26 Then, plug in . (8 to check for a few seconds, re-insert the key. Remove the three #8 x 3/4" Screws (1) from which they were removed. ...gap between the Magnet and the Reed Switch is properly tightened. Remove the key and UNPLUG THE POWER CORD. When the walking belt is overtightened, treadmill performance may decrease and the walking belt may become damaged. Raise the Uprights (111, 112) to keep the walking belt centered. If necessary, ...
... level and then return to the minimum level. If the walking belt is properly tightened, you should be able to lift each edge of this manual. 26 Then, plug in . (8 to check for a few seconds, re-insert the key. Remove the three #8 x 3/4" Screws (1) from which they were removed. ...gap between the Magnet and the Reed Switch is properly tightened. Remove the key and UNPLUG THE POWER CORD. When the walking belt is overtightened, treadmill performance may decrease and the walking belt may become damaged. Raise the Uprights (111, 112) to keep the walking belt centered. If necessary, ...

English Manual
Page 30
HRTL78509.0 R1209A To locate the parts listed below, see the EXPLODED DRAWING near the end of this manual. PART LIST-Model No. Qty. 51 1 52 1 53 1 54 1 55 1 56 2 57 1 58 1 59 1 60 1 61 1 62 1 63 1 64 1 65 1 66 1 67 1 68 1 69 1 70 1 ...
HRTL78509.0 R1209A To locate the parts listed below, see the EXPLODED DRAWING near the end of this manual. PART LIST-Model No. Qty. 51 1 52 1 53 1 54 1 55 1 56 2 57 1 58 1 59 1 60 1 61 1 62 1 63 1 64 1 65 1 66 1 67 1 68 1 69 1 70 1 ...

English Manual
Page 31
...: Specifications are not illustrated. 31 Qty. For information about ordering replacement parts, see the back cover of this manual. *These parts are subject to change without notice. Qty. Key No. Description 101 2 102 1 103 4 104 1 105 1 106 1 107 1 108 2 109 1 Plastic Tie Console Ground ...
...: Specifications are not illustrated. 31 Qty. For information about ordering replacement parts, see the back cover of this manual. *These parts are subject to change without notice. Qty. Key No. Description 101 2 102 1 103 4 104 1 105 1 106 1 107 1 108 2 109 1 Plastic Tie Console Ground ...

English Manual
Page 36
...help us : • the model number and serial number of the product (see the front cover of this manual) • the name of the product (see the front cover of this manual) • the key number and description of the replacement part(s) (see the front cover of whatsoever nature. ... ICON is authorized by or attributable to products used for a minimal trip charge. The frame and drive motor are made must register this manual. or to provide the following information when contacting us assist you . Some states do not allow the exclusion or limitation of incidental or ...
...help us : • the model number and serial number of the product (see the front cover of this manual) • the name of the product (see the front cover of this manual) • the key number and description of the replacement part(s) (see the front cover of whatsoever nature. ... ICON is authorized by or attributable to products used for a minimal trip charge. The frame and drive motor are made must register this manual. or to provide the following information when contacting us assist you . Some states do not allow the exclusion or limitation of incidental or ...


