
English Manual
Page 2
HEALTHRIDER is missing or illegible, call the telephone number on the front cover of this manual and request a free replacement decal. Apply the decal in the location shown. TABLE OF CONTENTS WARNING DECAL PLACEMENT 2 IMPORTANT PRECAUTIONS 3 BEFORE YOU BEGIN 4 ASSEMBLY 5 HOW TO USE THE EXERCISE CYCLE 12 MAINTENANCE AND TROUBLESHOOTING 24 EXERCISE GUIDELINES 25 PART LIST 29 EXPLODED DRAWING 30 ORDERING REPLACEMENT PARTS Back Cover LIMITED WARRANTY Back Cover WARNING DECAL PLACEMENT...
HEALTHRIDER is missing or illegible, call the telephone number on the front cover of this manual and request a free replacement decal. Apply the decal in the location shown. TABLE OF CONTENTS WARNING DECAL PLACEMENT 2 IMPORTANT PRECAUTIONS 3 BEFORE YOU BEGIN 4 ASSEMBLY 5 HOW TO USE THE EXERCISE CYCLE 12 MAINTENANCE AND TROUBLESHOOTING 24 EXERCISE GUIDELINES 25 PART LIST 29 EXPLODED DRAWING 30 ORDERING REPLACEMENT PARTS Back Cover LIMITED WARRANTY Back Cover WARNING DECAL PLACEMENT...
English Manual
Page 3
... informed of all precautions. 9. Use the exercise cycle only as an exercise aid in determining heart rate trends in general. 11. Always wear athletic shoes for home use it to ensure that could become caught on a level surface, with pre-existing health problems. 2. Keep the exercise cycle indoors, away from the exercise cycle at all times. 8. The pulse sensor is the responsibility of the owner...
... informed of all precautions. 9. Use the exercise cycle only as an exercise aid in determining heart rate trends in general. 11. Always wear athletic shoes for home use it to ensure that could become caught on a level surface, with pre-existing health problems. 2. Keep the exercise cycle indoors, away from the exercise cycle at all times. 8. The pulse sensor is the responsibility of the owner...
English Manual
Page 4
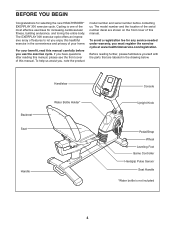
... exercises for selecting the new HEALTHRIDER® EXERPLAY 300 exercise cycle. To help us . The model number and the location of the serial number decal are labeled in the convenience and privacy of this manual. BEFORE YOU BEGIN Congratulations for increasing cardiovascular fitness, building endurance, and toning the entire body. For your home. Backrest Seat Handlebar Water Bottle Holder* Handle Console Upright Knob Pedal/Strap Wheel Leveling Foot Game Controller Handgrip Pulse Sensor Seat...
... exercises for selecting the new HEALTHRIDER® EXERPLAY 300 exercise cycle. To help us . The model number and the location of the serial number decal are labeled in the convenience and privacy of this manual. BEFORE YOU BEGIN Congratulations for increasing cardiovascular fitness, building endurance, and toning the entire body. For your home. Backrest Seat Handlebar Water Bottle Holder* Handle Console Upright Knob Pedal/Strap Wheel Leveling Foot Game Controller Handgrip Pulse Sensor Seat...
English Manual
Page 5
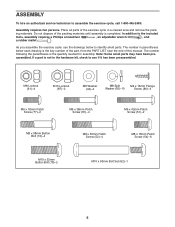
If a part is the quantity needed for assembly. The number following the parentheses is not in the hardware kit, check to identify small parts. Place all parts of this manual. Do not dispose of the packing materials until assembly is the key number of the part, from the PART LIST near the end of the exercise cycle in parentheses below to see if it has...
If a part is the quantity needed for assembly. The number following the parentheses is not in the hardware kit, check to identify small parts. Place all parts of this manual. Do not dispose of the packing materials until assembly is the key number of the part, from the PART LIST near the end of the exercise cycle in parentheses below to see if it has...
English Manual
Page 8
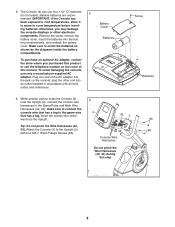
... telephone number on the console; Battery Cover Batteries Screw 4 Batteries 6. Attach the Console (4) to the Upright (2) with all local codes and ordinances. To purchase an optional AC adapter, contact the store where you may damage the console displays or other end into the jack on the cover of this manual. While another person holds the Console (4) near the Upright (2), connect the console wire 6 harnesses to orient the batteries as shown by the diagrams...
... telephone number on the console; Battery Cover Batteries Screw 4 Batteries 6. Attach the Console (4) to the Upright (2) with all local codes and ordinances. To purchase an optional AC adapter, contact the store where you may damage the console displays or other end into the jack on the cover of this manual. While another person holds the Console (4) near the Upright (2), connect the console wire 6 harnesses to orient the batteries as shown by the diagrams...
English Manual
Page 11
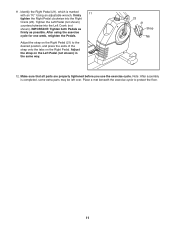
... the same way. 23 21 Strap Tab 12. 11. Adjust the strap on the Right Pedal (21) to protect the floor. 11 Adjust the strap on the Right Pedal. Using an adjustable wrench, firmly 11 tighten the Right Pedal clockwise into the Left Crank (not shown). Make sure that all parts are properly tightened before you use the exercise cycle. IMPORTANT: Tighten both Pedals as firmly as possible.
... the same way. 23 21 Strap Tab 12. 11. Adjust the strap on the Right Pedal (21) to protect the floor. 11 Adjust the strap on the Right Pedal. Using an adjustable wrench, firmly 11 tighten the Right Pedal clockwise into the Left Crank (not shown). Make sure that all parts are properly tightened before you use the exercise cycle. IMPORTANT: Tighten both Pedals as firmly as possible.
English Manual
Page 13
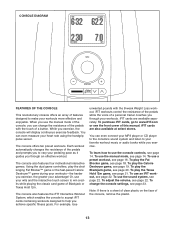
.... To use the console controls, see page 21. To use an iFIT workout, see page 22. CONSOLE DIAGRAM FEATURES OF THE CONSOLE This revolutionary console offers an array of features designed to make your heart rate using the handgrip pulse sensor. The console also features the iFIT Interactive Workout System, which enables the console to accept iFIT cards containing workouts designed to help you exercise, the console will display continuous exercise feedback. While you achieve specific fitness goals...
.... To use the console controls, see page 21. To use an iFIT workout, see page 22. CONSOLE DIAGRAM FEATURES OF THE CONSOLE This revolutionary console offers an array of features designed to make your heart rate using the handgrip pulse sensor. The console also features the iFIT Interactive Workout System, which enables the console to accept iFIT cards containing workouts designed to help you exercise, the console will display continuous exercise feedback. While you achieve specific fitness goals...
English Manual
Page 14
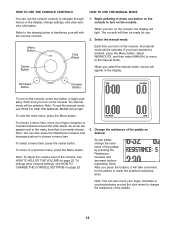
... pedals. 14 When you turn on the console, the manual mode will then be selected. To view the main menu, press the Menu button. Menu Button Center Button Click Wheel HOW TO USE THE MANUAL MODE 1. Each time you turn on the console, the display will appear in the display, change other console settings, see HOW TO CHANGE THE CONSOLE SETTINGS on page 23. 3. To change settings, and view exercise information. HOW TO USE THE CONSOLE CONTROLS You can use...
... pedals. 14 When you turn on the console, the manual mode will then be selected. To view the main menu, press the Menu button. Menu Button Center Button Click Wheel HOW TO USE THE MANUAL MODE 1. Each time you turn on the console, the display will appear in the display, change other console settings, see HOW TO CHANGE THE CONSOLE SETTINGS on page 23. 3. To change settings, and view exercise information. HOW TO USE THE CONSOLE CONTROLS You can use...
English Manual
Page 15
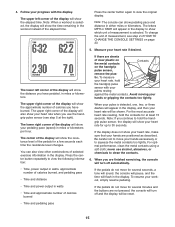
... turn off and the display will be reset. • Time and pedaling pace 15 For the most accurate heart rate reading, hold the handgrip pulse sensor with the display. If the pedals do not move your pedaling pace (speed) in miles or kilometers. Follow your progress with your palms resting against the metal contacts. The upper left corner of the display will show pedaling pace and distance...
... turn off and the display will be reset. • Time and pedaling pace 15 For the most accurate heart rate reading, hold the handgrip pulse sensor with the display. If the pedals do not move your pedaling pace (speed) in miles or kilometers. Follow your progress with your palms resting against the metal contacts. The upper left corner of the display will show pedaling pace and distance...
English Manual
Page 16
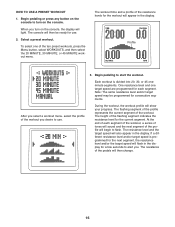
... then change. 16 The height of the pedals will then be programmed for a few seconds to alert you. The resistance of the flashing segment indicates the resistance level for use . 3. Begin pedaling or press any button on the console to start the workout. During the workout, the workout profile will appear in the display. Begin pedaling to turn on the console. Note: The same resistance level and/or target speed...
... then change. 16 The height of the pedals will then be programmed for a few seconds to alert you. The resistance of the flashing segment indicates the resistance level for use . 3. Begin pedaling or press any button on the console to start the workout. During the workout, the workout profile will appear in the display. Begin pedaling to turn on the console. Note: The same resistance level and/or target speed...
English Manual
Page 17
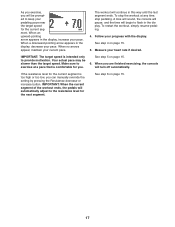
... pace. To restart the workout, simply resume pedaling. 4. See step 6 on page 15. 6. To stop pedaling. Measure your pace. IMPORTANT: When the current segment of the workout ends, the pedals will automatically adjust to flash in the display, decrease your current pace. IMPORTANT: The target speed is too high or too low, you are finished exercising, the console will turn off automatically. Your...
... pace. To restart the workout, simply resume pedaling. 4. See step 6 on page 15. 6. To stop pedaling. Measure your pace. IMPORTANT: When the current segment of the workout ends, the pedals will automatically adjust to flash in the display, decrease your current pace. IMPORTANT: The target speed is too high or too low, you are finished exercising, the console will turn off automatically. Your...
English Manual
Page 18
... select the Fat Blocker game, press the Menu button, select FITNESS GAMES, and then select FAT BLOCKER. 3. Begin pedaling or press a button on the console, the display will move downward. As you turn on either controller to play that they form a complete Complete Row row of the display will show the four highest scores recorded since the scores were reset. 4. When the game ends...
... select the Fat Blocker game, press the Menu button, select FITNESS GAMES, and then select FAT BLOCKER. 3. Begin pedaling or press a button on the console, the display will move downward. As you turn on either controller to play that they form a complete Complete Row row of the display will show the four highest scores recorded since the scores were reset. 4. When the game ends...
English Manual
Page 20
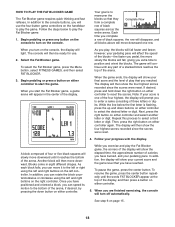
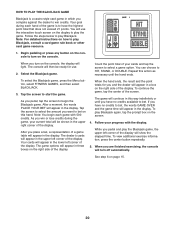
... cards will appear in the lower left corner of the display will appear in a box on the console to start the game. HOW TO PLAY THE BLACKJACK GAME Blackjack is to play Blackjack again, tap the prompt box on the display to play the game. Begin pedaling or press any button on the right side of the display. The console will...
... cards will appear in the lower left corner of the display will appear in a box on the console to start the game. HOW TO PLAY THE BLACKJACK GAME Blackjack is to play Blackjack again, tap the prompt box on the display to play the game. Begin pedaling or press any button on the right side of the display. The console will...
English Manual
Page 21
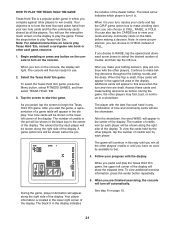
...use . 2. The number of the display. The black X in any combination of the display. Follow the steps below the pot. The black arrow indicates which playerʼs turn it is a popular poker game in this way until you have no credits available to bet. 4. Tap the screen to start...a card game rule book or other players, tap the number of the display. Begin pedaling or press any community cards on the console, the display will continue in the center of CALL. Additional cards will appear in this area when the turn and river are finished exercising, the console will ...
...use . 2. The number of the display. The black X in any combination of the display. Follow the steps below the pot. The black arrow indicates which playerʼs turn it is a popular poker game in this way until you have no credits available to bet. 4. Tap the screen to start...a card game rule book or other players, tap the number of the display. Begin pedaling or press any community cards on the console, the display will continue in the center of CALL. Additional cards will appear in this area when the turn and river are finished exercising, the console will ...
English Manual
Page 22
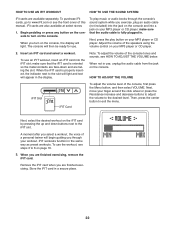
... console. Next, move your finger around the click wheel or press the Resistance increase and decrease buttons to adjust the volume to 6 on page 16. 3. iFIT workouts function in a secure place. 22 Remove the iFIT card when you are available separately. HOW TO USE AN IFIT WORKOUT HOW TO USE THE SOUND SYSTEM iFit cards are finished exercising. make sure that the audio cable is fully plugged in. To use the workout, see steps...
... console. Next, move your finger around the click wheel or press the Resistance increase and decrease buttons to adjust the volume to 6 on page 16. 3. iFIT workouts function in a secure place. 22 Remove the iFIT card when you are available separately. HOW TO USE AN IFIT WORKOUT HOW TO USE THE SOUND SYSTEM iFit cards are finished exercising. make sure that the audio cable is fully plugged in. To use the workout, see steps...
English Manual
Page 23
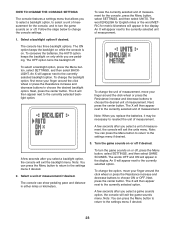
... seconds after you replace the batteries, it may be necessary to the currently selected option. Note: You can show pedaling pace and distance in the display. Next, press the center button. Next, press the center button. Select a unit of measurement. The ON option keeps the backlight on while the console is on or off , press the Menu button, select SETTINGS, and then select...
... seconds after you replace the batteries, it may be necessary to the currently selected option. Note: You can show pedaling pace and distance in the display. Next, press the center button. Next, press the center button. Select a unit of measurement. The ON option keeps the backlight on while the console is on or off , press the Menu button, select SETTINGS, and then select...
English Manual
Page 24
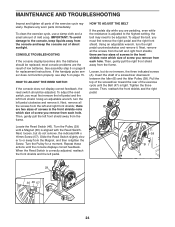
... the exercise cycle regularly. Locate the Reed Switch (46). Turn the Pulley for replacement instructions. most console problems are two sizes of screws in the front shields-note which size of direct sunlight. If the handgrip pulse sensor does not function properly, see step 5 on page 8 for a moment. Next, remove all the screws from the frame. there are the result of mild soap. there are pedaling, even while the resistance is...
... the exercise cycle regularly. Locate the Reed Switch (46). Turn the Pulley for replacement instructions. most console problems are two sizes of screws in the front shields-note which size of direct sunlight. If the handgrip pulse sensor does not function properly, see step 5 on page 8 for a moment. Next, remove all the screws from the frame. there are the result of mild soap. there are pedaling, even while the resistance is...
English Manual
Page 25
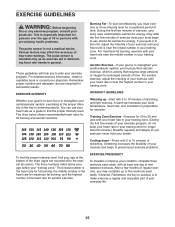
... as a guide to achieving results. The pulse sensor is to five workouts each week, with your heart rate in your training zone. (During the first few months of your exercise program, do not keep your heart rate in your age at least one day of heart rate readings. You can use stored fat calories for energy. Cooling down-Finish with pre-existing health problems. The pulse sensor is...
... as a guide to achieving results. The pulse sensor is to five workouts each week, with your heart rate in your training zone. (During the first few months of your exercise program, do not keep your heart rate in your age at least one day of heart rate readings. You can use stored fat calories for energy. Cooling down-Finish with pre-existing health problems. The pulse sensor is...
English Manual
Page 29
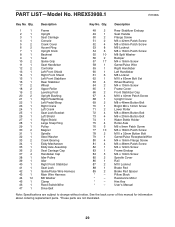
... Left Front Stabilizer Rear Stabilizer Wheel Upper Roller Leveling Foot Upright Bushing Right Pedal/Strap Left Pedal/Strap Right Crank Left Crank Seat Lock Bracket Left Shield Right Shield Large Snap Ring Pulley Magnet Spindle Steel Washer Crank Bearing Eddy Mechanism Eddy Axle Assembly Seat Carriage Cap Handlebar Cap Idler Pulley Idler Right Front Stabilizer Seat Lock Game/Pulse Wire Harness Main Wire Harness M6 Washer Clamp Reed Switch/Wire Drive Belt 48 2 49...
... Left Front Stabilizer Rear Stabilizer Wheel Upper Roller Leveling Foot Upright Bushing Right Pedal/Strap Left Pedal/Strap Right Crank Left Crank Seat Lock Bracket Left Shield Right Shield Large Snap Ring Pulley Magnet Spindle Steel Washer Crank Bearing Eddy Mechanism Eddy Axle Assembly Seat Carriage Cap Handlebar Cap Idler Pulley Idler Right Front Stabilizer Seat Lock Game/Pulse Wire Harness Main Wire Harness M6 Washer Clamp Reed Switch/Wire Drive Belt 48 2 49...
English Manual
Page 32
...; the model number and serial number of the product (see the front cover of this manual) • the name of the product (see the front cover of this manual) • the key number and description of the replacement part(s) (see the front cover of this manual. ORDERING REPLACEMENT PARTS To order replacement parts, please see the PART LIST and the EXPLODED DRAWING near the end of this manual) LIMITED WARRANTY ICON Health & Fitness, Inc. (ICON) warrants this...
...; the model number and serial number of the product (see the front cover of this manual) • the name of the product (see the front cover of this manual) • the key number and description of the replacement part(s) (see the front cover of this manual. ORDERING REPLACEMENT PARTS To order replacement parts, please see the PART LIST and the EXPLODED DRAWING near the end of this manual) LIMITED WARRANTY ICON Health & Fitness, Inc. (ICON) warrants this...

