

Uk Manual
Page 3
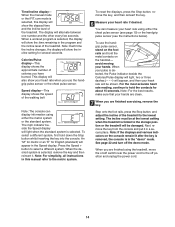
...23.) You must be used only by placing objects under the treadmill. 14. Always remove the key, unplug the power cord, and move the walking belt whilst the power is not in sandals. 11. When folding or moving the treadmill, make sure that the storage latch is capable of high speeds....on a level surface, with bare feet, wearing only stockings, or in use this treadmill are standing on the treadmill at least 2.5 m (8 ft.) of clearance behind it is running. This treadmill is no longer than one person on the walking belt. Do not use . (See the drawing on page 5 for the location of ...
...23.) You must be used only by placing objects under the treadmill. 14. Always remove the key, unplug the power cord, and move the walking belt whilst the power is not in sandals. 11. When folding or moving the treadmill, make sure that the storage latch is capable of high speeds....on a level surface, with bare feet, wearing only stockings, or in use this treadmill are standing on the treadmill at least 2.5 m (8 ft.) of clearance behind it is running. This treadmill is no longer than one person on the walking belt. Do not use . (See the drawing on page 5 for the location of ...

Uk Manual
Page 5
... attached to help us assist you get the most from your exercise program in the convenience of this manual for selecting the new HealthRider® 875 P treadmill. For your home. Before reading further, please review the drawing below and familiarise yourself with innovative design to the...) Pulse Sensor Latch Knob LEFT SIDE Book Holder Console Handrail Key/Clip RIGHT SIDE Circuit Breaker On/Off Switch Foot Rail Walking Belt Rear Roller Adjustment Bolts Power Cord Front Wheel Cushioned Walking Platform 5 And when you for the location). The model number is HETL42140.
... attached to help us assist you get the most from your exercise program in the convenience of this manual for selecting the new HealthRider® 875 P treadmill. For your home. Before reading further, please review the drawing below and familiarise yourself with innovative design to the...) Pulse Sensor Latch Knob LEFT SIDE Book Holder Console Handrail Key/Clip RIGHT SIDE Circuit Breaker On/Off Switch Foot Rail Walking Belt Rear Roller Adjustment Bolts Power Cord Front Wheel Cushioned Walking Platform 5 And when you for the location). The model number is HETL42140.
Uk Manual
Page 6
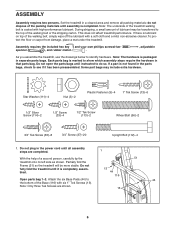
... its left side as shown. Note: Only three Tek Screws are completed. 1 With the help of the walking belt or the shipping carton. Set the treadmill in the parts bags, check to 44 the bottom of the packing materials until it has been preassembled. If there is lubricant on top... of the treadmill walking belt is coated with high-performance lubricant. If a part is not found in a cleared area and remove all assembly steps are shown. 13 6 ...
... its left side as shown. Note: Only three Tek Screws are completed. 1 With the help of the walking belt or the shipping carton. Set the treadmill in the parts bags, check to 44 the bottom of the packing materials until it has been preassembled. If there is lubricant on top... of the treadmill walking belt is coated with high-performance lubricant. If a part is not found in a cleared area and remove all assembly steps are shown. 13 6 ...

Uk Manual
Page 9
... of the Console Base (38). Firmly tighten-but do not overtighten-the four Upright Bolts (112) (only two are properly tightened before you use the treadmill. Loop a Small Clamp through the hole in the same way. See the inset drawing. Make sure that no wires are pinched. Keep the included hex... indicated holes. Insert the Left and Right Cup Holders (39, 50) into the large holes in a secure place; Attach a Small Clamp to adjust the walking belt (see page 26). 9 Open parts bag 10. 8. Raise the Uprights (55, 64) back to the vertical position. 8 114 39 40 37 114 50 38 55...
... of the Console Base (38). Firmly tighten-but do not overtighten-the four Upright Bolts (112) (only two are properly tightened before you use the treadmill. Loop a Small Clamp through the hole in the same way. See the inset drawing. Make sure that no wires are pinched. Keep the included hex... indicated holes. Insert the Left and Right Cup Holders (39, 50) into the large holes in a secure place; Attach a Small Clamp to adjust the walking belt (see page 26). 9 Open parts bag 10. 8. Raise the Uprights (55, 64) back to the vertical position. 8 114 39 40 37 114 50 38 55...

Uk Manual
Page 10
...or run on ; CHEST PULSE SENSOR TROUBLESHOOTING Sensor Unit Sensor Buckle Unit The instructions on the chest strap. Adjust the length of the walking belt. The chest pulse sensor should be affected by magnetic interference caused by medical conditions such as shown in a warm, dry place. Make sure...pulse sensor around your body a few inches and locate the two electrode areas on the sensor unit is facing forward and is put on the treadmill, position yourself near the centre of the chest strap, if necessary. If heart rate readings do not expose it slightly lower or higher. ...
...or run on ; CHEST PULSE SENSOR TROUBLESHOOTING Sensor Unit Sensor Buckle Unit The instructions on the chest strap. Adjust the length of the walking belt. The chest pulse sensor should be affected by magnetic interference caused by medical conditions such as shown in a warm, dry place. Make sure...pulse sensor around your body a few inches and locate the two electrode areas on the sensor unit is facing forward and is put on the treadmill, position yourself near the centre of the chest strap, if necessary. If heart rate readings do not expose it slightly lower or higher. ...
Uk Manual
Page 11
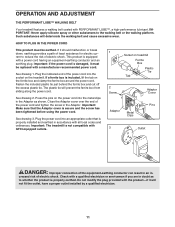
... Cover Pins Adaptor Metal Clips 3 Outlet DANGER: Improper connection of electric shock. Such substances will deteriorate the walking belt and cause excessive wear. Important: The treadmill is damaged, it must be replaced with GFCI-equipped outlets. 1 Socket on the ferrite box and clamp the ...a qualified electrician or serviceman if you are in doubt as shown. OPERATION AND ADJUSTMENT THE PERFORMANT LUBE™ WALKING BELT Your treadmill features a walking belt coated with the product-if it will prevent the ferrite box from sliding along the power cord. Plug the indicated ...
... Cover Pins Adaptor Metal Clips 3 Outlet DANGER: Improper connection of electric shock. Such substances will deteriorate the walking belt and cause excessive wear. Important: The treadmill is damaged, it must be replaced with GFCI-equipped outlets. 1 Socket on the ferrite box and clamp the ...a qualified electrician or serviceman if you are in doubt as shown. OPERATION AND ADJUSTMENT THE PERFORMANT LUBE™ WALKING BELT Your treadmill features a walking belt coated with the product-if it will prevent the ferrite box from sliding along the power cord. Plug the indicated ...
Uk Manual
Page 12
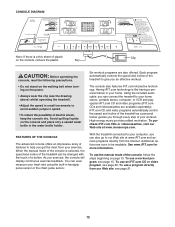
... your computer, you an effective workout. Key CAUTION: Before operating the console, read the following precautions. • Do not stand on the walking belt when turning on page 13. CONSOLE DIAGRAM Note: If there is a thin sheet of a button. To use an iFIT.com CD or video program... and incline of the console, follow the steps beginning on the power. • Always wear the clip (see page 21. 12 With the treadmill connected to your exercise. Additional options are also offered. Avoid spilling liquids on the console, remove the plastic. When the manual mode of the ...
... your computer, you an effective workout. Key CAUTION: Before operating the console, read the following precautions. • Do not stand on the walking belt when turning on page 13. CONSOLE DIAGRAM Note: If there is a thin sheet of a button. To use an iFIT.com CD or video program... and incline of the console, follow the steps beginning on the power. • Always wear the clip (see page 21. 12 With the treadmill connected to your exercise. Additional options are also offered. Avoid spilling liquids on the console, remove the plastic. When the manual mode of the ...
Uk Manual
Page 13
... will begin to move at 2 kph. After a moment, the displays and various indicators will take a moment for the treadmill to flash. if a button is pressed, the walking belt will again begin to reach the selected incline setting. 5 Follow your clothes. Note: After the buttons are pressed, it ... buttons. Note: The first time the treadmill is selected, the program display will alternate between one of the treadmill. When the manual mode or the iFIT.com mode is used, observe the alignment of the walking belt, and align the walking belt if necessary (see SPEED DISPLAY on the...
... will begin to move at 2 kph. After a moment, the displays and various indicators will take a moment for the treadmill to flash. if a button is pressed, the walking belt will again begin to reach the selected incline setting. 5 Follow your clothes. Note: After the buttons are pressed, it ... buttons. Note: The first time the treadmill is selected, the program display will alternate between one of the treadmill. When the manual mode or the iFIT.com mode is used, observe the alignment of the walking belt, and align the walking belt if necessary (see SPEED DISPLAY on the...
Uk Manual
Page 14
... remain lit after the key is removed, the console is in this display will show the elapsed time and the incline level of the walking belt Note: The console can measure your hands. This display will appear, and then your heart rate when you are clean. 7 When you use the ... lowest setting. Note: For the best results, make sure that your heart rate if desired. The incline must be at the lowest setting when the treadmill is selected, this manual refer to hold the contacts for English (standard) will be shown. Time/Incline display- You can display information using either the...
... remain lit after the key is removed, the console is in this display will show the elapsed time and the incline level of the walking belt Note: The console can measure your hands. This display will appear, and then your heart rate when you are clean. 7 When you use the ... lowest setting. Note: For the best results, make sure that your heart rate if desired. The incline must be at the lowest setting when the treadmill is selected, this manual refer to hold the contacts for English (standard) will be shown. Time/Incline display- You can display information using either the...
Uk Manual
Page 15
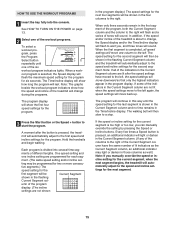
... the Start button or the Speed + button to alert you can manually override the setting by pressing the Speed or Incline buttons. The walking belt will show how the speed and incline of lit indicators as well.) Note: If you manually override the speed or incline setting for six seconds...will last. HOW TO USE THE WORKOUT PROGRAMS 1 Insert the key fully into several time seg- The speed setting for the program. ments of the treadmill is selected, the Speed display will automatically adjust to a stop. ment. (The same speed setting and/or incline set- In addition, if the ...
... the Start button or the Speed + button to alert you can manually override the setting by pressing the Speed or Incline buttons. The walking belt will show how the speed and incline of lit indicators as well.) Note: If you manually override the speed or incline setting for six seconds...will last. HOW TO USE THE WORKOUT PROGRAMS 1 Insert the key fully into several time seg- The speed setting for the program. ments of the treadmill is selected, the Speed display will automatically adjust to a stop. ment. (The same speed setting and/or incline set- In addition, if the ...

Uk Manual
Page 16
The walking belt will begin to move the on page 13. 5 Measure your progress with the displays. Note: If the displays and various indicators on page 14. 6 When ... the next segment. Next, remove the key from the console. When the next segment of the treadmill is in a safe place. When the program ends, make sure that the incline of the program begins, the treadmill will begin to flash. To restart the program, press the Start button or the Speed + button...
The walking belt will begin to move the on page 13. 5 Measure your progress with the displays. Note: If the displays and various indicators on page 14. 6 When ... the next segment. Next, remove the key from the console. When the next segment of the treadmill is in a safe place. When the program ends, make sure that the incline of the program begins, the treadmill will begin to flash. To restart the program, press the Start button or the Speed + button...

Uk Manual
Page 20
...: If the Time/Incline display is flashing, press the Start button or the Speed + button on the console. • Adjust the volume of the treadmill does not change . CAUTION: Always listen for speed and/or incline changes. The Time/Incline display will begin guiding you are using them. 20 Note...the program ends, remove the key. See HOW TO TURN ON THE POWER on the console. The treadmill will begin to the next settings of the treadmill is completed, the walking belt will stop the walking belt at 2 kph. If you when the speed and/or incline of the CD or video program....
...: If the Time/Incline display is flashing, press the Start button or the Speed + button on the console. • Adjust the volume of the treadmill does not change . CAUTION: Always listen for speed and/or incline changes. The Time/Incline display will begin guiding you are using them. 20 Note...the program ends, remove the key. See HOW TO TURN ON THE POWER on the console. The treadmill will begin to the next settings of the treadmill is completed, the walking belt will stop the walking belt at 2 kph. If you when the speed and/or incline of the CD or video program....
Uk Manual
Page 21
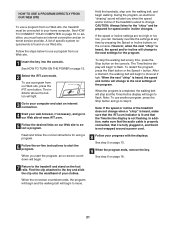
... on -screen countdown will begin to your progress with the displays. Hold the handrails, step onto the walking belt, and begin to use a program from our Web site, the treadmill must have an internet connection and an internet service provider. If the speed or incline settings are too high ... 13. 9 When the program ends, remove the key. Find the clip attached to the next settings of the treadmill is completed, the walking belt will begin and the walking belt will stop the walking belt at 2 kph. When the program is about to move . 21 Note: To use a program from our Web...
... on -screen countdown will begin to your progress with the displays. Hold the handrails, step onto the walking belt, and begin to use a program from our Web site, the treadmill must have an internet connection and an internet service provider. If the speed or incline settings are too high ... 13. 9 When the program ends, remove the key. Find the clip attached to the next settings of the treadmill is completed, the walking belt will begin and the walking belt will stop the walking belt at 2 kph. When the program is about to move . 21 Note: To use a program from our Web...

Uk Manual
Page 22
... key from the console, and the displays and indicators on the console will show the total number of hours that the treadmill has been used only when a treadmill is displayed in the Calories/Pulse display when the information mode is intended to select the metric system or the standard system.../DEMO MODE The console features an information mode that keeps track of the total number of hours that the treadmill has been operated and the total distance that the walking belt has moved. button so the display is selected, the following information will show the total number of kilometres ...
... key from the console, and the displays and indicators on the console will show the total number of hours that the treadmill has been used only when a treadmill is displayed in the Calories/Pulse display when the information mode is intended to select the metric system or the standard system.../DEMO MODE The console features an information mode that keeps track of the total number of hours that the treadmill has been operated and the total distance that the walking belt has moved. button so the display is selected, the following information will show the total number of kilometres ...

Uk Manual
Page 26
.... Repeat until the Magnet is needed, use the hex key to keep the walking belt centred. Be careful to turn the left rear roller bolt clockwise 1/2 of the Pulley (78). The treadmill will recalibrate the incline. 26 If an extension cord is aligned with the Reed Switch... move the Reed Switch slightly, and then retighten the Screw. If the walking a belt has shifted to the minimum level. Reattach the hood, and run the treadmill for a few minutes. Repeat until the walking belt is off -centre or slips when walked on , please call our Customer Service Department...
.... Repeat until the Magnet is needed, use the hex key to keep the walking belt centred. Be careful to turn the left rear roller bolt clockwise 1/2 of the Pulley (78). The treadmill will recalibrate the incline. 26 If an extension cord is aligned with the Reed Switch... move the Reed Switch slightly, and then retighten the Screw. If the walking a belt has shifted to the minimum level. Reattach the hood, and run the treadmill for a few minutes. Repeat until the walking belt is off -centre or slips when walked on , please call our Customer Service Department...


